
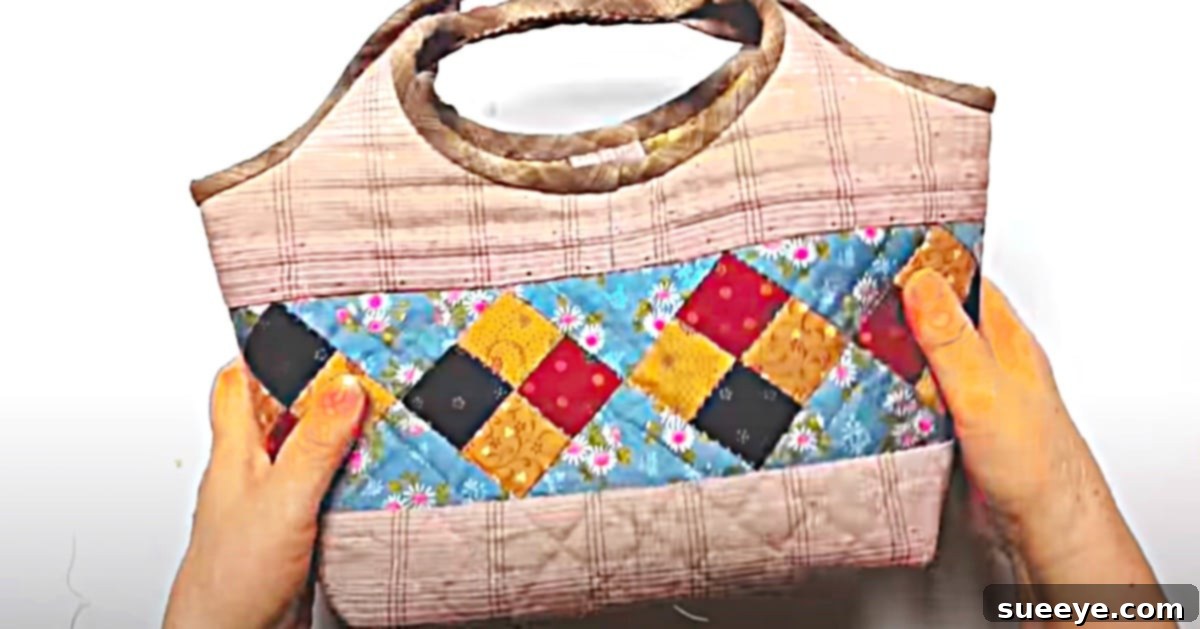
How To Craft A Chic DIY Quilted Bag: Free Pattern & Expert Tips Included
Embark on a delightful creative journey and discover the immense satisfaction of crafting your very own Quilted Bag. This project stands out for two compelling reasons: it utilizes a completely free pattern download, making it accessible to everyone, and features a breathtaking, easy-to-follow handmade patchwork detail that elevates its aesthetic to something truly special. Imagine carrying a unique, stylish accessory that perfectly complements your favorite jeans and casual outfits, ideal for shopping trips or simply adding a touch of personalized flair to your daily ensemble. The desire to create a bespoke piece for my own DIY fashion needs was irresistible, and I found the process incredibly rewarding from start to finish.
My crafting adventure began with gathering the necessary materials. I was thrilled to find that this project is wonderfully suited for using up fabric remnants and scraps. I specifically sought out discounted pieces from the clearance section at my local fabric store, proving that you don’t need expensive new textiles to create something magnificent. The sewing instructions are remarkably straightforward, designed to guide you effortlessly through each stage. You simply download the pattern, trace its contours onto your chosen fabrics, cut out the pieces (including the outer fabric layer and interfacing), and then the magic of sewing begins.
A crucial element often overlooked in bag making is the interfacing, which plays a pivotal role in the bag’s structure and finish. While softer interfacing might suffice for a bag intended solely for light transport, if your goal is a bag that stands tall, maintains its shape, and boasts a professional, tailored appearance, opting for heavy fusible interfacing is highly recommended. Fusible interfacing offers a distinct advantage as it can be ironed directly onto your fabric, creating a much more cohesive and durable component within your project. This integration not only simplifies the sewing process by preventing fabric slippage but also significantly enhances the overall longevity and professional feel of your finished bag. The initial step, once materials were gathered, was to download the simple pattern, meticulously trace it, and then carefully cut out all the required pieces, setting the foundation for a truly handmade masterpiece.
Why Craft Your Own Quilted Bag? The Benefits of DIY
Creating a DIY quilted bag isn’t just a craft project; it’s an investment in personal style, sustainability, and skill development. Here are compelling reasons to start stitching:
- Unleash Personal Style: Unlike mass-produced bags, your handmade creation will be a unique expression of your taste. You get to choose every fabric, color, and detail, ensuring your bag perfectly reflects your personality and complements your wardrobe.
- Eco-Friendly & Sustainable: This project is a fantastic way to utilize fabric scraps and remnants, reducing waste and giving new life to forgotten textiles. It’s a small step towards a more sustainable lifestyle, crafting with purpose.
- Cost-Effective Fashion: High-quality, stylish bags can be expensive. By making your own, you save money without compromising on style or durability, especially when leveraging affordable scrap fabrics.
- Skill Enhancement: Whether you’re a seasoned sewist or a curious beginner, this project offers an excellent opportunity to refine your sewing techniques, learn about fabric manipulation, and gain confidence in your crafting abilities.
- Thoughtful Gift Option: A handmade quilted bag makes an incredibly thoughtful and personal gift. Imagine the joy of presenting a loved one with a bag crafted especially for them, knowing the effort and love poured into it.
- Versatile & Functional: Designed for practicality, this bag is perfect for various uses – from a chic shopping companion to a stylish everyday carry-all, or even a travel bag for essentials. Its sturdy construction ensures it’s up to the task.
Essential Materials for Your Quilted Bag Project
Before diving into the construction of your beautiful quilted bag, ensure you have all the necessary tools and materials at hand. A well-prepared workspace and a complete set of supplies will make your crafting experience much smoother and more enjoyable.
- Fabrics of Your Choice: The beauty of this project lies in its flexibility. Scraps, remnants, or fat quarters work exceptionally well, allowing for creative patchwork designs. Consider a mix of cotton, linen, or canvas for varying textures and durability. Think about your desired color palette and patterns – whether you want a cohesive look or a vibrant, eclectic mix. You’ll need outer fabric pieces, lining fabric, and pieces for any straps or handles.
- Fusible Interfacing: This is a game-changer for bag construction. As mentioned, heavy fusible interfacing is highly recommended for a bag that maintains its shape and stands upright. It adds structure, body, and durability. Ensure you have enough to cover all your main outer fabric and lining pieces.
- High-Quality Thread: Choose a polyester all-purpose thread that matches or complements your fabrics. Strong, durable thread is essential for seams that will withstand daily use.
- A Reliable Sewing Machine: While the original tutorial demonstrates hand-sewing, a sewing machine will significantly speed up the process, provide stronger seams, and yield a more professional finish. Ensure it’s in good working order and you have suitable needles.
- Sharp Fabric Scissors: For precise cutting of fabric and trimming threads.
- Rotary Cutter and Cutting Mat: For quilters and sewists, a rotary cutter with a self-healing mat is invaluable. It allows for incredibly straight, accurate cuts, especially when working with multiple layers or long strips, saving time and ensuring precision for your patchwork.
- Quilting Ruler (or Straight Edge Ruler): Paired with your rotary cutter, a clear acrylic quilting ruler helps you achieve perfectly straight lines and accurate measurements, critical for neat patchwork and bag construction.
- Free Pattern Download: Don’t forget to download and print your pattern! This is the blueprint for your entire project, providing all the essential shapes and dimensions.
Preparation is Key: Setting Up for Sewing Success
Before you even make your first cut, a little preparation goes a long way in ensuring a smooth and successful sewing experience. Taking these steps will help you achieve professional results and avoid common crafting frustrations.
- Organize Your Workspace: Dedicate a clean, well-lit area for your sewing. Having everything within reach and ample space to lay out fabric will prevent clutter and make the process more enjoyable.
- Pre-Wash Your Fabrics: It’s always a good practice to pre-wash and dry your fabrics before cutting. This helps to pre-shrink them and ensures any potential dye bleeding occurs before your bag is assembled, preventing puckering or color distortion after future washes.
- Iron Your Fabrics: A crisp, wrinkle-free fabric is easier to cut and sew accurately. Iron all your chosen fabrics, including the interfacing, before you begin.
- Review the Pattern and Tutorial: Take a moment to thoroughly read through the entire free pattern and, if available, watch the full tutorial video. Understanding the sequence of steps and any specific instructions will boost your confidence and reduce errors.
Step-by-Step Directions to Create Your Quilted Bag
Follow these detailed steps to bring your stylish DIY quilted bag to life. Remember, patience and precision are your best friends in achieving a beautiful, professional finish.
Watch the full tutorial for visual guidance: For a comprehensive, easy-to-follow guide, refer to this excellent patchwork purse tutorial by Redquilt on YouTube. The video offers clear, step-by-step instructions that complement these written directions perfectly.
Step 1: Download, Print, and Prepare Your Pattern
Begin by downloading the free pattern. It’s crucial to print it at 100% scale to ensure the dimensions are accurate. After printing, carefully cut out all the individual pattern pieces. Label them if necessary, to avoid confusion later on.
Step 2: Precise Fabric Cutting
Lay your prepared (ironed and pre-washed) fabrics flat on your cutting mat. Place the pattern pieces strategically to maximize fabric usage, paying attention to the fabric grainline for optimal drape and strength. Using your rotary cutter and ruler, meticulously cut out all the required fabric pieces:
- Outer bag pieces (main body, straps/handles if not separate)
- Lining bag pieces
- Interfacing pieces (matching the outer bag and strap pieces)
Accuracy here is paramount, especially for patchwork. Precise cuts lead to precise seams.
Step 3: Applying Fusible Interfacing
This step is key to a structured bag. Following the manufacturer’s instructions for your fusible interfacing, place the adhesive side down onto the wrong side of your outer fabric pieces and any strap pieces that require it. Using a hot iron, apply even pressure and heat, moving slowly across the fabric. Ensure the interfacing is securely bonded to the fabric, with no bubbles or wrinkles. This process gives your bag body, stability, and a crisp finish.
Step 4: Constructing the Patchwork Panels (if applicable)
If your design incorporates patchwork, this is where it comes to life. Arrange your smaller fabric scraps into your desired pattern for the main outer bag panels. Using a 1/4-inch seam allowance (or as specified in the pattern), stitch the individual pieces together. After each seam, press the seams open or to one side to reduce bulk and create a flat, smooth surface. Continue until your main outer bag panels are complete.
Step 5: Assembling the Outer Bag and Lining
With right sides together, sew the outer bag pieces together along the designated seams (usually side and bottom seams), leaving the top edge open. Repeat this process for the lining pieces. If your pattern includes boxed corners for a flat bottom, now is the time to create them on both the outer bag and the lining. This involves matching the side and bottom seams, flattening the corner into a triangle, and stitching across it to form the box.
Step 6: Preparing and Attaching the Straps
Cut your strap fabric according to the pattern. If using interfacing, apply it now. Fold the strap fabric lengthwise, right sides together, and stitch along the raw edge. Turn the strap right side out (a loop turner or safety pin can help here) and press it flat. Topstitch along the edges for a professional finish and added durability. Pin the straps securely to the top edge of your outer bag, ensuring they are evenly spaced and not twisted. Baste them in place within the seam allowance.
Step 7: Combining the Outer Bag and Lining (“Bagging Out”)
Place the outer bag (right side out) inside the lining bag (wrong side out), so their right sides are facing each other. Align the top raw edges carefully, matching any side seams or notches. Pin all around the top opening. Stitch around the entire top edge, leaving a 4-6 inch opening along one side of the lining (this is crucial for turning the bag right side out). Trim the seam allowance around the top edge, especially around curves, to reduce bulk.
Step 8: Finishing Touches and Turning
Gently pull the outer bag through the opening in the lining. Once the entire bag is turned right side out, push out all corners and smooth the seams. Press the top edge of the bag thoroughly to create a crisp, finished look. The opening in the lining can be hand-stitched closed using a ladder stitch for an invisible finish, or machine topstitched very close to the edge. For a final professional touch, topstitch around the entire top opening of the bag, approximately 1/8 to 1/4 inch from the edge. This adds durability and a polished appearance.
A Note on Sewing Methods: While the YouTube tutorial beautifully demonstrates how to complete this entire project by hand, it is important to note that using a sewing machine will significantly expedite the process, result in stronger, more uniform seams, and generally lead to a more professional and durable finish. For those new to hand-sewing or aiming for efficiency, a machine is highly recommended.
Tips for Success and Customization
To ensure your quilted bag turns out spectacular and truly your own, consider these additional tips:
- Embrace Patience: Rushing through steps, especially cutting and pressing, can lead to uneven results. Take your time, enjoy the process, and appreciate the craftsmanship involved.
- Pressing is Crucial: Don’t underestimate the power of your iron. Pressing seams as you go, rather than waiting until the end, creates crisp lines and a much more professional finish.
- Customize Your Design: Make this bag truly yours! Consider adding internal pockets for organization, a magnetic snap or zipper closure for security, or decorative embellishments like buttons, embroidery, or appliqué.
- Experiment with Quilting: If you’re feeling adventurous, you could add free-motion quilting to your outer fabric panels before assembly for an extra layer of texture and design.
- Care Instructions: Handwash your finished bag in cold water with mild detergent, or machine wash on a gentle cycle. Air dry flat to maintain its shape and integrity.
Your Masterpiece Awaits!
I absolutely adore this pattern, and I’m incredibly pleased with the beautiful quilted bag I’ve created. This simple yet effective method has quickly become a favorite, and I anticipate using it for many future projects. There’s a profound sense of accomplishment that comes with transforming simple fabric scraps into a functional, beautiful, and personalized accessory. We encourage you to download the free pattern, gather your materials, and embark on this rewarding DIY journey. Share your unique creations with the crafting community – we’d love to see what you make!