
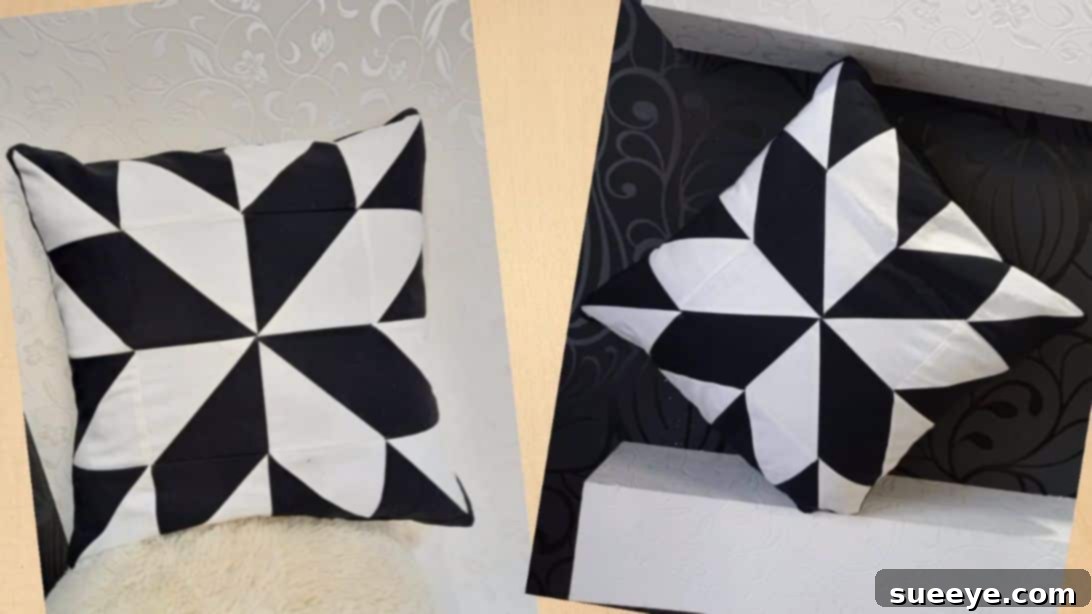
Transform Your Living Room: Easy Two-Toned Patchwork Pillow Cover Tutorial
Are you looking to infuse a fresh burst of style and personality into your living room, bedroom, or cozy reading nook? Nothing quite elevates a space like thoughtfully designed textiles, and this beautiful two-toned patchwork pillow cover is the perfect project to achieve just that. This design masterfully combines distinct fabric patterns and colors, creating a captivating visual interest that can seamlessly complement or boldly contrast your existing furniture and decor themes. Whether you prefer a minimalist monochrome look or a vibrant pop of color, this versatile design offers endless possibilities for personalization.
One of the most appealing aspects of this project is its accessibility. Regardless of your sewing experience, from an absolute beginner to a seasoned crafter, you’ll find the steps straightforward, clear, and immensely satisfying. Crafting your own home accessories not only allows for unique customization but also brings a profound sense of accomplishment. Imagine the joy of pointing to a stylish pillow on your sofa and proudly saying, “I made that!”
Ready to embark on this creative journey and craft your very own bespoke pillow cover? We invite you to follow this comprehensive patchwork tutorial inspired by the excellent work of Shveyniy ugolok s Ludmiloy Zardinovoy. Their expert guidance makes the process enjoyable and ensures a stunning finished product. Dive in, gather your materials, and prepare to have fun sewing this lovely and engaging pattern. For full instructions, continue reading this detailed guide.
Why Choose Patchwork for Your Home Decor?
Patchwork is an ancient craft with a rich history, known for its ability to transform small pieces of fabric into stunning, intricate designs. In modern home decor, patchwork elements, like a decorative pillow cover, offer a unique blend of vintage charm and contemporary appeal. It’s a fantastic way to introduce texture, pattern, and a personalized touch that mass-produced items simply can’t replicate. A patchwork pillow can become a focal point, drawing the eye and adding a layer of warmth and handcrafted artistry to any room.
Beyond aesthetics, creating a patchwork item allows for immense creative freedom. You can experiment with different fabric types, colors, and prints to match specific seasons, moods, or existing decor. For this two-toned design, the simplicity of two contrasting colors highlights the geometric precision of the patchwork, making it both striking and elegant. It’s an excellent way to use up fabric scraps, making your project environmentally friendly and budget-conscious.
Selecting Your Fabrics and Essential Tools
The success of any sewing project begins with the right materials and tools. For this patchwork pillow cover, your fabric choices will largely dictate the final look and feel. We recommend using high-quality cotton fabrics, as they are easy to work with, durable, and come in an endless array of colors and patterns. Consider how the two chosen colors or patterns will interact. Do you want a subtle contrast, such as two shades of the same color, or a bold statement with starkly different hues?
When selecting your fabrics, think about the overall aesthetic you wish to achieve. For a modern, minimalist vibe, stick to solid colors like black and white, or charcoal and cream. If you prefer a more bohemian or eclectic style, consider combining a solid with a subtle geometric or floral print. Always pre-wash and iron your fabrics before cutting. This step is crucial to prevent shrinking and ensure colorfastness after your pillow cover is complete, leading to a much more professional finish.
Beyond the fabrics, having the right sewing tools will make your project smooth and enjoyable. Here’s a comprehensive list of what you’ll need:
- Sewing Machine: Essential for stitching seams with consistent precision.
- Sharp Fabric Scissors or Rotary Cutter: For precise and clean fabric cuts. A rotary cutter with a self-healing mat and a clear ruler is highly recommended for patchwork, as it ensures straight, accurate cuts.
- Iron and Ironing Board: Crucial for pressing seams flat, which contributes significantly to the neatness and professional appearance of your finished project.
- Straight Pins or Fabric Clips: To hold fabric layers together securely before sewing.
- Matching Thread: High-quality polyester or cotton thread that complements your fabric colors.
- Seam Ripper: Every sewer’s best friend for correcting mistakes gracefully.
- Fabric Marker or Tailor’s Chalk: For marking lines on your fabric.
- Measuring Tape or Ruler: For accurate measurements.
Materials List for Your Patchwork Pillow Cover
To create the stunning two-toned patchwork design for the front of your pillow cover, you will need the following fabric pieces. The dimensions are specified to create a standard-sized throw pillow cover, which can be easily adapted for larger or smaller projects if desired.
For the Front Patchwork Design:
- 2 pieces of 10.24-inch squares in a primary color (e.g., black)
- 2 pieces of 10.24-inch squares in a contrasting color (e.g., white)
- 4 pieces of 1.97-inch wide strips for the border (length will be determined during construction, typically requiring at least two strips the width of your patchwork block and two strips the height once pieced). For initial cutting, you can start with strips slightly longer than needed, such as 20 inches, and trim later.
For the Envelope Back Fabric:
An envelope back is a popular and easy method for pillow covers, allowing for easy removal of the pillow insert. You will need two overlapping pieces for this:
- 1 piece of 19.7-inch by 9.84-inch black fabric
- 1 piece of 19.7-inch by 16.14-inch black fabric
These dimensions are designed to create an overlapping closure, ensuring your pillow insert stays neatly tucked inside while allowing for easy access for washing or changing inserts.
Step-by-Step Instructions: Crafting Your Patchwork Pillow Cover
Step 1: Preparing Your Square Blocks
Begin by taking one white square and placing it directly on top of one black square, ensuring their right sides are facing each other and all edges align perfectly. Using a fabric marker or tailor’s chalk, carefully sketch two opposite diagonal lines across the white square, forming a clear ‘X’. Next, draw a horizontal line and a vertical line through the exact center of the square, creating a cross. These markings will guide your stitching and cutting, ensuring precise half-square triangles. Secure the layers with pins to prevent shifting, then repeat this marking process with the remaining two squares (one white, one black).
Step 2: Sewing Your Diagonal Lines
With your squares pinned and marked, take them to your sewing machine. Carefully sew a straight diagonal line on either side of the *originally drawn* diagonal lines (the ‘X’ lines), maintaining a precise 1/4 inch seam allowance. You will essentially be sewing four diagonal lines in total on each set of squares. This technique is fundamental for creating accurate half-square triangles (HSTs). Precision here is key for a polished final look.
Step 3: Creating Half-Square Triangles (HSTs)
Once all the diagonal stitching is complete on both sets of squares, it’s time to transform them into individual blocks. Carefully cut along all the previously drawn lines – the ‘X’ diagonals and the center cross lines. This will yield eight smaller triangular pieces from each set of squares. Open each triangular piece, pressing the seam allowance to one side (usually towards the darker fabric to prevent shadowing) or open, whichever you prefer for flatter seams. You will now have several individual half-square triangle units. Lay them flat and, using a rotary cutter and ruler, trim any excess fabric to square up each unit to a consistent size. This step is critical for ensuring your patchwork blocks fit together perfectly.
Step 4: Assembling Your Patchwork Design
Now comes the exciting part where your patchwork design truly takes shape. Carefully arrange all the newly created square units according to the desired pattern. The original tutorial demonstrates a striking geometric layout, often achieved by rotating the half-square triangles. Before sewing, lay out all your trimmed squares on a flat surface, arranging them into the specific pattern you wish to create for the pillow front. Once you are satisfied with the design, mentally, or physically, stack each vertical column of squares in the correct order to prepare for sewing.
Step 5: Piecing the Patchwork Front
With your design laid out, it’s time to stitch the individual squares together. Begin by sewing the squares within each column first. Take the top square of a column, place it right sides together with the square below it, align edges, pin, and sew with a consistent 1/4 inch seam allowance. Continue this process until all squares within each column are sewn together. Once all columns are complete, press the seams. Then, take the assembled columns, place them right sides together, align carefully, pin thoroughly, and sew them together with a 1/4 inch seam allowance to form the complete patchwork pillow front. Press all seams flat once again to ensure a smooth, professional finish.
Step 6: Adding the Border
To frame your beautiful patchwork design and give the pillow cover a finished edge, you will now attach the border strips. First, measure the exact dimensions of your pieced patchwork front. Cut two border strips to match the length of two opposite sides of your patchwork, and two strips to match the length of the remaining two sides (including the attached border widths). Pin the first two border strips, right sides together, along two opposite edges of the patchwork front, sew with a 1/4 inch seam allowance, and press. Then, attach the remaining two border strips to the other two sides in the same manner. Trim off any excess fabric from the border strips. For a crisp finish, you can “finger press” the borders temporarily, then follow up with a hot iron to set the seams perfectly.
Step 7: Constructing the Envelope Back and Finishing
Now it’s time to create the envelope back that allows for easy insertion and removal of your pillow. Take both of your back fabric pieces. On one of the 19.7-inch sides of each piece, create a neat hem. To do this, fold the raw edge over by about 1/2 inch and press, then fold it over again by another 1/2 inch to conceal the raw edge, press again, and stitch neatly along the inner folded edge. This creates a durable, finished hem for the opening. Lay your finished patchwork front right side up. Place one of the hemmed back fabric pieces on top, right side down, aligning its raw edges with the raw edges of the patchwork front. Then, place the second hemmed back fabric piece on top, also right side down, overlapping the first back piece to create the envelope opening. The combined back pieces should perfectly match the size of your patchwork front. Pin all layers securely around the perimeter. Stitch all the way around the outer edges of the pillow cover with a 1/2-inch seam allowance. For added durability, you can stitch a second line about 1/8 inch inside the first. Once sewn, carefully trim the corners to reduce bulk and turn the pillow cover right side out through the envelope opening. Use a blunt tool, like a chopstick, to gently push out the corners for a sharp finish. Give it a final press, insert your pillow, and admire your beautiful creation!
Tips for Sewing Success
- Accuracy is Paramount: In patchwork, small inaccuracies compound. Measure and cut meticulously.
- Pressing is Your Friend: Don’t skip ironing. Pressing seams flat after each step makes a huge difference in the overall neatness.
- Use a Walking Foot: If your fabrics are slippery or thick, a walking foot attachment for your sewing machine can help feed layers evenly.
- Test Stitches: Always test your stitch length and tension on a scrap piece of your project fabric before you begin.
- Take Your Time: Rushing can lead to mistakes. Enjoy the process!
Customization and Creative Variations
This tutorial provides a fantastic foundation, but the beauty of DIY is the endless potential for customization. Once you’ve mastered this basic two-toned design, consider these ideas to make future pillow covers uniquely yours:
- Color Palette Exploration: Experiment with different color schemes. Use analogous colors for a harmonious look, complementary colors for a vibrant contrast, or multiple shades of a single color for an elegant gradient effect.
- Fabric Combinations: Mix solid fabrics with patterned ones (florals, geometrics, stripes) to add depth and complexity. Just ensure the patterns don’t overwhelm the patchwork design.
- Embellishments: Add decorative elements like piping around the edges, pom-pom trim, fabric ruffles, or even a simple embroidered motif in one of the squares for an extra touch of flair.
- Block Arrangement: Play with different arrangements of your half-square triangle units to create entirely new patterns. The possibilities are truly infinite!
Caring for Your Handmade Patchwork Pillow Cover
To ensure your beautiful, handmade pillow cover remains vibrant and lasts for years to come, proper care is essential. Generally, if you’ve used 100% cotton fabrics, machine washing on a gentle cycle with cold water and mild detergent is recommended. Tumble dry on low heat or air dry to prevent shrinkage and maintain fabric integrity. Always avoid harsh bleaches. If you’ve used delicate fabrics or embellishments, hand washing or spot cleaning might be more appropriate. Following these simple care instructions will help preserve the colors and stitching of your cherished creation.
Congratulations on completing your stunning two-toned patchwork pillow cover! You’ve not only added a beautiful, personalized touch to your home decor but also honed your sewing skills and enjoyed the rewarding process of creation. This project is a testament to how simple techniques can yield incredibly impressive results. We hope this detailed guide, alongside the inspiring video tutorial by Shveyniy ugolok s Ludmiloy Zardinovoy, has empowered you to bring your creative vision to life.
May your new pillow cover bring comfort, style, and a daily reminder of your wonderful craftsmanship. Happy sewing, and don’t hesitate to embark on your next DIY home decor adventure!