
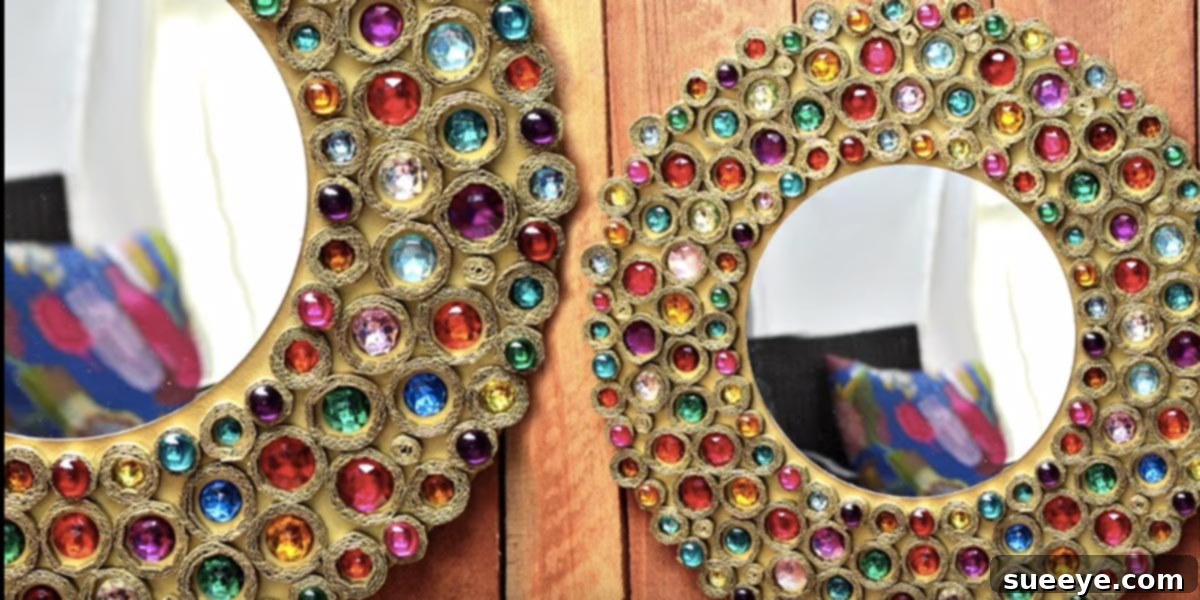
Transform Your Home with Stunning DIY Ornamental Mirrors: A Budget-Friendly Guide to Elegant Decor
Imagine stepping into a room and being greeted by an exquisite piece of art that radiates elegance, reflects light beautifully, and creates an illusion of expanded space. What if we told you that this captivating decor element could be crafted by your own hands, using surprisingly simple and inexpensive materials? Get ready to uncover the secret to creating truly stunning ornamental mirrors that look like they’ve been sourced from a high-end boutique, yet cost a mere fraction of the price. This isn’t just a craft project; it’s an opportunity to inject personalized glamour into your living space, making a significant impact on your home’s aesthetic without breaking the bank.
The allure of a well-placed decorative mirror is undeniable. It can serve as a focal point, brighten a dim corner, or simply add a touch of sophisticated charm. But often, the most beautiful pieces come with hefty price tags, placing them out of reach for many homeowners. This is where the magic of DIY comes in. We’re about to dive into a project that transforms humble cardboard into a magnificent, ornate mirror, proving that luxury and style are accessible to everyone willing to unleash their creativity. The results are so breathtaking, you’ll find it hard to believe they weren’t professionally crafted.
Why Choose a DIY Ornamental Mirror? Unlocking Style and Savings
The decision to embark on a DIY ornamental mirror project offers a multitude of compelling benefits beyond mere cost savings. While the budget-friendly aspect is undoubtedly attractive, the true value lies in the freedom of customization and the profound sense of accomplishment. Store-bought mirrors, while often beautiful, are mass-produced, limiting your ability to find a piece that perfectly aligns with your unique decor vision or specific dimensions. With a DIY approach, you become the designer, dictating every aspect from shape and size to color palette and embellishment choices.
Consider the environmental advantage as well. By repurposing readily available materials like cardboard, you’re not only saving money but also contributing to sustainable living by reducing waste. Crafting can also be a wonderfully therapeutic experience, offering a creative outlet that allows you to de-stress and focus on bringing something beautiful into existence. The satisfaction derived from admiring a finished piece, knowing every intricate detail was brought to life by your own hands, is truly unparalleled. Whether you’re aiming to revitalize a dining room, as I did with three stunning pieces that instantly elevated the space to look absolutely divine, or seeking a unique gift, the DIY ornamental mirror stands out as a brilliant choice for any creative enthusiast.
The Magic of Cardboard: An Unsung Hero in Elegant Decor
It sounds almost unbelievable that such an elegant and expensive-looking decorative mirror could be fashioned primarily from cardboard, yet it’s precisely this ingenious use of an everyday material that makes this DIY project so remarkable. Cardboard, often dismissed as mere packaging, possesses incredible versatility and structural integrity when handled correctly. Its lightweight nature makes it ideal for wall decor, and its pliable form allows for intricate cuts and layered designs that mimic traditional carved wood or metal frames.
The real stroke of genius in this particular design lies in the clever technique of using narrow cardboard strips to frame out jewels and other embellishments. This method not only secures the decorative elements firmly but also adds depth and dimension to the mirror’s frame, creating a sophisticated, multi-layered effect that truly elevates its appearance. By building up these delicate layers of cardboard, you can achieve a three-dimensional texture that catches the light beautifully, enhancing the sparkle of any gems or rhinestones embedded within. This approach transforms what could be a flat, simplistic frame into a luxurious, ornate masterpiece that rivals store-bought alternatives in grandeur and visual appeal. It’s a testament to the fact that resourcefulness and imagination can yield results far beyond expectations.
Designing Your Masterpiece: From Concept to Creation
Before you even pick up your first piece of cardboard, the most crucial step in creating your DIY ornamental mirror is designing it. This is where your vision comes to life and where you can truly personalize the piece to complement your home’s existing aesthetic. Start by considering the space where the mirror will hang. Will it be a grand focal point in a dining room, a subtle accent in a hallway, or a charming addition to a bedroom vanity?
Choosing Your Mirror Base and Shape
The actual mirror itself will dictate the central shape of your project. Round, oval, rectangular, or even irregularly shaped mirrors can all serve as fantastic starting points. Once you have your mirror, you can begin sketching out potential frame designs around it. Think about the overall style you want to achieve: a baroque, ornate look with intricate swirling patterns; a more contemporary geometric design; or perhaps a delicate, nature-inspired motif. Don’t be afraid to experiment with different ideas on paper, drawing inspiration from existing decor, online galleries, or even nature itself. The beauty of DIY is that there are no strict rules, allowing your creativity to flow freely.
Selecting Your Embellishments and Finishing Touches
The decorative elements are what will truly make your ornamental mirror shine. While the initial inspiration might involve jewels and rhinestones, the possibilities are virtually endless. Consider incorporating small acrylic gems, shimmering beads, delicate pearl accents, or even repurposed costume jewelry for an eclectic touch. For those who prefer a more subdued elegance, textured paint, metallic leafing, or even a distressed finish can create a stunning effect without relying on excessive sparkle. The narrow cardboard strips provide the perfect channels for these embellishments, allowing you to create intricate patterns and borders. Remember that the color scheme of your embellishments should harmonize with both the mirror frame and the room it will adorn, ensuring a cohesive and sophisticated final product. The careful selection and placement of these decorative elements are key to achieving that expensive, custom-made appearance that makes people gasp in admiration.
Essential Tools and Materials: Your Crafting Arsenal
One of the most appealing aspects of this DIY ornamental mirror project is that it requires a relatively short list of accessible and affordable tools and materials. You likely have many of these items already in your craft box or can easily source them from a local dollar store or craft supply shop. Investing in good quality essentials will make the crafting process smoother and ensure a more professional finish for your elegant mirror.
Must-Have Tools for Precision and Assembly:
- Utility Knife or Craft Blade: Essential for precise cutting of cardboard. Always use a fresh, sharp blade for clean edges.
- Self-Healing Cutting Mat: Protects your work surface and provides a stable base for cutting.
- Ruler (Metal preferred): For accurate measurements and straight cuts. A T-square can also be very helpful.
- Pencil: For marking cut lines and design outlines on your cardboard.
- Hot Glue Gun (with plenty of glue sticks): The fastest and most efficient way to assemble cardboard pieces and attach embellishments.
- Strong Craft Adhesive: For securing the actual mirror to the cardboard base, and for any embellishments that might require a stronger, more permanent bond than hot glue.
- Paint Brushes: For applying paint, primer, or sealant.
- Small Pliers or Tweezers: Handy for placing small gems and details accurately.
Key Materials for Your Ornate Mirror:
- Cardboard (various types):
- **Corrugated Cardboard:** Ideal for the main base and structural elements due to its rigidity. Repurpose old delivery boxes!
- **Cereal Box Cardboard/Poster Board:** Thinner and more flexible, perfect for intricate cutouts, narrow strips for framing jewels, and delicate layered designs.
- Small Mirror: The central element of your project. Choose a size and shape that suits your design vision. These can often be found cheaply at craft stores or discount shops.
- Acrylic Gems, Rhinestones, or Beads: The “jewels” that will give your mirror its ornamental flair. Purchase in bulk for cost-effectiveness.
- Paint (Acrylic or Spray Paint):
- **Primer:** Essential for cardboard to ensure paint adheres well and to create a smooth, even finish.
- **Color Paint:** Choose colors that complement your decor. Metallic paints (gold, silver, bronze) are excellent for an opulent look.
- **Sealer/Clear Coat:** Protects your finished piece and adds a professional sheen.
- Optional Embellishments: Glitter, metallic leafing, textured paste, small trinkets, or even fabric scraps for unique textures.
- Picture Hanging Hardware: A D-ring or sawtooth hanger suitable for the weight of your finished mirror.
By gathering these essential supplies, you’ll be well-prepared to embark on a creative journey that promises a stunning and personalized decorative mirror for your home or as a heartfelt gift.
Step-by-Step Inspiration: Crafting Your Own Elegant Mirror
While specific instructions vary with each design, the general process of creating a DIY ornamental mirror from cardboard is surprisingly straightforward and incredibly rewarding. Following these conceptual steps will guide you through the transformation of simple materials into an exquisite home decor piece that truly stands out.
1. Design and Plan: The Blueprint of Beauty
Begin by finalizing your design. Sketch your desired frame shape and embellishment patterns around your chosen mirror. Measure carefully to ensure your cardboard pieces will fit together perfectly. Consider how many layers of cardboard you’ll need to achieve the desired depth and ornate effect. This planning phase is crucial for avoiding mistakes and ensuring a smooth crafting experience.
2. Cut the Cardboard Base: Laying the Foundation
Using your utility knife and ruler, meticulously cut out the main base pieces of your mirror frame from the thicker corrugated cardboard. This includes the back piece to which the mirror will be glued, and the initial frame layer that will surround the mirror. Accuracy here ensures a neat final product. Don’t forget to cut out the central opening for your mirror.
3. Create the Ornamental Frame Details: Building Dimension
Now comes the creative part! From thinner cardboard (like cereal boxes or poster board), cut out all the intricate decorative elements for your frame. This includes the narrow strips for outlining your jewels, swirling patterns, floral motifs, or any other ornate details you’ve designed. Carefully glue these layers onto your base frame using hot glue, building up the desired three-dimensional effect. Take your time to ensure each piece is aligned and securely attached, creating the “channels” and raised areas for your embellishments.
4. Prepare and Attach the Mirror: The Central Focus
Before gluing, clean your mirror thoroughly. Then, using strong craft adhesive, carefully attach your mirror to the designated space on your cardboard base. Press firmly and allow adequate drying time according to the adhesive’s instructions. You want a secure bond that will last.
5. Paint and Embellish: Unleashing the Glamour
Once the glue is dry, prime your entire cardboard frame to create an even surface for painting. Once primed, apply your chosen base color. Metallic spray paints or acrylics often work wonderfully for an opulent look. After the base paint dries, begin adding your embellishments. Carefully place your acrylic gems, rhinestones, or beads into the channels and onto the raised areas of your frame, securing them with hot glue or a strong craft adhesive. You can also add glitter, metallic waxes, or other finishing touches at this stage to enhance the overall sparkle and depth. This is where the mirror truly transforms into a dazzling piece of art.
6. Finish and Hang: The Final Touches
Once all embellishments are securely in place and any paint is dry, apply a clear sealant or varnish to protect your beautiful creation and give it a polished, professional finish. Finally, attach appropriate picture hanging hardware to the back of the mirror. Ensure it’s securely fastened and can support the weight of your finished piece. Step back and admire your handiwork – you’ve just created a high-impact decorative mirror that looks incredibly expensive, yet was made with your own skillful hands and a bit of cardboard!
Where to Display Your DIY Glamour: Decorating with Ornamental Mirrors
The true beauty of a DIY ornamental mirror lies not only in its creation but also in its strategic placement within your home. These versatile pieces of wall art can dramatically alter the perception of space, light, and style in almost any room. Knowing where and how to display your handmade masterpiece can maximize its impact and elevate your home decor to new heights.
Creating Focal Points and Enhancing Ambiance
As mentioned earlier, I crafted three such mirrors for my dining room, and the transformation was instantaneous and divine. They didn’t just fill empty wall space; they became luminous focal points, bouncing light around the room and making it feel significantly grander and more luxurious. This same principle can be applied to various areas:
- Living Room: Position a large ornamental mirror above a fireplace mantel, a sofa, or a console table. It instantly draws the eye, reflecting beautiful elements of the room and adding depth.
- Bedroom: A smaller, more intricate mirror can serve as a stunning accent above a headboard or a dresser, adding a touch of personal glamour and sophisticated charm to your private sanctuary.
- Entryway or Hallway: These often-neglected spaces can be completely transformed by an ornamental mirror. It creates a welcoming impression, makes the area feel more expansive, and provides a last-minute check before heading out the door.
- Gallery Wall: Integrate your DIY mirror into a gallery wall arrangement. Its ornate frame will provide a striking textural contrast to photographs or simpler artworks, creating visual interest and dimension.
- Opposite a Window: For maximizing natural light and enhancing views, place your mirror directly opposite a window. It will reflect the outdoors, bringing a sense of freshness and openness into the room.
Remember that ornamental mirrors aren’t just for checking your reflection; they are powerful decorative tools. Their ability to reflect light can brighten even the darkest corners, while their elaborate frames serve as art pieces in their own right. By thoughtfully considering the mirror’s size, shape, and surrounding decor, you can ensure your handmade creation enhances the elegance and character of your home, making every glance a delight.
The Joy of Gifting: Handcrafted Treasures for Loved Ones
Beyond adorning your own home, the DIY ornamental mirror project offers an incredible opportunity to create meaningful and personalized gifts for friends and family. There’s something uniquely special about receiving a handmade present, especially one as beautiful and functional as a decorative mirror. It speaks volumes about the thought, effort, and love invested, making it far more cherished than any store-bought item.
I’m currently pouring my creativity into crafting a larger, more elaborate version for my mother’s upcoming birthday, and I know she’s going to absolutely adore it. It’s a gift that not only saves money but also carries a personal touch that store-bought items simply cannot replicate. The same goes for the upcoming holiday season. I’ve already decided that these elegant mirrors will make fantastic Christmas presents for my family this year. They always appreciate the unique, handcrafted gifts I give them, and I’m always thrilled to be able to save a ton of money while still providing them with something truly special and memorable.
Whether it’s for a birthday, a housewarming, a wedding, or simply a thoughtful gesture, a custom-made ornamental mirror is a gift that keeps on giving. It’s a beautiful piece of decor that will be admired for years, a constant reminder of your affection and artistic talent. The ability to tailor each mirror to the recipient’s personal style and home decor makes it an even more perfect and thoughtful present. This practice of gifting handmade items truly highlights the spirit of generosity and creativity, turning a simple piece of cardboard into a cherished heirloom.
Unleashing Your Inner Artisan: Embracing the DIY Spirit
In a world brimming with mass-produced goods, the DIY movement stands as a vibrant testament to human ingenuity and the desire for personalization. It’s no wonder we find ourselves constantly searching DIY sites for unique projects that promise both beauty and affordability. The individuals who conceive these brilliant ideas are truly “brainiacs” in the best sense of the word – incredibly intelligent minds whose creativity and resourcefulness benefit us all. We, as fellow crafters and homeowners, get to be the fortunate benefactors of their brilliance, transforming their innovative concepts into tangible beauty within our own homes.
One such visionary is Mark Montano, whose DIY craft tutorials are, in my humble opinion, the absolute bomb! I always eagerly anticipate the cool, innovative ideas he comes up with, and his step-by-step guidance makes even the most elaborate projects feel achievable. It was through tutorials like his that the inspiration for these awesome ornamental mirrors truly blossomed. If you’re feeling inspired by the elegance and affordability of this project, I wholeheartedly encourage you to watch his tutorials or similar guides. Witnessing the process unfold visually will undoubtedly ignite your own creative spark and provide the confidence you need to get busy making these stunning mirrors yourself. Embrace the joy of creation, the satisfaction of saving money, and the pride of knowing you’ve added a truly unique and glamorous touch to your living space. Your home, and perhaps the homes of your loved ones, will thank you for it!