
Craft Your Own Charming Dollar Tree Wood Crate Fall Centerpiece: An Easy DIY Guide
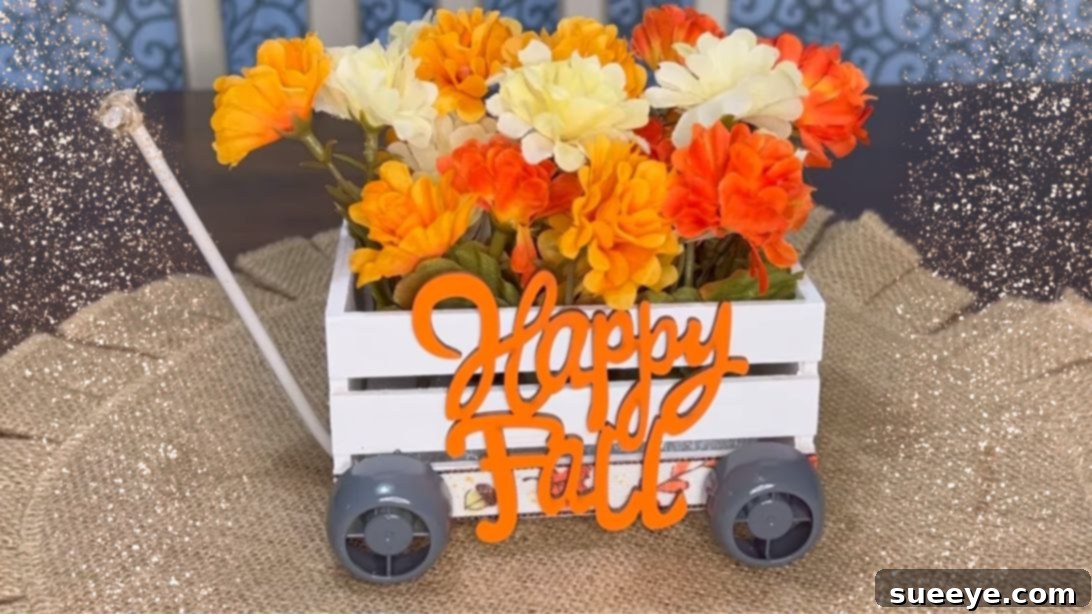
As the leaves begin to turn and the air grows crisp, there’s a unique warmth that autumn brings, inspiring us to infuse our homes with seasonal charm. If you’re eager to embrace the vibrant colors and cozy feel of the Fall season without breaking the bank, you’ve come to the right place! This comprehensive guide walks you through creating a stunning Dollar Tree wood crate fall centerpiece. Originally inspired by the brilliant creativity of Jen Joy Crafts on Youtube, this DIY project is not only wonderfully easy and budget-friendly but also offers a fantastic opportunity to personalize your home decor. You might even find many of the necessary objects already tucked away in your craft stash, proving that a little creativity goes a long way. Dive in and discover how to craft a beautiful, custom fall decoration that will captivate attention and celebrate the spirit of autumn!
Creating this eye-catching centerpiece is more than just a craft; it’s an experience. Imagine a quaint, rustic cart brimming with lush fall florals, perfectly complementing your harvest gatherings or simply adding a touch of seasonal elegance to your living space. This Dollar Tree fall centerpiece transforms simple, affordable items into a sophisticated decor piece, proving that high style doesn’t have to come with a high price tag. Whether you’re a seasoned crafter or just starting your DIY journey, the clear, step-by-step instructions provided here will guide you through the process, ensuring a successful and enjoyable project. Get ready to gather your materials and let your autumnal imagination flourish!
Essential Materials: Gathering Your Supplies for This Budget-Friendly Fall Craft
One of the many joys of this Dollar Tree wood crate fall centerpiece project is its accessibility. Most, if not all, the supplies can be found at your local Dollar Tree, making it incredibly affordable. Before you begin, ensure you have all these items ready. Remember, don’t be afraid to experiment with colors and textures to truly make this piece your own!
- Dollar Tree Wood Crate: This will serve as the foundation of your charming fall cart. These small wooden crates are versatile and perfect for a rustic look.
- Dollar Tree Florals (Dark Orange, Light Orange, White): Choose an assortment of artificial flowers and foliage in classic fall hues. Mixing dark and light oranges with white provides a lovely balance and visual interest. Feel free to add reds, yellows, or deep greens for more variety.
- Chalk Paint (Your Choice of Color): Chalk paint offers a beautiful matte finish and excellent coverage. Select a color that complements your fall decor scheme, such as an antique white, a warm gray, a deep burgundy, or a classic pumpkin orange.
- Paint Brush: A standard paintbrush suitable for applying chalk paint evenly.
- Dollar Tree Round Styrofoam: This will be placed inside the crate to hold your floral arrangements securely. Look for one that fits snugly or can be easily trimmed to size.
- Lollipop Sticks: These sturdy sticks will form the handle of your decorative cart. You might need a few, depending on the desired length and structure.
- Metallic Paint: A small amount of metallic paint (e.g., gold, copper, or bronze) will add an elegant touch to your handle.
- Satin Paint: Mixing satin paint with metallic paint can create a unique sheen and deeper color for your handle.
- Wire Cutter: Essential for cutting and shaping the stems of your artificial florals.
- Ribbon: Choose a ribbon with a fall-themed pattern or color (e.g., burlap, plaid, or a solid orange/cream) to adorn the crate.
- 4 Plastic Caps (from yogurts or small toy wheels): These ingenious items will become the “wheels” of your fall cart, adding a whimsical touch.
- Gray Spray Paint: Used to give your plastic caps a uniform, metallic “wheel” appearance.
- Glue Gun and Glue Sticks: Your best friend for quick and secure assembly of various components.
- Jute Twine: Adds a rustic touch and helps reinforce the handle.
Step-by-Step Guide: Crafting Your Beautiful Dollar Tree Fall Centerpiece
Let’s transform these simple Dollar Tree finds into a captivating fall decoration. Follow these instructions carefully, and remember to enjoy the creative process!
Step 1: Preparing Your Wooden Crate and Crafting the Handle Foundation
Begin your autumnal crafting journey by preparing your Dollar Tree wooden crate. Choose a chalk paint color that resonates with your desired fall aesthetic – perhaps a rustic burnt orange, a cozy cream, a deep forest green, or a classic matte black. Using a high-quality brush, carefully apply an even coat of paint to both the exterior and interior surfaces of the crate. Don’t rush this step; smooth, consistent strokes will ensure a professional finish. Allow the first coat to dry completely, which might take an hour or two depending on the paint type and humidity. For best results and full coverage, especially if you’re using a lighter color over raw wood, apply a second coat once the first is thoroughly dry. Proper drying time is crucial before moving to the next steps, ensuring your centerpiece has a durable and beautiful foundation.
While your crate dries, shift your attention to crafting the handle for your charming cart. In a small dish, mix your metallic paint with a bit of satin paint. This combination will create a unique sheen and depth of color, making the handle stand out. Take a lollipop stick and carefully paint it with this custom mixture. This stick will form the main, longer part of your cart handle. Set it aside to dry thoroughly, ensuring the paint is completely cured before proceeding.
Step 2: Creating a Stable Base for Your Fall Florals
Once your painted crate is completely dry, it’s time to prepare the base for your beautiful floral arrangement. Take your round styrofoam and, using a craft knife or sturdy scissors, carefully cut it to the exact size of the bottom of the crate. The goal here is a snug fit; the styrofoam should sit firmly at the bottom without shifting. A stable base is crucial for your florals to remain upright and securely in place. If your styrofoam is slightly too large, trim small amounts until it fits perfectly. If it’s a bit too small, you can pack a little newspaper around the edges to secure it, though a precise fit is ideal. Once trimmed, gently press the styrofoam into the bottom of the crate.
Step 3: Designing Your Floral Elements and Initial Handle Assembly
Now, let’s prepare your Dollar Tree florals for arrangement. Using your wire cutters, carefully snip the floral stems into various lengths. Having a mix of shorter and longer pieces will allow you to create depth and dimension in your centerpiece, giving it a more natural and dynamic look. Think about how real flowers grow – not all at the same height. Aim for variety in your cuts to make the arrangement visually appealing.
Next, return to your painted lollipop stick (ensure it’s completely dry!). Take one of the longer painted lollipop sticks that will form the main pull handle of your cart. Carefully bend one end of this long piece at a gentle angle. This bent end will be the part that attaches to the base of the crate, forming the structure. Additionally, cut a smaller, straight piece from another lollipop stick; this will be the horizontal grip of your handle, connecting to the bent main piece later.
Step 4: Arranging Your Autumn Blooms in the Centerpiece
With your florals prepped and your styrofoam base in place, it’s time for the most creative part: arranging your autumn blooms! Start by taking the shorter floral pieces and strategically poke them into the styrofoam, positioning them around the edges of the crate. These smaller pieces will form the base layer of your arrangement, helping to define its shape and fill out the perimeter. As you add the bigger, longer floral pieces, work your way towards the center and top, building volume and height. A key tip for a professional-looking arrangement is to avoid placing clusters of the same color together. Distribute your dark orange, light orange, and white florals evenly throughout the crate, creating a balanced and visually harmonious display. Step back periodically to assess your progress and make adjustments, ensuring a full, vibrant, and well-distributed floral arrangement that truly captures the essence of fall.
Step 5: Adding Decorative Details and Functional Wheels
To give your crate a polished and festive look, measure and cut a length of ribbon that perfectly matches the long sides of your crate. Using your hot glue gun, carefully attach this ribbon along the bottom edge of both long sides. This adds a charming decorative trim and helps to hide any imperfections. Next, take your four plastic caps, which will become your cart’s wheels. Lay them out on a protected surface in a well-ventilated area and apply an even coat of gray spray paint. This will give them a uniform, metallic, wheel-like appearance. Allow them to dry completely according to the spray paint instructions, ensuring they are no longer tacky.
Once the painted caps are dry, use your hot glue gun to attach one to each corner of the bottom of the crate. Ensure they are evenly spaced and securely fastened, giving your centerpiece the appearance of a functional, miniature cart. Finally, it’s time to attach the handle you prepared earlier. Take the long lollipop stick with the bent end and hot glue the bent end securely to the bottom edge of one of the crate’s short sides. Ensure it’s centered and firm. Then, take the small, straight piece of lollipop stick and hot glue it horizontally to the other end of the long stick, creating the T-shaped handle. For added aesthetic appeal and reinforcement, wrap some jute twine around the connection points of the handle. This not only strengthens the handle but also adds a lovely rustic texture that perfectly complements the fall theme. Your Dollar Tree wood crate fall centerpiece is now complete!
Pro Tips & Creative Variations for Your Dollar Tree Fall Centerpiece DIY
This Dollar Tree wood crate fall centerpiece is highly customizable, allowing you to truly express your personal style. Here are some ideas to elevate your creation and make it uniquely yours:
Customization Ideas for Your Fall Decor
- Vary Your Color Palette: While classic oranges and whites are beautiful, consider other fall color schemes. Think deep burgundies and forest greens for a rich, moody look, or soft creams and muted browns for a more farmhouse-chic aesthetic.
- Add Natural Elements: Incorporate small pinecones, dried leaves, acorns, or mini decorative pumpkins and gourds amongst the florals for extra texture and an authentic autumnal feel.
- Sparkle and Shine: If you enjoy a bit of glam, lightly dust some of your florals with gold or copper spray paint, or weave in some berry picks with a metallic finish.
- LED Fairy Lights: For an enchanting evening glow, tuck a strand of battery-operated LED fairy lights within the floral arrangement. The soft twinkle will highlight your centerpiece beautifully.
- Scented Elements: Place a small sachet of potpourri or a few drops of fall-scented essential oils (like cinnamon or pumpkin spice) on cotton balls hidden within the styrofoam to add an aromatic dimension to your decor.
Placement & Styling Suggestions
- Dining Table: This centerpiece is perfect for your Thanksgiving feast or any autumnal dinner gathering. Pair it with matching placemats and candles.
- Coffee Table: It makes a charming focal point in your living room, inviting warmth and conversation.
- Entryway Console: Welcome guests with a festive display right as they step into your home.
- Mantelpiece: Flanked by fall garlands or other seasonal decor, it creates a cozy fireplace aesthetic.
- Shelving Unit: Integrate it into a larger display with books, family photos, and other decorative objects.
Making it Your Own: Personal Touches
Don’t limit yourself to the exact materials listed. Do you have old toy wheels lying around? Use those instead of plastic caps! Do you prefer fabric flowers over plastic ones? Go for it! This project is about igniting your creativity and using what you have. Consider adding a small personalized tag or a charming fall-themed stencil to the side of the crate for an extra special touch.
Why Choose This Dollar Tree Fall Craft? The Benefits of DIY Decor
Opting for a DIY project like this Dollar Tree wood crate fall centerpiece offers numerous advantages beyond just decorating your home. It’s a rewarding experience that resonates on multiple levels.
Unbeatable Affordability
In a world where seasonal decor can often be surprisingly expensive, this project stands out for its incredible cost-effectiveness. By sourcing materials primarily from Dollar Tree, you can create a high-quality, charming centerpiece for a fraction of the cost of store-bought alternatives. This allows you to decorate lavishly without straining your budget, proving that beautiful home accents don’t require a hefty price tag.
Unleash Your Creativity and Personalization
DIY crafts are a fantastic outlet for self-expression. This project provides a blank canvas, allowing you to choose your own colors, floral arrangements, and embellishments. The ability to customize every detail means your centerpiece will perfectly match your existing decor and personal style, something mass-produced items simply can’t offer. There’s immense satisfaction in knowing that the beautiful piece adorning your home was created by your own hands, reflecting your unique taste.
A Perfect Seasonal Project for Everyone
Engaging in seasonal crafting is a wonderful way to connect with the spirit of the holidays and changing seasons. This particular fall project is easy enough for beginners, yet offers enough scope for experienced crafters to add their own sophisticated touches. It can be a delightful solo activity, a fun project to do with friends, or even a supervised craft session with older children, fostering creativity and teamwork. The process of gathering materials, painting, arranging, and assembling is inherently therapeutic and enjoyable, culminating in a beautiful piece that enhances your autumn celebrations.
Conclusion: Your Handmade Fall Treasure Awaits
You’ve now learned how to transform a few inexpensive Dollar Tree items into a breathtaking fall centerpiece – a charming wooden cart brimming with the warmth and beauty of autumn. This project is a testament to the power of creativity and the joy of DIY, offering an affordable, personalized, and deeply satisfying way to welcome the season into your home. From selecting your favorite fall florals to adding those whimsical wheels, every step of this craft allows for personal expression, resulting in a unique decoration that truly speaks to your style.
So, gather your materials, follow these easy instructions, and get ready to infuse your living space with the cozy, inviting atmosphere of fall. Whether it graces your dining table, brightens your entryway, or becomes a focal point on your mantel, your handmade Dollar Tree wood crate fall centerpiece is sure to be admired. Don’t forget to share your beautiful creations with friends and family, inspiring them to embrace the spirit of DIY fall decor!