
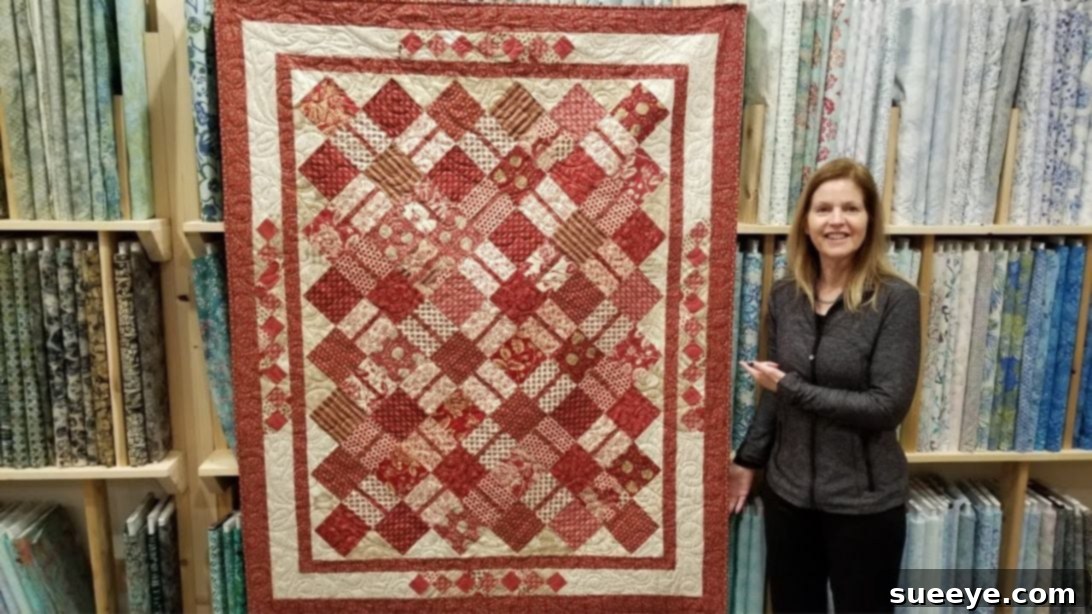
Crafting the Exquisite Layer Cake Ribbons Quilt: A Comprehensive Guide
Embark on a delightful quilting journey with the stunning Layer Cake Ribbons Quilt, a captivating pattern brought to life by the creative minds at Jordan Fabrics. This particular design is celebrated for its elegant visual appeal, where carefully arranged fabric strips create a beautiful ribbon-like effect that adds depth and movement to your finished piece. What makes this quilt truly special is its accessibility: it’s incredibly simple to construct, making it an ideal project for quilters of all skill levels, from confident beginners to seasoned artisans looking for a quick yet impactful make. The pattern ingeniously utilizes just one pack of pre-cut layer cake squares, or a comparable collection of 10-inch fabric squares, streamlining the cutting process and getting you to the sewing machine faster. If you have a stash of these versatile squares waiting for their moment to shine, now is the perfect opportunity to transform them into this gorgeous, eye-catching quilt. Follow along with our detailed guide, inspired by the original tutorial, to create a masterpiece that will undoubtedly garner admiration.
The beauty of the Layer Cake Ribbons Quilt lies not only in its striking appearance but also in the clever techniques employed to achieve its signature look. The interplay of light and dark fabrics, combined with delicate accent strips, creates a dynamic pattern that seems to dance across the quilt top. This guide will walk you through each step, from preparing your fabric to assembling the blocks and finishing your quilt, ensuring you have all the knowledge and confidence to succeed. We’ll delve into the nuances of accurate cutting, precise seam allowances, and effective pressing techniques – all crucial elements for a professional-looking finish. Prepare your sewing machine, gather your fabrics, and get ready to create a heirloom-quality quilt that showcases your creativity and skill.
Essential Materials for Your Layer Cake Ribbons Quilt
Before diving into the construction of your beautiful quilt, it’s vital to gather all the necessary materials. High-quality fabrics and the right tools will not only make the process more enjoyable but also ensure a stunning and durable end product. Here’s a comprehensive list of what you’ll need to create the Layer Cake Ribbons Quilt:
- One Layer Cake or 40 Pieces of 10-inch Squares: This is the heart of your quilt. A standard layer cake typically contains 42 pre-cut 10-inch squares, offering a coordinated collection of fabrics. For this specific pattern, you’ll need 23 light-colored fabrics and 16 dark-colored fabrics to achieve the desired contrast and ribbon effect. Ensuring you have a good balance of lights and darks is key to the quilt’s visual impact and overall design success.
- 1/2 Yard for Border 1: This fabric will form the first, often narrower, border around your pieced quilt top. Choose a color that complements or subtly contrasts with your main quilt fabrics, effectively framing the central design.
- 3/4 Yard for Border 2: The second border provides another layer of framing and can be used to introduce another color, a coordinating print, or a texture that enhances the quilt’s aesthetic.
- 3/4 Yard for Border 3: The outermost border, often the widest, gives the quilt a comprehensive finished look and can significantly impact its overall size and visual presence. Consider how this final frame interacts with the other borders and the quilt center.
- 3/4 Yard for Binding: The binding fabric encases the raw edges of your quilt, providing a clean, durable, and decorative finish. Consider a fabric that either matches one of your borders for a seamless look or offers a playful pop of contrasting color for added charm.
- 4 Yards for Backing: The backing fabric forms the reverse side of your quilt. While often hidden, a beautiful backing can elevate the entire piece. You might choose a solid color that coordinates with your front, a large-scale print, or even piece together leftover fabrics for a creative and unique quilt back.
Beyond these primary fabric requirements, you’ll also need standard quilting tools such as a rotary cutter, a self-healing cutting mat, an assortment of quilting rulers (including a long one for borders), a sewing machine, high-quality thread (matching or coordinating with your fabrics), pins or fabric clips, an iron, and a pressing mat. Investing in good quality tools will make your cutting more accurate, your sewing more efficient, and ultimately contribute to a professional and satisfying finish for your Layer Cake Ribbons Quilt.
Step-by-Step Instructions: Assembling Your Layer Cake Ribbons Quilt
Creating the Layer Cake Ribbons Quilt is a rewarding process that combines precise cutting with careful sewing. Pay close attention to your seam allowances and pressing techniques to ensure your blocks come together beautifully and your finished quilt lays flat and true. Let’s begin crafting your stunning quilt!
General Quilting Tips for Success:
Before you make your first cut, it’s always a good practice to pre-wash your fabrics if you have concerns about shrinkage or dye bleeding, especially if mixing different fabric types or colors. Once dry, press all your fabrics thoroughly to remove any wrinkles and ensure they are flat and smooth for accurate cutting. Use a sharp rotary blade and a non-slip quilting ruler on a self-healing mat to achieve precise cuts, as accuracy at this stage is paramount for well-fitting blocks. Throughout the sewing process, maintain a consistent 1/4-inch seam allowance; this “scant quarter inch” is the standard for most quilting patterns and is critical for blocks to measure up correctly when joined. Pressing after each seam is also vital for flat, professional results.
Step 1: Preparing Your Dark 5-inch Squares
Begin by selecting 12 of your dark 10-inch squares. For each of these squares, carefully cut it into four smaller, equal pieces, resulting in 5-inch squares. To do this efficiently, first cut the 10-inch square in half horizontally (producing two 5×10-inch rectangles), and then cut each of those rectangles in half vertically (yielding two 5×5-inch squares from each rectangle). This precise cutting process will give you a total of 48 dark 5-inch squares. These will serve as the contrasting blocks within your quilt design, providing visual anchors and contributing to the dynamic ribbon effect.
Step 2: Preparing Your Light 5-inch Squares
Next, take 9 of your light 10-inch squares. Similar to the dark squares, each of these light squares needs to be cut into four perfect 5-inch squares. Follow the same cutting method: cut in half horizontally, then cut each resulting 5×10-inch rectangle in half vertically. This will yield a total of 36 light 5-inch squares. These light squares will form the base for your accent strip blocks, which are central to creating the distinctive “ribbon” look that defines this quilt pattern.
Step 3: Creating the Accent Strips
Now, it’s time to create the crucial accent strips that give this quilt its name and unique character. Choose 2 of your darkest 10-inch squares from your fabric stash. Cut each of these 10-inch squares in half, creating two 5×10-inch rectangles from each original square. From each of these four 5×10-inch rectangles, you will then meticulously cut ten 5×1-inch strips. To do this accurately, stack two or three rectangles (if comfortable and safe) and use your rotary cutter and ruler to cut 1-inch wide strips along the 10-inch length. This careful cutting will provide you with a total of 20 distinct 5×1-inch accent strips. These narrow strips, often in a contrasting dark fabric, will be sewn into the light blocks to create the captivating ‘ribbon’ illusion.
Step 4: Assembling the Light Accent Blocks
This step is where the magic of the ribbon effect truly begins to take shape. Take one of your light 5-inch squares (prepared in Step 2) and carefully cut it in half, creating two pieces of 2 1/2 x 5-inch rectangles. Now, select one of your 5×1-inch accent strips (from Step 3). Carefully sew this accent strip onto one of the long sides (the 5-inch side) of one of the 2 1/2 x 5-inch light rectangles. Remember to use a precise 1/4-inch seam allowance, as consistency here is key. After sewing, gently press the seam allowance towards the accent strip. Pressing consistently in one direction helps to reduce bulk and ensures your blocks lay flatter and more accurately. Next, take the remaining 2 1/2 x 5-inch light rectangle and sew it to the opposite long side of the accent strip, mirroring your first seam. Finger press the second seam allowance towards the accent strip as well. Once pressed, you will have successfully created a composite 5-inch square block with a dark accent strip running through its center. Repeat this precise process for all of your light 5-inch squares (you will need to make 35 of these blocks) until you have a total of 35 light blocks, each featuring a prominent central accent strip. These meticulously crafted blocks are the foundation of your stunning ribbon design.
Step 5: Arranging Your Quilt Blocks
With your 35 light accent blocks and 48 dark 5-inch squares meticulously prepared, it’s time to bring the overall design to life on your design wall or a large, clean, flat surface. The arrangement is paramount to creating the continuous, interwoven ribbon effect that defines this quilt. Begin to lay out your blocks, alternating between the 5-inch light accent blocks (the ones with the dark strip in the center) and the plain 5-inch dark blocks (from Step 1). Envision a grid where each row and column features an alternating pattern of light and dark blocks. This specific alternating placement is crucial for the ribbons to appear to weave over and under each other when the blocks are sewn together, creating a sense of depth and movement. Take your time with this step; it’s a visual planning stage. Step back frequently to view the arrangement from a distance, allowing you to catch any misplacements or adjust the flow until you are completely pleased with the visual harmony. This careful visual planning helps prevent errors before you commit to sewing.
Step 6: Preparing the Side Triangles
To beautifully frame your central quilt design and give it a polished, expansive edge, you’ll add side triangles. Select 6 of your light 10-inch squares. From each of these 10-inch squares, you will first cut an 8 1/2-inch square. Then, carefully cut each of these 8 1/2-inch squares along both diagonals, from corner to opposite corner. This precise cutting will yield four triangles from each square. In total, you will have 24 triangles. These triangles are specifically designed to fit along the sides of your main block arrangement, effectively extending the quilt design outwards. Carefully place these triangles around the perimeter of your main 5-inch block layout, as depicted in the tutorial’s visual aids, ensuring their straight edges align perfectly with the outer edges of your block rows and columns. These triangles are often referred to as “setting triangles” and are crucial for squaring up the quilt top and providing a larger canvas for your quilting.
Step 7: Preparing the Corner Triangles
Completing the framing of your quilt top with a neat, professional finish requires specific corner triangles. Take 1 of your light 10-inch squares and accurately cut it down to a 7 1/2-inch square. Once you have this 7 1/2-inch square, cut it along both diagonals, from one corner to the opposite corner. This will precisely create 4 triangles. These triangles are perfectly sized to fit into the four corners of your quilt top, providing a clean, finished edge that blends seamlessly with the side triangles. Place one of these triangles in each of the four corners of your quilt layout. When all your blocks and triangles are arranged, you should see the complete quilt top design taking shape, ready for assembly into rows.
Step 8: Assembling Rows and Trimming
With all your blocks and triangles meticulously arranged according to your design, it’s time to begin sewing them together. Work methodically, sewing the individual blocks and triangles into horizontal rows. Take immense care to match your seams precisely, pinning extensively at each intersection if necessary, to ensure your points and lines align perfectly. Maintain that consistent 1/4-inch seam allowance throughout this process. As you complete each row, carefully press all seam allowances towards the darker fabric. This technique, commonly known as “pressing to the dark side,” helps to reduce bulk where seams meet and prevents the darker fabric from shadowing through lighter fabrics when the quilt is finished. After you’ve sewn and pressed your rows, you may notice some excess fabric from the side and corner triangles extending beyond the main quilt top. Carefully trim off this excess fabric using a long quilting ruler and a rotary cutter to create perfectly straight and even edges for your quilt top. This step is crucial for achieving a professional, square foundation for your quilt.
Step 9: Joining Rows and Final Pressing
Once all your individual rows are pieced, trimmed, and pressed, it’s time to join them together to form the complete quilt top. Align two adjacent rows, carefully matching up all the seams and intersections. Pin extensively at each seam intersection to ensure perfect alignment, which is critical for points to meet cleanly. Sew these rows together with your consistent 1/4-inch seam allowance, taking care not to stretch the fabric. After joining, press the seam allowances to one side. A highly recommended technique is to press alternate rows’ seams in opposite directions; for example, press seams in Row 1 to the left, Row 2 to the right, Row 3 to the left, and so on. This method allows the seams to “nest” beautifully when you join the rows, significantly reducing bulk and helping your quilt top lie flatter and without distortion. Continue this meticulous process until all your rows are sewn together, and you have a complete, cohesive quilt top.
Step 10: Squaring Up and Final Trim
With your quilt top fully assembled, the penultimate step before adding borders is to square it up and give it a crisp, finished edge. Place your quilt top on your cutting mat or a large, flat surface. Using a large quilting square or a long ruler, thoroughly steam press the entire quilt top. Steam pressing helps to relax the fabric fibers, remove any puckering, and set the seams, ensuring the quilt lies perfectly flat and smooth. Once pressed, carefully trim off the edges of your quilt top. The goal is to trim the edges precisely 1/2 inch beyond the outermost 5-inch blocks, creating a consistent and straight perimeter. This precise squaring and trimming are absolutely essential for attaching your borders evenly and ensuring your finished quilt hangs beautifully without any waviness or distortion, ready for the next stages of quilting.
Adding Borders: Framing Your Masterpiece
Now that your quilt center is complete and perfectly squared, it’s time to add the borders, which will elegantly frame your design and increase the overall size of your quilt. Borders are not just functional elements; they are also an integral design feature that can significantly enhance the visual appeal and proportions of your quilt. Using your pre-measured fabrics for Border 1, Border 2, and Border 3, carefully measure the length and width of your quilt top through the center to ensure your borders are cut to the exact size needed. It’s crucial not to simply cut strips based on the pattern’s suggested length, as quilt tops can sometimes shift slightly during piecing. Attach Border 1 first, sewing it to all four sides with a precise 1/4-inch seam, pressing seams outwards towards the border to reduce bulk. Repeat this process for Border 2 and then Border 3, ensuring each border is accurately cut, sewn, and pressed. This meticulous approach to borders will ensure your quilt remains square, lies flat, and presents a professional, gallery-worthy appearance.
Quilting and Binding: The Final Touches
Once your quilt top is complete, pressed, and squared, the next exciting phase is quilting and binding – the processes that transform your fabric pieces into a functional and beautiful quilt. Quilting involves sandwiching your quilt top with a layer of batting (the insulating middle layer that gives the quilt its warmth and dimension) and your chosen backing fabric. This “quilt sandwich” is then carefully stitched together, either by hand or machine, using a variety of patterns – from simple straight lines that echo the design to intricate free-motion designs that add artistic flair. The quilting process adds texture, stability, and durability to your quilt, preventing the layers from shifting. After quilting, the final step is adding the binding. This involves cutting fabric strips, joining them to create one long strip, and then sewing this strip around the entire perimeter of your quilt. The binding encloses all the raw edges, protecting them from wear and tear while providing a neat, decorative frame that completes the quilt. Take your time with binding, especially at the corners, to ensure a smooth, secure, and professional finish that truly elevates your handmade Layer Cake Ribbons Quilt to a cherished heirloom.
Your Completed Layer Cake Ribbons Quilt
Congratulations! You have successfully completed your beautiful Layer Cake Ribbons Quilt. This project, while simple in its construction techniques, yields a stunning visual effect that truly showcases the artistry and precision of quilting. The elegant ribbon design, achieved through the clever use of contrasting light and dark fabrics and strategically placed accent strips, creates a dynamic and sophisticated piece perfect for draping over a sofa, adorning a bed, or gifting to a cherished loved one. Each stitch tells a story of patience, creativity, and dedication, culminating in a unique work of textile art. Take a moment to admire your handiwork and appreciate the immense satisfaction of creating something beautiful and functional from fabric. We encourage you to display your quilt proudly, enjoy the warmth and comfort it brings to your home, and share your masterpiece with fellow quilting enthusiasts. Happy quilting!