
Ultimate Guide: Safely Remove a Stuck Ring from Your Finger at Home
It’s a common and often stressful situation: you glance down at your hand only to realize that your favorite ring, perhaps one you’ve worn for years, or even a new one you just tried on, is now stubbornly stuck on your finger. The initial attempts usually involve soap, lotion, or cooking oil – any lubricant you can find – hoping to slide it off. However, when these common tricks fail, panic can start to set in. Before you consider drastic measures or rush to a professional for help, there’s a surprisingly simple, effective, and safe hack involving just a piece of thread and some tape that could save your day (and your finger!).
This ingenious method has rescued countless fingers from the discomfort and worry of a trapped ring. It’s incredibly easy to execute, requires minimal materials, and provides a gentle solution without causing further irritation or injury. Let’s dive into how this clever technique works and empower you to safely remove that stubborn ring.
Why Rings Get Stuck: Understanding the Problem
Rings can get stuck for various reasons, and understanding these can help in prevention and effective removal. Common culprits include:
- Swelling: This is perhaps the most frequent cause. Factors like heat, humidity, certain medications, salty foods, weight gain, pregnancy, or even a simple insect bite can cause your fingers to swell, making a previously well-fitting ring feel too tight.
- Injury: A minor bump or bruise can lead to localized swelling around the finger joint, trapping the ring.
- Changes in Body Composition: Gradual weight gain can lead to rings becoming tighter over time.
- Long-Term Wear: Rings worn for extended periods might become difficult to remove due to natural changes in finger size or even slight skin accumulation around the ring.
- Cold Weather Shrinkage: While fingers usually swell in heat, sudden exposure to cold can cause your finger tissue to contract, making it feel like the ring is tighter when in fact, the finger itself might be slightly smaller, leading to difficulty in manipulation.
When a ring gets stuck, the natural inclination is to pull and twist, but this often exacerbates the problem by causing more swelling and discomfort. This is where a gentle, methodical approach like the thread and tape hack becomes invaluable.
Essential Materials for This Smart Ring Removal Hack
The beauty of this method lies in its simplicity and accessibility. You likely have everything you need lying around your house:
- Strong Thread: This is crucial. Dental floss (unwaxed is often best for grip), fishing line, or a strong piece of sewing thread will work well. The key is that it shouldn’t break easily when tension is applied.
- Tape: Standard Scotch tape or medical tape will do. Its purpose is to secure one end of the thread, making the process much easier to manage.
- Scissors: For cutting the thread to the appropriate length.
- Optional: A needle (for guiding the thread if the ring is very tight), and a lubricating agent (like soap, oil, or lotion) can sometimes be helpful *after* the finger has been compressed by the thread, but is not always necessary with this method.
RELATED: Key Stuck In A Lock? Try This Quick & Easy Solution!
Step-by-Step Guide: How to Easily Remove a Stuck Ring with Thread
Follow these steps carefully for the most effective and safe removal:
Step 1: Threading the Ring
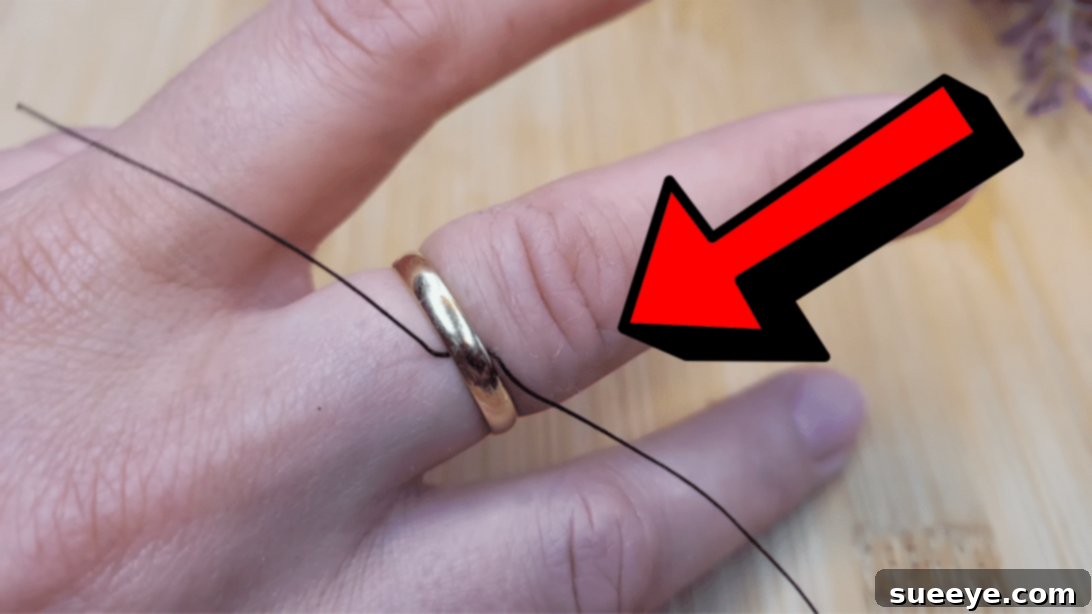
Begin by taking one end of your chosen thread and gently insert it through the ring, sliding it underneath towards your palm or wrist. This is perhaps the trickiest part, especially if the ring is very tight. You might need to gently push your skin down a bit to create a tiny gap. If you’re struggling, you can carefully use a needle or a very thin piece of plastic to help guide the thread through. Once through, ensure you have a decent length of thread on both sides. Hold the end of the thread that is closest to your wrist securely with one hand, keeping it taut against your finger.
Step 2: Compressing the Finger
Now, grab the other end of the thread (the one extending towards your fingertip) with your free hand. Starting right below the ring, begin to wrap the thread tightly and evenly around your finger. Each wrap should be snug and directly beside the previous one, with no gaps, working your way towards the tip of your finger. The goal here is to compress the swollen tissue, making your finger temporarily thinner. Continue wrapping until you’ve passed the widest part of your knuckle, effectively covering the entire area where the ring is stuck and beyond. Maintain consistent, firm pressure as you wrap, but avoid wrapping so tightly that your finger turns purple or becomes numb.
Step 3: The Unwrapping Magic
Once your finger is thoroughly wrapped and compressed past the knuckle, carefully cut off any excess thread from the end you were wrapping, leaving enough to secure. Use a small piece of tape to firmly secure this wrapped end against your finger to prevent it from unraveling prematurely. Now, return to the first end of the thread – the one you inserted under the ring and held near your wrist. Slowly and steadily, begin to unwrap this original end of the thread. As you unwrap, the ring will gently be pushed over the compressed part of your finger, effortlessly sliding past the knuckle. It might take a moment, but with each unwind, the ring should move closer to coming off. Watch the video tutorial by simple & fast on YouTube for a clear visual demonstration of this technique.
The ingenuity of this method lies in how the wrapped thread physically compresses the soft tissue of your finger, shrinking its circumference just enough. As you unwind the thread from the wrist side, it acts like a ramp or a gentle pusher, guiding the ring over the now-compressed knuckle without the friction and swelling caused by direct pulling.
What to Do If It Doesn’t Work (and When to Seek Help)
While highly effective, there are rare instances where this method might not work immediately. If the ring is still stuck after your first attempt, you can:
- Re-lubricate: Apply a small amount of soap or oil to your finger and the ring before trying the thread method again.
- Rest and Elevate: Sometimes, simply elevating your hand for 10-15 minutes can help reduce swelling. Apply a cold compress (not ice directly) to the finger to reduce inflammation.
- Try a Different Thread: A slightly thinner or stronger thread might yield better results.
When to Seek Professional Help: Safety First!
It’s crucial to prioritize your safety. If you experience any of the following, stop immediately and seek medical attention:
- Severe Pain: If the process causes significant or increasing pain.
- Discoloration: If your finger turns blue, black, or any other unusual color, indicating compromised blood flow.
- Numbness or Tingling: These are signs of nerve compression.
- Open Wounds or Trauma: If the finger is cut, bleeding, or severely injured.
- No Progress: If you’ve tried the method a couple of times without any success, it’s time to let professionals handle it. Emergency rooms, fire departments, or jewelers often have specialized tools to safely cut rings.
Prevention is Key: Avoiding Future Stuck Ring Scenarios
Once your ring is safely off, consider these tips to prevent it from getting stuck again:
- Regular Sizing Checks: Your finger size can change throughout your life. Get your rings checked and resized if necessary.
- Remove Rings During Swelling: Take off your rings before activities that cause swelling (e.g., strenuous exercise, long flights, hot weather, certain medical conditions).
- Avoid Wearing Rings During Injury: If you injure your hand or finger, remove rings immediately to prevent them from becoming trapped by swelling.
- Moisturize: Keeping your skin hydrated can help rings slide on and off more easily.
- Consider Ring Guards or Spacers: If your finger size fluctuates, these can provide a temporary fit solution.
After the Rescue: Ring Care and Finger Comfort
Once the ring is off, give your finger some attention. Gently massage the area and, if there’s any lingering swelling, apply a cold compress. Clean your ring to remove any lubricants or thread residue, and then store it safely until your finger returns to its normal size. This also might be a good time to visit a jeweler to get it resized if it was a persistent issue.
This simple thread and tape method is a brilliant example of how a little ingenuity can solve a big problem. It’s a practical skill worth knowing and sharing. We hope you find this method as helpful as many others have! Feel free to share this ingenious trick with anyone who might benefit from it. You can see the full visual demonstration from simple & fast via YouTube. Give her channel a visit and subscribe for more amazing hacks!