
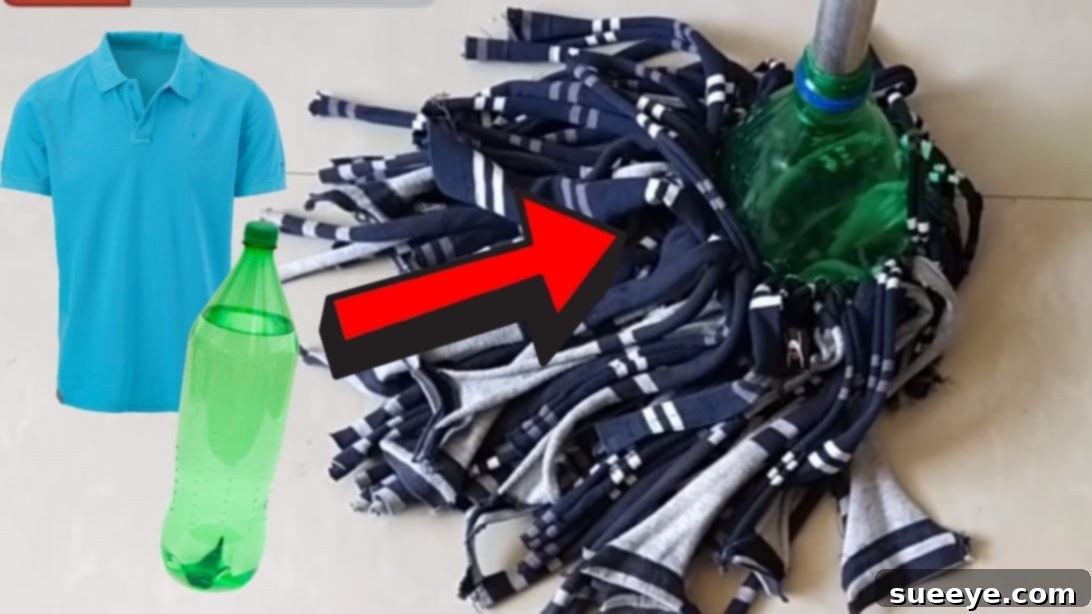
DIY Eco-Friendly Floor Mop: Transform Plastic Bottles and Old Shirts into a Powerful Cleaning Tool
Are you searching for ingenious ways to minimize household waste, save money on cleaning supplies, and contribute to a more sustainable lifestyle? If your wardrobe harbors a collection of old t-shirts past their prime and your recycling bin frequently fills with plastic bottles, then you’ve stumbled upon the perfect project! This remarkably clever DIY recycling craft offers an innovative solution to give those discarded items a valuable second life. Learn how to construct an incredibly effective and environmentally friendly floor mop using materials you likely already have readily available. This engaging and rewarding tutorial, inspired by the brilliant ideas from My World Easy Craft, vividly demonstrates that you don’t need to splurge on expensive cleaning equipment when a dash of creativity and resourcefulness can yield exceptional results. Dive into this comprehensive guide and embark on your journey towards a cleaner home and a greener planet, all while relishing the immense satisfaction of a handmade creation.
Why Make Your Own Mop? The Multifaceted Benefits of Upcycling for Cleaning
Crafting your own floor mop from recycled materials offers a wealth of advantages that extend far beyond simply acquiring a new cleaning tool. Firstly, it stands out as an incredibly **cost-effective** solution. Instead of continuously investing in disposable mop heads or entirely new mops from the store, you are wisely utilizing items that would otherwise be destined for the landfill, thereby significantly reducing your ongoing household expenses. Secondly, and arguably its most crucial benefit, this project represents a powerful act of **environmental stewardship**. By repurposing plastic bottles and old textiles, you actively divert substantial waste from overflowing landfills, consequently lessening your carbon footprint and making a tangible contribution to the circular economy. This particular project is a prime example of **upcycling**, a process that transforms discarded or unwanted materials into new products of higher quality or environmental value. Furthermore, there’s an immense and often underestimated **personal satisfaction** derived from creating something genuinely useful with your own hands. It offers a concrete and accessible way to engage directly in sustainable living practices, develop new practical skills, and, crucially, inspire friends, family, and wider communities to adopt similar eco-conscious behaviors. This DIY mop is not merely a practical cleaning implement; it serves as a powerful statement about responsible consumption, inventive problem-solving, and the enduring value of homemade solutions.
Gather Your Materials: Essential Items for Your Upcycled Mop
One of the most appealing aspects of embarking on this DIY project is that the majority of the necessary items are very likely already present within your home, waiting to be repurposed. Before you begin the crafting process, take a moment to meticulously gather these simple yet crucial tools and materials:
- Large Plastic Bottle: Select a sturdy plastic bottle, ideally a 2-liter or larger size, made from PET plastic (commonly found in soda, water, or juice bottles). These types of bottles are robust enough to form the durable base of your mop head. It’s imperative that the bottle is thoroughly cleaned, rinsed, and completely dried before you start working with it.
- Cutter: A sharp utility knife or a box cutter will be indispensable for making the initial, precise cut on the plastic bottle. Always prioritize safety: use the cutter on a stable, protected surface and direct the blade away from your body.
- Pair of Scissors: Once the preliminary incision is made with the cutter, a good pair of sharp, strong scissors will prove invaluable for refining the edges of the plastic bottle and efficiently cutting the fabric strips from your old shirt.
- Old Shirt(s): Opt for cotton or cotton-blend t-shirts, as these materials offer excellent absorbency and durability, making them ideal for cleaning tasks. Softer, well-worn shirts often work best. Depending on the size of the shirts and your desired mop fullness, you might need one to three. Lighter-colored shirts are often preferred to minimize any risk of dye bleeding onto your floors.
- Candle or Lighter: This will be used as a heat source to warm the tip of your metal tool, enabling it to melt through the plastic bottle to create holes. Ensure you work in a well-ventilated area and have a fire-safe surface beneath your workspace.
- Marker: A permanent marker is recommended for clearly and precisely marking the spots on the plastic bottle where you intend to create the holes for attaching the fabric strips.
- Screwdriver or Any Small Metal Rod: A standard Phillips head screwdriver or a similar small, sturdy metal object will be heated to melt the holes into the plastic bottle. Choose one with an insulated or comfortable handle that you can grip securely and safely while its tip is being heated.
- Metal Tube (or Wooden Dowel/Broomstick): This component will serve as the robust handle for your newly constructed mop. An old broomstick, a durable metal tube, or even a thick wooden dowel can be repurposed effectively. Crucially, ensure it is long enough for comfortable ergonomic use and strong enough to withstand the pressure and forces involved in cleaning.
Step-by-Step Instructions: Crafting Your Recycled Mop with Precision
Step 1: Prepare the Plastic Bottle Base with Care
To begin, retrieve your large plastic bottle. Using a sharp utility cutter, carefully remove the entire top portion of the bottle, specifically the tapered neck and the screw-top opening. For safety and precision, make a small initial incision with the cutter, then immediately switch to a pair of strong scissors to complete the cut smoothly around the bottle’s circumference. This approach allows for a much more controlled and safer cut, making the entire process quicker and more efficient. Aim for a clean, even edge around the newly created opening. Discard the separated top section and any small plastic fragments. The remaining bottom part of the bottle will form the essential core structure of your mop head, so ensure its edges are free from any sharp or jagged protrusions that could snag your fabric or cause injury.
Step 2: Expertly Create Your Fabric Mop Strips
Next, it’s time to transform your old shirt into the absorbent mop strips. Lay your chosen old shirt flat on a clean, stable surface and smooth out any wrinkles. Using your scissors, make a horizontal cut across the shirt, just below the sleeves. This will give you a large, rectangular piece of fabric. Now, to create the strips, measure a consistent width of approximately half an inch (which is roughly 1.25 cm) from one side edge. Make a small vertical cut into the fabric at this mark. For optimal efficiency and to achieve natural, slightly frayed edges that significantly enhance the mop’s scrubbing capability, gently tear the fabric strip all the way across. Repeat this precise process methodically until you have successfully converted the entire shirt into a generous pile of fabric strips. The more strips you meticulously prepare, the fuller, denser, and ultimately more effective your finished mop head will be at cleaning and absorbing liquids. If you only have one shirt, consider repurposing a second one to ensure maximum cleaning power and durability for your mop.
Step 3: Precisely Prepare the Bottle for Fabric Attachment
With your plastic bottle base now trimmed and ready, take your permanent marker and create a series of evenly spaced marks around the bottom edge of the bottle. These marks will serve as precise indicators for where you will create the holes, which are essential for attaching the fabric strips. For an optimally full and efficient mop head, aim for marks that are approximately 1 to 1.5 centimeters apart. Once all your marks are meticulously laid out, it’s time to create the holes. Light a candle or use a lighter to heat the tip of your screwdriver or chosen metal rod. Hold the metal tip in the flame until it is sufficiently hot; you’ll observe it glowing slightly or, if very hot, perhaps a faint wisp of smoke. With extreme caution and a steady hand, carefully press the heated tip into each marked spot on the plastic bottle to melt through and create a clean, circular hole. It is absolutely crucial to perform this step in a well-ventilated area and on a sturdy, heat-resistant surface to prevent accidents. The heat will help create smooth, rounded edges for the holes, effectively preventing any sharp plastic from damaging or snagging your fabric strips during attachment or use.
Step 4: Securely Attach the Fabric Strips for a Full Mop Head
This is where your mop head truly begins to take shape. Take each individual fabric strip you meticulously prepared and insert one end into a hole from the outside of the plastic bottle, pushing it through until it emerges on the inside. Continue pulling the strip through until an equal length of fabric hangs symmetrically on both the inside and outside of the bottle. Once threaded, tightly tie the two ends of the fabric strip together with a simple yet secure knot; a double knot is highly recommended for enhanced security and durability, ensuring the strip remains firmly attached to the bottle. Repeat this precise process for every single hole you have created around the bottle’s circumference. For an even denser, fuller, and significantly more effective mop, consider creating a second layer of holes positioned slightly above the first row, intentionally staggering them between the knots of the initial layer. Then, proceed to insert and tie more fabric strips into these new holes. Continue adding strips until the entire bottom of the plastic bottle is completely covered with a thick, bushy array of fabric fringes. Remember, the fuller and more voluminous your mop head, the better it will be at efficiently picking up dirt, trapping debris, and absorbing liquids, leading to superior cleaning results.
Step 5: Securely Assemble the Mop Handle
The final crucial step involves securely attaching the handle to your newly crafted mop head. Take your chosen metal tube, wooden dowel, or repurposed broomstick. If the handle’s end is not already perfectly tapered or shaped to fit snugly into the central opening of the plastic bottle, you might need to make some minor adjustments. You could gently heat the plastic of the bottle’s central opening with a lighter to slightly soften it, allowing the handle to be pushed in more easily. Alternatively, if the bottle’s opening is somewhat larger than your handle, you can create a secure and tight fit by wrapping the end of the handle with strong adhesive tape or a piece of thick cloth until it achieves the desired snugness. Carefully and firmly insert the end of the handle into the central opening of the plastic bottle. Push it down with considerable force until it is securely lodged and perfectly stable, ensuring it won’t wobble or detach during vigorous cleaning. For an added layer of security and peace of mind, especially if your handle fit isn’t absolutely tight, consider applying a dab of strong, waterproof adhesive around the joint where the handle meets the bottle. And there you have it – a remarkably clever, robust, and truly eco-friendly cleaning mop, ingeniously created from materials that were once destined for the waste bin! Before its maiden voyage, give it a good test for stability and readiness for action.
Caring for Your Homemade Mop: Essential Tips for Longevity and Hygiene
To ensure your DIY floor mop serves you effectively and hygienically for countless cleaning sessions, proper care and maintenance are absolutely essential. After each use, particularly if you’ve been cleaning heavily soiled or dirty areas, it’s highly advisable to rinse the fabric strips thoroughly under running water until the water runs completely clear of dirt and debris. For a more comprehensive and deeper clean, you have the convenient option to easily detach the fabric section (if you designed your mop head to allow for removal) and simply toss it into your washing machine with your regular laundry cycle. Cotton strips are remarkably durable and perfectly machine washable, making regular maintenance a straightforward and effortless task. After washing, always allow the mop head to air dry completely to prevent the growth of mildew, the development of unpleasant odors, and to ensure its hygienic condition. Storing your mop head in an elevated position or in a well-ventilated area will also significantly contribute to its overall longevity and freshness. With consistent and proper care, your ingeniously upcycled mop can reliably last for many months, if not several years, providing a truly sustainable and highly effective alternative to conventional, often disposable, cleaning tools.
Customization and Variations: Personalize Your Eco-Friendly Cleaning Tool
This DIY mop project is inherently highly adaptable, offering ample opportunities for personal touches and functional variations to suit your specific cleaning needs and aesthetic preferences. Here are a few creative ideas to customize and enhance your unique creation:
- Diverse Fabric Choices: While cotton t-shirts are excellent for general absorbency, feel free to experiment with different types of old fabric. For instance, cut-up microfiber cloths can offer streak-free cleaning on delicate surfaces, or old denim jeans, cut into strips, can provide added durability and scrubbing power for tougher, more stubborn tasks.
- Varying Bottle Sizes: Utilizing a larger plastic bottle will naturally yield a wider mop head, allowing you to cover more floor area quickly and efficiently. Conversely, a smaller bottle might be perfectly suited for navigating tighter spaces or tackling smaller, more detailed cleaning jobs.
- Alternative Handle Designs: If a metal tube isn’t readily available, an old wooden broom handle, a sturdy piece of PVC pipe, or even a robust, smooth branch from your yard can be repurposed. Always ensure your chosen handle is smooth, splinter-free, and comfortable to grip. For a truly detachable handle, consider carefully drilling a small hole through the plastic bottle’s central opening and into the handle, then securing it with a screw for easy removal and reattachment.
- Strategic Color Coding: If you’re inclined to create multiple mops for various cleaning purposes, consider using different colored shirts for the fabric strips. This allows you to color-code them for specific cleaning areas (e.g., blue for bathrooms, green for kitchens, yellow for general living spaces), effectively preventing cross-contamination and promoting better hygiene.
- Infused Scented Cleaning: For an added touch of freshness, before you begin cleaning, you can lightly mist the fabric strips of your mop with a diluted solution of your favorite essential oil (such as lemon, lavender, or eucalyptus). This will leave a subtle, refreshing aroma as you clean, enhancing the overall cleaning experience.
Conclusion: Embrace Eco-Friendly Cleaning with Your Handmade Mop
Congratulations! You have successfully transformed what were once considered discarded items into a truly valuable and indispensable household tool, powerfully demonstrating the remarkable potential of upcycling. This DIY eco-friendly floor mop, ingeniously crafted from plastic bottles and old shirts, is far more than just a simple cleaning device; it stands as a testament to human ingenuity, commitment to sustainability, and a proactive approach to responsible living. By consciously choosing to craft your own cleaning tools rather than continuously purchasing new ones, you are not only making significant savings on your household budget but are also actively participating in the crucial global effort to reduce waste and protect our precious planet. Each time you pick up and use your handmade mop, you’ll be reminded of your positive environmental impact and the tangible difference you are making. So go ahead, put your new, personalized mop to the test, and revel in the satisfaction of maintaining a cleaner home the truly sustainable way. Don’t hesitate to share your impressive creation and newfound skills with friends and family, inspiring them to join this growing movement towards a greener, more resourceful, and ultimately more sustainable lifestyle!