
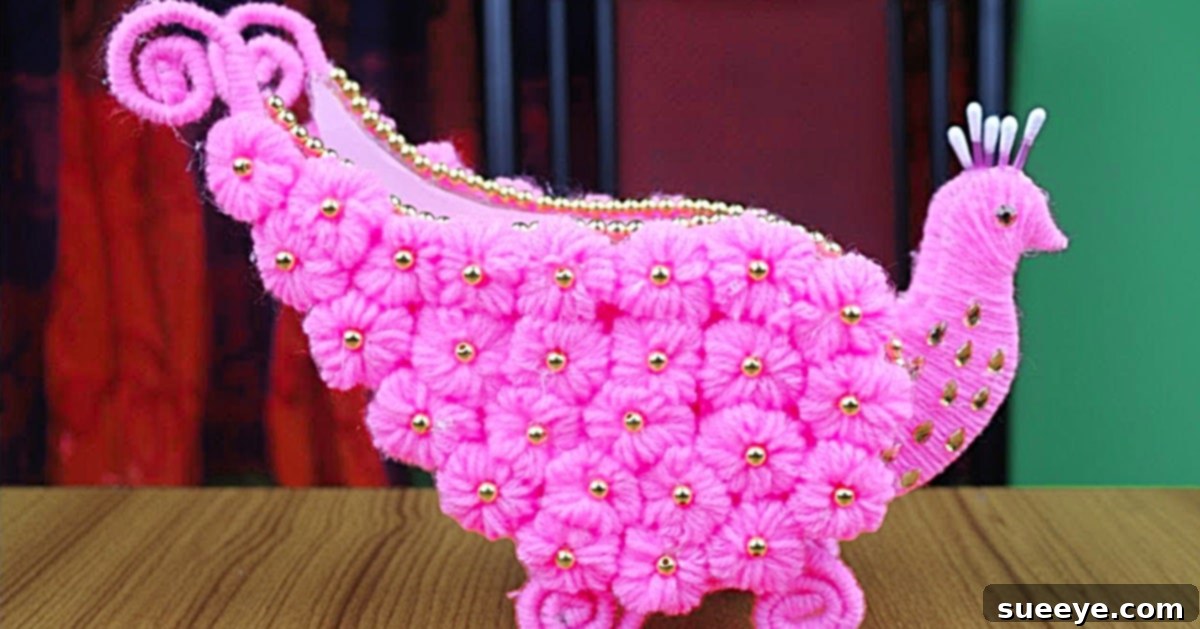
DIY Peacock Yarn Vase: Craft Your Own Elegant Home Decor
Are you a passionate knitter, crocheter, or simply a craft enthusiast with a stash of beautiful yarn yearning for a purpose? Then get ready to transform those colorful skeins into a breathtaking decorative piece for your home! This DIY Peacock Yarn Vase project is not just a craft; it’s an opportunity to create something truly unique and elegant, utilizing materials you likely already have on hand. Imagine a vibrant peacock, majestic and graceful, brought to life through the warmth and texture of yarn, ready to adorn any corner of your living space.
This project is designed to be both enjoyable and accessible, requiring minimal cash outlay and bringing immense satisfaction. We’ll guide you through each step, from crafting delicate yarn flowers to assembling the peacock’s proud form, ensuring you create a stunning Peacock Yarn Vase that will be a testament to your creativity. Let’s dive into the wonderful world of yarn crafting and make something beautiful together!
Why Craft a DIY Peacock Yarn Vase?
Beyond the simple joy of making, creating your own Peacock Yarn Vase offers a multitude of benefits. For starters, it’s an excellent way to use up leftover yarn from other projects, reducing waste and giving new life to those forgotten skeins. It’s also incredibly cost-effective, as most of the required materials are common household or crafting items. Furthermore, crafting provides a wonderful outlet for self-expression and stress relief. The rhythmic process of wrapping yarn and assembling components can be meditative, offering a calming escape from daily routines.
This project also allows for immense personalization. You can choose yarn colors that perfectly match your existing home decor, or experiment with bold, contrasting hues to make a statement. The finished vase serves as a unique conversation piece, a handmade treasure that reflects your individual style and dedication to creative pursuits. Whether you’re looking for a new decorative accent, a thoughtful handmade gift, or simply a fun weekend activity, this DIY Peacock Yarn Vase is a perfect choice for crafters of all ages and skill levels.
Embrace the challenge of transforming ordinary materials into extraordinary art. This peacock vase isn’t just a container; it’s a statement piece, a testament to the beauty of handmade decor, and a vibrant addition to any room that needs a touch of whimsy and elegance.
Materials You’ll Need
One of the best aspects of this DIY Peacock Yarn Vase is that it relies on easily accessible and often repurposed materials. Before you begin, gather the following items. You might be surprised how much you already have in your craft drawer!
- Yarn: Choose a variety of colors and textures. Different shades of blues, greens, and purples are ideal for a peacock theme, but don’t shy away from golds, browns, or even a bold splash of red or yellow for accents. Leftover scraps are perfect for the smaller details like flowers. Consider both chunky and finer yarns for textural contrast.
- Cardboard or Cardstock: This will form the structural base for your peacock’s head, neck, and wings. Repurposed materials like cereal boxes, tissue boxes, or old greeting cards work perfectly. The sturdier the cardboard, the more durable your peacock will be.
- A Hot Glue Gun and Glue Sticks: Essential for quickly and securely attaching yarn and embellishments. Always exercise caution when using a hot glue gun, and supervise children if they are involved in the project. Have plenty of glue sticks on hand!
- Small Plastic Jewels/Gems: These will add a beautiful, sparkling accent to your peacock, mimicking the iridescent quality of real peacock feathers. Look for shades of blue, green, clear, or even iridescent gems for maximum impact.
- A Pen or Pencil: Used as a temporary guide for wrapping yarn to create uniform small yarn flowers. Any cylindrical object of similar size could also work.
- Scissors: A good pair of sharp scissors is crucial for cleanly cutting yarn, cardboard, and any other materials.
- Optional Embellishments: Consider adding small gold beads (for eyes or decorative strings), decorative trim (like thin ribbon or sequin trim), small Q-tips (for antennae), glitter glue, or even small craft feathers to further enhance your peacock’s grandeur and uniqueness.
Step-by-Step Guide: Crafting Your Majestic Peacock Yarn Vase
Follow these detailed instructions to bring your beautiful Peacock Yarn Vase to life. Take your time with each step, and enjoy the creative process! Remember, there’s no single “right” way to craft, so feel free to adapt these steps to your personal style.
Step 1: Create Your Delightful Yarn Flowers
These charming little yarn flowers will form the vibrant “eyes” of your peacock’s tail feathers or add color to its wings. They’re simple to make and add a wonderful textural element. You’ll need several of these, so make a small batch in varying colors and sizes.
- Take your pen or pencil and begin wrapping your chosen yarn around its entire length. Wrap snugly but not too tightly, ensuring you can slide it off easily without losing its shape. Aim for a consistent, dense wrapping to create a full flower. The more wraps, the fuller and larger your flower will be.
- Once you’ve wrapped a sufficient amount (typically 30-50 wraps, depending on yarn thickness and desired flower size), carefully slide the wrapped yarn off the pen, keeping its bundled shape intact.
- Take a separate, shorter piece of yarn (about 6-8 inches) and thread it underneath the center of your wrapped yarn bundle. Tie this piece securely around the middle of the bundle, pulling tightly to cinch it in the center, forming a bow-like shape. Double knot it to ensure it holds.
- Trim the loops on both ends of the tied bundle with your scissors to create individual yarn strands. Then, gently fluff out the cut strands to form a small, circular, pom-pom-like flower. Repeat this process until you have a good collection of flowers for your peacock.
Set these aside; they will be a crucial decorative element later on.
Step 2: Secure and Refine Your Yarn Flowers
This stage ensures your yarn flowers are robust, neat, and ready for attachment. A secure knot is key to their longevity and professional appearance. This step allows for a final check and adjustment of your handcrafted blossoms.
- After forming each yarn flower, double-check that the central tie is tight and secure. You can add a tiny dot of hot glue directly onto the knot if you wish to prevent it from unraveling over time. This extra step adds durability.
- Gently trim any unruly or excessively long strands with your scissors to make your flowers neat and symmetrical. You can also vary the size of your flowers by initially wrapping more or less yarn around the pen, or by using objects of different diameters (e.g., a marker for larger flowers, a toothpick for tiny ones).
These vibrant embellishments are now ready to be incorporated into your peacock design, providing beautiful focal points.
Step 3: Organize Your Components and Prepare Your Workspace
Before proceeding, ensure all your yarn flowers are neatly arranged and accessible. This organizational step makes the assembly process much smoother and more enjoyable. A tidy workspace is a happy workspace!
- Place all your completed yarn flowers in a small container, a divided tray, or simply lay them out neatly on your work surface. Group them by color or size if you plan a specific arrangement.
- Clear your workspace of any unnecessary clutter and ensure you have enough room to comfortably assemble the larger parts of your peacock.
Taking a moment to organize your materials can significantly enhance your crafting experience and prevent misplacing small, important components during the assembly phase.
Step 4: Constructing the Peacock’s Head and Neck
The peacock’s head and neck are central to its iconic silhouette. Precision in cutting the cardboard and neatness in yarn wrapping will make this element truly stand out, giving your peacock a graceful and elegant posture.
- On your chosen cardboard or cardstock, carefully draw two identical peacock head and neck shapes. Think of a graceful S-curve for the neck, culminating in a distinct, elegant head with a slight crest area. Ensure the shapes are approximately the size you desire for your vase, proportionate to the overall peacock.
- Carefully cut out both shapes using your sharp scissors. Take your time to achieve clean, smooth lines.
- Take your primary yarn color for the peacock’s body (often a rich blue or green) and begin wrapping it tightly and evenly around one of the cardboard cutouts. Apply a small dot of hot glue at the starting point on the back of the shape to secure the yarn.
- Continue wrapping the yarn, overlapping slightly to ensure no cardboard shows through. Apply tiny dots of hot glue periodically (especially on curves and edges) on the back of the shape to keep the yarn firmly in place and prevent it from shifting.
- Repeat this precise wrapping process for the second identical cardboard cutout. You now have two beautifully yarn-wrapped peacock head and neck pieces, which will be joined later to create a sturdy, double-sided form.
These will form the proud upper part of your peacock, setting the tone for its majestic appearance.
Step 5: Embellish the Head with Jewels and Sparkle
Add a touch of sparkle and luxury to your peacock’s head with carefully placed plastic jewels. This step mimics the natural brilliance and iridescent quality of a real peacock’s crest and facial markings, making your creation truly eye-catching.
- Take one of your yarn-wrapped peacock head and neck pieces. This will be the front-facing side of your peacock’s head.
- Using your hot glue gun, carefully glue small plastic jewels onto the head area. You can arrange them in a regal pattern, such as a crown along the top of the head, or randomly scatter them for a shimmering, glittery effect. Consider using different shades of jewels (blues, greens, purples, or clear) to add depth and dimension.
- Allow the glue to cool and set completely. Hot glue sets quickly, but it’s best to give it a minute or two before handling extensively to ensure the jewels are firmly secured.
This adds an eye-catching detail that makes your peacock truly regal and distinctive, capturing the essence of its natural beauty.
Step 6: Crafting the Peacock’s Wings and Attaching Yarn Flowers
The wings provide the grand, fanned backdrop for your peacock’s vibrant “tail.” These will be adorned with your previously made yarn flowers, creating the iconic “eye” patterns characteristic of peacock feathers. This is where your creativity truly shines!
- From your cardboard or cardstock, cut out two wing shapes. These should be larger and more rounded than the head/neck pieces, resembling the upper part of a peacock’s fanned tail or elegant wings. Think of a semi-circular, fan-like, or elongated teardrop shape. Ensure they are symmetrical.
- You can choose to wrap these wing shapes with yarn as well, using a color that complements your primary peacock body color, or leave the cardboard exposed and paint it if you prefer a different look. Wrapping with yarn will provide a consistent texture and a more unified appearance.
- Now, take your collection of small yarn flowers. Arrange and glue them onto the cardboard wing shapes. Place them strategically to create a beautiful, layered effect, mimicking the vibrant “eyes” of a peacock’s feathers. You can use varying colors and sizes of flowers to add visual interest and depth to your design.
- Ensure each flower is securely attached with hot glue. Hold each flower in place for a few seconds until the glue cools and sets. You can also add smaller beads or sequins around the center of each flower to enhance the “eye” effect.
These wings will form the central decorative element of your vase, giving it that unmistakable peacock grandeur.
Step 7: Adding Golden Beads and Distinctive Antennae
Enhance the elegance and detail of your peacock’s head with carefully placed golden beads and its characteristic antennae. These small touches add personality and a finished look to your creation.
- Take your other yarn-wrapped peacock head and neck piece (if you didn’t embellish both sides in Step 5, this will be the back or additional detail side).
- Carefully glue on small gold beads. You can create a graceful line along the top of the head, around the eye area, or along the curve of the neck, as shown in the inspiration photo. Alternatively, scatter them for a unique, shimmering touch that catches the light.
- For the peacock’s antennae, take two Q-tips. You can trim them to a desired length to suit your peacock’s scale. For a more polished look, you might dab a tiny bit of glue on the cotton ends to make them sturdier or less fluffy, or even paint them gold or black.
- Using hot glue, attach the Q-tip antennae to the top of the peacock’s head, positioning them gracefully upwards and slightly outwards, giving your peacock a curious and alert expression.
These intricate details will give your peacock more character and a beautifully finished appearance, bringing it to life.
Step 8: Final Assembly and Decorative Trim
Now it’s time to bring all your carefully crafted components together to form the complete peacock vase. This is where your masterpiece truly comes to life, ready to adorn your home.
- Take your two yarn-wrapped peacock head and neck pieces. Apply a generous line of hot glue along the edges of one piece and carefully press the other piece on top, ensuring they align perfectly. This creates a sturdy, double-sided head and neck that will hold its shape.
- Attach the embellished wing shapes to the back of the peacock’s neck/body area. Position them so they fan out elegantly, creating the illusion of a majestic tail. Use a generous amount of hot glue for a secure attachment, holding in place firmly for several seconds until the glue sets.
- If you are attaching your peacock to an actual vase (e.g., a yarn-wrapped glass bottle), you will need to adapt this step. You might glue the peacock’s body directly onto the front of the prepared vase. For a freestanding decorative piece, ensure the base of the peacock’s “body” (where the wings attach) is stable, perhaps by adding a flat, weighted cardboard base if needed.
- To add a final flourish and a professional touch, glue gold bead strings, thin metallic ribbon, or other decorative trim along the outer edges of the wings or around the peacock’s neck. This adds a refined, finished look and can conceal any minor imperfections.
Your DIY Peacock Yarn Vase is now complete! Step back and admire your beautiful, handcrafted work of art, a testament to your creativity and patience.
Tips for Success and Creative Customization
To ensure your DIY Peacock Yarn Vase turns out beautifully and reflects your unique style, consider these helpful tips and customization ideas. Personalizing your craft makes it even more special!
- Yarn Selection: Don’t limit yourself to traditional peacock colors. Experiment with metallics, pastels, or even multi-colored variegated yarns for a truly artistic interpretation. Different yarn weights (e.g., chunky vs. thin) will also create varied textures and visual interest in your design.
- Glue Gun Mastery: A hot glue gun is your best friend for this project due to its quick drying time. Use small, precise dots for attaching yarn and embellishments. If you find the glue strings annoying, a quick blast with a hairdryer (on a low setting and from a distance) can help melt them away, or simply rub them off once dry.
- Cardboard Thickness: Thicker cardboard will provide a more rigid and durable structure, especially for larger peacocks. For smaller, more delicate designs, cardstock might suffice, but ensure it’s firm enough to hold its shape once yarn-wrapped.
- Adding a Vase Element: If you truly want a functional “vase,” consider wrapping a plain glass jar, bottle, or even an old tin can with yarn first. Then, attach your assembled peacock to its front. This creates a functional vase that can hold artificial flowers, pens, or serve as a unique centerpiece.
- Kid-Friendly Adaptation: For younger crafters, pre-cut the cardboard shapes to simplify the process. For safety, use craft glue (like Tacky Glue) instead of a hot glue gun, allowing for longer drying times. They can still enjoy wrapping yarn and decorating with gems and flowers.
- Sparkle and Shine: For an extra dose of glitter, apply a thin layer of craft glue over parts of the yarn and sprinkle with fine glitter while wet, or use glitter glue pens for specific, controlled accents. This adds an extra layer of magic to your peacock.
- Peacock Eyes Detail: For a more realistic peacock eye effect, consider cutting small ovals from felt or colored paper (e.g., black, white, and a lighter color) and layering them under your plastic jewels on the wing flowers. This adds depth and definition.
- Display Ideas: Your finished peacock vase can be proudly displayed on a bookshelf, mantelpiece, or as a vibrant centerpiece on a coffee table. It also makes a thoughtful, handmade gift for friends and family for any occasion, from birthdays to housewarmings.
Unleash Your Inner Artist: Your Peacock Masterpiece Awaits!
Congratulations on completing your stunning DIY Peacock Yarn Vase! This project truly showcases how simple materials and a touch of creativity can transform into an exquisite piece of home decor. We hope you found the process enjoyable and the step-by-step guide clear, inspiring, and easy to follow. From utilizing your beloved yarn stash to adding intricate, shimmering details, every step contributes to a unique, handcrafted item that brings beauty and personality to your space.
Whether you made this for yourself, as a thoughtful gift, or as a fun activity with loved ones, the satisfaction of creating something beautiful with your own hands is immeasurable. Your DIY Peacock Yarn Vase is more than just a decoration; it’s a symbol of patience, creativity, and the pure joy of crafting. Share your creations with pride, inspire others, and continue to explore the endless possibilities that DIY projects offer. We encourage you to experiment with different colors, textures, and embellishments to make each peacock vase uniquely yours. Happy crafting, and may your home be filled with handmade beauty!