
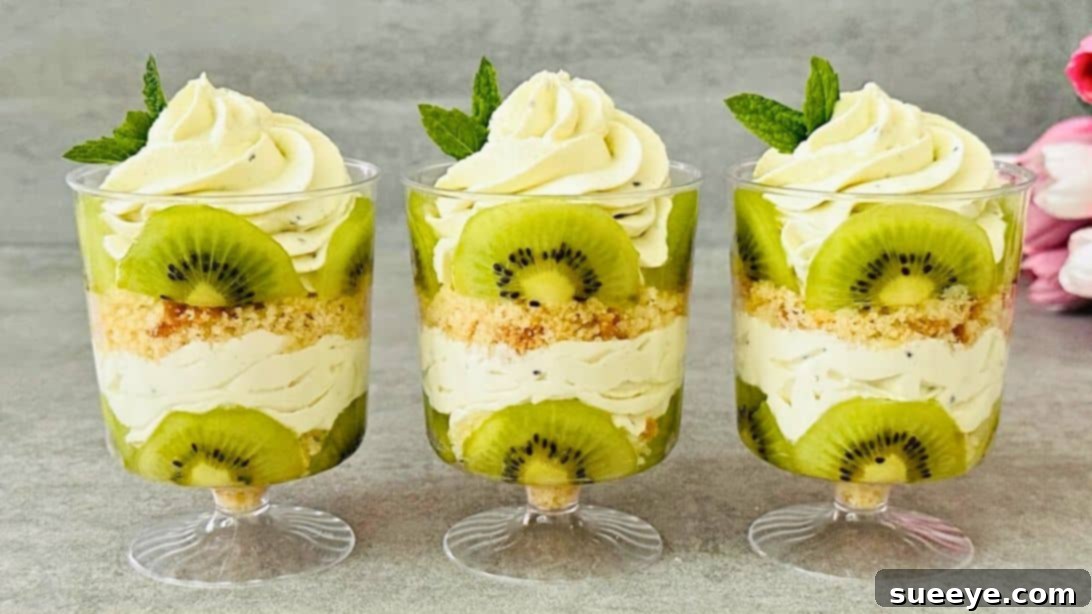
Embark on a culinary journey to create an exceptionally refreshing and visually appealing dessert that will captivate your taste buds: Kiwi Dessert Cups. Bursting with the vibrant, sweet, and tangy flavor of fresh kiwis, this delightful treat perfectly balances the fruit’s unique zest with the rich, smooth texture of cream cheese and whipping cream. Each spoonful is a harmonious blend of creamy indulgence and fruity freshness, making it an ideal dessert for any occasion, from casual gatherings to elegant celebrations. This no-bake recipe is not only incredibly delicious but also remarkably simple to prepare, ensuring a delightful experience for both the seasoned chef and the enthusiastic beginner. Prepare to impress your family and friends with this heavenly creation, inspired by the wonderful culinary insights from Easy & Yummy.
Why You’ll Adore Our Refreshing Kiwi Dessert Cups
There are countless reasons why these kiwi dessert cups are destined to become a staple in your dessert repertoire. Firstly, their exquisite flavor profile, a masterful combination of sweet and tart, offers a refreshing escape, particularly on warmer days. Beyond taste, the ease of preparation is a significant draw. As a no-bake dessert, it frees you from the oven, making it perfect for last-minute entertaining or when you simply crave a quick, satisfying treat without the fuss. The vibrant green hue of the kiwi, layered with creamy white, creates an undeniably attractive presentation that is sure to draw compliments. Moreover, this recipe is highly customizable, allowing you to adapt it to your preferences or dietary needs. It’s a versatile dessert that promises both delightful flavor and effortless execution, ensuring every bite is a moment of pure bliss.
The Marvelous World of Kiwi Fruit
Before diving into the recipe, let’s appreciate the star ingredient: the kiwi fruit. Originally known as the Chinese gooseberry, this fuzzy, oval-shaped fruit was rebranded as “kiwi” in the 1950s, named after New Zealand’s national bird. Its bright green flesh, speckled with tiny black edible seeds, is as beautiful as it is delicious. Kiwis are celebrated for their unique sweet-tart flavor, often described as a blend of strawberries, bananas, and pineapples, with a distinct refreshing zing. They are incredibly versatile, used in everything from salads and smoothies to desserts and savory dishes. Beyond their delightful taste, kiwis are a powerhouse of nutrition, making them an excellent choice for a healthy and enjoyable treat.
Nourish Your Body: The Health Benefits of Kiwi
Beyond its captivating taste, the kiwi fruit offers a wealth of health benefits that make these dessert cups even more appealing. Kiwis are an excellent source of Vitamin C, surpassing oranges in their concentration, which is vital for boosting the immune system and promoting healthy skin. They are also rich in Vitamin K, essential for blood clotting, and Vitamin E, an important antioxidant. Furthermore, kiwis provide dietary fiber, aiding in digestion and promoting gut health, and contain unique enzymes like actinidin, which can help break down proteins. Their antioxidant properties help combat free radicals, contributing to overall cellular health. Incorporating kiwi into your diet through delicious desserts like these cups is a fantastic way to enjoy its flavors while reaping its numerous nutritional advantages.
Essential Ingredients for Your Heavenly Kiwi Dessert Cups
Crafting these delectable dessert cups requires a few simple yet essential ingredients, each playing a crucial role in achieving the perfect balance of flavor and texture. High-quality ingredients are key to elevating your dessert from good to absolutely unforgettable. Here’s a detailed look at what you’ll need:
- 4 to 5 Ripe Kiwis (Peeled): The star of our show! Choose kiwis that are firm but yield slightly to gentle pressure, indicating ripeness. Their vibrant green flesh and distinct sweet-tart flavor are non-negotiable for this recipe. We’ll be using them for both the refreshing puree and decorative slices.
- 1 Tablespoon of Granulated Sugar (for kiwi puree): This small amount of sugar helps to enhance the natural sweetness of the kiwi puree and balances its tartness, creating a more rounded flavor profile.
- 2.65 oz (approx. 75g) of Vanilla Cake or Muffins: This forms the delightful crumbly base and middle layers of our dessert cups. Vanilla cake or muffins provide a soft, absorbent texture and a complementary sweet flavor. You can use store-bought or homemade.
- 1/2 cup (approx. 115g) of Full-Fat Cream Cheese, softened: The foundation of our creamy layer. Ensure your cream cheese is at room temperature for easy whisking and a smooth, lump-free consistency. It contributes a rich, tangy, and stable base to the dessert.
- 2 Tablespoons of Granulated Sugar (for cream cheese mixture): This sweetens the cream cheese layer, balancing its natural tanginess and complementing the sweetness of the kiwi. Adjust to your personal taste.
- 1/2 teaspoon of Vanilla Extract: A classic flavor enhancer that adds warmth and depth to the creamy layer, harmonizing beautifully with both the cream cheese and the kiwi. Use pure vanilla extract for the best flavor.
- 1/2 cup (approx. 120ml) of Cold Heavy Whipping Cream (35% fat or higher): This is crucial for creating a light, airy, and luscious texture in the creamy layer. Ensure it’s very cold to achieve stiff peaks efficiently.
- Fresh Mint Leaves for Garnish (Optional but Recommended): A sprig of fresh mint not only adds a beautiful pop of color but also imparts a subtle, refreshing aroma and flavor that perfectly complements the kiwi.
Step-by-Step Instructions: Crafting Your Heavenly Kiwi Dessert Cups
Follow these detailed steps carefully to create stunning and delicious kiwi dessert cups that are sure to impress. Precision and patience are your best tools for a perfect outcome.
Step 1: Prepare the Kiwi Slices and Cubes for Purity and Presentation
Begin by taking two of your peeled kiwis. Carefully slice each of these kiwis in half lengthwise, then proceed to cut each half into delicate, thin semicircular slices. The thinness of these slices is key for both aesthetic appeal and ease of layering within the dessert cups. From these prepared slices, select about nine of the most visually perfect pieces and set them aside on a clean plate. These will be reserved for decorating the sides of your dessert glasses, creating that beautiful, inviting visual effect. Transfer the remaining thin kiwi slices to a separate plate. Now, take the rest of your peeled kiwis (typically 2-3 kiwis, depending on size) and cut them into small, uniform cubes. Place these kiwi cubes into a medium-sized bowl. This precise preparation ensures you have both the decorative elements and the base for your flavorful puree ready for the next steps.
Step 2: Create the Smooth and Flavorful Kiwi Puree
With the cubed kiwis now in a bowl, it’s time to transform them into a luscious puree. Using an immersion blender or a standard blender, process the kiwi cubes until they are completely smooth and free of any large chunks. A fine, velvety texture is what we’re aiming for. Once pureed, transfer this vibrant kiwi mixture into a small saucepan. Add the designated 1 tablespoon of granulated sugar to the saucepan and stir thoroughly until the sugar is fully dissolved and well incorporated into the kiwi puree. Place the saucepan over medium-low heat and bring the mixture to a gentle simmer. Allow it to simmer for approximately 5 minutes, stirring occasionally to prevent sticking and ensure even cooking. This brief cooking process intensifies the kiwi flavor and helps to slightly thicken the puree. After 5 minutes, remove the saucepan from the heat and allow the kiwi puree to cool down completely to room temperature. It’s crucial that the puree is cold before mixing it with the whipped cream in a later step to prevent the cream from deflating.
Step 3: Prepare the Vanilla Cake or Muffin Crumbs
Next, prepare the delightful crumbly layers for your dessert cups. Take your vanilla cake or muffins and, using your fingers or a fork, gently tear them into small, breadcrumb-like pieces. The goal is to achieve a fine, consistent crumb texture that will easily absorb the moisture from the creamy layers and provide a pleasant textural contrast. Place these prepared crumbs into a clean bowl and set it aside. If you prefer a more uniform crumb, you can briefly pulse the cake or muffins in a food processor, being careful not to over-process them into a paste. This step is quick but essential for building the foundational layers of your dessert.
Step 4: Craft the Velvety Cream Cheese and Whipping Cream Mixture
In a separate, generously sized mixing bowl, combine the softened cream cheese, the 2 tablespoons of granulated sugar, and the 1/2 teaspoon of vanilla extract. Using an electric mixer on medium speed, or a whisk and plenty of arm power, whisk these ingredients together until the mixture is perfectly smooth and completely free of any lumps. The cream cheese should be light and fluffy at this stage. Once smooth, add the very cold heavy whipping cream directly into the same bowl. Increase the mixer speed to high and continue whisking until stiff peaks form. This means that when you lift the beaters, the cream should hold its shape firmly without collapsing. Be careful not to over-whisk, as it can turn into butter. This rich, airy cream mixture will form the luxurious backbone of your dessert.
Step 5: Gently Fold the Puree and Prepare for Piping
Now, it’s time to bring the vibrant kiwi puree and the delicate cream mixture together. Ensure your cooked kiwi puree from Step 2 has cooled down completely to room temperature or even slightly chilled. Gently add the cooled kiwi puree to the bowl containing the stiff-peaked whipping cream and cream cheese mixture. Using a spatula, carefully fold the kiwi puree into the cream mixture. The key here is to use a gentle, upward motion to combine the ingredients without deflating the air you’ve whipped into the cream. You want a beautifully swirled or lightly combined mixture, depending on your desired visual effect, that maintains its light and airy texture. Once combined, carefully transfer this delightful kiwi cream mixture into a piping bag. If you don’t have a piping bag, a large resealable plastic bag with one corner snipped off will work just as well.
Step 6: Assemble and Chill Your Exquisite Kiwi Dessert Cups
This is where your dessert cups come to life! Arrange your prepared kiwi slices (both the decorative ones and the remaining thin ones), the vanilla cake crumbs, and your chosen serving glasses on a clean workspace. Pick up one glass and carefully stick some of the reserved thin kiwi slices onto the inner sides of the glass. Gently press them against the glass to ensure they adhere, creating an attractive visual border. Next, add a generous layer of the prepared vanilla cake crumbs at the bottom of the glass, pressing them down lightly to form a compact base. Now, using your piping bag, pipe a luscious layer of the kiwi cream mixture over the crumbs. Repeat these layers: add more kiwi slices (if desired), another layer of cake crumbs, and then another layer of kiwi cream, until your glass is nearly full, leaving a little space at the top. For a final flourish, artfully arrange a few more fresh kiwi slices or a sprig of fresh mint leaves on top for garnish. Once all your cups are assembled, place them in the refrigerator to chill for at least 1 hour. This chilling time is crucial as it allows the flavors to meld beautifully and the dessert to set firmly, resulting in a perfectly refreshing and delightful treat. Serve chilled and enjoy the unparalleled taste!
Expert Tips for Crafting Perfect Kiwi Dessert Cups
Achieving dessert perfection is often in the details. Here are some expert tips to ensure your kiwi dessert cups turn out flawless every time:
- Choose Ripe Kiwis: The success of this dessert largely depends on the quality of your kiwis. Select kiwis that are slightly soft to the touch, similar to a ripe avocado. Overly hard kiwis will be too tart, while overly soft ones might be mushy.
- Room Temperature Cream Cheese: Ensure your cream cheese is completely softened to room temperature before mixing. This prevents lumps and ensures a smooth, creamy texture in your dessert layers.
- Cold Whipping Cream: Always use very cold heavy whipping cream. Chilling your mixing bowl and whisk attachments for 10-15 minutes beforehand can also help achieve stiff peaks more quickly and easily.
- Gentle Folding: When combining the kiwi puree with the whipped cream mixture, fold gently. This retains the air in the whipped cream, keeping your dessert light and airy. Over-mixing will result in a dense, heavy texture.
- Cool the Puree Completely: It’s crucial that the cooked kiwi puree is cooled entirely before being folded into the cream mixture. Warm puree will melt the whipped cream, causing it to deflate.
- Chill Time is Key: Don’t rush the chilling process. A minimum of 1 hour (preferably longer, up to 2-3 hours) allows the dessert to set properly, the flavors to meld, and the cake crumbs to soften slightly from the cream, creating a delightful texture.
- Presentation Matters: Take your time with layering. Alternating the vibrant kiwi cream with the golden cake crumbs creates an attractive visual appeal. Don’t forget the decorative kiwi slices on the glass sides and a fresh mint garnish!
- Adjust Sweetness: Taste the kiwi puree and the cream cheese mixture before assembly. Depending on the sweetness of your kiwis and your personal preference, you might want to slightly adjust the amount of sugar.
Creative Variations & Customizations for Your Kiwi Dessert Cups
While the classic kiwi dessert cup recipe is undeniably delicious, don’t hesitate to get creative and personalize your treats. Here are some ideas to inspire your culinary imagination:
- Add Other Fruits: Layer with thinly sliced strawberries, raspberries, or blueberries for an extra burst of color and flavor. Mango or pineapple could also complement the kiwi beautifully.
- Different Cake Bases: Instead of vanilla cake, try chocolate cake crumbs for a chocolate-kiwi fusion, or lemon cake for an even zestier profile. Graham cracker crumbs or crushed digestive biscuits can also be used for a cheesecake-like crust.
- Nutty Crunch: Incorporate a layer of finely chopped nuts like pistachios or almonds for added texture and a subtle nutty flavor.
- Spiced Cream: Add a pinch of cinnamon or cardamom to the cream cheese mixture for a warm, exotic twist.
- Coconut Delight: Fold a tablespoon of shredded coconut into the cake crumbs or sprinkle some on top for a tropical flair.
- A Hint of Alcohol: For adult-only versions, a small drizzle of Cointreau or a kiwi liqueur over the cake crumbs can add a sophisticated touch.
- Chocolate Drizzle: A light drizzle of melted white or dark chocolate over the top or between layers can elevate the indulgence.
Serving and Storage Suggestions
These delightful kiwi dessert cups are best served chilled, making them the perfect refreshing treat for any time of day. They are excellent for individual servings at parties, brunches, or as a sweet ending to a family meal. For an elegant touch, serve them on a small dessert plate with a delicate spoon. To ensure optimal freshness and flavor, store any leftover dessert cups in an airtight container in the refrigerator. They will remain delicious for up to 2-3 days. While the flavors may deepen, the cake crumbs might soften a bit more over time, but the overall enjoyment remains high. Freezing is generally not recommended for this type of dessert as the texture of the cream and kiwis can change significantly upon thawing.
Frequently Asked Questions About Kiwi Dessert Cups
Q: Can I use frozen kiwi for this recipe?
A: While fresh kiwi is highly recommended for its vibrant flavor and texture, you can use frozen kiwi for the puree. Thaw it completely and drain any excess liquid before blending. However, avoid using frozen kiwi for decorative slices, as it will become mushy upon thawing.
Q: Can I make this dessert vegan?
A: Yes, with a few substitutions! Use a plant-based vanilla cake or muffin, vegan cream cheese, and a plant-based whipping cream (like coconut cream, chilled well) to create a delicious vegan version of these dessert cups. Ensure all ingredients are dairy-free.
Q: How far in advance can I prepare these dessert cups?
A: You can prepare these kiwi dessert cups up to 1 day in advance. As they sit, the flavors meld and the cake crumbs soften slightly, often enhancing the overall taste and texture. Just make sure to keep them refrigerated in an airtight container.
Q: What if my whipping cream doesn’t form stiff peaks?
A: This often happens if the cream isn’t cold enough or if there’s any fat or grease on your mixing bowl or whisk. Ensure your cream is very cold, and your equipment is impeccably clean and chilled if possible. If it’s still not working, try adding a small amount of powdered sugar or a stabilizer.
Q: Can I use different types of cake or cookies for the crumb layer?
A: Absolutely! Feel free to experiment with different cake flavors (lemon, almond, even chocolate) or use crushed cookies like vanilla wafers, graham crackers, or shortbread biscuits. Each choice will impart a unique flavor profile to your dessert cups.
Conclusion: Your Journey to Refreshing Bliss
You now hold the secret to creating truly unforgettable Kiwi Dessert Cups. This recipe offers a delightful combination of zesty, sweet kiwi and rich, velvety cream, all layered with soft cake crumbs, culminating in a dessert that is both visually stunning and incredibly satisfying. Perfect for any occasion or simply as a refreshing treat for yourself, these no-bake cups are a testament to how simple ingredients can yield extraordinary results. We hope you enjoyed this detailed guide and feel confident in bringing these wonderful flavors to your kitchen. So go ahead, gather your ingredients, follow these steps, and prepare to indulge in the refreshing bliss of homemade kiwi dessert cups. Happy baking (or rather, no-baking)!