
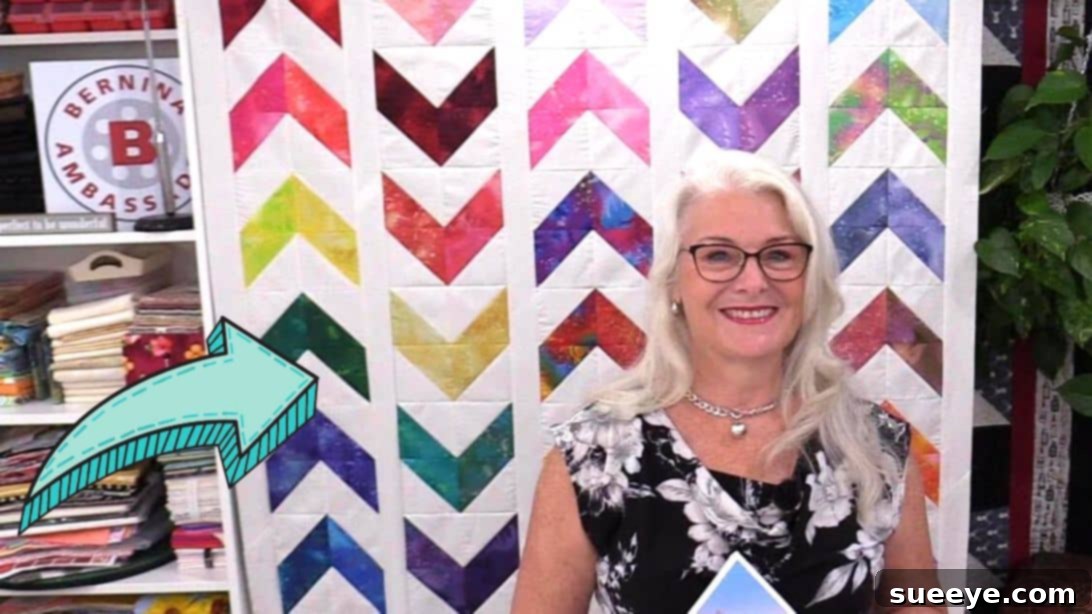
Embark on a delightful quilting journey with the “Always Chasing Rainbows” quilt, a vibrant and engaging project that’s perfect for quilters of all skill levels, especially beginners. This enchanting design captures the playful essence of a rainbow, bringing a burst of color and joy to any space. Inspired by the clear and concise tutorial from SewVeryEasy, this pattern is not only fun to sew but also remarkably straightforward, making it an ideal first large-scale quilting endeavor. Its dynamic colors and arrow-like blocks evoke a sense of movement and cheer, reminiscent of classic arcade games or a magical journey through a colorful landscape. Get ready to create a stunning piece of textile art that will brighten your home or make a cherished gift.
Create Your Own Radiant “Always Chasing Rainbows” Quilt
Quilting is an art form that blends creativity, precision, and a love for textiles. The “Always Chasing Rainbows” quilt embodies all these elements in a design that is both visually captivating and surprisingly simple to construct. Whether you’re a seasoned quilter looking for a quick and satisfying project or a newcomer eager to learn the ropes, this tutorial will guide you through each step of creating a beautiful rainbow-themed quilt. We’ll delve into the joy of selecting fabrics, the satisfaction of piecing blocks, and the pride of completing a handmade masterpiece.
Why This Quilt Is Perfect for You
- Beginner-Friendly: The design relies on simple half-square triangle (HST) units, which are fundamental in quilting and easy to master.
- Vibrant and Playful: The rainbow color scheme is inherently cheerful and allows for endless creative expression.
- Teaches Core Skills: You’ll gain valuable experience in accurate cutting, precise piecing, and consistent seam allowances.
- Relatively Quick to Assemble: Once your squares are cut, the construction process is methodical and moves along quickly.
- Customizable: Easily adjust the size or experiment with different color arrangements to make it uniquely yours.
Essential Materials for Your Rainbow Quilt
Before you begin, gathering all your materials is crucial for a smooth and enjoyable quilting process. High-quality cotton fabrics are recommended for their ease of sewing, durability, and ability to hold their shape well after washing. Consider pre-washing your fabrics to prevent shrinkage and color bleeding, especially with vibrant hues. Remember, precise cutting is the foundation of a beautiful quilt, so invest in good tools if you haven’t already.
- Colored Fabric Squares: 80 pieces of 5″ x 5″ squares. Choose a delightful array of colors to create your rainbow spectrum. Think reds, oranges, yellows, greens, blues, indigos, and violets, or any combination that sparks joy. These will form the colorful “arrows” of your quilt.
- Background Fabric Squares: 80 pieces of 5″ x 5″ white squares. These squares provide the crisp contrast that makes your rainbow colors pop and define the arrow shapes. Ensure your white fabric is of good quality and has a similar weight to your colored fabrics.
- White Backing Fabric: A sufficient amount for the entire back of your quilt. The exact yardage will depend on the final size of your quilt, but typically you’ll need around 3-4 yards for a throw-sized quilt. This should be a coordinating or neutral color to complement the front.
- Sashing and Border Fabric: Additional fabric for 2 1/2″ strips (for sashing between columns and borders). You’ll need enough to create long strips. Consider using the same white background fabric or a complementary solid to tie the design together. (The original mentioned 2 1/2″ squares, which will be used for cornerstones in the border, and 2 1/2″ strips for sashing and main border elements).
- Quilt Batting: An essential layer between the top and backing for warmth and texture. Choose a batting type (cotton, polyester, blend) that suits your preferences.
- Coordinating Thread: High-quality polyester or cotton thread that blends well with your fabrics, typically a neutral like white or light gray.
- Basic Quilting Supplies:
- Sewing machine with a 1/4″ presser foot.
- Rotary cutter, self-healing mat, and quilting ruler (for precise cutting).
- Fabric scissors.
- Pins or fabric clips.
- Iron and ironing board.
- Fabric marker or pencil (for drawing lines).
- Design board (highly recommended for laying out blocks).
Step-by-Step Quilting Guide: Instructions
This section will walk you through the creation of your “Always Chasing Rainbows” quilt, from piecing individual blocks to assembling the full quilt top. Precision is key in quilting, so take your time with each step, especially when cutting and pressing.
Step 1: Prepare Your Half-Square Triangle Units
The core of this design lies in half-square triangle (HST) units. For each arrow block you plan to create, you will need one white background square and one colored square. It’s helpful to organize your squares by color first. Match each colored square with a white background square, pairing them up. Use fabric clips or pins to keep these pairs together, ensuring you don’t mix them up. This method allows for efficient chain piecing later on.
Step 2: Plan Your Quilt Layout
Before you start sewing, it’s beneficial to visualize your design. Lay out your paired squares on a design board or a large flat surface. The suggested layout for this beautiful rainbow quilt is 5 columns with 7 rows. Arrange your colors in a rainbow sequence (e.g., red, orange, yellow, green, blue, indigo, violet) across the rows or down the columns. This step allows you to play with color placement and ensure a harmonious flow before committing to stitches.
Step 3: Constructing the Half-Square Triangles
Take one of your paired sets (one white and one colored square). On the wrong side of the white square, draw a diagonal line from one corner to the opposite corner. This line will serve as your cutting guide. Place the white square precisely on top of the colored square, right sides together. Pin them securely to prevent shifting. Using your sewing machine, sew a scant quarter-inch seam on both sides of the drawn diagonal line. A scant quarter-inch is slightly less than a true quarter-inch, which accounts for the fabric lost in the seam allowance and helps your finished blocks measure accurately.
Step 4: Cutting and Pressing for Arrow Direction
After sewing, carefully cut each unit directly on the diagonal line you drew. This will yield two half-square triangle (HST) blocks from each original pair. Open each unit and press the seams. For this quilt, it’s crucial to press the seams in opposite directions for neighboring units. For example, if one seam is pressed towards the colored fabric, the adjacent one should be pressed towards the white fabric. This technique, known as “nesting seams,” helps reduce bulk when joining blocks and makes matching points much easier. Now, you need to decide which direction your “arrows” will point. When you lay out two HSTs, you can orient them to create an arrow pointing up or down. For an “up” arrow, the white triangles will appear at the top, flanking the colored point. For a “down” arrow, the white triangles will be at the bottom. Using sticky notes or a diagram can help you keep track of your desired arrow directions for each row or column.
Step 5: Trim for Accuracy and Assemble Blocks
Once all your HSTs are pressed, trim them to a consistent size. For 5″ initial squares, your finished HSTs will likely be trimmed to 4 1/2″ square (unsewn) after sewing the 1/4″ seams and cutting. Using a quilting ruler with a 45-degree line makes this process accurate. Align the diagonal seam of your HST with the 45-degree line on your ruler to ensure a perfect square. After trimming, you will begin assembling your arrow blocks. Sew two HSTs together to form one arrow unit. Ensure you align the raw edges precisely and maintain a consistent quarter-inch seam allowance. When joining these units, press the seam open or to one side, alternating directions if you’re joining multiple units in a row to allow for nesting.
Step 6: Assemble Quilt Rows with Alternating Arrows
This step brings the dynamic element to your quilt. For the first row of your quilt, arrange all the arrow blocks so they are pointing upwards. For the second row, flip the blocks so that all the arrows are pointing downwards. Continue alternating the direction of the arrows (up, down, up, down…) until you have completed all your rows. This alternating pattern creates a visually striking ripple effect across the quilt. Once your rows are arranged to your satisfaction, sew the blocks together to form each individual row. Again, consistent quarter-inch seams are essential for perfectly aligning your rows later. Press the seams within each row, alternating the direction of the press for adjacent rows to facilitate nesting when joining them.
Step 7: Introduce Sashing Strips Between Columns
Sashing strips are narrow fabric strips used to separate blocks or columns, adding definition and stability to the quilt top. Cut 2 1/2 inches wide strips from your chosen sashing fabric (often the white background fabric or a coordinating solid). These strips should be long enough to span the full height of your quilt columns. Carefully place one sashing strip between each column of arrow blocks. Also, add sashing strips to the outermost sides of the quilt (the very first and last columns) to frame the design. Stitch these strips securely to the columns, ensuring a straight seam. Press your seams towards the sashing to help the colored blocks stand out.
Step 8: Construct and Attach the Quilt Borders
Borders frame your quilt and add to its finished size and aesthetic appeal. For this quilt, you will create top, bottom, and side borders. First, cut 2 1/2 inch wide strips for your side borders. These should be the length of your quilt top after the sashing strips are attached. Attach these to the left and right sides of your quilt top. Next, you’ll prepare the top and bottom borders. The original instructions suggest using 2 1/2″ squares at the ends of 2 1/2″ x 8 1/2″ strips. This implies creating cornerstones for the top/bottom borders. Cut four 2 1/2″ x 2 1/2″ squares (these are your cornerstones). Cut two long strips of your border fabric (2 1/2″ wide) that will span the length of your quilt between the side borders. Attach a 2 1/2″ square to each end of these long strips. You will make two such border units. Sew one of these finished border units to the top of your quilt and the other to the bottom. Press all border seams flat or towards the border fabric for a clean finish.
Bringing Your Quilt to Life: Quilting and Binding
Once your quilt top is complete, the next crucial steps are quilting and binding. These stages transform your pieced top into a functional, durable, and beautiful finished quilt.
Layering and Basting:
Prepare your quilt sandwich by laying out your backing fabric (wrong side up), then your batting, and finally your quilt top (right side up). Ensure all layers are smooth and free of wrinkles. Baste the layers together using safety pins, basting spray, or long hand stitches. This prevents shifting during the quilting process.
Quilting:
Choose a quilting method that appeals to you. Simple “stitch-in-the-ditch” (quilting along the seam lines) can define your blocks and is excellent for beginners. You could also opt for straight lines across the quilt, a wavy pattern, or even simple free-motion quilting if you feel adventurous. The quilting stitches secure the three layers together and add texture to the finished piece.
Binding:
The final step is to bind your quilt, creating a neat and durable edge. Cut 2 1/2 inch wide strips of fabric (often a coordinating solid or a print from your quilt). Join these strips end-to-end to create one long continuous strip. Fold this strip in half lengthwise and press. Attach the binding to the front edge of your quilt with a 1/4-inch seam, mitering the corners. Fold the binding over to the back and hand-stitch or machine-stitch it in place for a professional finish.
Pro Tips for a Perfect Quilting Experience
- Accuracy is Key: In quilting, a consistent 1/4-inch seam allowance is paramount. Use a 1/4-inch foot on your sewing machine if available, and regularly check your seam width.
- Pressing Matters: Pressing is not ironing. Gently press your seams, don’t iron back and forth, to avoid distorting your fabric. Pay attention to the pressing directions (open or to one side) to reduce bulk.
- Trim as You Go: Trimming your HSTs to a consistent size immediately after pressing will save you headaches later when assembling rows and columns.
- Stay Organized: Keep your fabric pieces and assembled blocks organized. A design wall or a clear labeling system can prevent errors.
- Take Breaks: Quilting can be meticulous. If you feel frustrated, step away and come back with fresh eyes. Enjoy the process!
- Watch Tutorials: The SewVeryEasy video is an invaluable resource for visual learners. Don’t hesitate to watch it multiple times.
Variations to Personalize Your Rainbow Quilt
While the “Always Chasing Rainbows” quilt is stunning as described, don’t hesitate to infuse your own creativity into the design:
- Color Palette Exploration: Instead of a traditional rainbow, consider an ombré effect with varying shades of one color, a monochromatic scheme, or a selection of pastels.
- Size Adjustments: To make a larger or smaller quilt, simply adjust the number of columns and rows. You can also start with larger or smaller initial squares (e.g., 6″ or 4″ squares) to change the size of your HSTs and, consequently, your overall quilt.
- Alternate Layouts: Once you understand the basic block, experiment with how the arrow blocks are arranged. Perhaps all arrows point in the same direction, or you create a pinwheel effect.
- Add Decorative Quilting: For experienced quilters, consider adding intricate free-motion quilting designs within the white spaces or colored blocks for added texture and visual interest.
Conclusion: Embrace the Joy of Your Handmade Rainbow Quilt
Creating your “Always Chasing Rainbows” quilt is more than just a sewing project; it’s an enjoyable journey that culminates in a beautiful, tangible representation of your efforts. From the careful selection of vibrant fabrics to the precise piecing of each half-square triangle, every step contributes to the final masterpiece. This quilt, with its cheerful colors and dynamic design, is sure to bring warmth and a smile to anyone who sees or uses it. It’s a testament to the fact that even beginner-friendly patterns can yield truly spectacular results. So, gather your materials, fire up your sewing machine, and prepare to chase those rainbows, one stitch at a time. The satisfaction of cuddling under your own handmade quilt is truly unmatched!