
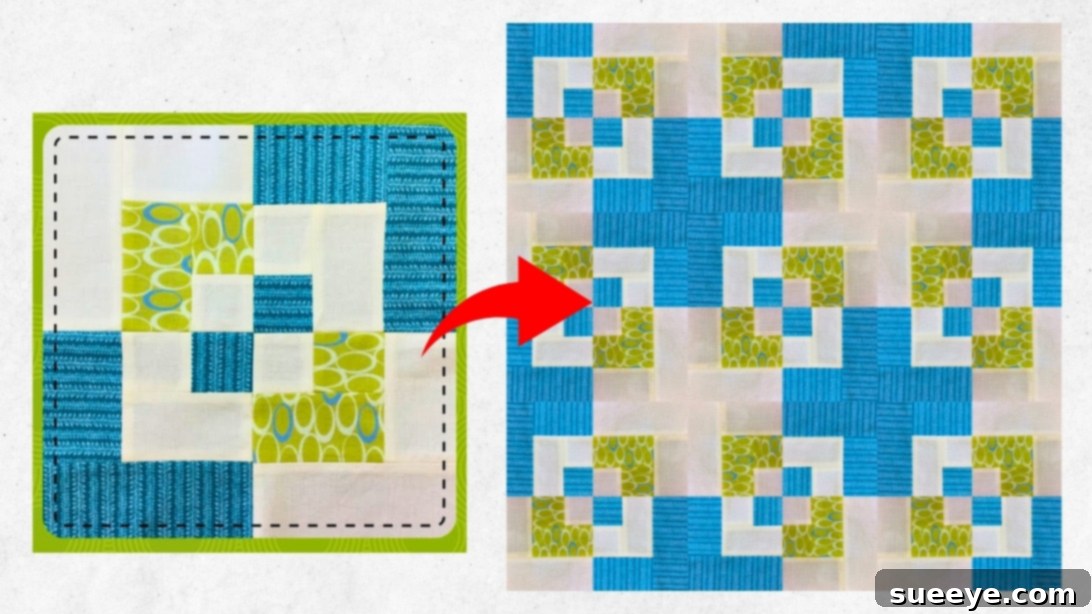
Embarking on your quilting journey can be incredibly rewarding, and discovering patterns that are both simple to master and visually captivating is key to building confidence. Among the myriad of quilt block designs, the Bento Box quilt block stands out as an absolute gem for beginners. Its straightforward construction belies a sophisticated, dynamic appearance, making it a favorite for many quilters. I distinctly remember this particular pattern, introduced by the talented Teresa DownUnder, being one of the first I tackled when I was just starting out. Its charm lies in its simplicity and the playful, almost optical illusion it creates when multiple blocks are joined. If you’re new to quilting or looking for a quick and satisfying project, this Bento Box block is an ideal choice. We’ll guide you through each step to create two distinct blocks that, when combined, form a truly unique design. Read on for detailed instructions, or watch the video for a visual walkthrough.
Essential Materials for Your Bento Box Quilt Block Project
Before diving into the cutting and sewing, gathering all your materials is crucial for a smooth quilting experience. For this tutorial, we’ll focus on creating two complementary Bento Box quilt blocks. These blocks use the same dimensions but will feature an alternating color placement to create visual interest. For clarity, we’ll refer to your primary fabric as “Fabric A” (e.g., blue) and your contrasting fabric as “Fabric B” (e.g., white). Ensure your fabrics are pre-washed, ironed, and free of any wrinkles to guarantee accurate cuts and a professional finish.
For Block One (Fabric A as center, Fabric B as primary frames):
- 1 square of Fabric A, measuring 4″ x 4″
- 2 strips of Fabric B, each measuring 4″ x 2 1/4″
- 2 strips of Fabric B, each measuring 7 1/2″ x 2 1/4″
- 2 strips of Fabric A, each measuring 7 1/2″ x 2 1/4″
- 2 strips of Fabric A, each measuring 11″ x 2 1/4″
For Block Two (Fabric B as center, Fabric A as primary frames):
To create the alternating effect, Block Two will largely reverse the fabric placement from Block One while using the identical strip dimensions. This subtle change is what gives the final assembled quilt block its dynamic, interwoven look.
- 1 square of Fabric B, measuring 4″ x 4″
- 2 strips of Fabric A, each measuring 4″ x 2 1/4″
- 2 strips of Fabric A, each measuring 7 1/2″ x 2 1/4″
- 2 strips of Fabric B, each measuring 7 1/2″ x 2 1/4″
- 2 strips of Fabric B, each measuring 11″ x 2 1/4″
Additional Essential Tools:
- Sewing machine with a 1/4-inch presser foot (highly recommended for accurate seams)
- Rotary cutter and cutting mat
- Quilting ruler (at least 12-inch or longer is ideal)
- Iron and ironing board
- Fabric scissors
- Matching thread
- Pins or fabric clips
Step-by-Step Guide to Creating Your Bento Box Quilt Block
Accuracy is paramount in quilting, especially for patterns that rely on precise alignment like the Bento Box. A consistent 1/4-inch seam allowance throughout your project will ensure your blocks come together perfectly. Take your time with each cut and seam, and remember to press your seams at each stage for flat, crisp blocks.
Step 1: Constructing the First Frame of Block One
Begin by taking the 4″ square of Fabric A, which will form the center of your first Bento Box block. Position one of the 4″ x 2 1/4″ Fabric B strips along the top edge of the square, right sides together. Pin in place. Then, take the second 4″ x 2 1/4″ Fabric B strip and place it along the bottom edge of the Fabric A square, also right sides together and pinned securely. Sew both strips to the center square using a precise 1/4-inch seam allowance. Once sewn, carefully press these seam allowances open with your iron. Pressing open helps reduce bulk, creating a flatter block, and aids in accurate alignment later on. This step creates the initial framed look of your center square.
Step 2: Adding the Second Frame to Block One
With the first frame attached, rotate your block 90 degrees. This rotation is crucial for building the subsequent frames correctly. Now, take the two 7 1/2″ x 2 1/4″ Fabric B strips. Attach one strip to the top edge of your current block (which now consists of the central square with two Fabric B strips sewn to its sides), right sides together. Attach the second 7 1/2″ x 2 1/4″ Fabric B strip to the bottom edge. Sew both of these strips with a 1/4-inch seam allowance. Again, after sewing, press your seams open. You’ll now have a larger framed square, with your central Fabric A square surrounded by a complete Fabric B frame.
Step 3: Integrating the First Fabric A Frame for Block One
For the next layer, we’ll introduce Fabric A strips to begin creating the alternating color effect. Rotate your block 90 degrees once more. Take the two pieces of 7 1/2″ x 2 1/4″ Fabric A strips. Align one strip along the top edge of your framed block, right sides together, and the second strip along the bottom edge, right sides together. Sew both of these Fabric A strips onto your block using that consistent 1/4-inch seam allowance. Upon completion of this step, press your seams flat. You’ll notice the block growing larger, with distinct color bands emerging.
Step 4: Completing the Outer Frame of Block One
You’re almost done with Block One! Rotate the block for the final framing step. Now, take the two largest Fabric A strips, measuring 11″ x 2 1/4″. Carefully align one strip along the top edge of your block and the other along the bottom edge, ensuring right sides are together and they are pinned securely. Sew these final two strips onto the block using your 1/4-inch seam allowance. Once sewn, press these seams flat and open. Congratulations! You have successfully completed Block One of your Bento Box design. It should now be a square block with concentric frames of alternating colors.
Step 5: Crafting Block Two with Alternating Fabrics
Now, it’s time to create Block Two, which will mirror Block One in construction but with reversed fabric placement. Refer to the material list for Block Two, where Fabric B forms the center square and Fabric A and B strips are arranged to create the contrasting frame effect. Repeat Steps 1 through 4 precisely, but pay close attention to which fabric (Fabric A or Fabric B) you are using for each strip. This intentional reversal is what gives the Bento Box design its signature interwoven look when the blocks are eventually cut and reassembled. This step is crucial for achieving the final dynamic pattern, so double-check your fabric choices at each stage.
Step 6: Preparing Blocks for Reassembly – The Crucial Cuts
With both Block One and Block Two completed, it’s time for the transformative step that creates the true Bento Box effect. Carefully mark the midpoint on each side of both finished blocks. For example, if your finished block measures 12 inches square, the midpoint would be at 6 inches on all four sides. Using a long quilting ruler and a sharp rotary cutter, cut each block in half, first in one direction (e.g., horizontally from midpoint to midpoint), and then in the perpendicular direction (vertically from midpoint to midpoint). This will yield four smaller, equal-sized square quadrants from each larger block, for a total of eight quadrants. Ensure your cuts are precise, as accuracy here directly impacts the final appearance of your reassembled blocks.
Step 7: Reassembling and Finishing Your Bento Box Quilt Blocks
Now for the exciting part! You have eight quadrants – four from Block One and four from Block Two. To create two new Bento Box blocks, you will “swap” pieces. Take two pieces from two opposite corners of Block One (e.g., top-left and bottom-right) and swap them with the corresponding corner pieces from Block Two. Arrange these swapped pieces to form two new, visually engaging Bento Box blocks. Lay out your four pieces for each new block on your design wall or table. Once satisfied with the arrangement, sew the pieces together in rows first. For instance, sew the top-left quadrant to the top-right quadrant, and the bottom-left to the bottom-right. Press these row seams open or to one side. Then, sew the top row to the bottom row, carefully aligning your seams for a perfect match. Press the final seam flat. This creates two beautifully intricate Bento Box quilt blocks ready for your next project.
Tips for Beginner Quilters and Mastering Your Bento Box Block
Mastering any new craft takes practice, and quilting is no exception. Here are a few invaluable tips to ensure your Bento Box quilt block project is a resounding success, especially if you’re a beginner:
- Accurate Cutting is Key: Invest in a good quality rotary cutter, mat, and ruler. Take your time to measure twice and cut once. Even a slight inaccuracy in cutting can lead to points not matching and wavy seams in your finished block.
- Consistent Seam Allowance: The 1/4-inch seam allowance is the standard in quilting. Practice sewing a perfect 1/4-inch seam on scrap fabric until it feels natural. A specialized 1/4-inch presser foot for your sewing machine can be a game-changer.
- Pressing Matters: Pressing is not ironing. When pressing, gently lift and place the iron, don’t slide it, to avoid distorting your fabric. For this pattern, pressing seams open helps to reduce bulk, but sometimes pressing to the darker fabric is also an option depending on the fabric weights. Consistent pressing after each seam is vital for flat blocks.
- Chain Piecing: To save time, especially when sewing multiple identical seams (like attaching all the first strips), try chain piecing. This involves feeding one piece after another through your machine without lifting the presser foot or cutting threads in between.
- Fabric Choice: For your first projects, choose good quality quilting cotton. It’s stable, easy to work with, and holds its shape well. Experiment with contrasting colors and prints to see how they interact and enhance the Bento Box design.
- Don’t Fear the Seam Ripper: Every quilter, no matter their experience level, uses a seam ripper. If a seam isn’t right, unpick it and re-sew. It’s better to fix it now than regret it later.
- Enjoy the Process: Quilting is a journey of creativity and patience. Don’t strive for perfection on your first attempt. Enjoy the process of learning, creating, and seeing your fabrics transform into something beautiful.
Your Journey with the Bento Box Quilt Block Continues
The Bento Box quilt block is more than just a simple pattern; it’s a foundational skill builder that introduces essential quilting techniques in a manageable way. Its versatility means that once you’ve mastered these two blocks, you can easily combine them with more of their kind to create stunning quilts of any size, from a charming baby quilt to an elaborate bedspread. Imagine using different color palettes or even incorporating fussy-cut centers to add your personal flair! The possibilities are truly endless.
We hope this detailed tutorial has empowered you to create beautiful Bento Box quilt blocks with confidence. Did you find this pattern enjoyable and easy to follow? If so, we highly recommend visiting Teresa DownUnder on Youtube. Her channel is a treasure trove of video tutorials, especially beneficial for beginner quilters looking for clear, encouraging instruction and a wealth of creative inspiration. Happy quilting, and may your sewing machine hum with joy!