
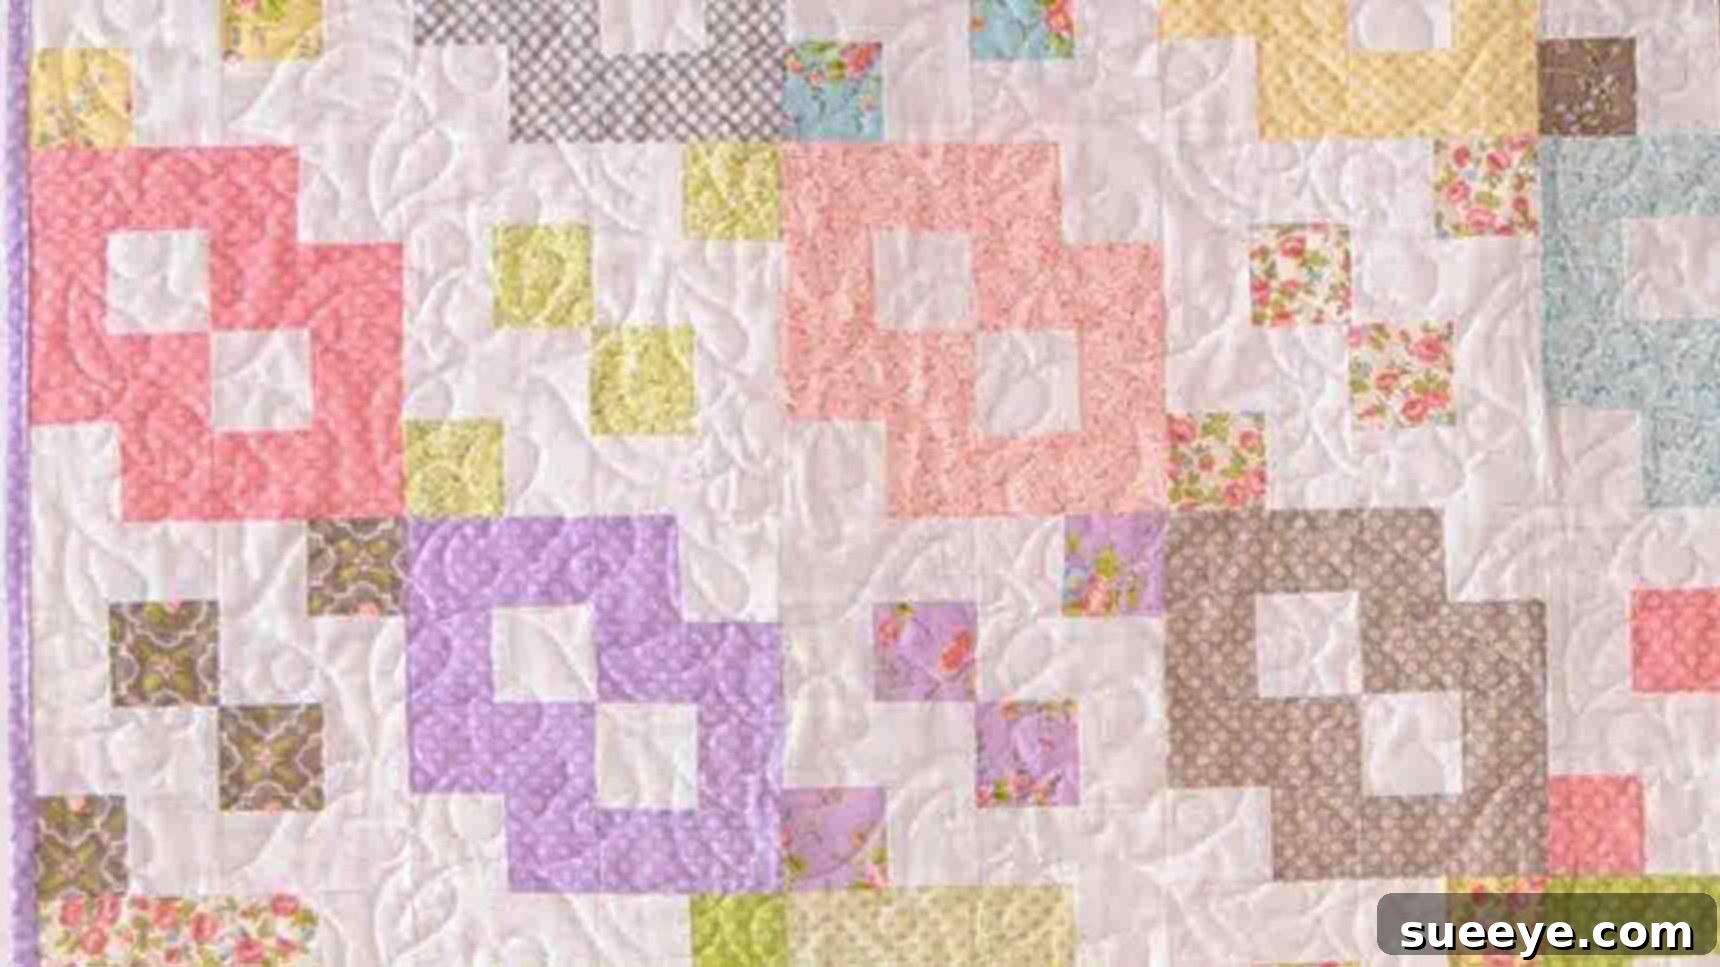
Are you searching for a quilt pattern that’s not only visually stunning but also incredibly straightforward to make? Look no further! The Layer Cake Links Quilt, a fantastic design from the experts at Fat Quarter Shop on YouTube, is the perfect project for both seasoned quilters looking for a quick sew and beginners eager to dive into the world of quilting. This delightful quilt pattern utilizes pre-cut layer cakes, simplifying the cutting process and making it remarkably beginner-friendly. Follow along with our detailed guide to learn how to create this beautiful quilt, transforming simple fabric squares into a masterpiece.
Mastering the Layer Cake Links Quilt: Your Ultimate Guide
The Layer Cake Links Quilt stands out as an ideal project for anyone new to quilting, primarily because it leverages the convenience of pre-cut fabrics known as “layer cakes.” These perfectly coordinated 10-inch squares eliminate the tedious task of cutting numerous pieces from yardage, allowing you to jump straight into the fun of piecing. With its repetitive block structure and clear instructions, you’ll gain confidence with every stitch, creating a professional-looking quilt that’s sure to impress.
Why Choose the Layer Cake Links Quilt?
Beyond its beginner-friendly nature, the Layer Cake Links Quilt offers several compelling reasons to make it your next project:
- Simplicity: The design is intuitive, focusing on basic sewing techniques that are easy to master.
- Speed: Using pre-cut fabrics significantly reduces preparation time, getting you to the sewing machine faster.
- Stunning Visuals: The alternating pattern of print and solid blocks creates a captivating “linked” design that adds depth and interest.
- Versatility: Depending on your fabric choices, this quilt can be vibrant and playful or subtle and sophisticated.
- Perfect for Gifting: A handmade quilt makes a thoughtful and cherished gift for any occasion.
Gathering Your Materials: What You’ll Need
Before you begin, ensure you have all your supplies ready. The beauty of this pattern is its minimal material requirements, making it accessible and economical. Make sure to choose high-quality fabrics that will stand the test of time.
- One Print Layer Cake: This typically contains 42 coordinating 10-inch squares. If you prefer to cut your own, you’ll need thirty-six print 10″ squares. These will form the “print” elements of your quilt blocks.
- One Solid Layer Cake: Similarly, this will provide 42 solid-colored 10-inch squares. If cutting your own, thirty-six solid 10″ squares are needed. These will create the contrasting “solid” elements.
- 5/8 Yard Binding Fabric: This fabric will be used to create the decorative and protective edge around your finished quilt.
- 3 & 3/4 Yards Backing Fabric: This forms the back of your quilt and will be layered with your quilt top and batting.
- Batting: Approximately 60″ x 75″ (or twin size) to go between the quilt top and backing (not listed in original, but essential for a quilt).
- Basic Quilting Supplies: A sewing machine, sharp rotary cutter, self-healing cutting mat, quilting ruler, fabric scissors, iron, ironing board, thread, and pins or fabric clips.
- Free Pattern: Don’t forget to grab the detailed cutting and assembly diagrams. Click here for the free Layer Cake Links Quilt pattern from Fat Quarter Shop.
Precision Cutting: The Foundation of Your Quilt
Accuracy in cutting is paramount for any quilting project, ensuring your pieces fit together perfectly. Take your time with this step, using a sharp rotary cutter and a clear quilting ruler for the best results. The pattern calls for specific cuts from your 10-inch layer cake squares. Organize your cut pieces by “Fabric A” through “Fabric F” to avoid confusion.
Cut thirty-six print 10″ squares into:
- Fabric A: 1 – 4 & 1/2″ square (36 total)
- Fabric B: 2 – 2 & 1/4″ x 8″ rectangles (72 total)
- Fabric C: 2 – 2 & 1/4″ x 4 & 1/2″ rectangles (72 total)
Cut thirty-six solid 10″ squares into:
- Fabric D: 1 – 4 & 1/2″ square (36 total)
- Fabric E: 2 – 2 & 1/4″ x 8″ rectangles (72 total)
- Fabric F: 2 – 2 & 1/4″ x 4 & 1/2″ rectangles (72 total)
Cut binding fabric into:
- Fabric G: 7 – 2 & 1/2″ Width of Fabric (WOF) strips. These strips will be joined end-to-end to create one long binding strip.
Step-by-Step Quilting Instructions
Now that your fabrics are perfectly cut, it’s time for the exciting part: piecing your quilt! Remember to use a consistent 1/4-inch seam allowance throughout your project. This is crucial for your blocks to come together accurately.
Step 1: Constructing Your Units (Print & Solid)
The first stage involves creating two distinct types of units: “print units” and “solid units.” These units are the building blocks for your larger quilt blocks.
- For the Print Unit: Take one Fabric D (a solid 4.5″ square) and sandwich it between two Fabric C pieces (print 2.25″ x 4.5″ rectangles). Ensure the raw edges align. Stitch them together using a precise 1/4″ seam allowance. Press your seams open or towards the darker fabric to reduce bulk.
- Next, add one Fabric B (print 2.25″ x 8″ rectangle) to the top edge of your assembled piece and another Fabric B to the bottom edge. Stitch with a 1/4″ seam. Press your seams. You will now have one complete “print unit.”
- For the Solid Unit: Follow the same process, but with inverse fabrics. Take one Fabric A (a print 4.5″ square) and sandwich it between two Fabric F pieces (solid 2.25″ x 4.5″ rectangles). Stitch with a 1/4″ seam and press.
- Then, add one Fabric E (solid 2.25″ x 8″ rectangle) to the top edge and another Fabric E to the bottom edge. Stitch with a 1/4″ seam and press. You will now have one complete “solid unit.”
You need to create 36 pieces of each unit type (36 print units and 36 solid units). Work systematically, perhaps chain piecing to save time and thread. Chain piecing involves feeding fabric pieces through your sewing machine one after another without lifting the presser foot or cutting the thread in between.
Step 2: Assembling Quilt Blocks
This step involves transforming your individual units into the larger “print blocks” and “solid blocks” that will form the body of your quilt.
- Prepare Your Units: Take one complete print unit and carefully cut it in half both horizontally and vertically. This will yield four smaller, identical pieces from each unit. You’ll end up with 144 pieces from your 36 print units. Repeat this process for all 36 solid units, also resulting in 144 pieces.
- Building the Print Block: Lay out four of these smaller print unit pieces to form a block. Pay close attention to the pattern; the “white square” (referring to the solid Fabric D originally in the center of your print unit) should guide your placement to create the distinctive “links” design. Once you’re satisfied with the layout, stitch these four pieces together into a 2×2 grid. Use your 1/4″ seam allowance. Again, chain piecing is highly recommended here to speed up the process. Press your seams according to the pattern’s guidance for a flat, crisp block. You will need to make 36 of these print blocks.
- Building the Solid Block: Similarly, lay out four of the smaller solid unit pieces. The key here is to observe where the “print” sections (from Fabric A, originally in the center of your solid unit) align to form the linked pattern. Stitch these four pieces together with a 1/4″ seam, chain piece, and press. You will also need to make 36 of these solid blocks.
Step 3: Bringing Your Quilt Together
With all your blocks complete, it’s time to assemble the quilt top. This stage reveals the beautiful pattern you’ve been working towards.
- Layout: Arrange your 36 print blocks and 36 solid blocks in an alternating pattern, typically in rows, to create a checkerboard effect with the linking design. The pattern will specify the exact arrangement, so refer to your free pattern for the layout.
- Joining Blocks into Rows: Stitch the blocks together in rows, again maintaining that consistent 1/4″ seam allowance. After each row is complete, press the seams. Often, quilters press seams in alternating directions for adjacent rows to allow for “nesting” when joining rows, reducing bulk and helping points match.
- Joining Rows: Once all your rows are complete, stitch them together, aligning your seams carefully. Take your time to match points for a professional finish. Press these final seams, either open or to one side, depending on your preference and what creates the flattest quilt top.
After this step, you will have a beautiful quilt top, ready for the next stages of quilting!
Essential Quilting Tools for Beginners
While the material list focuses on fabric, having the right tools makes a significant difference in your quilting journey. Here are some must-haves:
- Rotary Cutter: A sharp 45mm or 60mm rotary cutter is indispensable for quick and accurate cutting.
- Self-Healing Cutting Mat: Protects your surfaces and your rotary blade.
- Quilting Rulers: Clear acrylic rulers (especially a square one for trimming and a long one for strips) are essential for precision.
- Good Quality Thread: A strong, durable polyester or cotton thread that matches your fabric or is a neutral color.
- Fabric Scissors: Keep a pair specifically for fabric to ensure they stay sharp.
- Iron and Ironing Board: Crucial for pressing seams flat and ensuring blocks lie correctly.
- Pins or Fabric Clips: To hold fabric layers together securely before sewing.
- Seam Ripper: Mistakes happen! A good seam ripper is your best friend.
Tips for Quilting Success
To ensure your Layer Cake Links Quilt turns out beautifully, keep these tips in mind:
- Read the Pattern Thoroughly: Before making your first cut or stitch, read through the entire pattern. This helps you understand the overall process and foresee any challenges.
- Accurate Cutting: We cannot stress this enough. Measure twice, cut once. Even a tiny deviation can throw off your entire block.
- Consistent Seam Allowance: Practice stitching a perfect 1/4-inch seam. Use a seam guide or a specialized presser foot if your machine has one.
- Pressing is Key: Press your seams after every few stitches or units. Proper pressing ensures your blocks lie flat and helps points match precisely.
- Chain Piecing: Utilize this technique whenever possible. It saves time, thread, and creates a rhythmic flow to your sewing.
- Stay Organized: Label your cut pieces (Fabric A, B, C, etc.) to prevent confusion. Keep your workspace tidy.
- Don’t Rush: Quilting is a journey, not a race. Enjoy the process!
Finishing Touches: Batting, Quilting, and Binding
Once your quilt top is assembled, you’re almost there! The next steps involve making it a complete, functional quilt:
- Basting: This involves layering your quilt backing (wrong side up), batting, and quilt top (right side up), and securing them together. You can use safety pins, spray basting, or temporary adhesive.
- Quilting: This is the process of stitching through all three layers (quilt top, batting, backing) to hold them together and add texture. For a beginner, simple straight-line quilting or stitch-in-the-ditch (quilting along existing seam lines) is a great option.
- Binding: Attach your prepared Fabric G strips around the perimeter of the quilt. This finishes the raw edges, adds durability, and provides a beautiful frame for your design. There are many tutorials available for machine or hand binding techniques.
Customizing Your Layer Cake Links Quilt
While the pattern provides a fantastic foundation, don’t hesitate to personalize your quilt:
- Color Palette: Experiment with different color themes. A monochromatic scheme for a sophisticated look, or a vibrant rainbow for a playful feel.
- Fabric Textures: Combine cottons with flannels or minky for added texture and warmth on the back.
- Borders: Add a border around the central quilt design to make it larger or to frame the pattern beautifully.
- Quilting Designs: Once you’re more confident, explore free-motion quilting to add intricate patterns to your quilt surface.
Caring for Your Handmade Quilt
To ensure your beautiful Layer Cake Links Quilt lasts for generations, proper care is essential:
- Initial Wash: If your fabrics are pre-washed, a gentle wash with a color catcher is a good idea for the first wash to check for any dye bleed.
- Machine Washing: For most cotton quilts, machine wash on a delicate cycle with cold water and a mild detergent. Avoid harsh chemicals.
- Drying: Tumble dry on low heat or, ideally, air dry flat to prevent stretching and preserve the fabric.
- Storage: Store your quilt in a cool, dry place, away from direct sunlight, to prevent fading and deterioration. Fold it periodically to prevent permanent creases.
The Layer Cake Links Quilt is more than just a sewing project; it’s an opportunity to create something beautiful with your own hands, to learn new skills, and to join a vibrant community of quilters. With its clever use of pre-cut fabrics and clear, step-by-step instructions, this pattern is truly perfect for beginners, offering a rewarding experience from start to finish. So gather your layer cakes, fire up your sewing machine, and embark on your quilting adventure today. You’ll be amazed at what you can create!