
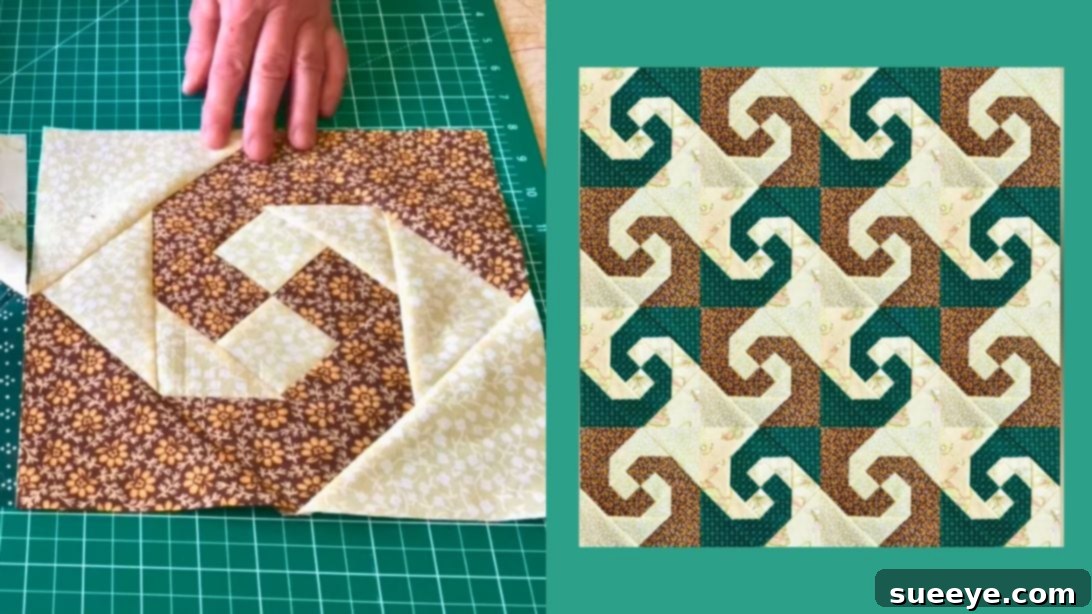
Master the Easy Snail Trail Patchwork Quilt Block: A Beginner-Friendly Tutorial
Embark on a captivating quilting journey with the Snail Trail Patchwork Quilt Block! While its intricate-looking design might initially appear challenging, trust us when we say it’s surprisingly simple to master, even for novice quilters. This classic block creates a mesmerizing swirling pattern, reminiscent of a snail’s path, bringing dynamic movement and visual interest to any quilt project. The beauty of the Snail Trail block lies in its repetitive nature: you’ll start with a foundational four-patch unit for the center, then systematically build outwards by adding triangles around the sides. This accessible method makes it an ideal project for those new to patchwork, helping you build confidence in your piecing skills while creating something truly stunning.
The Snail Trail quilt block is celebrated for its unique visual appeal and its straightforward construction, making it a favorite among quilters of all skill levels. Its design offers a fantastic opportunity to play with contrasting fabrics, allowing the ‘trail’ to emerge vividly. Whether you envision a full-sized quilt, a charming wall hanging, or a set of personalized placemats, understanding and creating this versatile block will open up a world of creative possibilities. In this comprehensive guide, we’ll walk you through each step of constructing your very own Snail Trail quilt block, ensuring you achieve perfect points and precise seams. We’ll cover everything from selecting your fabrics to accurate cutting, essential sewing techniques, and critical pressing methods that guarantee a professional finish. We’re drawing inspiration from the clear instructions provided by Melody of Sewing, ensuring you have all the guidance needed. So, gather your supplies, sharpen your rotary cutter, and let’s dive into the delightful world of quilting!
Essential Materials and Tools for Your Snail Trail Quilt Block
Before we begin piecing together your beautiful Snail Trail block, it’s crucial to gather all the necessary fabrics and quilting tools. For each individual Snail Trail block, you’ll need two distinct fabric types: one designated as your “background” fabric and another as your “printed” or “feature” fabric. The starker the contrast between these two, the more dramatically the beautiful swirling design will stand out. We highly recommend using good quality quilting cotton for the best results, as it’s easy to work with, presses well, and holds its shape beautifully over time, which is vital for precise patchwork.
Here are the specific fabric cuts required for one Snail Trail block. These measurements are carefully chosen to yield approximately a 9-inch finished block, though the final size can vary slightly based on the accuracy of your seam allowances and your chosen pressing methods:
- From Background Fabric (Light or Solid Color):
- One (1) rectangle measuring 2 1/4″ x 4 1/2″
- One (1) square measuring 3 1/2″ x 3 1/2″
- One (1) square measuring 4 1/4″ x 4 1/4″
- One (1) square measuring 5 1/2″ x 5 1/2″
- From Printed/Feature Fabric (Contrasting Pattern or Color):
- One (1) rectangle measuring 2 1/4″ x 4 1/2″
- One (1) square measuring 3 1/2″ x 3 1/2″
- One (1) square measuring 4 1/4″ x 4 1/4″
- One (1) square measuring 5 1/2″ x 5 1/2″
Beyond the fabric, having the right set of tools will make a significant difference in achieving accurate, professional-looking, and enjoyable quilting results. Precision in cutting and sewing is paramount for blocks like the Snail Trail. Here’s what you’ll need at your fingertips:
- Sewing Machine: Ensure it’s in good working order and consider using a quarter-inch presser foot if you have one, as it greatly aids in consistent seam allowances.
- Rotary Cutter: A sharp blade is absolutely crucial for clean, precise fabric cuts.
- Self-Healing Cutting Mat: Essential to protect your work surface and prolong the life of your rotary blade.
- Quilting Ruler: A clear acrylic ruler, at least 6″ x 12″ or larger, with highly visible markings for accurate measurements and cuts.
- Fabric Scissors or Thread Snips: Handy for quickly trimming threads and making small adjustments.
- Iron and Ironing Board/Pressing Mat: Indispensable for pressing seams flat and setting stitches, which is vital for crisp blocks.
- Pins or Fabric Clips: To securely hold fabric pieces together before sewing, preventing shifting.
- Thread: Use good quality 100% cotton thread that matches or blends well with your fabrics.
- Seam Ripper: Every quilter’s best friend! Don’t be afraid to use it for accuracy.
Step-by-Step Guide to Sewing Your Snail Trail Quilt Block
Accuracy is the cornerstone of successful quilting, particularly when constructing intricate blocks like the Snail Trail, which depend on precise piecing. Always strive for a consistent 1/4-inch seam allowance throughout this tutorial. We highly recommend testing your seam allowance on a scrap piece of fabric before you begin your actual block. Correct pressing of seams also plays a pivotal role in the final appearance and flatness of your finished block. Let’s get started on creating your stunning Snail Trail!
Step 1: Constructing the Initial Rectangle Unit
Begin by selecting your two smallest rectangular fabric pieces, each measuring 2 1/4″ x 4 1/2″. You’ll have one from your background fabric and one from your printed fabric. Place these two rectangles right sides together, ensuring all edges are perfectly aligned. This careful alignment is the first step towards a precise block. Using your sewing machine, stitch along one of the long sides with a consistent and accurate quarter-inch seam allowance. Once sewn, take your unit to the ironing board. Press the seam either open or towards the darker fabric – choose one method and maintain that consistency throughout your entire project. The objective here is to create a perfectly flat and smooth strip unit that will form part of your block’s core.
Step 2: Creating the Central Four-Patch Block
With your newly sewn rectangle unit from Step 1, it’s time to create the crucial foundation of your Snail Trail block: the four-patch. Carefully cut your strip unit in half horizontally, ensuring your cuts are straight and accurate. You should now have two identical smaller rectangle units, each comprising both background and printed fabric. Now, arrange these two units right sides together, making sure to alternate the fabric colors to create a clear checkerboard effect. For instance, if your first unit has the background fabric on top and the print on the bottom, align the second unit so the print is on top and the background on the bottom. This arrangement allows your seams to “nest” perfectly at the center intersection, which helps to align your fabrics and creates a crisp, flat junction. Pin the units together securely at the seam lines. Sew them together with your consistent quarter-inch seam allowance. Once sewn, press the seams flat. You have now successfully created a perfect four-patch block, which will serve as the very heart of your Snail Trail design.
Step 3: Adding the First Layer of Triangles
Now, let’s begin to build the “trail.” Grab your two 3 1/2″ squares – one from your background fabric and one from your printed fabric. Place one square directly on top of the other, right sides together. Using your clear quilting ruler and a sharp rotary cutter, carefully cut them diagonally from one corner to the opposite corner. Repeat this process for the second pair of squares. This efficient technique will yield four perfectly symmetrical triangles in total from your two squares. Now, take these freshly cut triangles and strategically place them onto each of the four sides of your central four-patch unit. Refer to the illustrative image above for the correct placement, paying close attention to how the fabric colors align to begin forming the distinct “snail trail” visually. You will attach one triangle to each of the four exposed sides of your four-patch. Sew these triangles onto the edges with your consistent quarter-inch seam allowance. After sewing each side, press the seams flat, typically pressing towards the newly added triangle unit to reduce bulk. Once all four triangles are securely attached, take a moment to square up your block if necessary by trimming any excess fabric to maintain straight edges and a perfectly square shape. This ensures your block remains flat and manageable.
Step 4: Expanding with the Second Layer of Triangles
It’s time to further expand your Snail Trail and watch its pattern grow! Take your two 4 1/4″ squares – one from your background fabric and one from your printed fabric. As in the previous step, place them right sides together and cut them diagonally in half from corner to corner. This will provide you with four larger triangles, ready for attachment. Just like before, carefully position these new triangles around the perimeter of your growing block. Pay meticulous attention to the arrangement to ensure the continuous flow of your “snail trail” design. The new triangles should seamlessly extend the spiral pattern, creating the next ‘turn’ of the trail. Sew these triangles onto the sides of your block, once again using a precise quarter-inch seam allowance. Once all four are sewn into place, press the seams flat. Take a moment to admire how your block is progressively taking shape and gaining its characteristic swirl. Remember to trim off any excess fabric around the edges to maintain the block’s square dimensions and keep everything tidy.
Step 5: Completing the Snail Trail and Final Squaring Up
For the final layer of your Snail Trail block, repeat the process from Step 4 using your two largest squares: the 5 1/2″ squares (one background, one printed). Place them right sides together and cut them diagonally in half to yield four even larger triangles. This is the crucial stage where the full impact of the “snail trail” really emerges and defines the block. Carefully arrange these triangles around the outside of your block, making absolutely sure that the printed fabrics (or background fabrics, depending on your desired spiral direction) connect seamlessly to continue the captivating swirling path. This precise arrangement is what defines the iconic look of the Snail Trail block and brings the entire design together. Sew each triangle in place with your consistent quarter-inch seam allowance. Once all sides are sewn, take your block to the ironing board and give it a final, thorough press to ensure all seams are crisp, flat, and well-settled.
Finally, and perhaps most importantly for the integrity of your future quilt, it’s time to square up your finished Snail Trail block. Using your rotary cutter and a reliable quilting ruler, meticulously trim any remaining excess fabric to achieve a perfect square. This step is absolutely vital for ensuring your blocks will fit together seamlessly and without distortion when you assemble them into a larger quilt top. Aim for a consistent finished size, such as 9 inches or 10 inches square, depending on your initial desired outcome. A perfectly squared block will make the next stages of your quilting project, like adding sashing or borders and assembling the quilt top, much easier and more enjoyable, resulting in a professional-looking finished product.
Beyond the Block: Your Snail Trail Quilting Adventures
Congratulations! You’ve successfully created a stunning and surprisingly easy Snail Trail Patchwork Quilt Block. This versatile design offers endless possibilities for your quilting projects, whether you’re a beginner or an experienced stitcher. The mesmerizing swirl of the Snail Trail is perfect for creating dynamic and engaging textile art. Here are a few inspiring ideas to help you envision and plan your next quilting adventure:
- Full Quilt Top: Make several Snail Trail blocks and arrange them in rows and columns. Don’t be afraid to experiment with rotating some blocks to create different secondary patterns and even more dynamic swirls across your entire quilt top. This can lead to surprisingly complex and beautiful designs.
- Table Runner or Placemats: A few blocks sewn together can create beautiful and unique home decor items that add a handmade touch to your dining area.
- Cushion Cover: One or two blocks can make a lovely decorative cushion cover, transforming a simple pillow into a focal point in any room.
- Fabric Play: Experiment with different color combinations! A monochromatic scheme can create a subtle, elegant swirl, while high-contrast colors will make the trail pop with energy. Using variegated fabrics can add depth and unique texture to your block, making each one a little different.
- Skill Building: Use this block as a foundation to practice precision piecing. The repetitive nature allows you to hone your quarter-inch seam allowance and pressing techniques, skills that are invaluable for any quilting project.
The Snail Trail block is a testament to how simple geometric shapes can combine to form complex and utterly beautiful designs. By mastering this block, you’ve added a valuable and beloved pattern to your quilting repertoire. We encourage you to continue practicing, experiment with different fabrics and layouts, and most importantly, truly enjoy every moment of the creative process. May your stitches always be straight, your seams perfectly pressed, and your quilting journey filled with joy and inspiration!