
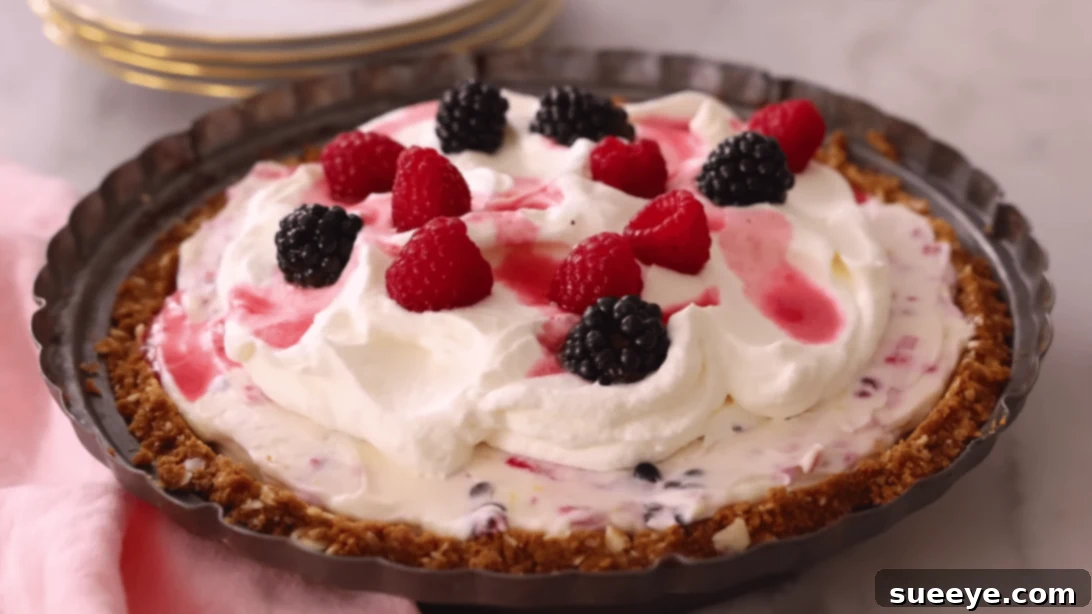
Discover the ultimate indulgence with this incredibly easy and delightful no-bake Berry Icebox Pie recipe, inspired by the renowned Preppy Kitchen on YouTube. This dessert masterpiece is designed for simplicity, making it accessible for even novice bakers, yet it delivers a sophisticated flavor that will impress everyone. Say goodbye to oven worries and complex techniques, and say hello to a creamy, fruity, and refreshingly cold treat perfect for any occasion.
What makes this Berry Icebox Pie truly special is its incredible versatility. While the recipe primarily features a vibrant mix of berries, feel free to unleash your creativity and customize it with your favorite fruits. Imagine a luscious strawberry pie, a tangy raspberry delight, or a tropical mango variation – the possibilities are endless! This adaptability ensures that every pie you make can be a unique reflection of your taste.
Beyond its simple preparation, this no-bake pie is a fantastic choice for gatherings. Whether you’re hosting a summer barbecue, a casual potluck, or just need a stunning dessert for a family dinner, this icebox pie is guaranteed to be a crowd-pleaser. Its elegant appearance and irresistible taste make it an instant hit, leaving your guests asking for the recipe. Prepare to make this your new go-to dessert, a staple in your culinary repertoire that brings joy with every chilled slice. Dive into the simple steps below and experience the magic of an effortlessly delicious Berry Icebox Pie!
RELATED: Easy Strawberry Icebox Cake Recipe
Essential Ingredients for Your Luscious Berry Icebox Pie
Crafting the perfect no-bake Berry Icebox Pie starts with selecting quality ingredients. Each component plays a crucial role in building the layers of flavor and texture that make this dessert so irresistible. Here’s a detailed breakdown of what you’ll need:
For the Irresistible Biscoff Crust:
- 1 cup + ½ cup of mixed berries, divided: Fresh, vibrant berries are the heart of this pie. Dividing them ensures a rich berry flavor throughout, both mashed into the crust and as a fresh addition.
- 1 tbsp of granulated sugar: This sweetens the berry mixture for the crust, balancing the tartness of the fruit.
- 1 lemon, zested and juiced: Lemon brightens the flavors of the berries and adds a delightful zesty aroma to the entire pie.
- 20 Biscoff cookies: These iconic spiced shortbread cookies provide a unique, buttery, and slightly caramel-like flavor that elevates the crust beyond a traditional graham cracker.
- 2 tbsp of brown sugar: Adds a deeper, molasses-rich sweetness and helps bind the crust mixture, complementing the Biscoff.
- ½ cup of sliced almonds: Offers a lovely textural contrast and a nutty depth that pairs beautifully with the Biscoff and berries.
- 6 tbsp of unsalted butter, melted: The essential binding agent, bringing all the crust ingredients together into a cohesive, pressable mixture.
- ¼ tsp of kosher salt: A touch of salt enhances all the sweet flavors, providing balance and preventing the crust from tasting one-dimensional.
For the Creamy, Dreamy Ricotta & Cream Cheese Filling:
- 1 cup of whole milk ricotta: Contributes a wonderfully light, airy, and slightly grainy texture, along with a subtle dairy sweetness that makes the filling incredibly rich yet refreshing.
- 1 (8oz) block of cream cheese, at room temperature: The foundation of the filling, providing its signature tanginess, smoothness, and stability. Ensure it’s at room temperature for a lump-free, perfectly creamy consistency.
- Lemon zest: A second burst of fresh lemon zest to brighten the rich filling and tie all the flavors together seamlessly.
- ¾ cup of powdered sugar: Sweetens the filling to perfection while contributing to its smooth and velvety texture, as powdered sugar dissolves more readily than granulated sugar.
- ½ cup of heavy whipping cream, cold: Whipped into soft peaks, this lightens the filling, adding an ethereal, airy quality that makes each bite melt in your mouth.
For the Elegant Whipped Cream Topping:
- ¾ cup of heavy whipping cream: Provides the fluffy, classic finish to your icebox pie, offering a beautiful contrast to the denser filling.
- ¼ cup of powdered sugar: Sweetens the topping and helps stabilize the whipped cream, ensuring it holds its shape beautifully.
- 1 tsp of vanilla extract, optional: Adds a warm, aromatic depth to the whipped cream, though the natural flavors of the berries and lemon are often enough to shine on their own.
Mastering the Art of No-Bake Berry Icebox Pie: Step-by-Step Guide
Crafting the Delightful Biscoff Berry Crust
The foundation of this exceptional icebox pie is its unique and flavorful Biscoff berry crust. It’s a simple process that sets the stage for the creamy layers to come.
Step 1: Preparing the Berry Base. In a medium mixing bowl, combine 1 cup of the mixed berries, granulated sugar, fresh lemon zest, and lemon juice. Using a fork or a potato masher, gently mash these ingredients together. This step helps to release the juices and intensify the berry flavor, creating a vibrant base. Continue mashing until the berries are mostly broken down but still have some texture. Then, add the remaining ½ cup of whole mixed berries and stir them in gently. This ensures pockets of fresh, whole berries are distributed throughout the crust layer, offering delightful bursts of fruit in every bite.
Step 2: Assembling the Biscoff Crumble. Next, prepare the signature Biscoff crumble. Place the Biscoff cookies in a food processor and pulse until finely crushed. The crumbs should resemble coarse sand. Add the brown sugar, sliced almonds, melted unsalted butter, and kosher salt to the food processor. Continue to pulse the mixture until all ingredients are well blended and the mixture is moist and clumpy. The butter will help bind everything together, creating a crust that holds its shape beautifully while offering a delightful spiced and nutty flavor profile.
Step 3: Forming and Chilling the Crust. Carefully transfer the prepared Biscoff mixture into a 9-inch pie tin or dish. Using the back of a spoon or your fingers, spread the mixture evenly across the bottom and up the sides of the dish. It’s crucial to press the mixture down very firmly to create a compact crust that won’t crumble when sliced. A flat-bottomed glass or measuring cup can be helpful for this. Once pressed, place the pie crust into the freezer for approximately 15 minutes. This quick chill helps the butter solidify, setting the crust and making it firm enough to hold the filling without becoming soggy. While the crust is chilling, you can begin preparing the creamy filling.
Creating the Irresistible Ricotta & Cream Cheese Filling
The heart of this icebox pie is its rich, yet surprisingly light, creamy filling. This section details how to achieve that perfect smooth and airy texture.
Step 1: Whipping the Cream Cheese Base. In a large mixing bowl, combine the whole milk ricotta, softened cream cheese, and a generous amount of fresh lemon zest. Using an electric mixer, beat these ingredients together on medium speed. Continue beating until the mixture is completely creamy and uniform, with no lumps of cream cheese remaining. This can take a few minutes, so be patient. Once smooth, gradually add the powdered sugar and continue beating until it is fully incorporated and the mixture is light and fluffy. The room-temperature cream cheese is vital here for achieving a perfectly smooth consistency.
Step 2: Achieving Velvety Smoothness and Incorporating Whipped Cream. Take a moment to taste the filling mixture and adjust the sweetness or lemon zest as desired. Continue mixing for a few more minutes on medium-high speed until the mixture is super smooth, glossy, and noticeably lightened in texture. Set this aside. In a separate, clean bowl, using an electric mixer with a whisk attachment, beat the cold heavy whipping cream on high speed until soft peaks form. Soft peaks hold their shape loosely and droop slightly when the whisk is lifted. Gently transfer this whipped cream to the cream cheese mixture. Using a spatula, carefully fold the whipped cream into the cream cheese mixture until just incorporated. Be careful not to overmix, as this can deflate the airiness of the whipped cream.
Step 3: Adding Berries and Freezing the Pie. Take your strained berries (from the crust preparation) and gently fold them into the creamy filling mixture. Ensure they are evenly distributed throughout. This provides beautiful color, texture, and bursts of fruity flavor. Pour the berry-infused filling into the pre-chilled Biscoff crust, spreading it evenly with a spatula to create a smooth, appealing surface. Once the filling is in place, return the pie to the freezer. It needs to freeze for a minimum of 3 hours, but ideally, let it chill for 6 hours or even overnight. This extended freezing time is crucial for the pie to set completely, ensuring clean, firm slices.
The Perfect Topping & Serving Suggestions
The final touches elevate this Berry Icebox Pie from delicious to absolutely divine, making it a showstopper for any occasion.
In the bowl of a stand mixer fitted with a whisk attachment, or using a hand mixer, add the heavy whipping cream, powdered sugar, and the optional vanilla extract. Beat these ingredients on high speed until stiff peaks form. Stiff peaks will hold their shape firmly and stand straight up when the whisk is lifted, indicating a perfectly stable topping. Carefully spread this luscious whipped cream over the set filling of the pie. For an extra touch of elegance and fresh flavor, generously top the pie with more fresh mixed berries. Finally, for an added layer of flavor and visual appeal, drizzle some of the reserved berry juice (from straining the berries for the filling) over the top. Allow the pie to sit at room temperature for 10-15 minutes before slicing to allow it to soften slightly, making it easier to cut. Serve immediately and enjoy the delightful combination of creamy, fruity, and crunchy textures!
Tips for Perfecting Your No-Bake Berry Icebox Pie
Achieving a flawless no-bake icebox pie is simple, but a few expert tips can ensure your dessert is truly outstanding:
- Ingredient Temperature is Key: Always ensure your cream cheese is at room temperature. This is crucial for a smooth, lump-free filling. Cold cream cheese will result in a clumpy texture that’s difficult to beat evenly.
- Don’t Rush the Chill Time: The minimum 3-hour freeze is essential for the pie to set properly. For the best slicing experience and firmest texture, an overnight chill is highly recommended. Patience truly pays off with icebox pies!
- Choose Ripe Berries: The success of this pie heavily relies on the quality of your fruit. Opt for fresh, ripe, and flavorful mixed berries. If fresh berries are out of season, high-quality frozen berries (thawed and drained well) can be a suitable alternative.
- Press the Crust Firmly: A well-packed crust is a sturdy crust. Use the bottom of a glass or your knuckles to really compress the Biscoff mixture into the pie dish. This prevents it from falling apart when you slice your pie.
- Gentle Folding: When incorporating the whipped cream into the cream cheese mixture, use a gentle folding technique with a spatula. This preserves the airiness of the whipped cream, ensuring a light and fluffy filling.
- Taste and Adjust: Don’t be afraid to taste your filling before adding the whipped cream. Adjust the sweetness or lemon zest to suit your personal preference.
Creative Variations to Explore
While the classic Berry Icebox Pie is undeniably delicious, don’t hesitate to experiment with these exciting variations:
- Fruit Swaps: Replace mixed berries with a single fruit like strawberries, raspberries, blueberries, or even a tropical blend of mango and passion fruit. Just be sure to adjust the sweetness slightly if using very tart or very sweet fruits.
- Different Crusts: Not a Biscoff fan? Try an Oreo cookie crust for a chocolatey twist, or a traditional graham cracker crust for a classic touch. Shortbread cookies or even ginger snaps can also make excellent crust bases.
- Citrus Burst: Amp up the citrus by adding orange or lime zest to the filling and crust, or even replacing some of the lemon juice with lime juice for a zingy key lime pie-inspired flavor.
- Chocolate Drizzle: For chocolate lovers, a drizzle of melted dark chocolate over the whipped cream topping would be a decadent addition.
- Nutty Additions: Consider adding other chopped nuts like pecans or walnuts to the crust mixture for a different texture and flavor profile.
- Coconut Cream Pie: Substitute half of the ricotta with coconut cream (the thick part from a can of full-fat coconut milk, chilled overnight) and add toasted coconut flakes to the crust and topping for a tropical delight.
Serving and Storage Suggestions
To enjoy your Berry Icebox Pie at its best, proper serving and storage are key:
- Serving Temperature: For optimal texture and flavor, allow the pie to sit at room temperature for 10-15 minutes before slicing. This slightly softens the filling and crust, making it easier to cut and ensuring a creamy, not rock-hard, bite.
- Garnish Generously: Besides fresh berries and reserved juice, consider garnishing with a sprig of fresh mint, a sprinkle of lemon zest, or a dusting of powdered sugar just before serving for an extra visual flourish.
- Clean Slices: For perfectly clean slices, dip your knife in hot water and wipe it clean between each cut.
- Storage: Leftover pie should be stored in an airtight container in the freezer for up to 5-7 days. While it can be stored in the refrigerator for 2-3 days, it will become softer. For best results, keep it frozen.
- Thawing: If storing in the freezer, simply take slices out about 15-20 minutes before you plan to eat them to allow them to soften to a delightful consistency.
*All image credit belongs to Preppy Kitchen via YouTube. Follow and subscribe to his channel for more inspiring and delicious recipes!
Experience the Simplicity and Joy of This Easy-to-Make Berry Icebox Pie Today!
Embrace the delightful ease of this no-bake Berry Icebox Pie and transform your dessert game. With its effortless preparation, vibrant flavors, and refreshing coolness, it’s truly a perfect treat for any season, especially during warmer months. The combination of the unique Biscoff crust, the creamy ricotta and cream cheese filling, and the burst of fresh berries creates an unforgettable culinary experience.
Whether you’re a seasoned baker or just starting your culinary journey, this recipe offers a foolproof path to a dessert that looks and tastes like it came from a gourmet bakery. Share it with loved ones at your next gathering, or simply savor a slice on a quiet afternoon. This Berry Icebox Pie isn’t just a dessert; it’s an invitation to enjoy the sweet, simple pleasures of life. So, gather your ingredients, follow these easy steps, and get ready to indulge in your new favorite no-bake delight!