
Delightful Edible Chocolate Pinecones: Your Easy No-Bake Holiday Treat
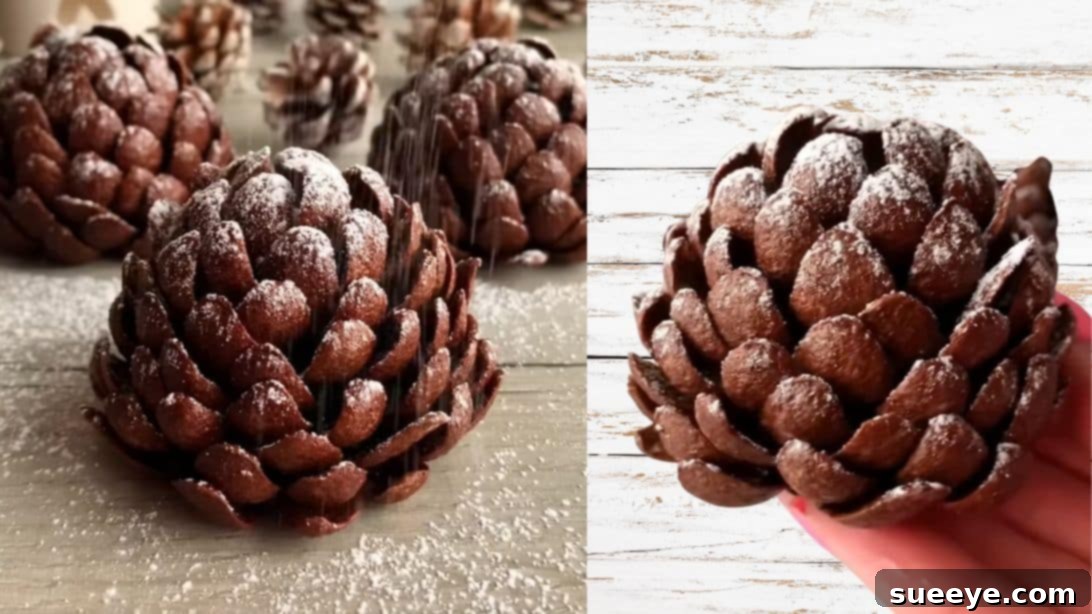
Imagine setting out a beautiful platter of festive holiday treats, and among them are what appear to be meticulously crafted pinecones. Your guests reach for one, perhaps admiring it as a decoration, until you reveal the delightful truth: “No, they are not real pinecones! Believe it or not, you can actually eat them!” This exact scenario unfolded when I made these last weekend, and the surprise on my family’s faces was only matched by their enjoyment of these surprisingly delicious creations. If you’re searching for a new, unique, and truly memorable Christmas treat this year, something that sparks wonder and satisfies sweet cravings, look no further than these incredible edible chocolate pinecones. I guarantee most people won’t realize they’re edible until you let them in on the secret!
Beyond their stunning visual appeal, these charming edible chocolate pinecones are incredibly simple to make, requiring just three main ingredients and no baking whatsoever. They offer a delightful blend of rich chocolate flavor and a satisfying texture, making them an instant hit at any holiday gathering, winter party, or family get-together. Get ready to impress everyone with this festive masterpiece that’s as fun to make as it is to eat. Whether you’re a seasoned baker or a complete novice in the kitchen, this easy no-bake recipe is guaranteed to bring smiles and compliments.
Why These Edible Chocolate Pinecones Are Your Next Holiday Must-Make
In the bustling lead-up to the holidays, finding a recipe that combines ease, elegance, and genuine “wow” factor can feel like searching for a needle in a haystack. These edible chocolate pinecones tick all those boxes and more. They are perfect for a multitude of reasons, making them a versatile and essential addition to your holiday repertoire:
- Impressive Visual Appeal: Their realistic pinecone appearance is a guaranteed conversation starter. Guests will be captivated by their intricate look and amazed to discover they’re edible.
- No-Bake Convenience: Skip the oven entirely! This recipe is ideal for busy holiday schedules, freeing up your oven for other festive dishes and saving you precious time and effort.
- Kid-Friendly Fun: The process of crushing Oreos, mixing, shaping, and decorating is simple enough for children to participate in, making it a wonderful and engaging family activity during the holiday season.
- Budget-Friendly Ingredients: With only a few core ingredients that are readily available at any grocery store, this treat is surprisingly economical, allowing you to create a beautiful dessert without breaking the bank.
- Unique Festive Flair: Move beyond traditional cookies and offer something truly distinctive. These pinecones capture the essence of winter and add a magical touch to any dessert spread.
- Perfect for Gifting: Package a few in a decorative box or clear cellophane bags with a festive ribbon for a thoughtful, charming, and delicious homemade holiday gift that friends, teachers, and neighbors will adore.
- Delicious Flavor Profile: The rich chocolate from the Oreos combined with the creamy tang of cream cheese creates a delightful truffle-like center, perfectly complemented by the crunchy cereal “scales.”
Whether you’re hosting a grand Christmas feast, attending a potluck, seeking a fun activity with the kids, or simply want to add a touch of magic to your dessert spread, these chocolate pinecones are an unbeatable and highly recommended choice.
The Simple Magic: Just Three Ingredients!
The true brilliance of this recipe lies in its elegant simplicity. You only need three core ingredients to craft these delightful chocolate pinecones – Oreos, cream cheese, and a suitable breakfast cereal. A light dusting of powdered sugar is entirely optional but adds a charming “snow-dusted” effect that truly elevates their festive appeal, transforming them into miniature winter wonders. This minimalist ingredient list means less time spent shopping, less fuss in the kitchen, and more precious moments to enjoy the holiday season with your loved ones!
What You’ll Need:
- 20 Oreos (approximately 1 standard package): These iconic chocolate sandwich cookies form the rich, fudgy base of our pinecones. Their distinctive dark cocoa flavor and crumbly texture are perfect. When finely crushed, they create an excellent, stable binder when combined with cream cheese, making the foundation both delicious and easy to work with.
- 1/2 cup of Cream Cheese (softened): This is the crucial binding agent and a secret ingredient that elevates the texture. It binds the Oreo crumbs together, adding a subtle tang, a luxurious richness, and a wonderfully smooth, truffle-like consistency to the interior of the pinecones. For best results and effortless mixing, it is absolutely essential that your cream cheese is softened to room temperature before you begin.
- Nestle Chocapic Breakfast Cereal (or similar chocolate-flavored flaky cereal): These unique, irregularly shaped cereal pieces are the stars of the show, as they ingeniously mimic the natural scales of a real pinecone. Their distinct shape and satisfying crisp texture are absolutely ideal for creating the realistic outer layer. If Nestle Chocapic is not readily available in your region, don’t despair! You can look for other chocolate-flavored flaky or petal-shaped cereals. Brands like Hershey’s Kisses Cereal or certain varieties of Cocoa Puffs might work, though Chocapic offers a superior visual match due to its unique shape.
- Powdered Sugar for Garnish (optional): A delicate dusting of powdered sugar transforms your finished pinecones into a charming winter wonderland scene, giving them a beautiful, frosty, “snow-kissed” look. It also adds a whisper of extra sweetness, perfectly balancing the rich chocolate.
For those looking for a quick and easy complementary treat that also requires no baking, consider trying this recipe: 4-Ingredient No-Bake Chocolate Balls Recipe. It’s another fantastic no-bake option that pairs wonderfully with these pinecones!
Crafting Your Edible Masterpieces: Step-by-Step Guide to Chocolate Pinecones
Making these edible chocolate pinecones is a fun, creative, and surprisingly straightforward process. Follow these detailed steps, adapted from Fitwaffle Kitchen, for clarity and comprehensive tips, to ensure you create your own batch of stunning and delicious holiday treats that will surely be the talk of the town.
Step 1: Prepare the Oreo Base
Your first and foundational task is to transform the 20 Oreos into a fine, consistent, sand-like crumb. Carefully place all 20 Oreos into a food processor and pulse them repeatedly until they are uniformly processed into very fine crumbs. The finer the crumbs, the smoother and more cohesive your chocolate pinecone base will be, which is crucial for a pleasant texture and easy shaping. If you do not have a food processor, an excellent alternative is to place the Oreos into a sturdy resealable plastic bag. Expel as much air as possible, seal it tightly, and then crush them thoroughly using a rolling pin, the bottom of a heavy glass, or even a meat tenderizer. Ensure there are absolutely no large chunks or pieces left. Once finely crushed, transfer these delicious chocolate crumbs into a medium-sized mixing bowl, ready for the next crucial step.
Step 2: Create the Rich Chocolate Mixture
To your bowl of meticulously prepared Oreo crumbs, add 1/2 cup of softened cream cheese. It is critically important that the cream cheese is at room temperature; this ensures it will blend smoothly and effortlessly with the dry Oreo crumbs, preventing any lumps and resulting in a consistent, pliable, and easy-to-handle “dough.” Use a sturdy rubber spatula, a wooden spoon, or even your clean hands (which often provide the best tactile feedback for this type of mixture) to thoroughly combine the ingredients. Continue mixing, scraping down the sides of the bowl as needed, until the Oreos and cream cheese are completely integrated, forming a thick, uniform chocolate “dough” that is firm enough to hold its shape yet soft enough to mold. This perfectly blended mixture will serve as the delicious core of your pinecones.
Step 3: Shape the Pinecone Cores
Now it’s time to shape the foundation upon which your pinecones will be built. Scoop up approximately 1/5 of the chocolate mixture for each pinecone – aim for roughly 2-3 tablespoons per piece, though you can adjust this slightly based on your desired final size. First, roll this portion into a smooth, compact ball between your palms. Once you have a neat ball, gently elongate and taper one end to form an eggy or slightly tear-drop shape. This shape should be notably wider at one end and gradually narrow towards the top, mimicking the natural, elongated base of a real pinecone. The goal is to create a consistent, smooth core that will serve as the perfect canvas for your cereal “scales.” Repeat this precise process with the remaining mixture until you have several uniformly shaped cores, all patiently waiting for their beautiful decoration.
Step 4: Decorate with Cereal Scales
This is truly where the magic of transformation happens, as your simple chocolate egg shapes evolve into strikingly realistic pinecones. Take one of your perfectly shaped chocolate cores. Begin pressing the Nestle Chocapic cereal pieces (or your chosen alternative) into the Oreo egg, always starting from the wider, bottom end of the shape. Arrange the first row of cereal pieces all around the base, ensuring they are slightly overlapping each other and pressed firmly enough so they adhere securely to the chocolate mixture without crushing the underlying structure. As you move to the subsequent rows, remember to stagger the cereal pieces: place each piece between the “scales” of the row directly below it. This meticulous, overlapping pattern is what brilliantly creates the natural, interlocking appearance of a real pinecone. Continue this systematic process, patiently working your way up the entire chocolate core, until its entire surface is fully and beautifully covered with cereal pieces. The accompanying photo below provides an excellent visual reference for achieving this intricate yet surprisingly simple pattern, guiding you to perfection.
Once each pinecone is meticulously decorated, carefully place the finished piece on a tray or plate that has been lined with parchment paper or wax paper to prevent any sticking. Repeat this artistic and patient process with all the remaining egg shapes until your tray is filled with a charming, edible forest of chocolate pinecones, each a testament to your creative efforts.
Step 5: Chill to Perfection
To ensure your exquisite chocolate pinecones firm up beautifully, allowing the cream cheese and Oreo mixture to set properly, and to help the intricate cereal scales remain securely in place, it is essential to refrigerate them. Place the tray of decorated pinecones in the refrigerator for at least 30 minutes. This chilling period makes the pinecones sturdy, easier to handle, and ensures they maintain their shape when served. You can certainly refrigerate them for a longer duration, even up to a few hours or overnight, especially if you are making them in advance for a holiday party or gathering. The longer they chill, the firmer they will become, enhancing their overall texture and stability.
Step 6: The Finishing Touch – A Dusting of Snow (Optional)
Before presenting and serving your magnificent edible chocolate pinecones, consider adding that quintessential winter wonderland effect with a light dusting of powdered sugar. A fine mesh sieve or a small sifter works perfectly for this task, allowing you to create an even, delicate “snow-dusted” appearance over each pinecone. This final flourish not only dramatically enhances their visual appeal, making them look even more festive and authentic, but it also adds a delicate touch of extra sweetness that beautifully complements the rich chocolate flavor. Once garnished (or not, if you prefer them au naturel), your stunning edible chocolate pinecones are ready to be admired, appreciated, and most importantly, delightfully devoured. Prepare for the flood of compliments!
Tips for Crafting the Perfect Edible Chocolate Pinecones
While this recipe is wonderfully straightforward, a few expert tips and tricks can help elevate your edible pinecones from merely good to absolutely spectacular, ensuring a flawless result every time:
- Softened Cream Cheese is Non-Negotiable: This is a crucial step! Cold cream cheese will be stiff and will result in a lumpy, hard-to-mix dough that’s difficult to shape smoothly. Always remember to take your cream cheese out of the refrigerator at least 30 minutes to an hour before you plan to start, allowing it to reach a pliable room temperature.
- Achieve Fine Oreo Crumbs: The finer and more uniform your Oreo crumbs are, the smoother and more cohesive your chocolate base will become. This consistency is vital for ease of shaping and for ensuring the cereal scales adhere properly without gaps or unevenness.
- Patience with Cereal Application: Do not rush this step, as it’s key to the realistic appearance. Take your time when applying the cereal pieces. Overlapping and staggering them carefully and deliberately is precisely what creates that authentic, natural pinecone effect. Press each piece firmly but gently to ensure it sticks without squishing or deforming your chocolate base.
- Cereal Alternatives to Consider: If Nestle Chocapic is difficult to find in your local grocery store, don’t let that deter you! Other chocolate-flavored cereals with a similar flake or petal-like shape can often work. Before committing to a whole batch, it’s a good idea to experiment with a small piece first to see how it looks, feels, and adheres to the chocolate mixture.
- Check and Adjust Consistency: During the mixing phase, pay attention to the dough’s consistency. If your Oreo mixture feels excessively sticky and challenging to handle, you can incorporate a tiny bit more finely crushed Oreo crumbs. Conversely, if it seems too dry and crumbly, a small amount more of softened cream cheese can help bring it to the perfect, pliable texture.
- Consider Wearing Gloves for Shaping: If you find that the chocolate mixture tends to stick to your hands during the shaping process, wearing disposable food-safe gloves can make the entire experience much cleaner and significantly easier, ensuring smooth, neat pinecones.
Creative Variations and Customizations for Your Edible Pinecones
While the classic chocolate pinecone is an undeniable crowd-pleaser, don’t hesitate to unleash your creativity and personalize your batch. These pinecones are wonderfully adaptable, allowing for delightful variations:
- Mint Chocolate Pinecones: For a refreshing holiday twist, use Mint Oreos as your base and add a small drop or two of pure peppermint extract to the cream cheese mixture before combining with the crumbs.
- White Chocolate Wonderland Pinecones: Opt for Golden Oreos for the base and seek out white chocolate-flavored cereals for the scales. For an extra touch of elegance, you could even drizzle them with melted white chocolate!
- Nutty Pinecones: Introduce an extra layer of crunch and flavor by folding finely chopped toasted pecans, walnuts, or almonds into the Oreo-cream cheese mixture. This adds a delightful textural contrast.
- Spiced Holiday Pinecones: Infuse your pinecones with warm, festive aromas by adding a tiny pinch of ground cinnamon, nutmeg, or even a dash of pumpkin pie spice to the chocolate base mixture.
- Intense Dark Chocolate Boost: For true dark chocolate aficionados, melt a tablespoon of high-quality dark chocolate (70% cocoa or higher) and mix it into the softened cream cheese before combining it with the Oreo crumbs.
- Glamorous Glitter Finish: Instead of, or in addition to, the powdered sugar dusting, give your pinecones an extra festive sparkle by dusting them lightly with edible gold, silver, or iridescent glitter.
If you’re looking for another delightful and timeless holiday cookie recipe to complement your pinecones, make sure to try this: Easy Snowball Christmas Cookies Recipe.
Serving and Storing Your Edible Pinecones
These delightful and charming edible chocolate pinecones are perfect for virtually any holiday occasion. Arrange them artfully on a serving platter, perhaps nestled among some real (but clean and food-safe) pine sprigs, cranberries, or other festive decor (ensuring they don’t directly touch the food for hygiene!). They make excellent, eye-catching additions to dessert buffets, highly sought-after items at cookie exchanges, or a simply charming and unique accompaniment to your holiday coffee or hot chocolate bar.
To ensure your edible chocolate pinecones remain fresh and firm, store them in an airtight container in the refrigerator. They will maintain their quality and deliciousness for up to 3-5 days. While they are undoubtedly best enjoyed fresh, their good shelf life makes them a fantastic make-ahead option for busy holiday hosts who want to minimize last-minute stress. When ready to serve, simply take them out of the refrigerator about 10-15 minutes beforehand to allow them to slightly soften to their optimal, truffle-like texture.
The Ultimate 3-Ingredient Chocolate Pinecones: A Holiday Tradition in the Making
These edible chocolate pinecones are truly more than just a dessert; they are a conversation starter, a delightful surprise, and a festive masterpiece that anyone, regardless of their baking experience, can confidently create. With minimal ingredients, absolutely no baking required, and a truly stunning visual payoff, they are destined to become a beloved and anticipated part of your annual holiday traditions. Gather your simple ingredients, follow these easy-to-understand steps, and prepare to enchant and impress your friends and family with these charming, incredibly delicious, and utterly irresistible no-bake treats. Happy holidays and happy making – may your festive season be filled with joy, sweetness, and edible magic!