
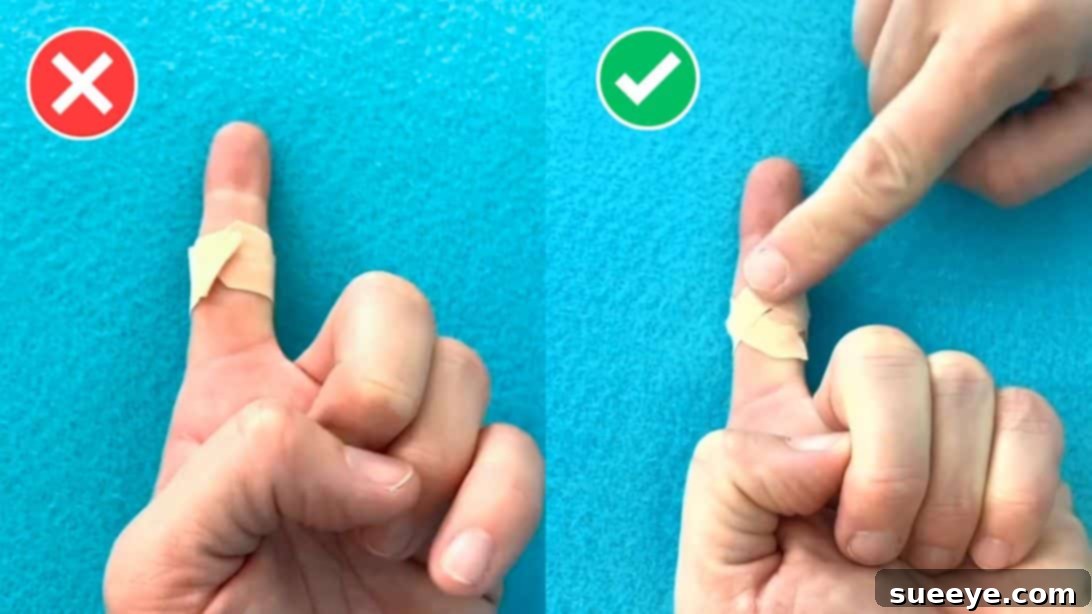
Master the Art of Bandage Application: The Ultimate Guide to Keeping Your Finger Band-Aid Secure
Few things are as frustrating as a band-aid that refuses to stay put, especially when it’s wrapped around a finger. We’ve all been there: you clean a small cut, apply an ointment, carefully cover it with a fresh band-aid, only for it to slip, bunch, or completely fall off moments later. This common nuisance not only wastes bandages but also leaves your wound exposed to dirt, bacteria, and further irritation. But what if there was a simple, ingenious trick to make your finger bandages stay firmly in place, no matter how much you move? Get ready to say goodbye to the constant struggle of reapplying bandages, because we’re about to share a game-changing method that will revolutionize your wound care routine. This clever hack, which I discovered through Pam’s POV YouTube channel, promises unparalleled security and comfort for finger injuries.
Why Traditional Finger Bandages Often Fail
Our fingers are arguably one of the most active parts of our body. From typing and cooking to crafting and working, our hands are in constant motion, making them particularly vulnerable to minor cuts and scrapes. However, this constant movement, combined with the unique anatomy of our fingers, poses a significant challenge for traditional bandage application.
Standard band-aids are designed with a rectangular adhesive strip meant to wrap around a flat surface. On a finger, which is cylindrical and tapers towards the tip, this design often leads to problems. The adhesive struggles to maintain full contact as the finger bends and stretches, causing the bandage to loosen, wrinkle, and eventually peel off. Furthermore, factors like natural skin oils, moisture from washing hands, and friction against clothing or objects only accelerate the detachment process. The result is often an unprotected wound, increased risk of infection, and the inconvenience of repeatedly replacing bandages. It’s a cycle of frustration that many of us have simply come to accept, but it doesn’t have to be this way.
The Crucial Importance of Proper Wound Care and Secure Bandaging
Before diving into our revolutionary band-aid hack, it’s vital to underscore the importance of proper wound care. A small cut, if not properly treated, can quickly escalate from a minor inconvenience to a painful infection. The primary goals of caring for a minor wound are to prevent infection, promote rapid healing, and minimize scarring. This process typically involves three key steps: cleaning, applying a protective agent, and covering the wound.
- Cleaning: Thoroughly wash the wound with mild soap and water to remove dirt, debris, and bacteria.
- Antiseptic/Ointment: Apply a thin layer of antibiotic ointment or petroleum jelly to keep the wound moist and prevent dryness, which can slow healing and increase scarring.
- Covering: This is where our band-aid trick comes in. A proper covering acts as a physical barrier, shielding the delicate healing tissue from external threats.
A securely applied bandage does more than just keep germs out. It creates a moist environment conducive to healing, protects against accidental bumps, and reduces pain by preventing air exposure to nerve endings. Without a bandage that stays firmly in place, all the effort put into cleaning and treating the wound can be undone, leaving it vulnerable. This highlights precisely why finding a reliable method for keeping band-aids on your fingers is not just about convenience, but about effective wound management and faster recovery.
Introducing the Figure-8 Band-Aid Technique: Your New Best Friend for Finger Injuries
Gone are the days of flimsy, slipping finger bandages. The “Figure-8 Band-Aid Technique” is a simple yet incredibly effective method that transforms a standard band-aid into a super-secure, flexible, and long-lasting protector for your finger. This ingenious trick utilizes a few strategic cuts to create “wings” that interlock around your finger, distributing tension evenly and allowing for natural movement without detachment. You’ll be amazed at how such a small adjustment can make such a significant difference in comfort and durability.
For this hack, all you need are two common items:
- A standard adhesive band-aid (preferably a rectangular one).
- A pair of clean scissors.
Once you master this technique, you’ll wonder how you ever managed without it. It’s perfect for anyone prone to finger cuts, whether from kitchen mishaps, DIY projects, or daily activities. Let’s walk through the steps to achieving a band-aid application that truly stays put.
Step-by-Step Guide: How to Put on a Band-Aid That Won’t Fall Off
Step 1: Preparing Your Band-Aid with Strategic Cuts
The secret to this method lies in modifying the band-aid to better conform to the contours of your finger. Instead of a single, rigid strip, we’ll create flexible adhesive “arms” that can be crisscrossed for a secure fit.
Take your standard rectangular band-aid. Identify the sterile non-stick pad in the center – this is the part that covers your wound. Using your clean scissors, make a cut down the middle of the adhesive strip on one end, stopping precisely where the adhesive meets the non-stick pad. Do not cut into the pad itself. Repeat this process on the opposite end of the band-aid. When you’re done, your band-aid should have four distinct “wings” or strips of adhesive, two on each side of the central pad, creating slits just like the visual guide below.
These cuts are crucial because they transform the band-aid from a stiff rectangle into a more adaptable shape, allowing it to conform snugly to the cylindrical form of your finger. Without these slits, the band-aid would simply buckle and crease as your finger moves.
Step 2: Precise Placement of the Band-Aid Pad
Before applying the adhesive strips, ensure your wound is clean, dry, and has any necessary ointment applied. Carefully peel the backing off one side of your modified band-aid. Gently position the sterile pad directly over your cut or wound, ensuring it is fully covered. Press the exposed adhesive strip firmly onto your skin to secure the pad in place. Take care not to stretch the bandage too tightly at this stage, as it can cause discomfort later.
Step 3: The Figure-8 Wrapping Technique for Unmatched Security
This is where the magic happens. With the central pad secured over your wound, it’s time to create the interlocking “Figure-8” pattern that gives this method its superior staying power.
- Start with one of the top adhesive strips (from the side you just peeled). Fold it diagonally downward and around your finger, pressing it firmly onto the skin.
- Next, take the corresponding bottom adhesive strip from the *same side*. Bring it diagonally upward, crossing over the first strip you applied, and press it firmly onto the skin. You’ve now created an “X” pattern on one side of your finger.
- Now, move to the opposite side of the band-aid (the side you haven’t wrapped yet). Peel off the remaining backing.
- Take the top adhesive strip from this second side and fold it diagonally downward, wrapping it around your finger and pressing firmly. This will cross over the strips you just applied from the first side.
- Finally, take the remaining bottom adhesive strip from the second side. Bring it diagonally upward, wrapping it around your finger, and pressing it firmly. This last strip completes the interlocking “Figure-8” pattern, securing the bandage from all angles.
You are essentially weaving the adhesive strips around your finger, creating a robust, crisscrossing pattern that distributes tension evenly. This figure-8 design allows the band-aid to flex with your finger’s natural movements without losing adhesion, ensuring it stays tight and secure for much longer than a conventional wrap.
Step 4: Final Adjustments and Comfort Check
Once all the strips are applied, gently press down along all the adhesive edges to ensure maximum contact with your skin. Move your finger through its full range of motion. You should notice that the band-aid feels snug and secure, yet allows for comfortable bending and straightening without tugging or creating uncomfortable pressure points. If it feels too tight, you may have pulled the strips too aggressively; gently readjust if possible. This method ensures your band-aid remains firmly in place, protecting your wound while allowing you to use your fingers comfortably throughout the day.
The Unbeatable Benefits of the Figure-8 Bandaging Method
Adopting the Figure-8 technique for your finger bandages offers a multitude of advantages over the traditional wrap:
- Unrivaled Durability: This method significantly extends the lifespan of your band-aid. The interlocking strips distribute tension across a larger surface area, making it much harder for the bandage to peel off, even during strenuous activities or frequent hand washing.
- Enhanced Flexibility and Comfort: Because the strips wrap individually and crisscross, the bandage moves with your finger rather than restricting it. This prevents uncomfortable bunching and allows for a full range of motion, making it ideal for active individuals or those who work with their hands.
- Superior Wound Protection: A band-aid that stays put provides continuous protection against dirt, germs, and accidental bumps. This consistent barrier is crucial for preventing infection and promoting faster, healthier healing.
- Cost-Effectiveness: By dramatically reducing the need for frequent band-aid changes, this technique saves you money and reduces waste. No more peeling off a perfectly good band-aid just because it slipped!
- Versatility: While specifically highlighted for fingers, the underlying principle of creating flexible, interlocking strips can be adapted for other challenging body parts where standard bandages struggle to adhere.
When to Consider Specialized Bandages and Alternatives
While the Figure-8 technique is incredibly versatile for most finger cuts, there are instances where specialized bandages might offer an even better solution. For specific wound locations, commercially available options can sometimes provide optimal coverage and protection:
- Fingertip Bandages: If your cut is directly on the very tip of your finger or thumb, traditional rectangular band-aids (even with the Figure-8 modification) can be tricky to apply effectively. Fingertip bandages are hourglass-shaped, designed to cup and wrap around the entire fingertip, providing complete and secure coverage for those hard-to-reach areas. They are a worthwhile investment if you frequently experience injuries on your fingertips due to the nature of your work or hobbies.
- Knuckle Bandages: For cuts located directly over a knuckle, a specialized knuckle bandage, often shaped like an H or a butterfly, offers superior flexibility. These designs allow the knuckle to bend without the bandage creasing or detaching, maintaining protection in a high-movement area.
- Waterproof Bandages: For wounds that need to stay dry during washing or swimming, consider using waterproof bandages in conjunction with the Figure-8 method. Many brands offer waterproof versions of standard band-aids that can still be cut and applied using our technique.
- Liquid Bandages: For very small cuts, especially those in awkward spots or on highly flexible areas, liquid bandages can provide a thin, flexible, and waterproof seal. However, they don’t offer the cushioning or absorbency of a traditional bandage.
Choosing the right type of bandage for the specific location and severity of your wound is an important part of comprehensive wound care. While our Figure-8 trick enhances standard band-aids, knowing when to reach for a specialized option ensures you’re always providing the best possible protection for your injury.
RELATED: 3 Ways to Remove a Ring Stuck on Your Finger
You might also find this helpful: How to Get Rid of Scars Forever
General Tips for Optimal Wound Healing
Beyond securing your bandage, a few other practices can significantly contribute to faster and healthier wound recovery:
- Keep it Clean: Always wash your hands thoroughly before touching a wound or changing a bandage.
- Change Bandages Regularly: Replace your bandage at least once a day, or more frequently if it gets wet or dirty. This prevents bacteria from multiplying and allows you to inspect the wound.
- Moist Environment: As mentioned, a thin layer of antibiotic ointment or petroleum jelly under the bandage can keep the wound moist, which is proven to speed healing and reduce scarring. Avoid letting the wound dry out and form a hard scab, as this can impede new skin growth.
- Monitor for Infection: Keep an eye out for signs of infection such as increased redness, swelling, warmth, pus, fever, or worsening pain. If any of these symptoms appear, seek medical attention promptly.
- Protect from Sun: Once the wound has healed, protect the new skin from sun exposure for several months, as this can help minimize scarring.
Conclusion: Your Fingers Deserve a Secure Bandage
The frustration of a band-aid constantly slipping off your finger is a universal experience, but it doesn’t have to be. By adopting the simple yet incredibly effective Figure-8 bandaging technique, you can transform a common household item into a highly secure, flexible, and long-lasting protective covering for your finger wounds. This method not only offers superior adhesion and comfort but also ensures your cuts remain protected, promoting faster healing and reducing the risk of infection. Say goodbye to wasted bandages and constant reapplication, and embrace a smarter approach to first aid. Try this trick next time you get a finger cut – your fingers (and your peace of mind) will thank you for it!