
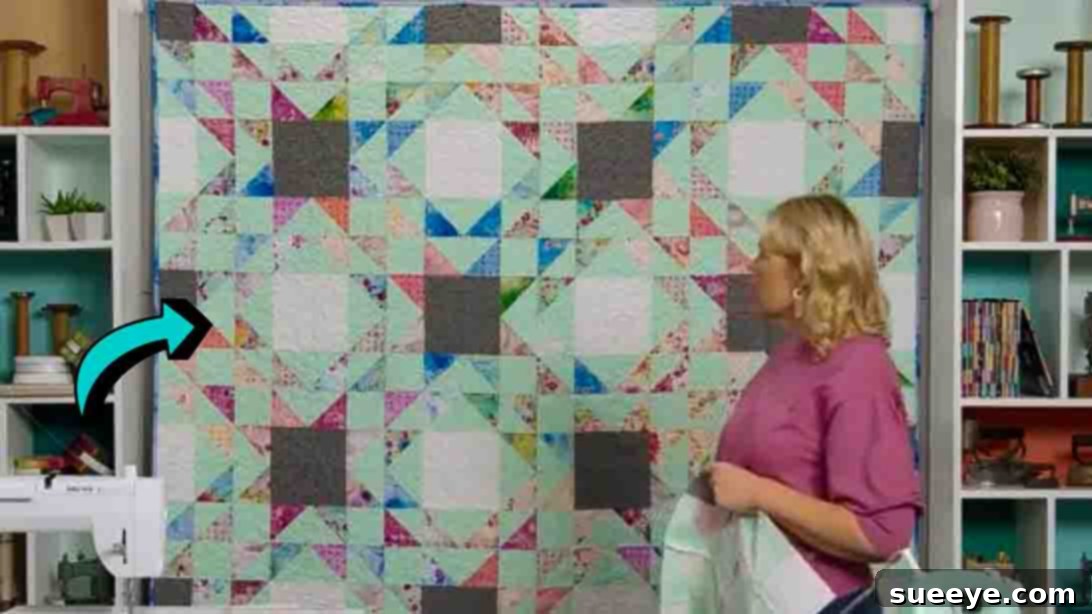
Are you eager to embark on your next captivating quilting adventure? Look no further than the mesmerizing **Prism Path Quilt**, a delightful project brought to life by the renowned experts at Missouri Star Quilt Company. This stunning quilt, despite its intricate appearance, is remarkably **beginner-friendly** and promises an immensely rewarding creative experience. You don’t need years of quilting expertise to craft this beautiful piece; its straightforward construction makes it an accessible and enjoyable project, potentially even allowing you to complete a block or more in a single day!
The Prism Path Quilt offers a unique blend of geometric artistry and simple construction, making it an ideal choice for both novice quilters seeking a sense of accomplishment and seasoned crafters looking for a quick, satisfying project. Its dynamic design creates an illusion of depth and movement, transforming basic fabric squares into a radiant display of color and pattern. Get ready to dive into the world of fabric, thread, and pure creative joy as we guide you through every step of making this lovely quilt.
In this comprehensive tutorial, inspired by the brilliant insights from Missouri Star, we will meticulously guide you through the process of creating the fundamental blocks that form the heart of this exquisite quilt. From selecting your fabrics to mastering essential techniques like the **half-square triangle (HST)**, we’ll ensure you have all the knowledge and confidence needed to bring your Prism Path Quilt to fruition. So, gather your chosen fabrics, prepare your quilting essentials, and let’s begin crafting this enchanting quilt today. For a visual demonstration of each step, refer to the instructional video by Missouri Star that inspired this guide.
Discover the Magic of the Prism Path Quilt
The Prism Path Quilt stands out with its striking visual appeal, characterized by a clever arrangement of shapes that create a three-dimensional effect, reminiscent of light passing through a prism. This optical illusion is achieved through the precise placement of different colored fabrics, making the quilt appear to shift and glow. It’s a design that looks complex but relies on a surprisingly simple foundational unit: the half-square triangle (HST).
What makes this particular quilting project so appealing? Beyond its stunning aesthetics, the Prism Path Quilt is a fantastic learning opportunity. It reinforces fundamental quilting skills such as accurate cutting, precise piecing, and careful pressing. For those new to quilting, it offers a manageable project that builds confidence without overwhelming complexity. For experienced quilters, it’s a canvas for exploring color theory and fabric play, allowing for endless variations based on your textile choices. Imagine it draped over a sofa, enhancing your living space, or gifted to a loved one, a testament to your thoughtful craftsmanship.
Gather Your Quilting Essentials for the Prism Path Quilt
Before you begin sewing, it’s crucial to have all your materials and tools ready. Preparation is key to a smooth and enjoyable quilting experience. The beauty of the Prism Path Quilt is its adaptability to various fabric collections, from pre-cut bundles to yardage from your stash. Here’s a detailed list of what you’ll need, along with tips for selection:
- 1 Pack of 10″ Print Squares (Layer Cake): This pre-cut bundle is a fantastic starting point, offering a coordinated collection of fabrics that save you time on cutting and ensure a harmonious color palette. Each square is 10×10 inches, perfect for generating multiple HSTs.
- 1 ¼ Yards of Light Accent Fabric: This fabric will provide contrast and illuminate your design, defining specific areas within your blocks. Choose a color that complements your print squares without overpowering them.
- 1 ¼ Yards of Dark Accent Fabric: Serving as the opposing anchor to your light accent, this fabric will add depth and structure to the prism effect. Ensure it contrasts well with both your light accent and print squares.
- 4 Yards of Background Fabric: Often a solid or tone-on-tone neutral (like white, cream, or a soft gray), this fabric provides a “canvas” against which your prism blocks will truly pop. It ties the entire quilt together and gives the eye a place to rest.
- ¾ Yard Binding Fabric: This fabric will be used to create the finished edge of your quilt, encasing all the raw edges and providing a polished frame. Consider a fabric that either matches a prominent color in your quilt or provides a bold contrasting border.
- 2 ½ Yards 108″ Wide Backing Fabric: The backing fabric is the foundational layer of your quilt. Using wide backing fabric means fewer seams, making the quilting process easier. Choose a fabric that is soft, durable, and complements the front of your quilt.
Essential Quilting Tools:
In addition to your fabrics, ensure you have the following basic quilting tools for precision and ease:
- Rotary Cutter, Mat, and Rulers: For accurate and efficient cutting of fabric. A 6.5″ or 8.5″ square ruler will be invaluable for squaring up HSTs.
- Sewing Machine: In good working order, with a fresh needle.
- Thread: High-quality 100% cotton thread that matches or blends with your fabrics.
- Iron and Ironing Board: Crucial for pressing seams, which is vital for flat, accurate blocks.
- Fabric Scissors or Snips: For trimming threads.
- Pins or Fabric Clips: To hold fabric pieces together before sewing.
- Seam Ripper: Every quilter’s best friend – for those inevitable moments when a seam needs to be re-done!
Step-by-Step Prism Path Quilt Tutorial: Crafting Your Masterpiece
Now that you have all your materials and tools, let’s embark on the creative journey of constructing your Prism Path Quilt. Precision and attention to detail in each step will ensure a beautiful and cohesive final product.
Step 1: Crafting Perfect Half-Square Triangles (HSTs)
Half-Square Triangles are the building blocks of the Prism Path Quilt, and mastering their creation is key to the quilt’s success. This method allows you to create multiple HSTs efficiently and accurately.
First, prepare your background fabric. From your chosen background fabric, carefully cut several 10″ squares and 4 ½” squares. Set these aside, as they will be used in various parts of your block construction.
Next, take one 10″ square from your layer cake (print fabric) and one 10″ square of the background fabric you just cut. Place these two squares right sides together, aligning all edges perfectly. Using a fabric marker or pencil, draw two diagonal lines from corner to corner on the lighter fabric, forming an “X” across the square. These lines will serve as your cutting guides, while the sewing lines will run parallel to them.
Now, take your layered squares to your sewing machine. Sew a seam ¼ inch away on both sides of each of the two marked diagonal lines. You will end up with four parallel seam lines across the square, two on either side of each drawn diagonal. Consistent ¼-inch seam allowances here are critical for precise HSTs.
Once you have sewn all four seams, it’s time to cut your squares apart. First, cut the entire unit in half both vertically and horizontally. This will give you four smaller squares. Then, carefully cut each of these four smaller squares in half along the original diagonal lines you drew. This process will yield eight half-square triangle units from your original 10-inch pair.
After cutting, gently press each HST open. It’s often recommended to press seams towards the darker fabric to prevent seam allowance shadows from showing through lighter fabrics. However, for HSTs, pressing seams open can also help reduce bulk and create flatter blocks. Choose the method you prefer, but be consistent throughout your project.
Finally, square up each HST unit to 4 ½”. This step is crucial for ensuring all your blocks fit together perfectly. Place a square ruler on your HST, aligning the 45-degree line of the ruler with the seam of your HST. Trim any excess fabric from the edges to achieve a perfect 4 ½” square. Repeat this process for all HSTs. Remember, you will need ten finished 4 ½” half-square triangles per quilt block, so plan accordingly and make extra if needed.
Step 2: Assembling Your Dynamic Quilt Block
With your precisely cut half-square triangles and accent squares, it’s time to bring the Prism Path block to life. This block is composed of 16 individual units arranged in a 4×4 grid. Laying out all your pieces before you sew is an essential step for visual accuracy and to prevent mistakes.
Refer to the visual guide or the diagram provided by Missouri Star as you arrange your pieces. Here’s a row-by-row breakdown of how to lay out the units for a single block:
- Row 1: Begin with one 4 ½” square of your dark accent fabric. Next, place two of your newly created half-square triangles (HSTs). Finish the row with one 4 ½” square of your background (often referred to as ‘white’ or ‘light’) fabric.
- Row 2: Start this row with one half-square triangle (HST). Follow that with one 4 ½” square of your dark accent fabric. Then, add two more half-square triangles (HSTs) to complete the row.
- Row 3: Place two half-square triangles (HSTs) to begin the third row. Then, add one 4 ½” square of your light accent fabric. Conclude the row with another single half-square triangle (HST).
- Row 4: The final row starts with one 4 ½” square of your background (white) fabric. Follow this with two half-square triangles (HSTs). Finish the entire block layout with one 4 ½” square of your dark accent fabric.
Once you are satisfied with your layout, carefully sew the pieces together within each row. Use a consistent ¼-inch seam allowance. As you sew, pay attention to nesting your seams where possible; this means pressing adjacent seams in opposite directions so they “lock” together when sewn, helping your points and corners align perfectly. Press the seams for each row open or to one side, again, consistently.
After all four rows are sewn, it’s time to join them together to form the complete quilt block. Pin the rows together, matching up your seams and corners as precisely as possible. Sew the rows together using a ¼-inch seam allowance. Press these final seams for the block, usually open, to help the block lie flat. You have now completed one Prism Path Quilt block! Admire your work, and then repeat the process to create as many blocks as needed for your desired quilt size.
Beyond the Block: Completing Your Quilt Top
Once you have constructed all your individual Prism Path blocks, the next exciting phase is assembling them into a cohesive quilt top. Arrange your finished blocks on a design wall or a large floor space to experiment with different layouts until you find the arrangement that speaks to you. Consider how the “prism” effect carries across the entire quilt. Some quilters like to add sashing (strips of fabric between blocks) or borders around the perimeter of the quilt to enhance the design and achieve a desired size. Carefully sew your blocks and any sashing/borders together in rows, then join the rows to form your complete quilt top. Press all seams diligently as you go to maintain flatness and accuracy.
Finishing Touches: Basting, Quilting, and Binding Your Prism Path Quilt
With your quilt top complete, you’re ready for the essential steps that transform it from a pieced top into a functional, beautiful quilt. This involves three main stages:
- Basting: This is the process of temporarily securing the three layers of your quilt – the quilt top, the batting (the middle insulating layer), and the backing fabric – together. You can use safety pins, basting spray, or thread basting. Proper basting prevents shifting during the quilting process, ensuring a smooth finish.
- Quilting: This is where the magic happens! Using your sewing machine (or hand-quilting if you prefer), you will stitch through all three layers, adding texture, durability, and a final design element to your quilt. Common quilting techniques include straight-line quilting with a walking foot, free-motion quilting, or following the seams (stitch-in-the-ditch). Choose a quilting pattern that complements the geometric nature of your Prism Path design without detracting from it.
- Binding: The final step is to finish the raw edges of your quilt with binding. This involves cutting strips of your binding fabric, sewing them together to form a continuous strip, and then attaching it to the perimeter of your quilt. The binding provides a clean, professional finish and adds another layer of durability to your handmade treasure.
Expert Tips for a Flawless Quilting Experience
To ensure your Prism Path Quilt project is as enjoyable and successful as possible, keep these expert tips in mind:
- Consistent Seam Allowance: A ¼-inch seam allowance is the standard in quilting. Practice maintaining a consistent scant ¼-inch seam to ensure your blocks and rows come together accurately.
- Pressing Matters: Pressing is not ironing. Gently press seams open or to one side (consistently!) after each sewing step. This creates flat blocks and rows, which is crucial for accuracy when joining larger sections.
- Stay Organized: Label your cut pieces if you’re taking a break. Keep your HSTs and accent squares in designated piles or containers to avoid mix-ups during block assembly.
- Watch the Video: The Missouri Star tutorial video is an invaluable resource. Watching the steps demonstrated visually can clarify any written instructions.
- Embrace Imperfection: Quilting is a journey of learning. Don’t be discouraged by minor imperfections. They add character and prove your quilt is genuinely handmade.
- Enjoy the Process: Most importantly, savor every moment of creating your quilt. It’s a labor of love, a creative outlet, and a chance to make something beautiful with your own hands.
Your Radiant Prism Path Quilt Awaits!
Congratulations! You are now equipped with the knowledge and steps to create a stunning Prism Path Quilt. This project, inspired by the ingenuity of Missouri Star Quilt Company, is more than just a collection of fabric and thread; it’s a testament to your patience, creativity, and the joy of making. From the foundational half-square triangles to the final binding, each stitch brings you closer to a beautiful, handmade treasure.
Whether you’re crafting it for a cozy addition to your home decor, a cherished gift for a loved one, or simply for the pure pleasure of quilting, the Prism Path Quilt promises a deeply satisfying experience. We encourage you to personalize your quilt with your unique fabric choices, making it a reflection of your individual style. Now, take a deep breath, thread your machine, and let your creativity shine. We can’t wait to see your radiant Prism Path Quilt!