
DIY Decoupage Candles: How to Decorate Candles with Printed Napkins for Stunning Home Decor
Are you searching for a creative and affordable way to infuse your living space with personality and charm? Decorating plain candles with vibrant printed napkins, a technique often referred to as candle decoupage, offers a remarkably simple yet incredibly effective solution. This delightful DIY project allows you to transform ordinary candles into extraordinary pieces of custom home decor, enhancing the ambiance of any room with a unique, handcrafted touch.
This beginner-friendly craft, inspired by fantastic tutorials like the one from Kcreations deco on YouTube, is not only kind to your wallet but also provides a wonderful outlet for artistic expression. Imagine candles adorned with intricate floral motifs, classic geometric patterns, whimsical illustrations, or even personalized designs that perfectly complement your interior style – from rustic farmhouse to modern minimalist, vintage chic to bohemian eclectic. The possibilities are truly endless, allowing you to design your candles exactly as you envision them.
The magic of this technique lies in transferring the beautiful patterns and rich colors of multi-layered napkins onto the wax surface of a pillar candle, creating a seamless, professional-looking decorative effect. You don’t need extensive crafting experience or a cabinet full of expensive supplies. With just a few basic materials, readily available in most craft stores or even around your home, and a dash of patience, you can achieve impressive results. Dive into this guide to learn how to create these captivating DIY decoupage candles, making your home truly your own.
RELATED: DIY Vintage Outdoor Candle Holder Light
Why Choose DIY Decoupage Candles?
Beyond their aesthetic appeal, crafting your own decoupage candles offers a myriad of benefits:
- Unmatched Personalization: Unlike mass-produced candles, your DIY creations reflect your personal style and taste. You can choose napkin designs that match your seasonal decor, special events, or simply your favorite aesthetics.
- Cost-Effective Decor: High-end decorative candles can be expensive. This project utilizes inexpensive pillar candles and printed napkins, allowing you to create beautiful pieces at a fraction of the cost.
- Unique Gifts: Handmade gifts carry a special sentiment. Decoupage candles make thoughtful, personalized presents for birthdays, holidays, housewarmings, or any occasion.
- Therapeutic Crafting: Engaging in creative activities like candle decorating can be a wonderful stress-reliever, offering a mindful escape from daily routines.
- Eco-Friendly Potential: Give new life to plain candles or even partially used ones (if the surface is smooth) and utilize leftover napkins, promoting a sense of resourcefulness.
- Seasonal Versatility: Easily update your home decor for any season or holiday by simply changing the napkin patterns. Think festive designs for Christmas, pastels for spring, or autumnal leaves for fall.
Essential Materials for Decoupage Candles
Gathering your supplies is the first exciting step in any DIY project. For this candle decoupage technique, you’ll need just a few key items. Quality materials ensure a smoother process and a more professional finish.
- Printed Napkin: This is the star of your project! Choose napkins with vibrant patterns, detailed illustrations, or beautiful imagery. Ensure they are multi-layered (typically 2 or 3 ply), as you’ll only be using the top printed layer.
- Pillar Candle: Opt for a smooth, plain pillar candle. White or ivory candles work best as they allow the napkin design to show through clearly without color distortion. Ensure the surface is clean and free of dust or debris.
- Greaseproof Paper (Parchment Paper): Also known as baking paper or parchment paper, this is crucial for the heat transfer process. It creates a protective barrier, allowing the heat to melt the wax just enough to absorb the napkin’s top layer without damaging the design.
- Crafting Glue: A small amount of liquid crafting glue (like a clear-drying school glue or specific decoupage glue) can be helpful for temporarily positioning your napkin pieces. Ensure it dries clear.
- Scissors: Sharp scissors are essential for precise cutting of your chosen napkin patterns.
- Hair Dryer: Your primary heat source! A standard hair dryer on a medium to high heat setting will gently melt the candle wax, allowing the napkin design to fuse onto the surface.
Optional Materials to Enhance Your Project:
- Craft Knife or X-Acto Blade: For more intricate cuts on the napkin design.
- Soft Cloth or Sponge: For smoothing out the napkin and ensuring good adhesion after heating.
- Paintbrush: For applying crafting glue if you choose to use it more broadly, or for applying a sealant (after the entire process is complete).
- Masking Tape: Can be useful to temporarily secure larger pieces of greaseproof paper around the candle.
- Work Surface Protection: A newspaper or craft mat to protect your table from wax drips or glue.
Step-by-Step Directions: Decorating Your Candles
Now that you have all your materials ready, let’s dive into the simple steps to create your stunning decoupage candles. Remember, patience and a steady hand will lead to the best results.
Step 1: Prepare Your Napkin and Design Placement
Begin by carefully separating the layers of your chosen printed napkin. Most decorative napkins are 2-ply or 3-ply; you only need the very top layer that features the printed design. Gently peel away any unprinted layers, as these will prevent proper adhesion.
Once you have your single-ply design layer, roughly cut around the specific patterns, images, or sections of the napkin that you wish to transfer onto your candle. Don’t worry about being perfectly precise at this stage; a rough cut is sufficient. Consider how these pieces will fit together on your candle. Will they wrap around, be scattered, or form a specific collage?
Next, it’s time to determine the placement. Temporarily attach the cut napkin pieces to the candle using a very small amount of crafting glue. Apply just enough to hold the design in place without saturating the paper. This step is crucial for visualizing your final design and ensuring everything is positioned exactly where you want it before the heat transfer. Lightly press the napkin pieces onto the candle surface.
Step 2: Heat Transfer and Finishing Touches
Once your napkin pieces are positioned on the candle, carefully wrap the entire candle with greaseproof paper. Ensure the paper is snug against the candle and the napkin design. This paper acts as a barrier, protecting the delicate napkin from direct heat while allowing the underlying wax to melt and absorb the design. If you have larger or multiple pieces of napkin, make sure the greaseproof paper covers all decorated areas, extending slightly beyond them.
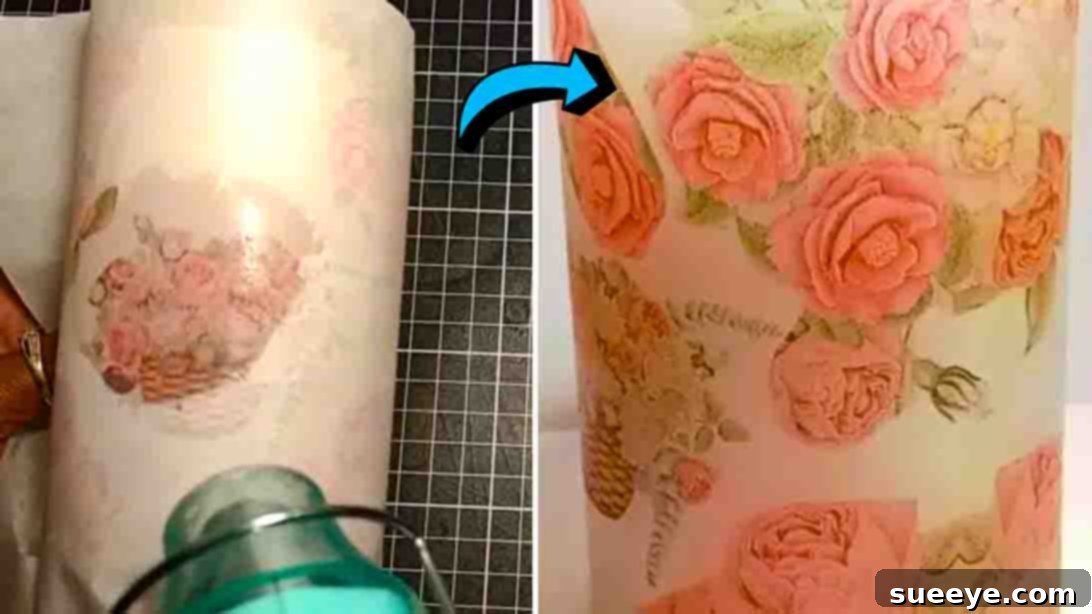
Now, take your hair dryer and begin to heat the candle through the greaseproof paper. Use a medium to high heat setting and move the hair dryer continuously over the areas where the napkin is placed. You’ll notice the wax beneath the napkin starting to melt slightly and darken, and the napkin design will become more transparent and vibrant as it fuses with the wax. Work slowly and evenly, ensuring consistent heat application.
As the wax melts and absorbs the napkin, gently rub the greaseproof paper against the candle surface with your fingers or a soft cloth. This action helps to smooth out any air bubbles or wrinkles and ensures optimal adhesion of the napkin to the wax. Continue heating and rubbing until the napkin looks fully integrated into the candle, with a smooth, almost painted-on appearance. The greaseproof paper might become slightly waxy itself, which is a good sign that the transfer is working.
Once you are satisfied with the transfer, turn off the hair dryer and allow the candle to cool for a few moments. Then, very gently and slowly peel away the greaseproof paper. Take care not to pull on the newly transferred design. Your DIY decoupage candle is now finished! Admire your unique creation.
Tips for Perfect Decoupage Candles
- Napkin Selection: Always use the top, printed ply of a multi-layered napkin. The thinner it is, the better it will fuse with the wax.
- Candle Surface: Ensure your candle is clean and smooth. Any imperfections will show through the napkin.
- Even Heating: Move your hair dryer constantly to prevent the wax from melting too much in one spot, which could distort the design or create drips.
- Smoothing Techniques: After heating, gently rub with a soft cloth or your fingers over the greaseproof paper to ensure all areas of the napkin are adhered and smooth. This also helps push out any trapped air bubbles.
- Overlapping Designs: For a seamless look when covering a larger area, try to overlap napkin pieces slightly. The edges will blend beautifully during the heating process.
- Full Coverage: For a completely covered candle, you can wrap a whole single-ply napkin around the candle, securing it with greaseproof paper before heating.
- Experiment with Tools: While a hair dryer is standard, some crafters use a heat gun (on a very low setting and from a greater distance) for faster results, but this requires more caution.
Troubleshooting Common Issues
Even with simple crafts, a few hiccups can occur. Here’s how to address them:
- Wrinkles or Bubbles: If you notice small wrinkles or air bubbles after removing the greaseproof paper, you can try reheating that specific area gently and rubbing it again with the greaseproof paper to smooth it out.
- Uneven Transfer: If parts of the napkin haven’t adhered well, it likely needs more heat and rubbing in that area. Reapply the greaseproof paper and repeat the heating and rubbing process.
- Wax Melting Too Much: If the candle wax starts to drip or deform, you’re using too much heat or holding the dryer in one spot for too long. Reduce the heat setting or increase the distance of the hair dryer.
- Napkin Tearing: The single ply of the napkin is very delicate. Handle it with care, especially when separating layers and positioning it on the candle. If a small tear occurs, often it can be blended in with careful heating.
Safety Precautions
While this is a simple craft, always prioritize safety:
- Hair Dryer Use: Be mindful of hot air and don’t aim the hair dryer at yourself or flammable objects for extended periods.
- Hot Wax: The candle wax will become warm/hot. Allow the candle to cool completely before handling it excessively after the heating process.
- Burn Decorated Candles Safely: Always place your decorated candles on a heat-resistant surface, away from drafts and flammable materials. Never leave a burning candle unattended. As the candle burns down, the flame should not come into direct contact with the paper design on the outside of the candle. For safety, it’s often recommended to use these candles more for decorative purposes, or to trim the wick to keep the flame small and centered. Alternatively, consider using LED pillar candles for a flameless, decorative option that beautifully showcases your decoupage work without any fire risk.
Care and Maintenance of Your Decoupage Candles
To ensure your beautifully decorated candles last, proper care is important:
- Storage: Store your candles in a cool, dry place away from direct sunlight, which can fade the napkin’s colors or cause the wax to melt and deform.
- Cleaning: If dust accumulates, gently wipe the candle with a soft, dry cloth. Avoid using water or harsh cleaners, which could damage the napkin design.
Unleash Your Creativity
Decorating candles with printed napkins is more than just a craft; it’s an opportunity to infuse your home with warmth, style, and a touch of your unique personality. Whether you’re making them for yourself, as thoughtful gifts for loved ones, or to add festive flair to a special occasion, these DIY decoupage candles are sure to impress.
So, gather your materials, choose your favorite napkin designs, and let your creativity shine. Don’t be afraid to experiment with different patterns, colors, and placements. The joy of DIY lies in the process and the satisfaction of creating something beautiful with your own hands. We encourage you to try this fantastic project and transform your home decor today!