
Irresistible Strawberry Crunch Ice Cream Cake: Your Ultimate Summer Dessert Recipe
Prepare to delight your taste buds and impress your guests with this incredibly refreshing and vibrant Strawberry Crunch Ice Cream Cake. Inspired by the genius of yoyomax12 – the diet free zone on YouTube, this layered dessert is an absolute showstopper, perfect for any summer gathering, backyard barbecue, or simply a sweet treat to beat the heat. Its captivating blend of creamy ice cream, crunchy cookie crust, and a delightful strawberry topping ensures every bite is a delightful surprise. Get ready to create a dessert that will have everyone asking for the recipe!
Why This Strawberry Crunch Ice Cream Cake Will Be Your New Favorite
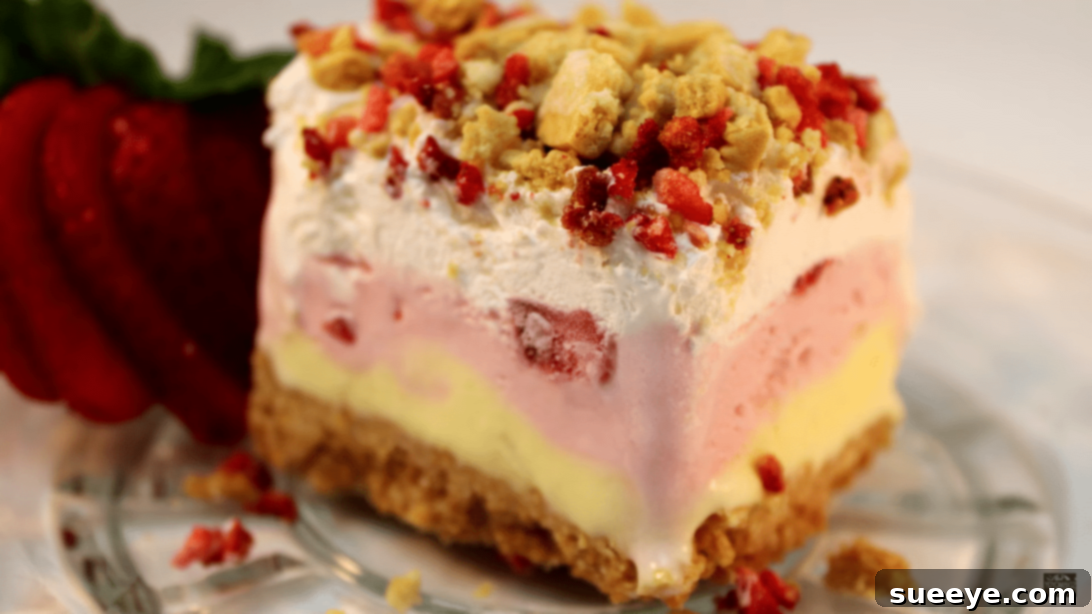
What makes this ice cream cake truly special? It’s more than just a dessert; it’s an experience. The magic lies in its dynamic textures and harmonious flavors. Imagine a rich, golden cookie crust providing a sturdy base, followed by layers of smooth vanilla and luscious strawberry ice cream, each offering a cool, melt-in-your-mouth sensation. But the real star is the signature strawberry crunch topping – a glorious medley of crushed Golden Oreos and freeze-dried strawberries that delivers an addictive textural contrast and an intense burst of fruity flavor. It’s a dessert that’s not only easy to assemble but also promises a feast for the senses, making it an instant hit with both kids and adults.
RELATED: If you love frozen desserts, don’t miss this Easy Copycat Dairy Queen Ice Cream Cake Recipe!
Gather Your Tools: Essential Equipment for Ice Cream Cake Success
While the recipe itself is straightforward, having the right tools on hand will make the process even smoother. You won’t need any specialized gadgets beyond common kitchen items. Make sure you have a reliable food processor for crushing cookies, a sturdy 9×9-inch baking pan (preferably with straight sides for neat slices), and parchment paper for easy removal. You’ll also need mixing bowls, a spatula or offset spatula for spreading the ice cream and whipped topping evenly, and measuring cups and spoons. A good freezer with ample space is also crucial to ensure each layer sets perfectly and the final cake achieves its ideal firm consistency.
Ingredients for Your Strawberry Crunch Ice Cream Cake: The Perfect Blend
The beauty of this recipe lies in its simple yet impactful ingredients, each playing a vital role in creating the ultimate Strawberry Crunch Ice Cream Cake. Choose quality ingredients to ensure the best flavor and texture in your finished dessert.
- 36 Golden Oreo Cookies: The foundational crunch! You’ll use 24 cookies for the buttery crust, providing a golden, slightly sweet base, and the remaining 12 for the signature crunchy topping. Their vanilla flavor perfectly complements the strawberries.
- ¼ cup Unsalted Butter, melted: Essential for binding the crushed Oreos into a firm, delicious crust. Using unsalted butter allows you to control the overall saltiness.
- 3 cups Vanilla Ice Cream, softened: Forms the creamy, classic base layer atop the cookie crust. Ensure it’s softened enough to spread easily but not completely melted to avoid a watery consistency.
- 5 cups Strawberry Ice Cream, softened: The star flavor! This layer brings the vibrant, fruity essence to the cake. Like the vanilla, soften it just enough for smooth spreading.
- 2 cups Cool Whip or other Whipped Topping: Provides a light, airy, and creamy final layer that balances the richness of the ice cream and offers a soft contrast to the crunch.
- ½ cup Freeze-Dried Strawberries, crushed: This ingredient is key to the “crunch” in the topping. Freeze-dried strawberries offer an intense, concentrated strawberry flavor and a delightful crisp texture that holds up well.
- ½ cup Fresh Strawberries, chopped (optional): While optional, a layer of fresh strawberries between the ice cream layers adds a burst of natural sweetness, vibrant color, and a juicy bite, enhancing the overall freshness of the cake.
How to Make Strawberry Crunch Ice Cream Cake: Step-by-Step Guide
Step 1: Preparing the Golden Oreo Crust
Begin by preheating your oven to 350°F (175°C). This preheating step is crucial for achieving a perfectly crisp crust. Line a 9×9-inch baking pan with parchment paper, ensuring there’s an overhang on all sides. This thoughtful preparation will allow for easy lifting and removal of the finished cake later on. Next, place 24 Golden Oreo cookies into a food processor. Process them until they are finely crushed, resembling coarse sand. Transfer these crushed cookies to a small mixing bowl and combine them thoroughly with the ¼ cup of melted butter. The butter acts as a binder, holding the crumbs together. Press this mixture firmly and evenly into the bottom of your prepared baking pan. A flat-bottomed glass or the back of a spoon can help you achieve a compact, uniform layer. Bake the crust in the preheated oven for approximately 15 to 20 minutes, which will help set it and create a delightful crispness. Once baked, remove it from the oven and allow it to cool completely before transferring it to the refrigerator to chill for at least 30 minutes. A well-chilled crust provides a stable base for your ice cream layers.
Step 2: Layering the Creamy Ice Cream Perfection
Once your Golden Oreo crust is thoroughly chilled and firm, it’s time to add the first ice cream layer. Evenly spread the softened vanilla ice cream over the crust. The key here is to work quickly and efficiently while the ice cream is spreadable but not fully melted. Use an offset spatula or the back of a spoon to create a smooth, consistent layer. Cover the pan tightly with plastic wrap or aluminum foil and return it to the freezer. Allow it to freeze until thoroughly set, which typically takes at least 2-3 hours. This critical freezing time ensures that your layers remain distinct and don’t bleed into each other. Once the vanilla layer is firm, spread the softened strawberry ice cream evenly on top. If you’re using fresh strawberries, sprinkle the chopped pieces over the strawberry ice cream layer before covering the pan again and returning it to the freezer until firm, another 2-3 hours. Patience during these freezing steps will result in a beautifully defined and structured ice cream cake.
Step 3: Creating the Signature Crunch Topping and Final Freeze
For the grand finale, it’s time to add the luscious whipped topping and the iconic strawberry crunch. Spread the whipped topping evenly over the firm strawberry ice cream layer, creating a smooth and appealing finish. For the crunch topping, coarsely crush the remaining 12 Golden Oreo cookies. You can do this in the food processor for a few pulses, or by placing them in a Ziploc bag and crushing them with a rolling pin for varying textures. Combine these crushed cookies with the crushed freeze-dried strawberries in a small bowl. The freeze-dried strawberries contribute an intense berry flavor and that delightful crisp texture. Evenly sprinkle this strawberry crunch mixture over the whipped topping. Gently press the topping down slightly to ensure it adheres well to the whipped layer. Cover the cake again, making sure the plastic wrap doesn’t touch the topping, and return it to the freezer for a final, crucial freeze. For the best results and a perfectly firm, sliceable cake, leave it to freeze for at least 8 hours, or ideally, overnight. When you’re ready to serve, simply lift the cake out of the pan using the parchment paper overhang, slice, and enjoy!
Tips for a Perfect Strawberry Crunch Ice Cream Cake
- Soften Ice Cream Just Right: Don’t let your ice cream melt completely. It should be soft enough to spread easily, but still hold its shape to ensure distinct, creamy layers.
- Chill Between Layers: This is arguably the most important tip. Adequate freezing time between each layer prevents them from mixing and ensures a beautiful presentation and firm texture.
- Parchment Paper is Your Friend: The parchment paper overhang makes removing the cake from the pan a breeze, ensuring your beautiful creation stays intact.
- Even Spreading: Use an offset spatula or the back of a spoon to spread each layer as evenly as possible for a professional look.
- Crush Wisely: For the topping, experiment with crushing the Golden Oreos to different consistencies for varying textures in the crunch.
- For Cleaner Slices: Dip your knife in hot water and wipe it clean between each slice. This will give you perfectly neat portions.
Creative Variations to Try
While the classic Strawberry Crunch Ice Cream Cake is utterly delicious, don’t hesitate to get creative with variations! You could swap Golden Oreos for vanilla wafers or shortbread cookies in the crust and topping. Experiment with different ice cream flavors—chocolate, mint chip, or even a lemon sorbet could add an interesting twist. Other freeze-dried fruits like raspberries or blueberries could replace strawberries in the crunch topping for a different berry profile. Add a drizzle of white chocolate or a layer of fudge for an extra touch of decadence. The possibilities are endless, allowing you to tailor this dessert to your personal preferences.
Storing Your Delicious Creation
This Strawberry Crunch Ice Cream Cake is best enjoyed when freshly frozen, but it also stores beautifully. Keep any leftovers tightly covered with plastic wrap or in an airtight container in the freezer. Proper storage will help prevent freezer burn and keep the cake fresh for up to two weeks. Before serving, you might want to let it sit at room temperature for 5-10 minutes to soften slightly for easier slicing, but don’t let it sit out too long!
Your New Go-To Summer Dessert
This Easy Strawberry Crunch Ice Cream Cake is more than just a recipe; it’s an invitation to create joy. Its delightful layers, vibrant flavors, and unforgettable crunch make it a truly special dessert that’s sure to become a beloved staple in your recipe collection. Whether you’re hosting a big party or simply craving a refreshing treat, this cake delivers on all fronts – ease, flavor, and visual appeal. So, roll up your sleeves, gather your ingredients, and prepare to whip up a masterpiece that will bring smiles to every face. Don’t forget to visit yoyomax12 – the diet free zone on YouTube for more fantastic recipes and inspiration!