
Craft Your Own Cozy Ambiance: An Easy DIY Popsicle Stick Lantern Tutorial
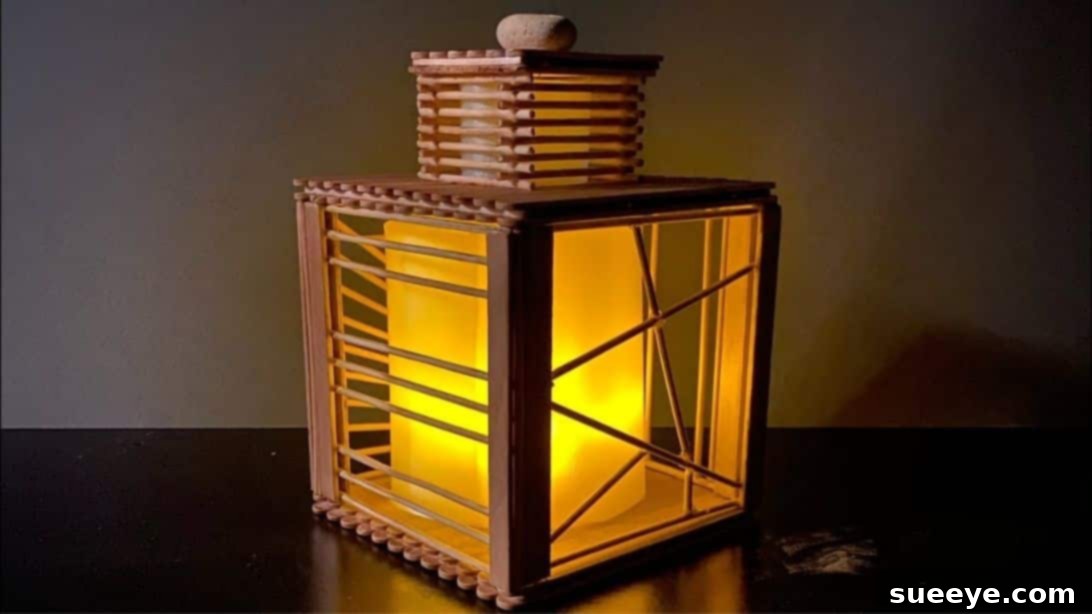
Dreaming of a home filled with unique, handcrafted decor but hesitant about the price tag? You’re in luck! Creating a beautiful, ambient lantern doesn’t have to be expensive or complicated. This comprehensive guide will walk you through the process of making your very own charming lantern using readily available and budget-friendly materials like popsicle sticks and bamboo skewers. Not only is this a fulfilling DIY project, but the resulting lantern will add a warm, inviting glow to any room, perfect for creating a cozy atmosphere. Learn how to easily craft this delightful piece by following our detailed steps, inspired by the creative insights from The lockdown tinker on YouTube.
Why Choose a DIY Popsicle Stick Lantern?
In a world dominated by mass-produced items, there’s a unique satisfaction in decorating your space with handmade crafts. A DIY popsicle stick lantern offers numerous advantages beyond just aesthetics:
- Budget-Friendly Decor: Popsicle sticks and bamboo skewers are incredibly inexpensive, making this an ideal project for anyone looking to spruce up their home without breaking the bank.
- Unleash Your Creativity: This project provides a fantastic canvas for personalization. You can experiment with different designs, colors, and embellishments to match your personal style and home decor.
- Eco-Conscious Crafting: By utilizing simple wooden sticks and repurposing a plastic container, you’re engaging in a form of sustainable crafting, giving new life to everyday items.
- Engaging for All Ages: While adult supervision is recommended for hot glue guns and sharp tools, the basic assembly of sticks can be a fun and engaging activity for families, fostering creativity and fine motor skills.
- A Unique Gift Idea: A handmade lantern makes for a thoughtful and personalized gift for friends and family, showing effort and care that store-bought items simply can’t replicate.
- Achieve Hygge at Home: The soft, diffused light from a lantern is synonymous with “hygge” – the Danish concept of coziness and comfortable conviviality. Your handmade lantern will be a perfect addition to creating such an environment.
Essential Materials for Your Lantern Project:
Gathering all your supplies before you begin will ensure a smooth crafting experience. Most of these items can be found at local craft stores, hardware stores, or even around your home.
- Popsicle Sticks (Craft Sticks): You’ll need a generous supply for the base, lid, and structural elements.
- Bamboo Skewers: These will form the delicate framework and decorative panels of your lantern.
- Heavy-Duty Kitchen or Craft Scissors: Essential for precisely cutting popsicle sticks and bamboo skewers. A small utility knife can also be useful for cleaner cuts on bamboo, but always exercise caution.
- Hot Glue Gun and Ample Glue Sticks: The primary adhesive for this project, allowing for quick bonding and strong holds.
- Small Plastic Container: An empty milk carton or juice box, thoroughly cleaned and dried, will be repurposed for the internal light housing.
- Wood Varnish or Sealant: To protect the wood, enhance its natural grain, and give your lantern a polished, finished look. Alternatively, wood stain or paint can be used for a different aesthetic.
- Fake LED Candle: A battery-operated LED candle is recommended for safety, eliminating fire hazards associated with open flames.
- Small Decorative Pebble: Or any small, aesthetically pleasing object that can serve as a handle for the lantern’s lid.
Step-by-Step Guide: Crafting Your Popsicle Stick Lantern
Follow these detailed instructions carefully to bring your unique popsicle stick lantern to life. Precision and patience are key!
Step 1: Preparing the Base, Lid, and Side Panels
Your lantern’s foundation and decorative sides are built in this crucial initial stage. Take your time to ensure accuracy.
- Constructing the Base and Lid: Begin by laying out several popsicle sticks side by side on a flat surface. The exact number will depend on the desired width of your lantern’s base, typically matching the length of a single popsicle stick. Once you’ve achieved the desired dimension, secure them together by hot gluing three additional popsicle sticks horizontally across the assembly: one near the top edge, one near the bottom edge, and one precisely in the center. This creates a sturdy panel. To give it a more refined and concealed finish, glue another set of three sticks directly on top of the first three horizontal sticks, effectively sandwiching the vertical sticks between two layers of horizontal supports. Repeat this entire process to create a second identical panel. These two panels will serve as the main base and the top lid of your lantern.
- Varnishing the Base and Lid: Once your base and lid panels are securely assembled, apply a coat of wood varnish evenly across their surfaces. Varnish not only protects the wood but also brings out its natural beauty and provides a professional finish. Allow them to dry completely according to the varnish manufacturer’s instructions. Proper drying is essential before proceeding to the next steps.
- Preparing Sticks and Skewers for Side Panels: While the varnish dries, prepare the components for the lantern’s side walls. Take four popsicle sticks and carefully cut off their curved top and bottom ends, making them perfectly straight and uniform in length. These will form the vertical supports for your side panels. Next, cut two bamboo skewers to the exact same length as these straightened popsicle sticks.
- Designing the First Side Panel: Lay two of the straightened popsicle sticks vertically, parallel to each other. These will act as the outer frame. Now, take two of your cut bamboo skewers and glue them horizontally across the top and bottom of these vertical sticks, forming a perfect rectangle or square. This creates a basic frame for one side panel.
- Adding Decorative Elements to Side Panels: This is where your creativity shines! Cut additional bamboo skewers into various lengths and use them to create intricate patterns or simple geometric designs within the bamboo frame you just built. You can make criss-cross patterns, parallel lines, or unique abstract shapes. Secure all these decorative bamboo pieces with hot glue.
- Creating Remaining Side Panels: Repeat steps 4 and 5 three more times, designing a total of four identical (or uniquely designed) side panels. Ensure all panels are uniform in size for a cohesive lantern structure.
- Staining/Varnishing Side Panels: Once all four side panels are assembled and the glue has dried, apply your chosen wood stain or varnish to them. This will protect the bamboo and popsicle stick components and unify their appearance with the base and lid. Allow these panels to dry thoroughly.
Step 2: Assembling the Lantern Structure and Adding Details
With all your components ready, it’s time to bring them together to form the complete lantern, adding the final decorative and functional elements.
- Assembling the Walls: Carefully take your four dried side panels. Apply hot glue along the vertical edges of one panel and attach it perpendicular to an adjacent panel, forming a corner. Continue this process, gluing all four side panels together to construct the four walls of your lantern. Ensure they are upright and form a stable square or rectangular structure.
- Attaching Walls to the Base: Once the wall structure is stable, apply a generous line of hot glue along the bottom edges of the assembled walls. Carefully center and press this structure onto one of your varnished popsicle stick panels, which will now serve as the lantern’s base. Hold firmly until the glue sets, ensuring a strong bond.
- Finishing the Corners: For a neat and finished look, you may find small gaps or imperfect joins at the corners where the side panels meet. Cut thin strips or small segments of bamboo skewers to precisely fit and fill these spaces, gluing them into place. This adds structural integrity and a refined aesthetic.
- Preparing the Top Panel for Light: Take the second varnished popsicle stick panel (your lid). Using a craft knife or drill, carefully cut a small circular hole in the exact center of this panel. This hole will eventually house the upper part of your internal light structure.
- Building the Top Light Housing: Cut several small bamboo skewers. Begin by gluing two skewers on either side of the hole you just cut, running parallel to each other. Then, glue two more skewers on top of these, but positioned perpendicular to the first set. Continue alternating this pattern, building up layers of bamboo skewers around the hole until you reach a desired height. This creates a chimney-like structure that will hold part of the plastic container.
- Creating the Upper Decorative Layer: Cut popsicle sticks to the same length as the bamboo skewers you used to build the top light housing. Glue one popsicle stick horizontally across the top of this bamboo structure, and another across the bottom. Then, stack and glue another set of popsicle sticks on top of these, just as you did when creating the base and lid. This provides a finished look for the top assembly.
- Preparing the Plastic Container: Take your small plastic container (e.g., milk carton). Carefully cut around its body to obtain two rectangular pieces: one small and one larger. These will be rolled and placed inside the lantern.
- Inserting the Internal Light Mechanism: Roll up the smaller rectangular plastic piece tightly enough to fit snugly inside the bamboo skewer structure you built around the hole in the lid. Glue it in place within the bamboo cage.
- Attaching the Lid and Handle: Now, carefully glue the completed lid (with the internal plastic housing) onto the top edges of your lantern’s walls. Ensure it’s centered and secure. For a decorative and functional handle, glue your small pebble or chosen ornament securely on top of the lid, directly above the central plastic insert.
- Final Light Installation: Roll up the larger plastic piece you cut from the container. Gently place it inside the main body of the lantern, ensuring it sits neatly on the base. This acts as a diffuser and protector for your light source. Finally, place your fake LED candle inside this plastic housing. Carefully put the lid back on, aligning it properly.
Tips for a Perfect Popsicle Stick Lantern
- Precision is Key: Measure twice, cut once! Accurate measurements for all sticks and skewers will ensure a perfectly aligned and sturdy lantern.
- Hot Glue Gun Safety: Always handle the hot glue gun with care to avoid burns. Work in a well-ventilated area and keep a bowl of cold water nearby in case of accidental contact.
- Drying Time Matters: Allow ample drying time for varnish or stain before assembling. Rushing this step can lead to smudges or a less durable finish.
- Level Surfaces: Always work on a flat, stable surface to prevent your lantern components from shifting or becoming misaligned during assembly.
- Test Fit Before Gluing: Before applying glue, dry-fit pieces together to ensure they align correctly. This saves time and avoids messy re-dos.
- Alternate Adhesives: While hot glue is fast, for extra strength, you can use wood glue for the main structural components, allowing longer drying times.
Customizing Your Lantern: Personal Touches
Don’t stop at the basic design! Here are some ideas to make your lantern truly unique:
- Paint or Stain: Instead of clear varnish, consider painting your lantern in colors that match your room decor, or using a darker wood stain for a rustic look.
- Embellishments: Add small beads, twine, fabric scraps, or miniature charms to the bamboo designs for extra flair.
- Different Light Sources: While LED candles are safest, small, battery-operated fairy lights or LED string lights can also be woven inside for a different effect.
- Varying Sizes and Shapes: Once you’ve mastered the basic design, experiment with making larger or smaller lanterns, or even ones with different base shapes like octagons.
- Themed Designs: Create holiday-themed lanterns (e.g., with small ornaments for Christmas) or seasonal designs.
Conclusion: Illuminate Your Space with Handmade Charm
Congratulations! You’ve successfully crafted a beautiful and unique popsicle stick lantern that adds a personal touch to your home decor. This project not only demonstrates that stunning results can be achieved with simple materials and a little creativity, but it also provides the satisfaction of a handmade item. Place your new lantern on a shelf, bedside table, or as a centerpiece to enjoy its warm glow. Embrace the joy of DIY and let your handcrafted lantern illuminate your space with unique charm and coziness.
*All image credit belongs to The lockdown tinker via YouTube. Follow and subscribe to his channel for more inspiring DIY projects!