
Transform Ordinary Plastic Spoons into Exquisite DIY Flowers: A Step-by-Step Guide to Upcycled Decor
Are you searching for a unique, budget-friendly, and eco-conscious way to add a touch of handmade beauty to your home? Look no further! This exciting DIY project allows you to transform humble plastic spoons, often destined for landfills, into stunning decorative flowers. It’s a fantastic opportunity to unleash your creativity, personalize your living space, and contribute to a more sustainable lifestyle. Whether you’re an experienced crafter or just starting your DIY journey, the process of making these plastic spoon flowers is immensely rewarding and surprisingly simple once you get the hang of it.
Imagine adorning your walls with a vibrant floral arrangement made entirely from recycled materials, or crafting a charming centerpiece that sparks conversation among your guests. This craft is not only about creating beautiful objects; it’s about seeing potential in the everyday, giving new life to discarded items, and adding a personal touch that store-bought decor simply can’t match. Plus, with most supplies likely already in your home or easily found at a dollar store, it’s an incredibly accessible project for almost everyone.
Why Choose This Upcycled Plastic Spoon Flower DIY?
In a world increasingly focused on sustainability and mindful consumption, upcycling projects like this one offer numerous benefits beyond just aesthetic appeal. This particular craft stands out for several compelling reasons:
-
Eco-Friendly Crafting at Its Best
One of the primary advantages of this project is its commitment to recycling. Instead of contributing to plastic waste, you’re diverting spoons from the trash and giving them a second, beautiful life. This small act of upcycling makes a tangible difference, transforming potential pollutants into charming pieces of art. It’s a creative way to be environmentally responsible and inspire others to rethink their waste.
-
Budget-Friendly Beauty for Every Home
You don’t need expensive materials to create breathtaking decor. Plastic spoons are incredibly inexpensive, often found in bulk at dollar stores or even saved from parties and events. Combined with common household items like scissors, candles, and a bit of spray paint, this project keeps your crafting costs minimal. This makes it an ideal option for those who love decorating but are mindful of their budget, proving that stunning home accents don’t have to come with a hefty price tag.
-
Unleash Your Creativity with Limitless Customization
The versatility of plastic spoon flowers is truly remarkable. You have complete control over the color palette, allowing you to match your existing decor perfectly or experiment with bold new schemes. While using pre-colored spoons can save time, spray painting offers endless possibilities. Imagine gradient effects, metallic finishes, or a stunning array of colors from the same family to create incredibly realistic and unique floral arrangements. This level of personalization ensures that your finished pieces are truly one-of-a-kind and reflect your individual style.
-
Unique Home Decor That Stands Out
These aren’t your average store-bought flowers. Each plastic spoon flower you create will possess its own unique character, showcasing the handcrafted charm that mass-produced items lack. They serve as excellent conversation starters and add an intriguing textural element to any room. Whether arranged in a vase, incorporated into a wreath, or used as a decorative accent, these upcycled blooms are guaranteed to catch the eye and infuse your home with an artistic, personal touch.
Essential Materials You’ll Need for Your Project
Gathering your supplies is the first step towards crafting these beautiful flowers. You’ll find that most items are readily available, making this a very accessible DIY:
- Plastic Spoons: The star of our show! You’ll need a generous quantity, depending on how many flowers you plan to make and how full you want each bloom to be. White plastic spoons are ideal if you plan to paint them, but colored ones can also be used as a base.
- Sharp Scissors: Essential for cleanly cutting the handles off your spoons. A sturdy pair will make this task much easier and safer.
- Candle or Heat Gun: This is the heat source you’ll use to soften and mold the plastic spoons into petal shapes. A simple tea light or pillar candle works well, but a heat gun offers more controlled heat, though it requires extra caution.
- Heavy-Duty Gloves: Protect your hands from the heat and potential burns while working with the softened plastic.
- Safety Glasses: Crucial for protecting your eyes from any accidental flickers of flame or stray plastic particles.
- Spray Paint (Plastic-Compatible): Choose colors that inspire you! Ensure the paint is specifically designed for plastic to guarantee proper adhesion and a long-lasting finish. Regular spray paint might not stick well and could peel or flake over time.
- Hot Glue Gun and Glue Sticks: Your primary tool for assembling the petals into a cohesive flower. Hot glue provides a strong, quick-drying bond.
- Styrofoam Block or Cardboard Box: Incredibly useful for holding your painted petals upright while they dry, ensuring an even coat and preventing smudges.
- Optional Embellishments: Consider floral wire (for stems), beads (for flower centers), glitter, or decorative elements to add an extra layer of sparkle and realism to your finished flowers.
Step-by-Step Guide: Crafting Your Plastic Spoon Flowers
Now that you have all your materials, let’s dive into the creative process. Remember to take your time and prioritize safety at every stage.
Step 1: Prepare Your Spoons
Begin by cleaning your plastic spoons thoroughly, especially if you’ve recycled them from a party. Once dry, use your sharp scissors to carefully cut off the handles of the spoons, leaving only the bowl portion. Aim for a clean, smooth cut near the base of the bowl. The precise length you leave might vary slightly depending on how deep you want your petals, but generally, you’ll be working with just the spoon head.
Step 2: Shaping the Petals with Heat
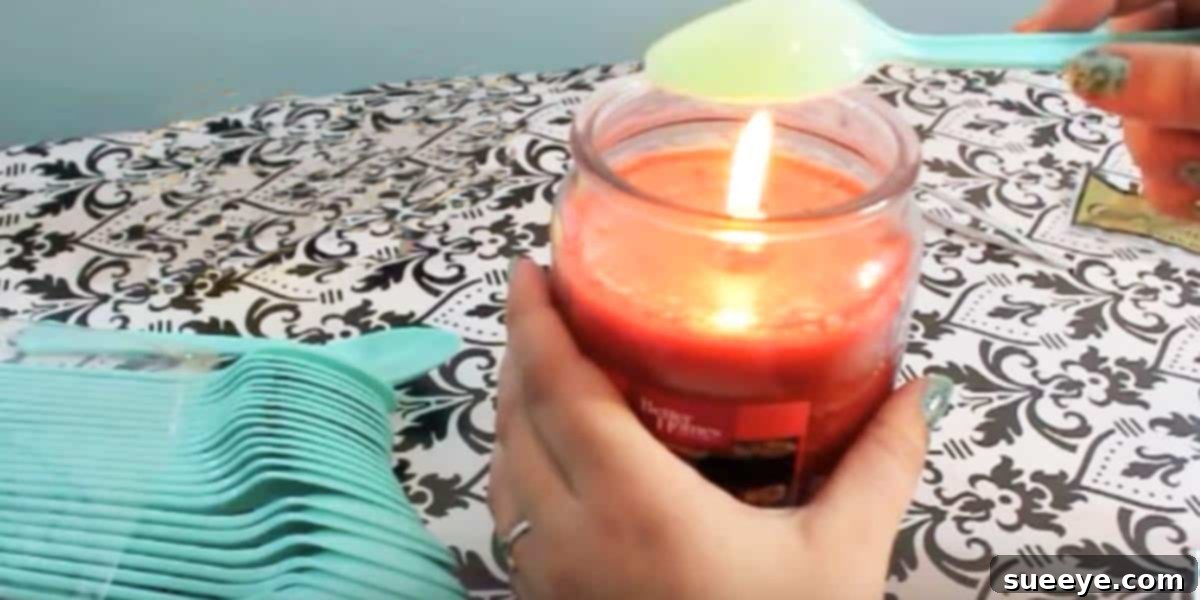
This is where the magic happens, but it requires extreme caution. Set up your workspace in a well-ventilated area, preferably outdoors or near an open window. Have a heat-resistant surface and a bowl of water nearby, just in case. Don your heavy-duty gloves and safety glasses.
Hold the bowl of a spoon (with the cut end) approximately an inch or two above the flame of a candle or directly under the heat gun. Rotate the spoon slowly and consistently to ensure even heating. As the plastic softens, you’ll notice it becoming pliable. This is your cue to gently mold it into a petal shape. For inner petals, you might want a tighter, more cupped curl. For outer petals, a flatter, slightly ruffled edge can create a more natural look. Experiment with different amounts of heat and molding techniques to create a variety of petal shapes. Be careful not to overheat the plastic, as it can burn, melt unevenly, or even release fumes. If it starts to bubble or smoke excessively, remove it from the heat immediately. Practice on a few spoons until you feel comfortable with the process.
Step 3: Painting Your Petals for Vibrant Colors
Once you’ve shaped all your desired petals and they have completely cooled, it’s time to add color. Place your shaped petals on a Styrofoam block or puncture them into a cardboard box, standing them upright. This method allows you to spray all sides evenly without touching them and risking smudges. In a well-ventilated area (ideally outdoors), apply light, even coats of your chosen spray paint. Multiple thin layers are always better than one thick coat, as it prevents drips and ensures a smoother finish. If you’re aiming for a multi-tonal or ombre effect, apply a base color first, let it dry, then layer a lighter or darker shade on the edges. Allow each coat to dry completely according to the spray paint manufacturer’s instructions before applying the next or handling the petals.
Step 4: Assembling Your Beautiful Flower
With your painted petals fully dry, it’s time to assemble your floral masterpiece. Heat up your hot glue gun. Start by creating the center of your flower. Take a small, tightly curled petal (or two) and use a dab of hot glue to form the very core bud. Then, begin layering additional petals around this center. Work outwards, overlapping each petal slightly to create a fuller, more realistic bloom. Apply a small amount of hot glue to the base of each petal and press it firmly against the previous layer. Continue adding layers until your flower reaches your desired size and fullness. You can experiment with different arrangements to create unique textures and forms for each flower.
Step 5: Adding Finishing Touches and Enhancements
Once the main flower is assembled and the glue has set, you can add final embellishments. A small bead or a dot of glitter glue in the very center can act as a stamen, adding a touch of sparkle. If you wish to create a flower with a stem, you can hot glue a piece of floral wire to the back of your finished flower. You can also attach a small loop of twine or a hanger if you intend for it to be wall art. Ensure all glue is dry and secure before handling or displaying your new creation.
Safety First: Important Considerations for This Project
While incredibly rewarding, this DIY project involves working with heat and spray paint, which necessitates strict safety precautions. It is absolutely crucial to understand that this is **not a suitable craft for children**.
-
Adults Only
The use of open flames or heat guns to soften plastic poses burn risks and potential fire hazards. The fumes from melting plastic and spray paint can also be harmful. For these reasons, this project should only be undertaken by adults or under very strict, direct adult supervision, though it’s generally recommended for adults to work alone.
-
Heat Safety Protocols
When working with a candle flame or heat gun, ensure you are in a very well-ventilated area, preferably outdoors. Keep a bowl of water or a fire extinguisher nearby in case of accidental ignition. Always work on a heat-resistant surface, away from flammable materials. Wear heavy-duty, heat-resistant gloves to protect your hands from the hot plastic and potential burns. Safety glasses are a must to shield your eyes from any plastic particles or accidental flame flickers.
-
Spray Paint Safety Guidelines
Spray painting should always be done in a well-ventilated area, ideally outdoors, to prevent inhaling harmful fumes. Wear a respirator or a face mask designed for paint fumes. Protect your skin by wearing long sleeves and gloves, and cover your work surface with newspaper or a drop cloth to prevent overspray on unintended areas. Allow painted items to dry in a well-ventilated space away from living areas.
Creative Variations and Applications for Your Spoon Flowers
The beauty of this craft lies in its incredible adaptability. Once you master the basic technique, the possibilities for integrating these unique flowers into your home decor are endless:
- Stunning Bouquets and Centerpieces: Combine several flowers of varying sizes and colors to create a captivating floral arrangement. Add some artificial leaves or natural branches for a mixed media look.
- Eye-Catching Wall Art: Arrange your flowers on a canvas, a piece of wood, or directly onto a wall to create a beautiful three-dimensional art piece. You can create a mosaic of colors and shapes.
- Decorative Wreaths: Attach your plastic spoon flowers to a plain wreath base (grapevine, foam, or wire) for a vibrant, long-lasting decorative wreath for your front door or interior walls.
- Lampshade Embellishments: Carefully glue smaller flowers around the base or top of a lampshade to add a delicate, textured detail that casts interesting shadows when lit.
- Unique Gift Toppers: Instead of traditional bows, adorn gifts with a handmade plastic spoon flower for a truly personal and memorable touch.
- Mixed Media Projects: Combine these flowers with other craft elements like fabric, paper, or natural materials to create intricate, multi-textured artworks.
- Seasonal Decor: Use appropriate colors for different holidays – reds and greens for Christmas, pastels for Easter, oranges and browns for autumn.
Experiment with different types of plastic spoons – clear ones can be dyed, and larger serving spoons can create bigger, bolder blooms. Don’t be afraid to mix and match colors, finishes (matte, glossy, metallic), and sizes to achieve truly spectacular results.
Pro Tips for Crafting Success
To ensure your plastic spoon flower project goes smoothly and yields the best results, keep these handy tips in mind:
- Start Small and Practice: If it’s your first time, don’t aim for a grand masterpiece immediately. Practice shaping a few spoons to get a feel for the heat and pliability of the plastic before committing to your main project.
- Control the Heat: The key to perfectly shaped petals is controlled heating. Don’t hold the spoon too close to the flame or heat gun, and keep it moving to prevent scorching or uneven melting.
- Thin, Even Paint Coats: Patience with painting pays off. Multiple thin layers of spray paint will always look better and last longer than one thick, drippy coat.
- Layering is Key for Realism: When assembling, think about how real flowers are structured. Start with tighter, smaller petals in the center and gradually add larger, looser petals around the outside to achieve a natural, full look.
- Don’t Rush the Drying Process: Allow paint and glue to dry completely before handling or assembling further. Rushing can lead to smudges, weakened bonds, and overall messiness.
- Experiment with Color Palettes: Don’t limit yourself to single colors. Try creating ombre effects, using contrasting colors for different layers, or adding metallic accents for a sophisticated touch.
Conclusion
Embarking on the plastic spoon flower DIY project is a journey into creative upcycling that offers immense satisfaction. From the simple act of preparing a spoon to the intricate assembly of a vibrant bloom, each step is an opportunity to craft something beautiful and sustainable with your own hands. You’ll not only create stunning, personalized decor but also contribute to reducing plastic waste, making it a truly rewarding endeavor.
So, gather your supplies, ignite your creativity, and get ready to transform ordinary plastic spoons into extraordinary floral art. The joy of seeing your unique creations adorn your home is unmatched, and the process itself is a delightful escape into the world of handmade beauty. We encourage you to give this project a try and discover the endless possibilities of upcycled crafting!