
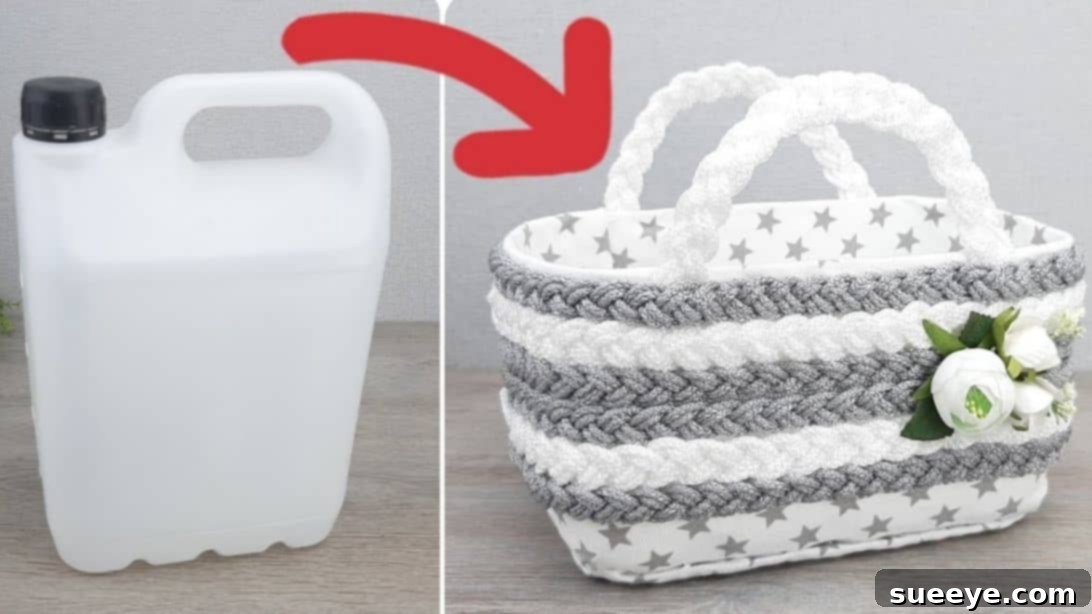
Transform Old Plastic Canisters into Beautiful DIY Storage Baskets: An Eco-Friendly Craft Project
Are you looking for innovative and creative ways to repurpose those old plastic canisters that have been accumulating around your home? Instead of discarding them and contributing to landfill waste, imagine transforming them into adorable, functional storage baskets that can elegantly organize any room. This comprehensive guide will walk you through the satisfying process of upcycling your forgotten containers into charming, homemade organizers. Not only is this a fantastic opportunity to declutter and infuse your living space with a personal touch, but it’s also an incredibly rewarding and eco-friendly craft. This ingenious project, originally inspired by the masterful crafter Супер Идейка via YouTube, offers a simple yet elegant solution to your everyday storage dilemmas. Prepare to unleash your creativity, embrace sustainable crafting, and give those old canisters a delightful new purpose!
Essential Materials for Your Upcycled Basket Project
Before you embark on this exciting crafting journey, it’s crucial to gather all your necessary supplies. Having everything meticulously prepared beforehand will ensure a smooth, enjoyable, and uninterrupted DIY experience. The inherent beauty of this project lies in its remarkable flexibility; feel free to adapt the colors, textures, and embellishments to perfectly match your personal style and the existing aesthetic of your home.
- Plastic Canister: This is the fundamental component and the star of our upcycling project. Seek out sturdy plastic canisters of various sizes from common household items such as laundry detergent, coffee, or even food storage containers. It is absolutely essential that they are thoroughly cleaned, sanitized, and completely dried before you begin any work. The specific shape and size you choose will significantly influence the final look, capacity, and overall utility of your finished basket.
- Yarn (Gray and White Recommended): Yarn will be meticulously used to create the beautiful, intricate braided design that imparts your basket with its charming, rustic, and handcrafted appeal. While classic gray and white offer a timeless and versatile aesthetic that complements many decors, do not hesitate to bravely experiment with any colors or textures that genuinely inspire your creative vision. Consider exploring different yarn weights for varied effects – thicker yarns will naturally produce bolder, more prominent braids, whereas finer yarns will yield a more delicate and intricate finish.
- Dense Fabric: This carefully selected fabric will serve a dual purpose: it will elegantly line the inside of your basket, providing a clean and soft interior, and it will also cover the exterior base, contributing to both a polished finish and enhanced structural integrity. Opt for a durable, non-fraying fabric such as robust canvas, repurposed denim scraps, soft felt, or even sturdy cotton. Choose a color that harmoniously complements your chosen yarn and seamlessly integrates with your existing home decor scheme.
- Cardboard: Cardboard is an absolutely essential material for creating a stable, firm, and durable bottom for your basket. Any clean, sturdy cardboard sourced from old shipping boxes or packaging will work perfectly for this purpose. Generally, the thicker the cardboard you use, the more robust and long-lasting your basket’s base will ultimately be, ensuring it can hold various items without sagging.
- Glue Gun: Your reliable glue gun will be your primary adhesive tool throughout this project. A hot glue gun offers rapid-setting, incredibly strong bonds, which are crucial for securely attaching fabric, yarn, and cardboard elements quickly and efficiently.
- Glue Sticks: Ensure you have an ample supply of high-quality hot glue sticks readily available to avoid any frustrating interruptions during your crafting session. Investing in good quality glue sticks will guarantee superior adhesion and a more durable finish for your basket.
- Artificial Flowers or Other Embellishments: These delightful items are reserved for the final decorative touches that will truly personalize your basket and make it uniquely yours. Consider incorporating artificial leaves, elegant ribbons, charming buttons, sparkling beads, or even small decorative charms. Allow your imagination to soar freely to create a truly one-of-a-kind piece that reflects your individual style and taste.
Step-by-Step Guide to Crafting Your DIY Storage Basket
Follow these meticulously detailed instructions carefully to transform your ordinary plastic canister into an extraordinary, decorative, and highly functional storage basket. Take your time with each individual step, paying close attention to precision, to ensure a professional-looking and lasting finish that you will be proud to display.
Step 1: Preparing Your Braided Yarn Accents
The braided yarn elements are central to the distinctive aesthetic appeal of your upcycled basket, adding texture, color, and a charming handcrafted touch. This step requires a bit of patience and careful execution but will result in beautiful, handmade details that elevate the entire project.
Begin by taking your chosen yarn, whether it’s gray or white. Loop the yarn three times, ensuring each loop is approximately an arm’s length long. This method provides ample length for creating a substantial and attractive braid. Secure one end of the looped yarn firmly with tape to prevent the strands from unraveling prematurely. Carefully cut through all the loops at the opposite end, which will result in a bundle of individual yarn strands. Now, meticulously separate these strands into three equal parts. If you are using a standard thickness of yarn, this will typically result in two individual strands per part, forming a total of six individual strands. Tightly braid these three sections together, maintaining even tension for a consistent look. Once your braid reaches the desired length – which should be substantial enough to wrap around your canister – secure the end with a dab of hot glue to prevent it from unraveling. Remove the tape from the initial end and complete the braiding process for that side, securing the final end with hot glue as well. Repeat this entire process with your white yarn, aiming to create at least three pairs of braids (meaning three gray and three white, totaling six individual braided pieces) or more, depending on the specific size of your canister and how much decorative coverage you desire. The more braids you meticulously prepare, the more flexibility and creative options you will have in designing the intricate exterior pattern of your basket.
Step 2: Preparing the Canister and Crafting a Sturdy Base
This crucial step focuses on carefully preparing the plastic canister itself and then constructing a robust, fabric-covered base that will provide your basket with essential stability and a beautifully polished, finished look.
Carefully take your thoroughly cleaned plastic canister. Using a permanent marker, accurately find and draw a horizontal line precisely around the middle circumference of the canister. This carefully drawn line will serve as your essential cutting guide. With a sharp craft knife or sturdy pair of scissors, meticulously cut the canister along this marked line. For safety, always exercise extreme caution when cutting plastic. Take the bottom half of the canister, which will form the primary body of your basket. Apply a generous amount of hot glue around the exterior base and sides of this bottom half, then carefully attach your dense fabric, ensuring it completely covers the entire exterior surface. Allow approximately half an inch of excess fabric to extend slightly above the newly cut edge of the canister; this crucial allowance will be neatly folded over to conceal the sharp plastic edge, creating a soft, safe, and aesthetically pleasing rim. Any excess fabric on the inside bottom or along the interior sides of the canister should be folded neatly and securely adhered with hot glue, creating a clean, professional internal finish. Next, take your sturdy cardboard. Trace the exact shape of the bottom of the canister onto the cardboard and meticulously cut out a corresponding circle (or the appropriate shape) that matches it perfectly. Apply hot glue to the bottom interior of the fabric-covered canister and firmly attach this first cardboard piece. Now, cut another piece of cardboard, making it slightly larger than the first, with an allowance of about an inch around its side circumference. Make small, even notches all around the edge of this second cardboard piece. Fold each notched strip inwards towards the center and secure them with hot glue, creating a neatly finished edge. This piece will serve as a foundational insert. Prepare a second, identical fabric-covered cardboard piece, ensuring it is neat and robust. Carefully place the first fabric-covered cardboard piece inside the canister, with its fabric-covered side facing upwards, and secure it firmly to the bottom with hot glue. Set the second fabric-covered cardboard piece aside; it will be used in a later step to finish the exterior bottom.
Step 3: Assembling the Basket and Adding Decorative Touches
With the canister thoroughly prepared and its base secured, it’s now time for the exciting assembly phase, where you will attach the decorative fabric strip, install the practical handles, and adorn your basket with the beautiful braided yarn and other chosen embellishments.
Cut a thick strip of your dense fabric, approximately 3 inches wide. Carefully position this fabric strip to slightly overlap the bottom exterior of the canister, aiming to create a seamless and visually appealing transition from the base. Secure the fabric strip all around the canister’s circumference with hot glue, then meticulously fold the bottom edge of the fabric strip underneath the canister and secure it with more hot glue for a tidy, finished seam. Now, retrieve the second fabric-covered cardboard piece that you thoughtfully set aside earlier. This piece is crucial as it will serve as the very bottom exterior of your basket, giving it a complete, stable, and aesthetically pleasing base. Place it firmly under the canister, ensuring its covered fabric side is facing outwards, and secure it robustly with hot glue. This thoughtful addition creates a beautifully finished and durable bottom. For the practical and decorative handles, take one of your prepared white braided yarn pieces. Measure it against the upper sides of the canister to achieve your preferred handle height and a graceful, appealing curve. Once you are completely satisfied with the length and curvature, carefully cut off any excess yarn. Repeat this precise process for the second white braided yarn handle, meticulously ensuring that both handles are perfectly symmetrical in length and arc. Curve each handle into an elegant arc and firmly attach its ends to both upper sides of the canister using a generous amount of hot glue. Ensure they are strong enough to reliably hold the basket’s weight when carried. Next, take a gray braided yarn piece and begin meticulously wrapping it around the upper part of the canister, positioning it just above where the ends of the handles are attached. Cut the yarn once it completely encircles the canister, ensuring both ends meet evenly for a seamless and polished look, and secure it with hot glue. Continue this decorative wrapping process, alternating the colors of your braided yarns (for example, gray, then white, then gray, then white), diligently working your way down the canister. Stop when you reach the point where the braided yarn thoughtfully overlaps the seam of the fabric strip at the bottom of the canister, ensuring a cohesive and beautifully finished appearance. Finally, unleash your inner decorator! Adorn your newly crafted basket with artificial flowers, delicate leaves, elegant ribbons, charming buttons, or any other embellishments that perfectly complement your personal style and the intended use of the basket. Attach them securely with hot glue to create a truly unique, personalized, and functional storage solution.
Why Choose to Upcycle Plastic Canisters? The Multifaceted Benefits
Beyond the simple, immediate joy of engaging in a creative crafting activity, the act of upcycling plastic canisters into functional and decorative baskets offers a multitude of profound benefits. This makes it an ideal project for both the environmentally conscious individual and anyone with a passion for creative expression and home improvement.
- Environmental Stewardship and Waste Reduction: Every single plastic canister you meticulously repurpose signifies one less item contributing to burgeoning landfills. This seemingly small yet significant act actively reduces waste, conserves valuable natural resources, and lessens your overall ecological footprint, making a tangible contribution towards a more sustainable and healthier planet for future generations.
- Cost-Effective and Budget-Friendly Storage Solutions: Acquiring high-quality, aesthetically pleasing storage solutions can often be surprisingly expensive. By intelligently utilizing materials you already possess around your home, or can source very cheaply, you are able to create stylish, practical, and durable organizers without incurring significant expenses. This project represents a truly smart and economical way to both decorate and organize your living space while adhering strictly to a budget.
- Personalized and Unique Home Decor: Unlike mass-produced, generic items found in stores, your DIY upcycled basket is inherently unique and imbued with your personal touch. You wield complete creative control over the selection of colors, the intricate textures, and the charming embellishments, allowing you to craft a piece that perfectly harmonizes with your home’s existing aesthetic and vividly reflects your distinctive personal style and taste.
- Fostering Creative Expression and Skill Development: Crafting, in its essence, is a wonderful and therapeutic outlet for creative expression. This specific project allows you to experiment freely with various yarns, diverse fabrics, and an array of decorative elements. It fosters a deep sense of accomplishment, boosts self-confidence, and instills immense pride in your handmade creations, while also honing your crafting skills.
- Versatile and Practical Home Organization: These beautifully crafted baskets are incredibly versatile and adaptable to numerous organizational needs. Use them ingeniously to store craft supplies, neatly organize toiletries, contain small toys, consolidate office essentials, keep pet accessories tidy, or even as elegant decorative planters for artificial plants. They are perfect for effectively decluttering and organizing virtually any space within your home, from bedrooms to bathrooms, and living rooms to craft corners.
Tips for Success and Inspiring Customization Ideas
To ensure your upcycled plastic canister basket turns out not only beautifully but also functionally, and to inspire you to explore further creative possibilities, consider incorporating these additional tips and exciting customization ideas into your crafting process.
- Prioritize Safety First: When undertaking the task of cutting the plastic canister, always use a sharp, appropriate tool and exercise extreme caution to prevent injuries. If children are involved in any part of the crafting process, direct and constant adult supervision is absolutely paramount. Additionally, always protect your work surface from potential hot glue drips and spills.
- Cleanliness is Paramount: Before commencing any work, ensure your plastic canister is meticulously cleaned, thoroughly sanitized, and completely dry. Any lingering residue or moisture can significantly impair glue adhesion and negatively affect the overall finished appearance of your basket.
- Practice Enhances Perfection: If you are relatively new to techniques like yarn braiding or using a hot glue gun, dedicating a little time to practice on scrap materials can significantly boost your confidence, refine your technique, and ensure a higher quality outcome when working on your main project.
- Embrace Yarn Variety: Do not feel restricted to using only gray and white yarns. Explore the vast world of variegated yarns, experiment with chunky yarns for a bolder statement, or even incorporate different natural materials like rustic twine or sturdy rope for a truly unique texture and visual appeal.
- Thoughtful Fabric Choices: Experiment with a wide array of patterned fabrics for the interior lining and the exterior base. A vibrant floral print, a chic geometric design, or even a bold, rich solid color can dramatically alter the basket’s character and make it truly stand out.
- Alternative Handle Designs: Instead of traditional braided yarn, consider using robust rope, elegant leather strips, or even neatly sewn fabric tubes for your handles. Regardless of your choice, always ensure they are securely and strongly attached for reliable functionality and longevity.
- Create Themed Baskets: Elevate your crafting by creating baskets with specific themes tailored for different rooms or distinct purposes. Imagine a serene nautical theme for a bathroom, a cozy rustic theme for a living room, or a playful and whimsical theme for a child’s bedroom or play area.
- Perfect for Thoughtful Gift Giving: These exquisite handmade baskets make incredibly thoughtful, personal, and cherished gifts for friends and family. Fill them with small gourmet treats, luxurious toiletries, or other carefully curated items to create a truly special and memorable present.
- Seasonal Decor Adaptations: Customize your baskets to align with different seasons or festive holidays. Utilize seasonal colors, holiday-themed embellishments, or artificial flowers that reflect the current time of year to effortlessly change their look and feel throughout the calendar.
Conclusion: Craft Your Way to Sustainable and Stylish Storage
You have now successfully acquired the knowledge and skills to transform a simple, often discarded, plastic canister into a beautiful, highly functional, and wonderfully eco-friendly storage basket. This DIY project is much more than just a craft; it is a profound statement of sustainability, a testament to your boundless creativity, and a demonstration of intelligent resourcefulness. Each and every basket you meticulously create not only contributes significantly to organizing your home but also grants a valuable second life to materials that would otherwise be needlessly discarded, thereby reducing waste and actively contributing to a greener, more sustainable planet.
We sincerely hope that this detailed, step-by-step guide has empowered and inspired you to enthusiastically embark on your very own upcycling journey. We encourage you to proudly share your unique creations and, in doing so, inspire others to embrace the immense joy and satisfaction of crafting beautiful, handmade, and sustainable home decor. Happy crafting!
*All image credit for this inspiring project belongs to Супер Идейка via YouTube. Please follow and subscribe to her channel for many more inspiring DIY projects and creative ideas!