
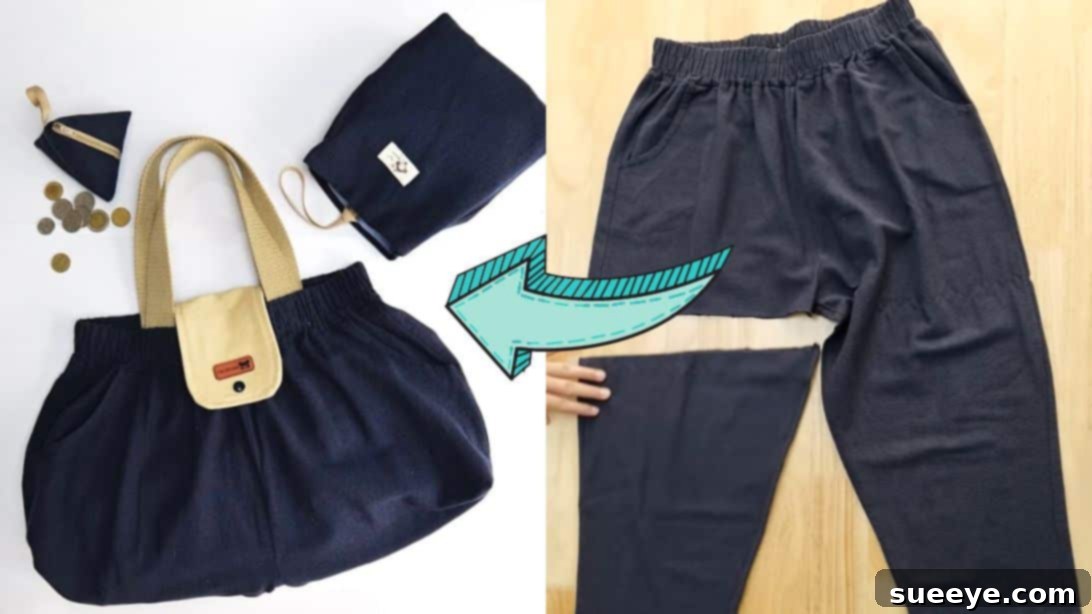
In a world increasingly conscious of waste and sustainability, finding creative ways to repurpose old items is more important than ever. Instead of simply discarding clothing you no longer wear, consider giving it a new life. This guide will walk you through an incredibly fun and rewarding project: transforming an old pair of pants into a stylish and functional bag. This brilliant idea, inspired by Ae PooiM on Youtube, demonstrates how easy it is to contribute to a greener planet while also crafting a unique accessory. You’ll be amazed at how much you can put inside, and yes, it even comes with pockets! The best part? This sewing project is designed to be straightforward, making it perfect for beginners and seasoned crafters alike. Get ready to unleash your creativity and turn forgotten denim into a chic statement piece. Let’s dive into the full instructions and start stitching your way to sustainable style.
Why Upcycle Your Old Pants into a Bag?
Upcycling isn’t just a trend; it’s a powerful movement towards a more sustainable lifestyle. By choosing to upcycle your old pants, you’re making a positive impact in several ways. Firstly, you significantly reduce textile waste, diverting items from landfills where they would otherwise contribute to pollution and resource depletion. The fashion industry is a major contributor to environmental issues, and every piece of clothing saved from the trash makes a difference. Secondly, upcycling is incredibly cost-effective. Instead of buying a new bag, you’re creating a unique item using materials you already own, saving money and encouraging resourceful living. Thirdly, crafting your own bag offers immense personal satisfaction. You get to express your creativity, learn new skills, and end up with a one-of-a-kind accessory that no one else has. Each stitch tells a story, making your bag not just an object, but a reflection of your ingenuity and eco-conscious values. This particular project is fantastic because it utilizes the inherent strength and often stylish appearance of denim or other pant fabrics, giving them a durable second life as a practical carry-all.
Choosing Your Perfect Pair of Pants for Upcycling
The success and final look of your upcycled bag heavily depend on the initial choice of pants. While this tutorial is flexible, selecting the right material and condition will make your sewing experience smoother and the end result more impressive. Denim jeans are often the most popular choice due to their durability, classic aesthetic, and ease of sewing. However, don’t limit yourself! Corduroy, canvas trousers, or even sturdy twill pants can also work wonderfully, each offering a different texture and style. When choosing, consider the following:
- Material Quality: Look for pants made from strong, woven fabrics. Avoid overly stretchy materials, as they can be challenging to sew and may not hold their shape well as a bag.
- Condition: The pants should be relatively clean and free from major rips, tears, or stains, especially in the areas you intend to use for the main body of the bag. Minor imperfections can sometimes be incorporated as character or easily repaired, but severe damage might make the project more difficult.
- Size: The size of the pants will influence the potential size of your bag. Larger pants offer more fabric to work with, allowing for a more spacious bag. Smaller pants can still be used, but your bag might be more compact.
- Pockets: One of the fantastic advantages of using old pants is the built-in pockets! Consider pants with well-placed back or side pockets that you’d like to integrate into your bag’s design for extra storage and visual interest.
Before you start cutting, make sure to wash and dry your chosen pants. This pre-shrinks the fabric and ensures it’s clean and ready for transformation.
Materials You’ll Need for Your Upcycled Bag:
Gathering all your materials before you begin will ensure a smooth and enjoyable crafting experience. Most of these items are readily available at craft stores, fabric shops, or even around your home.
- Old Pants: Your primary material! As discussed, a sturdy pair of jeans or similar trousers is ideal.
- Sharp Fabric Scissors: Essential for clean, precise cuts. Dull scissors can fray fabric and make cutting difficult.
- Ruler or Measuring Tape: Accuracy is key in sewing. A good ruler or measuring tape will help you get precise dimensions for your cuts and seams.
- Fabric Marker or Tailor’s Chalk: For marking cutting lines and stitching guides on your fabric. It should be easily removable or disappear after a short time.
- Canvas Fabric (for lining/details): A sturdy piece of canvas fabric, approximately 8×10 inches, will be used for a specific flap or lining component. This adds structure and a clean finish to certain parts of your bag. Choose a color that complements your pant fabric.
- Plastic Snap Buttons (2 sets): These provide a secure and easy-to-use closure for your bag, keeping your belongings safe. Ensure they are the sew-on type and come with the necessary tools for attachment.
- 1 1/2″ Webbing Strap (approx. 40 inches total): This robust material will form the durable handles for your bag. Webbing comes in various colors and materials (cotton, polyester); choose one that is comfortable to hold and matches your aesthetic.
- Sewing Machine (recommended) or Needle and Thread: While a sewing machine will make this project much quicker and create stronger seams, it’s absolutely possible to hand-sew this bag with a sturdy needle and strong thread if you have patience.
- Fabric Glue (optional, but helpful): A strong fabric adhesive can be useful for temporarily holding fabric pieces in place before stitching, especially for the canvas flap.
Having these items ready will set you up for success. Double-check your list before you begin to avoid interruptions.
Step-by-Step Guide to Your Upcycled Bag
Now, let’s get into the heart of the project! Follow these detailed instructions carefully to transform your old pants into a fantastic new bag. Take your time with each step, especially if you’re new to sewing, and remember that precision leads to a more professional-looking finish.
Step 1: Preparing Your Pants for Transformation
Begin by laying your old pants flat on a clean, hard surface. Take your fabric marker and ruler, and carefully draw a straight line just below the crotch area. The exact placement can vary slightly depending on the desired depth of your bag, but aiming for just below the bottom of the zipper fly or button placket is generally a good starting point. This ensures you maintain the integrity of the upper part of the pants. Once marked, use your sharp fabric scissors to cut along this line. After separating the top from the legs, you’ll have the upper section of the pants. Now, you’ll need to trim away the curved crotch seam itself. Lay the cut section flat again, and carefully cut along the inner seam where the crotch fabric connects, effectively removing the excess fabric from the crotch curve. This creates a clean, straight bottom edge for your bag’s main body.
Step 2: Inside Out for Initial Stitching
With the main body of your bag now having a clean, straight bottom edge, flip the entire piece inside out. This is a standard practice in sewing that allows you to work on the seams from the “wrong side” of the fabric, ensuring that all raw edges and stitching lines will be hidden once the bag is turned right side out. Making sure it’s fully inside out and smoothed flat will help with the next steps.
Step 3: Creating the Bag’s Base and Box Corners
Working on the wrong side of the fabric, focus on the bottom edge of your bag’s body. At both the bottom-left and bottom-right corners, use your marker and ruler to draw a rectangle measuring 2 inches in width by 2 3/8 inches in height (or depth, as it will be along the bottom seam). Cut out these two rectangles precisely. These cuts are crucial for creating the “box corners” which give your bag a flat, structured bottom and more internal volume. Next, fold the bottom raw edge of your bag upwards by 3/8 of an inch, press it flat, and then fold it again by another 3/8 inch. Stitch this bottom hem securely across the entire width of the bag. Now, to form the box corners: take one of the cut corners. Bring the cut edges together so that the seam you just sewed along the bottom aligns with the raw edges of the rectangle you cut out. Flatten it into a triangle shape. Stitch across this triangle, connecting the bottom seam to the top of the cut rectangle with a strong seam, using a 3/8-inch seam allowance. Repeat this process for the other corner. This creates a neat, squared-off base for your bag, allowing it to stand on its own.
Step 4: Crafting the Canvas Flap/Lining Piece
Now, let’s work on the canvas fabric. Cut two rectangular pieces of canvas, each measuring 7 7/8 inches in length by 4 3/4 inches in height. Take one of these rectangles and gently curve the top two corners. You can use a small round object (like a coin) as a guide for a smooth curve. Place this curved canvas piece directly on top of the other, uncurved canvas rectangle, aligning all edges. Now, sew all the way around the perimeter of these two stacked pieces, using a 3/8-inch seam allowance. However, remember to leave a small opening (about 2-3 inches) along one of the straight edges – this opening is crucial for turning the fabric right side out later. Before turning, carefully trim the seam allowances, especially around the curved corners of the bottom piece, following the curve closely without cutting into the stitches. This reduces bulk. Once trimmed, gently push the fabric through the opening to turn the entire piece right side out. Use a blunt tool (like a chopstick) to gently push out the corners and curves for a crisp shape. Finally, topstitch all the way around the edge of the canvas piece, approximately 1/8 inch from the edge. This will close the opening you left and give the piece a clean, finished look, adding strength and professionalism.
Step 5: Attaching the Canvas Flap and Snap Buttons
With your bag still right side out, take the finished canvas flap piece. Locate the straight edge of the sewn canvas flap (the one without the curves) and align it neatly along the top edge of your pant fabric bag, centered. You can use fabric glue to temporarily hold it in place for easier stitching, or pin it securely. Stitch this straight edge firmly to the top opening of your bag. Ensure this seam is strong, as it will hold the flap in place. Once the canvas flap is attached, it’s time to add your plastic snap buttons. Determine the ideal placement for the snaps: one part on the canvas flap and the corresponding part on the main body of the bag, ensuring they align perfectly for a secure closure. Typically, you’d place them a couple of inches from the edges for good support. Follow the manufacturer’s instructions for attaching your plastic snap buttons securely to both the canvas flap and the pant fabric. This will give your bag a functional and tidy closing mechanism.
Step 6: Preparing the Webbing Straps for Handles
Take your 1 1/2-inch wide webbing strap. Measure and cut two equal lengths, each measuring 19 3/4 inches long. These two pieces will become the durable handles for your bag. It’s always a good idea to slightly singe or apply a small dab of clear fabric glue to the cut ends of the webbing to prevent fraying, especially if it’s a synthetic material.
Step 7: Attaching the Handles with Box Stitching
Now, flip your bag inside out once again. This allows you to attach the handles with strong, hidden seams. Take one of your cut webbing straps. Position the ends of the webbing strap on either side of where the canvas flap is attached, near the top edge of the bag. The placement should be symmetrical and aesthetically pleasing, ensuring the handles are balanced. The raw ends of the webbing should be aligned with the raw top edge of your bag (which will soon be finished). For maximum strength and durability, use a “box stitch” or a “box-and-X stitch.” This involves sewing a small rectangle around the end of the webbing where it meets the bag, and then adding an ‘X’ within that rectangle. This method distributes tension and prevents the handles from tearing away. Repeat this exact process for the other webbing strap on the opposite side of the bag, ensuring both handles are attached securely and evenly.
Step 8: The Grand Reveal – Your Finished Upcycled Bag!
With the handles securely attached, it’s time for the exciting final step. Carefully flip your bag right side out. Push out the corners of the base and gently smooth the fabric. Your stylish, handmade upcycled bag is now complete! Take a moment to admire your work. You’ve transformed an old, unused item into a functional and fashionable accessory, showcasing your crafting skills and commitment to sustainability.
Expert Tips for a Flawless Finish
To ensure your upcycled bag project goes smoothly and yields the best possible results, keep these expert tips in mind:
- Pre-Wash Your Fabric: Always wash and dry your old pants before you start cutting and sewing. This prevents any future shrinkage or color bleeding after the bag is completed, especially important if you plan to wash your finished bag.
- Use Quality Thread: A strong, all-purpose polyester thread is recommended. Denim and canvas are sturdy fabrics, so you need thread that can withstand the wear and tear your bag will experience.
- Press Your Seams: After each major stitching step, take a moment to press your seams flat with an iron. This creates a much neater and more professional finish, making subsequent steps easier and more accurate.
- Sharp Needles are Key: When working with denim or heavy canvas, a sharp, sturdy needle is crucial for your sewing machine (e.g., a “jeans” or “denim” needle). A dull needle can cause skipped stitches, thread breaks, or damage your fabric.
- Backstitch at the Start and End: Always backstitch a few stitches at the beginning and end of each seam. This locks the stitches in place and prevents them from unraveling, especially for high-stress areas like the bag’s base and handles.
- Don’t Rush: Sewing is a craft that benefits from patience. Take your time with measurements, cutting, and stitching. Rushing can lead to mistakes that are time-consuming to fix.
- Test Stitches: If you’re unsure about your machine’s tension or stitch settings, do a test stitch on a scrap piece of your pant fabric first. This helps you troubleshoot before working on your main project.
Customizing Your Upcycled Bag
While the basic tutorial provides a fantastic foundation, one of the joys of DIY projects is the opportunity for personalization. Your upcycled bag can truly reflect your style with a few simple additions or modifications:
- Add a Zipper Closure: For extra security, consider replacing the snap buttons with a zipper. This would involve creating a zipper placket at the top opening of the bag, offering a completely enclosed space for your valuables.
- Interior Lining: For an even more polished look and added durability, you could sew a full interior lining from a contrasting or coordinating fabric. This would also allow you to add more internal pockets.
- Decorative Patches or Embroidery: Personalize your bag with iron-on patches, fabric paint, or hand embroidery. This is a great way to cover any small imperfections on the original pants or simply add a pop of color and personality.
- Adjust Strap Length: The webbing strap length can be adjusted to your preference. Make them longer for a shoulder bag or even create a cross-body strap. You could also use different materials for straps, such as leather or braided fabric.
- External Pockets: If your original pants had back pockets, you could carefully remove them and re-attach them to the outside of your bag for additional quick-access storage.
- Appliques and Fabric Scrap Embellishments: Use scraps from other fabric projects to create interesting appliques. You can cut shapes and sew them onto the bag for a unique textured look.
Experimenting with these ideas will allow you to create a bag that is not only eco-friendly but also a true expression of your individual taste.
Caring for Your Handmade Bag
To ensure your beautiful upcycled bag lasts for years to come, proper care is essential. Since your bag is made primarily from repurposed clothing, its care instructions will largely depend on the original fabric. For most denim or canvas bags:
- Gentle Washing: If your bag needs cleaning, hand wash it in cold water with a mild detergent. If you must use a machine, turn the bag inside out and place it in a mesh laundry bag to protect the snaps and stitching. Use a delicate cycle with cold water.
- Avoid Harsh Chemicals: Do not use bleach or harsh stain removers, as these can damage the fabric and potentially affect the color or integrity of your snaps and webbing.
- Air Dry: The best way to dry your bag is to air dry it. Reshape it while damp and hang it in a well-ventilated area away from direct sunlight to prevent fading. Avoid using a tumble dryer, as high heat can shrink the fabric, warp the snaps, or damage the webbing.
- Spot Cleaning: For small spills or dirt, spot cleaning with a damp cloth and mild soap is often sufficient.
- Storage: When not in use, store your bag in a clean, dry place. Avoid cramming it into tight spaces to help maintain its shape.
By following these simple care tips, you can extend the life of your upcycled bag and continue to enjoy its unique charm.
Conclusion: Embrace Sustainable Style with Your Upcycled Bag
You’ve successfully completed the journey from discarded clothing to a delightful, one-of-a-kind accessory. This upcycled bag project is more than just a sewing tutorial; it’s an invitation to embrace creativity, reduce waste, and champion sustainable fashion. Every stitch you made contributed to giving an old pair of pants a vibrant new purpose, proving that beauty and functionality can indeed emerge from forgotten items. The joy of crafting something with your own hands, coupled with the satisfaction of making an eco-conscious choice, is incredibly rewarding. Whether you’re using it for groceries, as a casual everyday bag, or a unique gift, your handmade creation will undoubtedly spark conversations and inspire others to look at their unused items with a fresh, imaginative perspective. So, why stop here? Let this project be the first of many upcycling adventures. Keep exploring, keep creating, and continue to transform the ordinary into the extraordinary. Happy upcycling!