
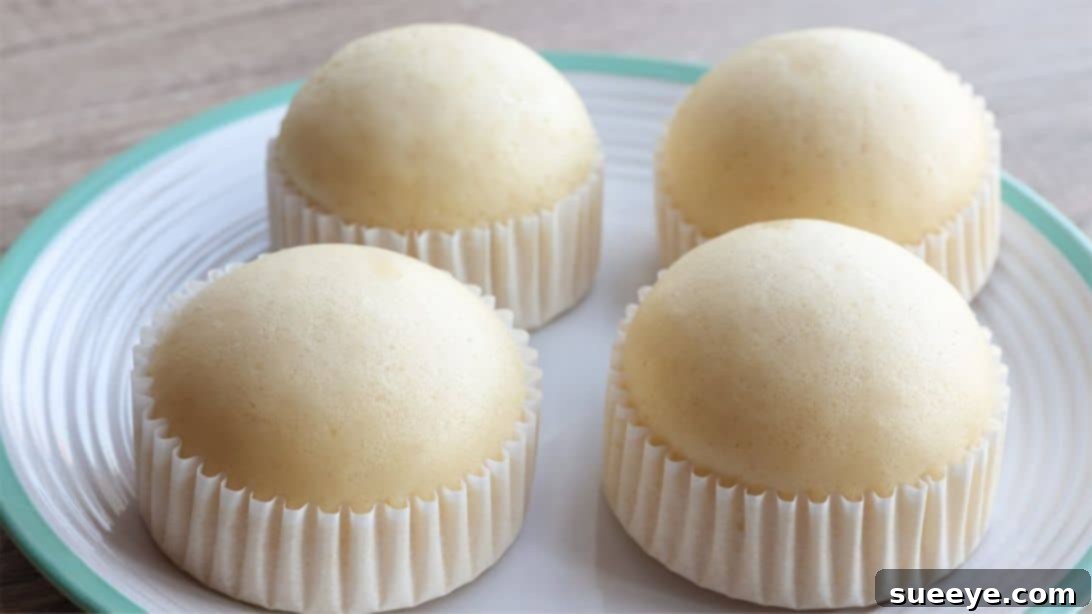
Baking has always been a cherished pastime of mine, a delightful way to unwind and create sweet treats for loved ones. However, a recent move to a new apartment presented a challenge: I found myself without an oven, leaving my baking aspirations temporarily on hold. The thought of not being able to whip up a batch of delicious cupcakes was quite disheartening. Determined to satisfy my sweet tooth and my passion for baking, I embarked on a quest for innovative recipes that didn’t require an oven. My search led me to an incredible discovery: Gabby’s life on YouTube, where I stumbled upon a fantastic no-bake fluffy and moist milk cupcake recipe. It promised the perfect solution for anyone in a similar oven-less predicament, or simply those looking for an incredibly easy and quick dessert.
To my absolute delight, this recipe exceeded all expectations. It was unbelievably simple to follow and surprisingly quick to prepare, yielding cupcakes that were far more delicious than I could have imagined. The texture was nothing short of perfection – incredibly fluffy, wonderfully moist, and with a delicate, milky flavor complemented by a subtle hint of vanilla extract. Sharing these delightful treats with my friends and family brought immense joy; they instantly fell in love with them, showering me with requests to make more the very next weekend! These no-bake milk cupcakes are not just a convenient alternative; they are a truly exquisite dessert in their own right. They pair beautifully with a warm cup of coffee or tea, or even a refreshing glass of juice. I wholeheartedly encourage you to try this recipe yourself and experience the magic of stovetop baking. Dive into the detailed instructions below or watch the insightful video for a visual guide.
Why Choose No-Bake Cupcakes?
The concept of “no-bake” might sound unconventional for cupcakes, but it opens up a world of possibilities, especially for those with limited kitchen appliances or simply looking for a quicker baking method. No-bake cupcakes, typically made by steaming, offer several distinct advantages:
- Accessibility: Ideal for dorm rooms, small apartments, or homes without an oven.
- Speed: Steaming often cooks faster than traditional oven baking, reducing overall preparation time.
- Moisture: The steaming process naturally infuses moisture into the cupcakes, resulting in an exceptionally tender and delicate crumb.
- Energy Efficiency: Using a stovetop steamer can be more energy-efficient than heating a large oven, especially for small batches.
- Ease of Use: The method is generally straightforward, making it perfect for beginner bakers or anyone seeking a hassle-free dessert.
This particular recipe for fluffy and moist milk cupcakes showcases all these benefits, proving that you don’t need a fancy oven to create truly delectable treats.
Essential Ingredients for Your Fluffy Milk Cupcakes
The beauty of this recipe lies in its simplicity and the use of common pantry staples. Each ingredient plays a crucial role in achieving the perfect texture and flavor. Here’s what you’ll need:
- 1 Egg: The humble egg acts as a primary binder, providing structure and richness to the cupcakes. It also helps with the emulsification of the other liquid ingredients.
- 3 Tablespoons of Sugar: Granulated sugar not only adds sweetness but also contributes to the moistness and tenderness of the cupcakes. It helps create a fine crumb structure.
- 1 Teaspoon of Vanilla Extract: A crucial flavor enhancer, vanilla extract brings warmth and depth to the milky notes, elevating the overall taste profile. Opt for a good quality pure vanilla extract for the best results.
- 2 Teaspoons of Condensed Milk: This ingredient is a game-changer, adding an incredible depth of milky sweetness and a wonderfully moist texture. It contributes to the rich flavor and the tender crumb.
- 1/4 Cup of Milk: Regular milk acts as the primary liquid, hydrating the dry ingredients and ensuring a smooth, pourable batter. Any type of milk (whole, skim, or even a non-dairy alternative) will work.
- 2 Teaspoons of Vegetable Oil: Unlike butter, vegetable oil provides consistent moisture and tenderness without adding extra richness or flavor, allowing the milky notes to shine. It helps keep the cupcakes soft and moist for longer.
- 1 Teaspoon of Baking Powder: This leavening agent is essential for creating the fluffy and airy texture. It reacts with the liquid and heat during steaming to produce carbon dioxide bubbles, causing the cupcakes to rise. Always ensure your baking powder is fresh for optimal results.
- 3/4 Cup of Cake Flour: Cake flour is key to achieving that delicate, light, and tender crumb. Its lower protein content compared to all-purpose flour prevents the cupcakes from becoming dense or chewy. If you don’t have cake flour, you can create a substitute by removing 2 tablespoons from 3/4 cup of all-purpose flour and replacing it with 2 tablespoons of cornstarch, then sifting well.
Note on Yield: This mixture is perfectly proportioned to make 4 delightful milk cupcakes using standard 5 oz ramekins. If you wish to make a larger batch, simply scale up the ingredients proportionally. The ramekin size ensures the cupcakes steam evenly and are of a good individual serving size.
Equipment You’ll Need
One of the many appealing aspects of this no-bake recipe is that it requires minimal specialized equipment. Most of these items are likely already in your kitchen:
- Mixing Bowl: A medium-sized mixing bowl is perfect for combining all your ingredients.
- Whisk: Essential for thoroughly blending the batter and incorporating air, which contributes to the cupcakes’ fluffiness.
- Measuring Cups and Spoons: Accurate measurements are crucial in baking, even for simple recipes.
- Sieve (or Fine-Mesh Strainer): Used for sifting the dry ingredients, ensuring a lump-free batter and a finer texture.
- Ramekin Bowls (5 oz): These individual ceramic dishes are ideal for steaming. Their sturdy nature allows them to withstand the heat, and their size is perfect for single-serving cupcakes.
- Paper Cupcake Liners: While not strictly mandatory, these make it much easier to remove the cupcakes from the ramekins and serve them neatly.
- Steamer (or large pot with a steamer basket/rack): The heart of this no-bake method. A dedicated steamer is great, but a large pot with a tight-fitting lid and a heat-proof rack or steamer basket will work perfectly.
Step-by-Step Instructions for No-Bake Milk Cupcakes
Follow these simple steps to create your own batch of irresistible fluffy and moist milk cupcakes. Remember, preparation is key, so have all your ingredients measured out and ready before you begin.
Step 1: Combine Wet Ingredients for the Base
Begin by cracking 1 egg into a clean mixing bowl. To this, add 2 teaspoons of vegetable oil and 2 teaspoons of condensed milk. Take your whisk and gently but thoroughly combine these ingredients. Whisk until the mixture is smooth, homogenous, and all components are well-integrated. This initial step creates a rich and stable base for your cupcake batter.
Step 2: Incorporate Sweetness and Flavor
Next, introduce the sweetness and signature flavor to your base. Add 3 tablespoons of sugar, 1/4 cup of milk, and 1 teaspoon of vanilla extract to the mixture. Continue to mix with your whisk until all the sugar has dissolved and the ingredients are completely incorporated. The mixture should appear smooth and slightly creamy, with no visible sugar granules.
Step 3: Introduce Dry Ingredients and Achieve Smoothness
For the perfect light and fluffy texture, sifting your dry ingredients is paramount. Into a separate bowl or directly over your wet mixture (using a sieve), sift 3/4 cup of cake flour along with 1 teaspoon of baking powder. Sifting removes any lumps from the flour and helps to evenly distribute the baking powder, ensuring a consistent rise. Once sifted, gently whisk the entire mixture until everything is just combined. Be careful not to overmix; overmixing can develop the gluten in the flour, leading to dense or tough cupcakes. Mix only until no streaks of dry flour remain, aiming for a smooth, pourable batter.
Step 4: Prepare for Steaming
Prepare your ramekin bowls by placing a paper cupcake liner into each one. These liners will prevent sticking and make for easy removal and serving once the cupcakes are done. Carefully and gently fill each paper cup with the milk mixture, ensuring you only fill them about 3/4 full. This is crucial because the cupcakes will rise significantly during steaming, and filling them too much could cause them to overflow. Evenly distribute the batter among your four ramekins.
Step 5: The Steaming Process
Carefully place the filled ramekins inside your steamer. Ensure there’s enough water in the steamer pot, but not so much that it touches the bottom of the ramekins. Bring the water to a rolling boil before placing the ramekins in, then reduce the heat to a medium-high simmer to maintain a steady steam. Cover the steamer with its lid. Steam the cupcakes for approximately 20 minutes. You’ll know they’re ready when they appear soft, fluffy, and springy to the touch. A toothpick inserted into the center should come out clean. Avoid opening the lid frequently during steaming, as this can cause the temperature to drop and affect the rise of the cupcakes.
Step 6: Cool, Serve, and Enjoy!
Once the cupcakes are perfectly steamed and cooked through, carefully remove the ramekins from the steamer. Allow the cupcakes to cool within the ramekins for a few minutes before gently lifting them out using the paper liners. Letting them cool slightly prevents them from collapsing and makes them easier to handle. Once cooled to a comfortable temperature, they are ready to be served. These fluffy and moist milk cupcakes are delightful on their own, or you can enhance them with various toppings (see suggestions below). Enjoy your homemade, oven-free treat!
Serving Suggestions and Variations
These No-Bake Fluffy and Moist Milk Cupcakes are delicious as they are, but you can elevate them further with a few creative touches:
- Classic Pairing: Serve warm or at room temperature alongside your favorite coffee, a soothing cup of tea, or a refreshing glass of milk or juice.
- Simple Garnishes: A dusting of powdered sugar, a dollop of whipped cream, or a few fresh berries (strawberries, blueberries, raspberries) can add visual appeal and extra flavor.
- Chocolate Lover’s Dream: Sprinkle some mini chocolate chips into the batter before steaming, or drizzle melted chocolate over the cooled cupcakes.
- Citrusy Twist: Add a teaspoon of lemon or orange zest to the batter for a bright, refreshing flavor.
- Nutty Crunch: Top with finely chopped toasted nuts like almonds or pistachios for added texture.
- Flavor Extracts: Experiment with other extracts like almond, coconut, or rum for different flavor profiles.
- Cream Cheese Frosting: For a more decadent treat, top with a simple cream cheese frosting once completely cooled.
Storage Tips
To keep your no-bake milk cupcakes fresh and delicious, proper storage is important:
- Room Temperature: If consumed within 1-2 days, store the cupcakes in an airtight container at room temperature.
- Refrigeration: For longer storage, or if topped with perishable ingredients like whipped cream or fresh fruit, keep them in an airtight container in the refrigerator for up to 3-4 days. Allow them to come to room temperature for optimal flavor and texture before serving.
Troubleshooting Common Steaming Issues
While this recipe is straightforward, here are a few common issues you might encounter and how to address them:
- Cupcakes are dense or rubbery: This is often a sign of overmixing the batter, which develops the gluten too much. Remember to mix only until just combined.
- Cupcakes didn’t rise enough: Ensure your baking powder is fresh. Old baking powder loses its leavening power. Also, make sure your steamer water is at a consistent boil/simmer throughout the steaming process.
- Cupcakes are too wet or soggy: This could be due to not steaming them long enough, or too much condensation dripping onto the cupcakes. Ensure the lid is tight and consider wrapping it in a cloth to absorb excess condensation.
- Cupcakes stick to the ramekins: Always use paper liners! If you don’t have them, make sure to generously grease and flour your ramekins.
No-Bake Fluffy and Moist Milk Cupcakes: Your New Favorite Dessert
This no-bake fluffy and moist milk cupcake recipe truly is a revelation. It proves that culinary creativity knows no bounds, even when faced with the absence of a conventional oven. From my personal journey of discovery to the sheer delight of sharing these treats with friends and family, this recipe has become a cherished addition to my collection. Its simplicity, speed, and utterly delicious results make it a perfect choice for any occasion, whether you’re a seasoned baker looking for a quick fix or a complete novice eager to impress without the fuss of an oven.
The delicate, milky flavor, combined with the incredibly light and moist texture, is simply irresistible. It’s a comforting dessert that feels gourmet yet is incredibly easy to achieve. So, whether you’re living in a small space, avoiding turning on your oven, or simply curious about the wonders of stovetop baking, I cannot recommend this no-bake milk cupcake recipe enough. Gather your ingredients, follow these straightforward steps, and prepare to indulge in a batch of homemade cupcakes that are guaranteed to bring smiles and satisfy any sweet craving. Happy baking – or rather, happy steaming!