
Mastering the Beginner Carpenter Star Quilt: A Comprehensive Guide to Half-Square Triangles
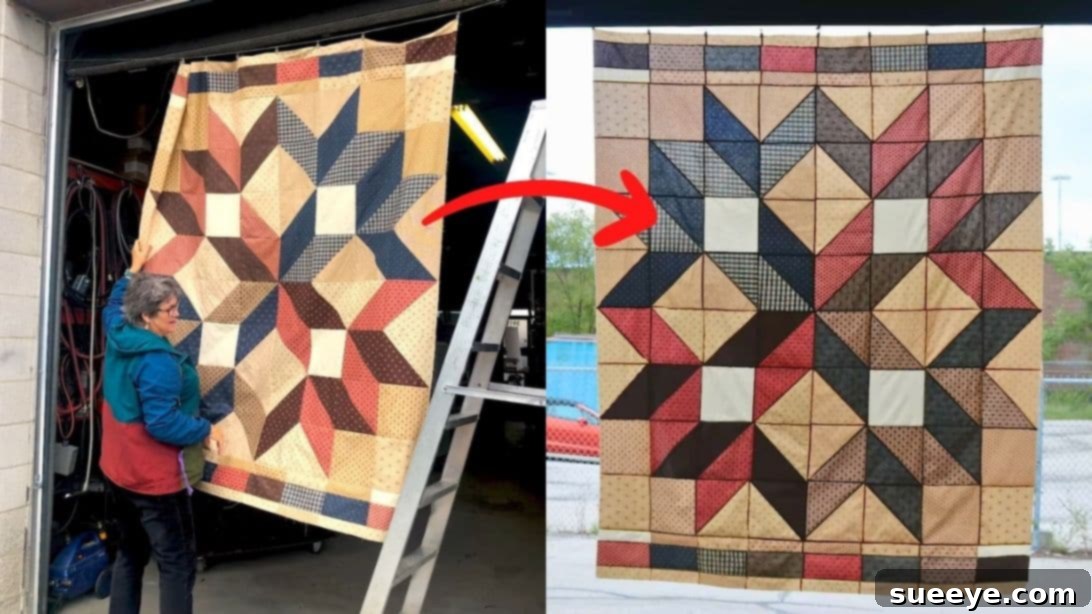
Embark on a delightful quilting journey with the classic Carpenter Star pattern! This design is not only visually stunning but also incredibly beginner-friendly, making it the perfect project to elevate your quilting skills. If you’re looking to master the art of creating Half-Square Triangles (HSTs) – a fundamental building block in countless quilt patterns – this tutorial is tailor-made for you. We’ll guide you through each step with clarity and precision, ensuring your Carpenter Star quilt turns out beautifully. Follow along with these detailed instructions, inspired by the excellent tutorial from Just Get it Done Quilts, and prepare to fall in love with quilting!
The Carpenter Star is a beloved traditional quilt block that creates a striking visual impact with its radiating star points. Its geometric simplicity belies its elegant finished look, making it a favorite among quilters of all levels. For newcomers to quilting, this pattern offers an ideal opportunity to practice essential techniques such as accurate cutting, precise piecing, and effective pressing – all crucial for professional-looking results. By the end of this project, you’ll not only have a gorgeous quilt top but also the confidence and foundational skills to tackle more complex designs. Let’s gather our supplies and begin this rewarding creative adventure!
Essential Materials for Your Carpenter Star Quilt
Before diving into the cutting and sewing, it’s vital to gather all your materials. High-quality fabric and accurate tools are your best friends in achieving a successful quilt. For this Carpenter Star quilt, we recommend using quilting cotton, known for its stability and ease of sewing. The contrast between your chosen light, mid-tone, and dark fabrics will truly make the star points pop, so choose colors that complement each other beautifully.
- Light Color Fabric: 8 fat quarters or 2 yards. This fabric will form the background and some star points, providing a bright foundation for your design.
- Dark Color Fabric: 4 fat quarters or 1 yard. This contrasting fabric will define the bold points of your star, adding depth and drama.
- Mid-Tone Color Fabric: 4 fat quarters or 1 yard. The mid-tone fabric acts as a bridge between the light and dark, creating a nuanced gradient within the star points.
- Rotary Cutter: Essential for precise and efficient fabric cutting.
- Self-Healing Cutting Mat: Protects your work surface and provides a stable base for cutting.
- Quilting Rulers: Clear acrylic rulers with distinct measurement lines are indispensable for accuracy. A large square ruler (e.g., 12.5″ x 12.5″ or 15″ x 15″) and a smaller rectangular ruler will be helpful.
- Fabric Scissors: For any smaller snips or trimming threads.
- Sewing Machine: A reliable machine capable of a consistent straight stitch.
- Thread: High-quality 100% cotton thread that matches or blends with your fabrics.
- Iron and Ironing Board/Pressing Mat: Crucial for pressing seams open or to the side, ensuring flat, accurate blocks.
- Fabric Marking Pen or Pencil: To draw diagonal lines for Half-Square Triangles.
- Pins or Fabric Clips: To hold fabric pieces together before sewing.
A note on fabric yardage vs. fat quarters: Fat quarters are pre-cut pieces of fabric, usually 18×22 inches. They are excellent for projects requiring smaller pieces of various fabrics. If you prefer to cut from yardage, ensure you have enough to accommodate the dimensions specified. Pre-washing your fabrics is often recommended to prevent shrinkage and color bleeding, especially if you’re mixing different fabric types or colors. If you choose not to pre-wash, be consistent for all fabrics in your project.
Step-by-Step Guide to Crafting Your Carpenter Star Quilt
Accuracy is the cornerstone of successful quilting. Take your time with each step, particularly with cutting and pressing, as these foundational stages directly impact the precision and beauty of your finished quilt. We’ll begin by preparing our fabric sets, which will soon transform into the intricate points of our Carpenter Star.
Step 1: Preparing Your Fabric Sets
To begin, you’ll need to organize your fabrics into specific groups. This systematic approach ensures you have all the necessary components for your star points. Create four identical sets, each comprising one light, one mid-tone, and one dark fat quarter. Additionally, set aside four extra light fat quarters that will serve as background elements for your quilt.
By pre-sorting your fabrics, you streamline the cutting process and minimize confusion as you move through the subsequent steps. This initial organization is a small but significant step towards an efficient and enjoyable quilting experience.
Step 2: Precise Cutting for Star Point Squares
Accuracy in cutting is paramount in quilting. Take one of your dark, mid-tone, and light fat quarter sets. Lay them flat on your cutting mat, aligning the selvage edges (the tightly woven edges of the fabric) at the bottom. Start by trimming a clean, straight edge along the bottom to square up your fabrics. Next, measure 18 inches up from this newly trimmed bottom edge and cut across the top, discarding any excess. Then, trim off the selvages from one side, measure 18 inches in from that clean edge, and make your final side cut. You should now have three perfectly stacked 18″ x 18″ squares.
This method of stacking and cutting multiple layers at once is a fantastic time-saver, but it requires a sharp rotary cutter and a steady hand. Ensure your fabric layers are perfectly aligned to guarantee uniform squares. Once you have your 18″ squares, stack them neatly. Now, cut this stack in half horizontally and then in half vertically. This will yield a total of 12 precisely cut 9″ squares: four dark, four mid-tone, and four light. These 9″ squares are the building blocks for your Half-Square Triangles.
Step 3: Pairing for Half-Square Triangles
With your 9″ squares cut, it’s time to form the pairs that will become your Half-Square Triangles (HSTs). From the 12 squares you just cut, you will create specific color combinations:
- Pair 2 light fabric squares with 2 dark fabric squares. (2 light/dark pairs)
- Pair 2 light fabric squares with 2 mid-tone fabric squares. (2 light/mid-tone pairs)
- Pair 2 mid-tone fabric squares with 2 dark fabric squares. (2 mid-tone/dark pairs)
Each of these pairs will eventually yield two Half-Square Triangles, forming the distinct points and sections of your Carpenter Star. Careful pairing now will ensure you have the correct color combinations for assembly later.
Step 4: Repeating the Process for All Star Point Fabrics
Now that you’ve completed the initial cutting and pairing for one set of fabrics, simply repeat steps 2 and 3 for the remaining three sets of light, mid-tone, and dark fat quarters. This systematic repetition will ensure you have all the necessary 9″ square pairs ready for transformation into Half-Square Triangles. Working in batches like this is an efficient way to manage larger quilting projects.
Step 5: Preparing the Background/Filler Squares
Next, let’s prepare the background or filler squares that will frame your star points and help define the overall design. Take your remaining four extra light fat quarters. Stack them neatly, ensuring the right sides are facing up and all selvage edges and bottom edges are perfectly aligned. Using your rotary cutter and ruler, trim them into precise 17″ x 17″ squares, discarding the selvages and any excess fabric. Once you have these four stacked 17″ squares, cut the entire stack in half horizontally, and then cut it in half vertically. This will yield a total of 16 identical 8 1/2″ squares. These squares will serve as crucial background elements, providing breathing room around your star and completing the block structure.
Step 6: Crafting Half-Square Triangles (HSTs)
This step is where the magic of Half-Square Triangles truly comes to life! Take each of your paired 9″ squares (right sides together). Using your fabric marking pen or pencil and a ruler, draw a diagonal line from one corner to the opposite corner on the wrong side of the top fabric. This line will serve as your guide. Now, using your sewing machine, sew a seam on both sides of this drawn diagonal line, maintaining a precise quarter-inch seam allowance. The quarter-inch seam is standard in quilting and crucial for accurate block construction.
Once both seams are sewn, carefully cut along the original diagonal line you drew. When you open up these two new units, you will have two perfect Half-Square Triangles from each paired square! Press your HSTs carefully. Many quilters prefer to press seams open for a flatter finish, while others press to the darker fabric side to help conceal the seam allowance. For this pattern, pressing to the darker fabric is often beneficial as it helps seams “nest” when joining blocks later.
After pressing, your HSTs might be slightly larger than needed or a little distorted. It’s good practice to trim them down to a consistent size, if required, for ultimate accuracy. While the tutorial doesn’t specify a final HST size, often they are trimmed to a specific measurement (e.g., 8.5 inches square, or a size that fits perfectly into the overall block layout). Use a square-up ruler designed for HSTs to trim them precisely, aligning the diagonal seam with the 45-degree line on your ruler. This attention to detail ensures perfectly symmetrical star points.
By the time you’ve finished this step for all your paired squares, you will have a grand total of 48 Half-Square Triangles: 16 light/dark, 16 light/mid-tone, and 16 mid-tone/dark. These are the vibrant components that will form the points and inner sections of your Carpenter Star.
Step 7: Assembling Your Carpenter Star Blocks
Now it’s time to bring all your carefully cut and sewn pieces together to form the striking Carpenter Star blocks. Lay out your HSTs and the 8.5″ background squares according to the Carpenter Star design. Visualizing the layout before you sew is incredibly helpful. The 8.5″ light squares will serve as the central background elements, allowing the star points to truly shine. Each Carpenter Star quilt block is typically made up of smaller units arranged in a grid, forming the star’s unique shape.
Once you are happy with your layout, begin sewing the pieces together in rows, and then sew the rows together. This is a common method for block assembly. When pressing your seams, pay close attention to the directions specified: press the seams of rows 1 and 3 to the left, and press the seams of rows 2 and 4 to the right. This alternating pressing technique allows the seams to “nest” together beautifully when you join the rows, reducing bulk and helping you achieve perfectly matched points where seams meet. This precision in pressing is a hallmark of skilled quilting and contributes significantly to the flatness and overall quality of your finished block.
The Carpenter Star quilt typically consists of multiple identical blocks sewn together to form the larger quilt top. For this particular design, you will need to make a total of five identical Carpenter Star blocks to create the full visual impact. Once you’ve completed one block, repeat the assembly process for the remaining four, meticulously laying out, sewing, and pressing each one. With each completed block, you’ll see your beautiful Carpenter Star quilt top taking shape.
Your Journey to a Beautiful Beginner Carpenter Star Quilt
Congratulations! By following these comprehensive steps, you are well on your way to completing a stunning Beginner Carpenter Star Quilt. This project is more than just sewing fabric; it’s a valuable learning experience that builds essential quilting skills and confidence. You’ve honed your cutting accuracy, mastered the versatile Half-Square Triangle, and practiced meticulous seam pressing – all fundamental techniques that will serve you well in countless future quilting endeavors.
The beauty of the Carpenter Star lies in its striking visual appeal achieved through simple, repetitive units. Each star point, carefully crafted from your chosen fabrics, contributes to a harmonious and dynamic design. Whether you choose to finish your quilt with a simple border, add a layer of batting and backing for warmth, or send it off to a professional longarmer, you can take immense pride in the artistry and craftsmanship you’ve poured into this project. Embrace the joy of creation, and know that your beautifully handmade Carpenter Star quilt will be a cherished item for years to come. Happy quilting!