
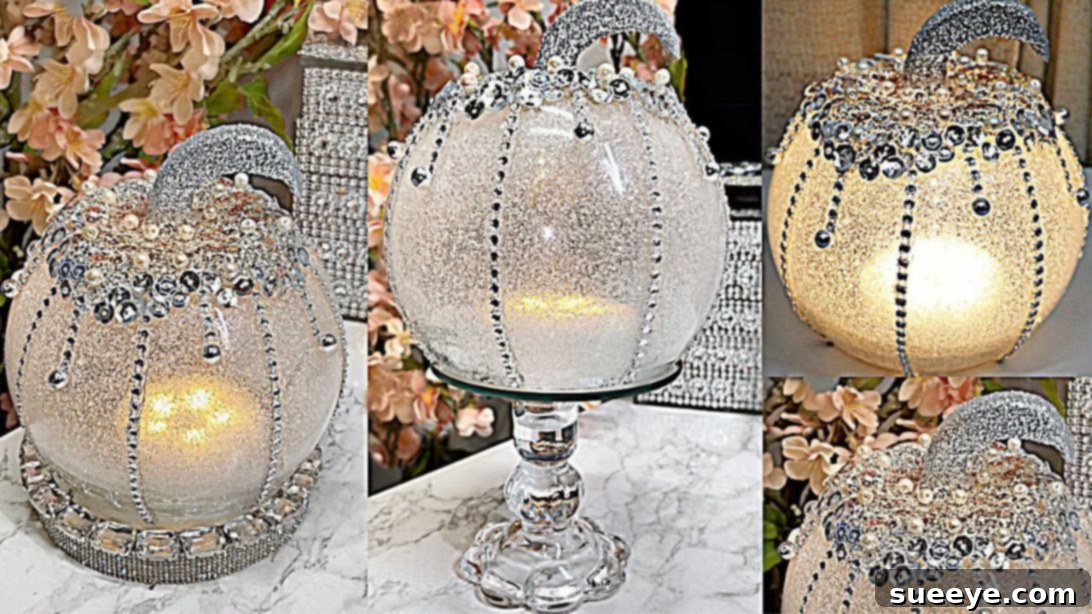
Are you searching for a truly unique, elegant, and surprisingly budget-friendly Halloween decoration to elevate your home’s autumn ambiance? Look no further! We’ve uncovered the most enchanting DIY project that promises to transform your space with a captivating glow: the DIY Lighted Mirror Pumpkin. This stunning decor piece is not only visually striking but also remarkably easy and inexpensive to create, utilizing readily available items primarily from Dollar Tree and local thrift stores. Its sparkling brilliance and sophisticated design make it a standout addition to any Halloween or fall display, guaranteed to draw compliments from guests.
The inspiration for this magnificent project comes from the incredibly talented Dezi1016, also known as Desiree, on Youtube. Her innovative approach to crafting has brought this radiant pumpkin to life, offering a creative solution for those who desire high-end decor without the hefty price tag. Whether you’re a seasoned crafter or a complete beginner, this guide will walk you through each step, ensuring you can replicate this dazzling piece with confidence and ease. Prepare to add a touch of sparkle and sophisticated charm to your seasonal decorating with this incredible lighted mirror pumpkin.
This project is perfect for adding a luxurious touch to your entry table, mantelpiece, or as a focal point in your Halloween party setup. Its versatility means it can also transition beautifully into general fall decor, providing a warm, inviting glow throughout the autumn months. Get ready to gather your materials and embark on a creative journey that culminates in a truly spectacular, personalized piece of home decor.
Materials for Your Sparkling Lighted Mirror Pumpkin
One of the most appealing aspects of this DIY lighted mirror pumpkin project is the accessibility and affordability of its materials. Many of the items can be sourced from dollar stores, craft shops, or even items you might already have around your home. Gathering everything before you begin will ensure a smooth and enjoyable crafting experience.
- A small bowl (this will form the main “pumpkin” body)
- A pair of sharp scissors (for precision cutting)
- Clear gel glue (or a similar strong, clear adhesive)
- A soft brush (for applying glue evenly)
- Frosted clear glitter (to create a shimmering, ethereal effect)
- Silver glitter (for added dimension and sparkle)
- Tweezers (helpful for precise placement of small elements)
- An Exacto knife (essential for shaping the pumpkin stem, handle with care)
- A clean towel or paper towels (for cleaning and drying)
- A “J” Styrofoam letter (this will be repurposed into the pumpkin stem)
- A Dollar Tree round mirror (the base that reflects the light)
- A candle stick holder (to elevate the mirror and create height)
- Permanent adhesive (for secure bonding of structural elements)
- A soft cloth (for cleaning surfaces)
- A container with water (for dampening brushes or cleaning up)
- Silver paint (for the pumpkin stem, adding metallic flair)
- Hairspray (a fantastic sealant for glitter, keeping it in place)
- Diamond wrap (or rhinestone mesh, for creating pumpkin “ribs”)
- Hot glue gun and hot glue sticks (for quick and strong bonds)
- Bling wrap (a square or wider rhinestone mesh, for embellishment)
- Ivory and blush sequins and beads (for decorative accents around the stem)
- A tap light (the magical element that illuminates your pumpkin from within)
Carefully selecting your materials can make a significant difference in the final look of your lighted mirror pumpkin. Consider different shades of glitter or sequins to match your personal decor style. For example, gold glitter could replace silver for a warmer aesthetic, or darker sequins could be used for a more dramatic Halloween feel. The beauty of DIY is the ability to customize!
Step-by-Step Guide to Crafting Your Lighted Mirror Pumpkin
Now that you have all your materials ready, let’s dive into the creative process. Each step is designed to be straightforward, ensuring that even novice crafters can achieve a professional-looking result. Take your time with each stage, allowing for proper drying times, and enjoy watching your beautiful Halloween decor piece come to life.
Step 1: Preparing the Mirror Base
Begin by taking your Dollar Tree round mirror. Using a soft, clean cloth, thoroughly clean both sides of the mirror surface. This crucial step ensures that any dust, fingerprints, or smudges are removed, allowing for optimal adhesion in subsequent steps and ensuring a pristine, reflective surface for your lighted pumpkin. Once clean, place the mirror right side down on a protected work surface. Next, take your permanent adhesive and apply a generous amount to the top rim of your chosen candle stick holder. Carefully center the candle stick holder onto the back (non-reflective side) of the mirror and press down firmly. Hold it in place for a few moments to allow the adhesive to set slightly. This assembly creates the elevated base for your pumpkin, adding height and an elegant pedestal effect to your finished piece. Allow sufficient time for the adhesive to fully cure according to the product’s instructions for a secure, stable foundation.
Step 2: Creating the Glittered Pumpkin “Shell”
Now, let’s transform your small bowl into the shimmering body of your pumpkin. Pour a moderate amount of clear gel glue into a separate small container or bowl. Using a damp brush, spread the clear glue evenly across the entire interior surface of your small bowl. Ensure a consistent, thin layer for the best glitter application. While the glue is still wet, generously sprinkle the frosted clear glitter over the glued surface, ensuring complete coverage. This layer will provide a beautiful, ethereal shimmer. Immediately after, sprinkle some silver glitter over the frosted layer. The combination of both glitters will add incredible depth, dimension, and an intense sparkle to your pumpkin. Once fully glittered, set the bowl aside and allow it to dry completely for at least 10 minutes, or longer if needed, to ensure the glitter is firmly adhered. This step is where the magic of the “lighted” effect truly begins, as the glitter will reflect the tap light’s glow beautifully.
Step 3: Finishing the Glittered Bowl
After the glitter application has had ample time to dry completely, carefully inspect the outside of the bowl. There may be some stray glitter particles that have adhered to the exterior. Using a clean paper towel or a soft, dry cloth, gently wipe down the outside surface of the bowl. This ensures that the exterior remains clean and smooth, providing a polished finish to your pumpkin. Avoid touching the glittered interior during this process to prevent disturbing the newly set glitter. A clean exterior contributes to the overall neatness and elegance of your final decor piece.
Step 4: Crafting the Pumpkin Stem
The pumpkin stem is a crucial detail that adds authenticity to your glittering creation. Take your “J” Styrofoam letter. Carefully use an Exacto knife to cut off the curved part of the “J” – this section will serve as the primary material for your stem. Once the curved piece is separated, carefully split it in half lengthwise using the Exacto knife. This will give you two thinner, more manageable pieces. Now, using the Exacto knife, meticulously cut and shape one of these pieces into your desired pumpkin stem form. You can make it short and stout, or tall and slender, depending on the aesthetic you prefer. Always cut away from yourself on a protected surface and exercise extreme caution when handling the Exacto knife. The aim is to create a realistic, slightly irregular stem shape that complements the roundness of your pumpkin body.
Step 5: Embellishing the Pumpkin Stem with Glitter
With your stem shaped, it’s time to add some sparkle. First, poke a small stick (like a skewer or toothpick) into the base of the newly formed Styrofoam stem. This stick will serve as a handle, making it easier to paint and glitter without getting your hands messy. Apply an even coat of silver paint to the entire surface of the stem. Silver paint provides a fantastic base, enhancing the reflective quality of the glitter to come. Allow the silver paint to dry completely for at least 30 minutes, or until it’s no longer tacky. Once dry, apply a layer of clear glue over the painted stem. Immediately sprinkle silver glitter over the wet glue, ensuring full coverage. This dual layer of silver will create an incredibly luminous and eye-catching stem. Set the glittered stem aside and let it dry thoroughly. To prevent glitter fallout and to seal the sparkle, finish by lightly misting the dried stem with hairspray. This creates a protective, shiny layer that locks the glitter in place, ensuring your stem remains dazzling.
Step 6: Assembling and Decorating the Pumpkin Body
Now for the exciting part – bringing all the elements together! Take your diamond wrap. Using your scissors, carefully cut the diamond wrap into single strips. These strips will form the distinct “ribs” of your pumpkin, giving it shape and definition. Using your hot glue gun, carefully attach eight of these single diamond strips to the exterior of your glittered bowl (which is now your pumpkin body), spacing them equally around the circumference. Ensure they run from the top edge to the bottom edge, mimicking the natural segments of a pumpkin. Next, take your square bling wrap and carefully secure it to the very top center of your glittered pumpkin, using hot glue. This will create a dazzling cap for your pumpkin. Now, carefully glue the prepared, glittered stem onto the center of this bling wrap. Finally, to add even more intricate detail and sparkle, cut shorter diamond strips and hot glue one to the center of each of the eight diamond wrap ribs you previously attached. This layering of bling creates an incredibly rich and textured effect, making your pumpkin truly radiant.
Step 7: Final Touches and Illumination
With the main structure complete, it’s time to add the delicate finishing touches that truly elevate this project. Carefully arrange the ivory and blush sequins and beads around the base of the pumpkin stem, using hot glue to secure them in place. These embellishments will beautifully cover the square edge of the bling wrap at the top, creating a seamless and polished transition from the stem to the pumpkin body. Take your time to create a pleasing arrangement, adding extra sparkle and texture. Once all the embellishments are securely in place, use a soft, clean cloth to gently wipe away any visible hot glue strings or fingerprints from the exterior of your completed pumpkin. Now for the grand finale: place your tap light (battery-operated) on top of the mirrored base, ensuring it is centered. Carefully lift your beautifully decorated glittered pumpkin (the bowl with the stem and bling) and gently place it over the tap light, allowing it to rest securely on the mirrored base. Activate the tap light, and watch as your DIY Lighted Mirror Pumpkin comes to life, casting a magical, sparkling glow that will instantly transform your Halloween and fall decor. This elegant piece is now ready to dazzle and delight!
Your Completed DIY Lighted Mirror Pumpkin Decor
Congratulations! You have successfully crafted an absolutely stunning and unique DIY Lighted Mirror Pumpkin. This project perfectly blends creativity, affordability, and elegance, resulting in a show-stopping piece that will be the envy of all your Halloween guests and a radiant addition to your fall decor. The subtle glow from the tap light, magnified by the glittered interior of the bowl and the reflective mirror base, creates an enchanting ambiance that is both festive and sophisticated.
This glittering pumpkin is not just a Halloween decoration; its versatile design allows it to transition seamlessly into general autumn decor, adding a touch of sparkle and warmth to your home throughout the season. Imagine it as the centerpiece of your dining table, a welcoming beacon on your entryway console, or a sophisticated accent on your mantelpiece. Its brilliant shimmer and understated elegance make it a truly special addition to any room.
Feel free to experiment with different color schemes for the glitter and sequins to personalize your pumpkin even further. Perhaps a warm gold and bronze combination for a harvest-themed look, or vibrant purples and greens for a more whimsical Halloween twist. The possibilities are endless when it comes to customizing this project to perfectly match your unique style and existing home decor.
Embrace the joy of DIY and the satisfaction of creating something beautiful with your own hands. This Lighted Mirror Pumpkin project proves that elegant, high-impact decor doesn’t have to come with a high price tag. We hope you enjoy the radiant glow and endless compliments your new sparkling pumpkin will bring to your home this season!