
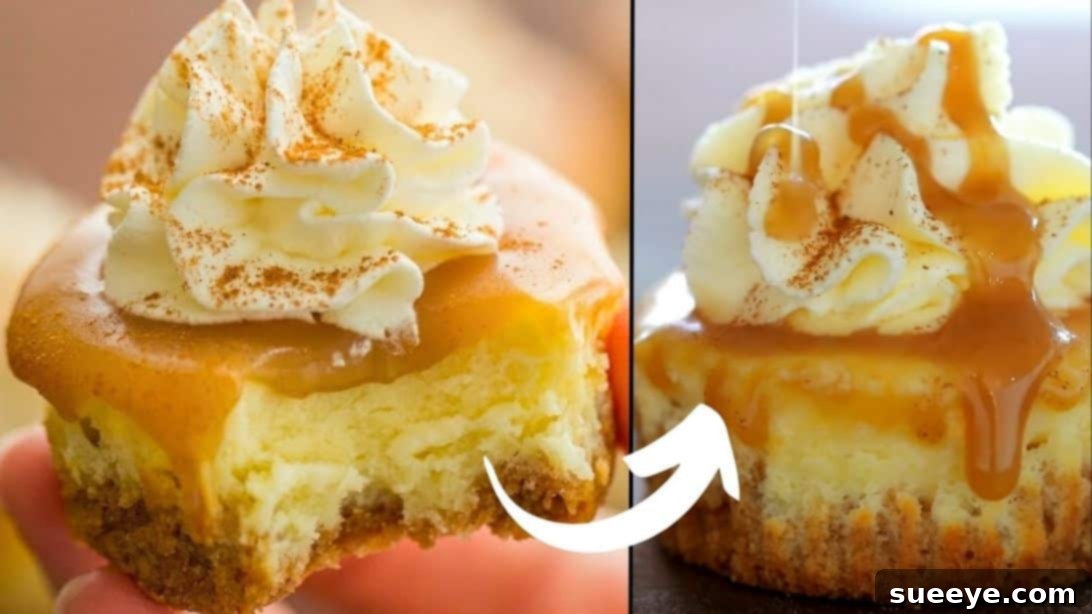
There’s something uniquely enchanting about a perfectly crafted cheesecake – its creamy texture, rich flavor, and the sheer indulgence it offers. But what if you could capture all that magic in individual, bite-sized portions, making them even more convenient and delightful? That’s precisely what you get with these incredible mini cheesecakes, lavishly topped with a luscious caramel sauce and a cloud of homemade whipped cream. My first encounter with this spectacular dessert was at a friend’s gathering, and I was utterly captivated. The combination of the tangy cream cheese, the sweet caramel, and the light whipped cream was an absolute revelation. I was instantly hooked, and after pestering my friend for the secret, she graciously shared this fantastic recipe, originally from the renowned Natasha’s Kitchen. The very next day, I found myself gathering all the necessary ingredients, eager to recreate that unforgettable taste. True to its promise, this recipe was a resounding success in my own home, with every single mini cheesecake disappearing in mere minutes. It’s safe to say this is more than just a dessert; it’s an experience, a definite must-try that will leave everyone craving more.
Decadent & Easy Mini Cheesecakes with Rich Caramel Sauce
Indulge in the perfect individual dessert: creamy mini cheesecakes with a sweet graham cracker crust, topped generously with homemade caramel and fluffy whipped cream. This recipe is designed for both novice and experienced bakers, ensuring a show-stopping treat every time.
Essential Ingredients for Your Mini Cheesecake Masterpiece
Crafting these heavenly mini cheesecakes begins with selecting the right ingredients. Each component plays a crucial role in achieving the desired texture, flavor, and overall decadence. For the best results, always aim for high-quality ingredients and ensure your dairy products are at room temperature unless otherwise specified.
For the Perfect Graham Cracker Crust:
- 1 and 1/2 cups of graham cracker crumbs (from approximately 12 whole crackers): The foundation of our cheesecake. Graham crackers provide a sweet, buttery, and slightly spiced base that complements the creamy filling beautifully. You can crush your own for a fresher taste or use pre-crushed crumbs for convenience.
- 6 tablespoons of unsalted butter (melted): Acts as the binding agent for the crust, creating a firm yet crumbly texture. Using unsalted butter allows you to control the overall saltiness of the dessert.
- 1/2 teaspoon of cinnamon: Adds a warm, inviting spice note to the crust, enhancing its flavor profile without overpowering it.
For the Creamy Mini Cheesecakes:
- 16 oz cream cheese (softened): The star of our cheesecake. Using full-fat cream cheese is essential for achieving that characteristic rich, smooth, and tangy texture. Ensure it’s softened to room temperature for lump-free mixing.
- 3 large eggs (room temperature): Provide structure and richness to the cheesecake batter. Using room temperature eggs helps them incorporate more smoothly into the cream cheese, preventing curdling.
- 14 oz sweetened condensed milk: This magical ingredient adds both sweetness and an incredibly smooth, dense texture to the cheesecake, eliminating the need for additional sugar and ensuring a consistent consistency.
For the Decadent Topping:
- 1 cup of caramel sauce: The crowning glory! You can use your favorite store-bought brand for ease, or elevate your dessert with a homemade caramel sauce for an extra touch of gourmet sophistication.
- 1 cup of heavy whipping cream (chilled): Forms the base of our fluffy homemade whipped cream. It must be well-chilled to whip up properly and hold its shape.
- 1 tablespoon of granulated sugar: Sweetens the whipped cream to perfection, balancing the richness of the cheesecake and caramel.
- 1/2 teaspoon of vanilla extract: Enhances the flavor of the whipped cream, adding a classic warmth and aroma.
- 1/4 teaspoon of cinnamon to garnish (optional): A final flourish that adds a hint of spice and visual appeal, perfectly complementing the caramel and graham cracker flavors.
Step-by-Step Instructions: Crafting Your Mini Cheesecake Delight
Follow these detailed steps carefully to ensure your mini cheesecakes turn out perfectly creamy, beautifully set, and utterly delicious. Precision in baking leads to exceptional results!
Step 1: Prepare Your Muffin Tin and Graham Cracker Crust
Begin by preheating your oven to a precise 350°F (175°C). While the oven heats, line a 24-cup muffin tin with paper cupcake liners. These liners are crucial for easy removal and serving. Next, it’s time to assemble your delightful crust. In a medium-sized mixing bowl, combine the graham cracker crumbs, the melted unsalted butter, and the cinnamon. Stir these ingredients thoroughly with a spoon or fork until the crumbs are uniformly moistened and resemble wet sand. This ensures an even crust that holds together. Now, divide this mixture evenly among the 24 prepared cupcake liners. Using the back of a small spoon or your fingers, firmly press the crumbs into the bottom of each liner and slightly up the sides. A well-pressed crust is key to preventing crumbling later.
Step 2: Create the Silky-Smooth Cheesecake Filling
In a large mixing bowl, using an electric mixer, beat together the softened 16 oz cream cheese and the 3 room temperature large eggs. Beat on high speed for a full 5 minutes until the mixture is exceptionally smooth, light, and airy. This crucial step incorporates air and ensures a lump-free, creamy filling. Remember to pause and scrape down the sides of the bowl with a rubber spatula as needed to ensure all ingredients are thoroughly combined. Following this, reduce the mixer speed to low, and carefully add the 14 oz of sweetened condensed milk. Continue to mix on low speed for another 2 minutes, just until everything is fully incorporated. Be careful not to overmix at this stage, as overmixing can introduce too much air, leading to cracks during baking.
Step 3: Bake Your Mini Cheesecakes to Perfection
With your filling ready, it’s time to assemble and bake. Carefully divide the cheesecake mixture evenly among the 24 cupcake liners, filling each one about three-quarters full. This ensures enough room for the cheesecakes to rise slightly without overflowing. Place the muffin tin into your preheated 350°F (175°C) oven and bake for exactly 15 minutes. The key to perfectly baked cheesecakes is to watch for the right cues: the edges should appear set and slightly firm, while the center should still have a gentle jiggly motion when you lightly tap the tin. It’s imperative not to overbake them! Overbaking is the primary cause of cracks in cheesecakes. If you notice any cracks forming on the surface, it’s a clear sign that they’ve been in the oven for too long.
Step 4: Prepare the Fluffy Whipped Cream
While your cheesecakes are cooling, prepare the delightful whipped cream topping. In a clean, chilled mixing bowl (preferably a metal bowl that has been in the freezer for 10-15 minutes), combine the 1 cup of cold heavy cream, 1 tablespoon of granulated sugar, and 1/2 teaspoon of vanilla extract. Using an electric mixer, beat these ingredients on high speed for approximately 2 minutes, or until soft peaks form and the cream is light and fluffy. Be careful not to overbeat, or you’ll end up with butter! The cold bowl and cold cream are essential for achieving the best volume and stability in your whipped cream.
Step 5: Cool, Chill, and Garnish Your Masterpiece
Once the mini cheesecakes are finished baking, remove the muffin tin from the oven and let them cool completely to room temperature within the baking dish. This gradual cooling prevents drastic temperature changes that can lead to sinking or cracking. Once cooled, gently spoon about 1/2 to 1 tablespoon of your chosen caramel sauce over the top of each individual cheesecake. Distribute the caramel evenly for a beautiful finish. Now, for the most challenging part – patience! Transfer the cheesecakes to the refrigerator and chill them for a minimum of 2 hours. This chilling period is absolutely vital as it allows the cheesecakes to fully set, firm up, and develop their optimal texture and flavor. Finally, once thoroughly chilled, remove them from the fridge. Using a piping bag fitted with your favorite tip (or simply a spoon), elegantly top each mini cheesecake with the freshly prepared whipped cream. For an optional but highly recommended touch, dust a light sprinkle of cinnamon over the whipped cream just before serving. This adds a beautiful aromatic finish and visual appeal.
Why Choose Mini Cheesecakes? The Perfect Individual Treat
While a full-sized cheesecake is undeniably impressive, mini cheesecakes offer a host of advantages that make them a preferred choice for many bakers and hosts. Firstly, they provide perfect portion control, making it easier to manage servings and avoid overindulgence. Each guest receives their own beautifully presented dessert without the fuss of slicing. This individual serving aspect also makes them incredibly hygienic and convenient for parties, potlucks, and gatherings, as there’s no need for shared utensils. Furthermore, baking mini cheesecakes often means faster baking times compared to a large springform pan, and they cool more quickly too. They are less prone to cracking than their larger counterparts, making them a more forgiving project for novice bakers. Finally, their adorable size makes them inherently appealing and easier to transport, whether you’re bringing them to a friend’s house or packing them for a picnic.
Expert Tips for Unforgettable Mini Cheesecakes
Achieving cheesecake perfection isn’t difficult, especially with these helpful tips:
- Room Temperature Ingredients are Key: Ensure your cream cheese and eggs are at room temperature. This allows them to combine smoothly and evenly, preventing lumps in your batter and ensuring a creamy, uniform texture in the final product.
- Don’t Overmix the Batter: After adding the eggs and condensed milk, mix just until combined. Overmixing can incorporate too much air, which expands during baking and then collapses during cooling, leading to cracks.
- Avoid Overbaking: This is crucial. Cheesecakes are delicate. Bake only until the edges are set and the center still has a slight jiggle. They will continue to set as they cool. Overbaking is the number one cause of dry texture and cracks.
- Cool Gradually: Allow the cheesecakes to cool completely in the muffin tin before refrigerating. Sudden temperature changes can shock the cheesecake and cause cracking or sinking.
- Chilling Time is Essential: Do not skip or shorten the refrigeration period. Chilling for at least 2 hours (or even better, overnight) allows the cheesecakes to firm up, intensify their flavors, and achieve that perfect dense, creamy texture.
- Customize Your Toppings: While caramel and whipped cream are divine, feel free to experiment! Fresh berries, chocolate ganache, lemon curd, or a sprinkle of toasted nuts can also make wonderful additions.
Creative Variations and Customizations for Your Mini Cheesecakes
This recipe provides a fantastic base, but don’t hesitate to unleash your creativity! Here are some ideas to customize your mini cheesecakes:
- Crust Alternatives: Instead of graham crackers, try crushed Oreo cookies for a chocolate crust, vanilla wafers, or even gingersnap cookies for a spicier twist. Adjust butter quantities if needed to achieve the right consistency.
- Flavor Infusions: Add lemon zest to the cheesecake batter for a bright citrus note, or a touch of almond extract for a different dimension. A tablespoon of espresso powder can also create a wonderful coffee-caramel fusion.
- Caramel Upgrades: Elevate your caramel sauce by stirring in a pinch of sea salt for a salted caramel delight, or a splash of bourbon for an adult-friendly version.
- Whipped Cream Flavors: Infuse your whipped cream with other extracts like almond, peppermint, or even a touch of orange blossom water for unique aromatic profiles. A dusting of cocoa powder instead of cinnamon also works beautifully.
- Other Topping Ideas: Consider a fresh berry compote (raspberry, strawberry, or blueberry), a drizzle of dark chocolate ganache, a dollop of lemon curd, or a sprinkle of toasted pecans or walnuts for added crunch.
Storage and Serving Suggestions
To keep your mini cheesecakes fresh and delicious, store them in an airtight container in the refrigerator. They will remain delightful for up to 3-4 days. If you’ve added whipped cream, it’s best to consume them within 2 days for optimal freshness of the cream. For longer storage, you can freeze the plain cheesecakes (without caramel or whipped cream) individually on a baking sheet until firm, then transfer them to a freezer-safe bag or container for up to 1 month. Thaw them in the refrigerator before adding your desired toppings. Always serve these mini cheesecakes chilled for the best texture and flavor experience. They make perfect individual desserts for dinner parties, brunches, or simply as a special treat for yourself!
Indulge in the Joy of Easy Mini Cheesecakes with Caramel Sauce
This recipe for easy mini cheesecakes with caramel sauce is more than just a dessert; it’s an invitation to create moments of pure delight. Whether you’re a seasoned baker or just starting your culinary journey, these individual treats are designed for success and guaranteed to impress. From the delightful crunch of the graham cracker crust to the silky-smooth cream cheese filling, all crowned with rich caramel and fluffy whipped cream, every bite is a celebration of flavor and texture. So go ahead, gather your ingredients, follow these simple steps, and prepare to enchant your taste buds and those of your loved ones with this truly irresistible homemade dessert!