
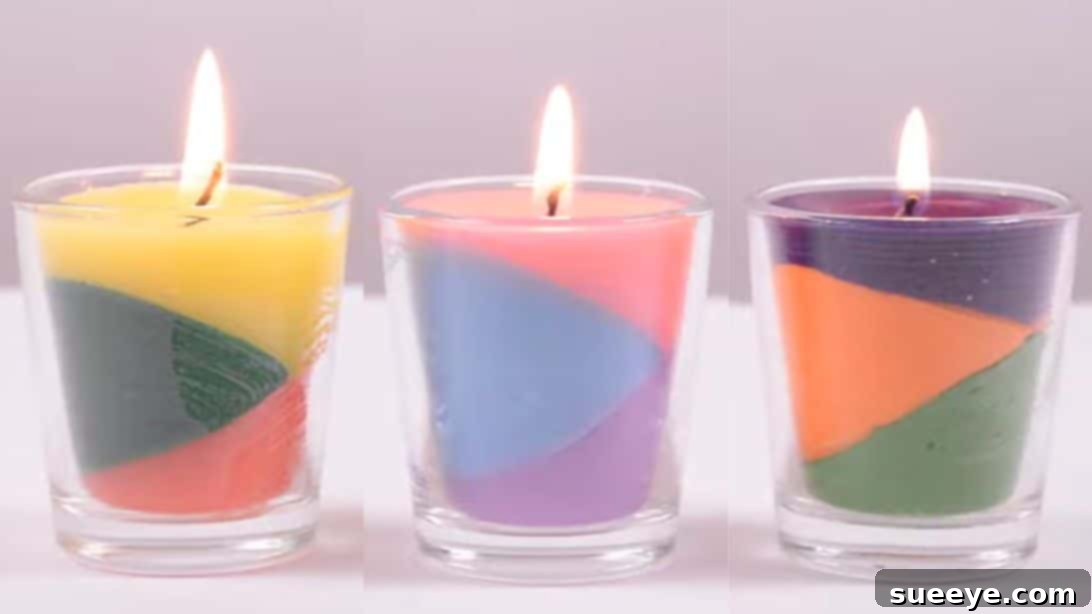
Are you looking for a fun, creative, and eco-friendly way to bring new life to those forgotten nubs of broken crayons? Look no further! This comprehensive guide will show you how to transform your leftover crayons into beautiful, vibrant, layered homemade candles. Not only is this a fantastic upcycling project, but it also allows you to create unique, personalized decor items or thoughtful handmade gifts without breaking the bank. Inspired by the ingenious craft ideas shared by Art IDEA on YouTube, this DIY project is perfect for crafters of all skill levels, offering a rewarding experience as you watch your colorful scraps turn into elegant candles.
Making your own DIY crayon candles is more than just a craft; it’s a statement of sustainability and creativity. Instead of discarding broken crayons, you’re giving them a purpose, reducing waste, and adding a personal touch to your home ambiance. Our detailed instructions will walk you through each step, ensuring a smooth and enjoyable crafting journey. Prepare to unleash your inner artist and illuminate your space with these charming, handmade creations!
Essential Materials for Your DIY Crayon Candles
Gathering the right materials is the first step to a successful candle-making project. Most of these items are easily found around your home or at a local craft store, making this an accessible and affordable endeavor.
- Wax Crayons: Collect an assortment of broken or unused crayons in various colors. The more diverse your collection, the more vibrant and unique your layered candles will be. Consider color palettes that complement each other for a harmonious finish.
- Candle Wax: Paraffin wax, soy wax, or beeswax flakes are all suitable. Soy wax is a popular choice for its clean burn and eco-friendly properties, while paraffin is widely available and often more economical. You’ll need enough to mix with your crayon shavings.
- Glass Candle Holder: Choose sturdy, heat-resistant glass containers. Mason jars, old glass tumblers, or dedicated candle jars work perfectly. Ensure they are clean and dry before you begin.
- Candle Wick: Opt for pre-tabbed wicks that are suitable for the diameter of your candle holder. You can salvage wicks from old candles, but new wicks ensure a consistent burn. Always match the wick size to the container to prevent tunneling or excessive smoking.
- Warm Water (for double boiler): You’ll need this for your double boiler setup to safely melt the wax. A large pot for the water and a smaller, heat-resistant glass or metal container for the wax are essential.
- Cutter or Craft Knife: A utility knife, craft blade, or even a vegetable peeler can be used to scrape the crayon wax and candle wax into fine shavings, which helps them melt more quickly and evenly. Exercise caution when using sharp tools.
- Stirring Sticks: Popsicle sticks, old spoons, or disposable stirring sticks are ideal for mixing the melted wax and crayon pigments.
- Wick Holders/Clips: Optional, but highly recommended for keeping your wick centered during the pouring and setting process. Clothespins or specialized wick clips work well.
Step-by-Step Directions for Crafting Your Layered Crayon Candles
Follow these detailed instructions to create stunning, multi-colored candles that are sure to impress. Remember, precision and patience are key to achieving beautiful results.
Step 1: Preparing the First Vibrant Layer
Begin by setting up your workspace in a well-ventilated area, preferably covered with newspaper or a craft mat to protect surfaces from wax spills. Safety glasses are also a good idea when dealing with hot wax.
Using your cutter or craft knife, carefully scrape both candle wax and one chosen crayon color into a small, heat-resistant glass container. Aim for an approximate 1:1 ratio of crayon shavings to candle wax flakes. The more crayon you add, the more intense the color will be, but too much can affect the wax’s burning quality. Focus on creating fine shavings for faster melting.
Next, take your candle wick and firmly position its metal tab at the very center of the bottom of your glass candle holder. You can secure it with a dab of hot glue or a wick sticker for stability. To keep the wick upright and centered, use a wick holder or clip, or simply wrap the top of the wick around a pencil resting across the rim of the candle holder.
Now, it’s time to melt your wax safely. Create a double boiler by filling a larger pot with about 1-2 inches of water and placing it on your stovetop. Bring the water to a gentle boil (around 100°C / 212°F). Carefully place your small glass container, filled with the scraped wax and crayon, into the larger pot of boiling water. The heat from the boiling water will gently and evenly melt the wax mixture without direct flame, preventing scorching and ensuring the color disperses smoothly.
Allow the wax and crayon to melt completely, stirring occasionally with a dedicated stirring stick until the mixture is uniform in color and consistency, with no lumps of crayon remaining. Once fully melted, carefully remove the small glass from the double boiler using oven mitts or tongs.
Before pouring, carefully tilt your prepared glass candle holder to one side. This critical step creates the distinctive layered effect. With the candle holder held at an angle, slowly pour the first color of melted wax mixture into it, filling about one-third of the way up. Maintain this tilted position for approximately 10 minutes, or until the wax has completely hardened and formed a solid, angled layer. You can gently test the surface with a toothpick to ensure it’s firm before moving on.
Step 2: Creating Additional Layers and the Final Finish
While the first layer is solidifying, prepare your second color. Repeat the scraping and melting procedure exactly as you did for the first layer. Choose a complementary or contrasting crayon color to create a visually appealing gradient or bold stripe.
Once your second wax mixture is perfectly melted and the first layer in your candle holder is completely hard, carefully tilt the candle holder to the opposite side from your first pour. This will create a mirrored angled layer. Slowly and steadily pour the new color of melted wax over the hardened first layer. Again, hold the candle holder in this tilted position for about 10 minutes, or until this second layer has fully hardened.
For your third and final layer, choose another crayon color. Repeat the melting process one last time. Once this wax mixture is ready, position the candle holder upright on a flat, level surface. Pour the last wax color directly on top of the previously hardened layers until the candle holder is completely filled, ensuring the top surface is flat and even. This final pour will level out any irregularities from the tilted layers and provide a smooth finish.
Allow the entire candle to sit undisturbed for a minimum of 10 minutes, or even longer (up to several hours for larger candles), to ensure all layers are thoroughly solid and properly set. The longer it sets, the better the layers will adhere and the more stable your finished candle will be. Once completely solid, your beautiful, custom-made crayon candle is ready to be admired and used! You can experiment with various color combinations and layering techniques to create an endless array of unique candles.
Pro Tips for Perfecting Your Homemade Crayon Candles
Elevate your candle-making game with these handy tips and tricks:
- Safety First: Always supervise children if they are assisting. Wear appropriate protective gear like gloves and safety glasses. Be extremely cautious when handling hot wax and sharp tools. Never leave melting wax unattended.
- Wick Centering: A properly centered wick ensures an even burn. If you don’t have a wick clip, a clothespin or a strategically placed pencil can hold the wick in place during pouring and cooling.
- Temperature Control: Melting wax too quickly or at too high a temperature can compromise its quality and the crayon’s pigment. The double boiler method is crucial for gentle, even melting.
- Color Intensity: Adjust the crayon-to-wax ratio to control the intensity of your colors. More crayon will yield a darker, more vivid hue, while less will create a pastel effect.
- Preventing Air Bubbles: Pour your wax slowly and steadily to minimize air bubbles. If bubbles appear, gently tap the candle holder on your work surface or use a toothpick to release them.
- Scented Candles: To add a fragrant element, incorporate candle-safe essential oils or fragrance oils into your melted wax *before* pouring. Add a few drops at a time and stir thoroughly. Always check the flashpoint of your chosen fragrance oil to ensure it’s compatible with candle making.
- Smooth Tops: If your candle’s surface cools with a slight dip or unevenness (a common occurrence known as “sinkholes”), you can remelt a small amount of the same color wax and gently pour a thin layer over the top to create a smooth finish.
- Curing Time: While the wax hardens quickly, most candles benefit from a longer “curing” period (24-48 hours or even a few days) before burning. This allows the wax molecules to fully stabilize, leading to a better burn and scent throw (if scented).
- Trim the Wick: Before lighting your candle for the first time, and before each subsequent burn, trim the wick to about 1/4 inch. This prevents excessive smoking and ensures a clean, efficient burn.
Why Make DIY Crayon Candles? Benefits and Inspiration
Beyond the simple joy of crafting, making your own crayon candles offers a multitude of advantages:
- Eco-Friendly Upcycling: This project is a fantastic way to practice sustainability. Instead of contributing to landfill waste with discarded crayons, you’re giving them a beautiful new life. It’s a small step towards a greener lifestyle.
- Cost-Effective: Homemade candles are significantly cheaper than store-bought options, especially when you’re using materials you already have on hand, like old crayons. This makes it an economical hobby that yields stunning results.
- Unleash Creativity: With an endless palette of crayon colors, your design possibilities are limitless. Experiment with vibrant rainbow layers, subtle ombrés, or bold contrasting stripes. Each candle becomes a unique piece of art, reflecting your personal style.
- Personalized Gifts: Handcrafted crayon candles make incredibly thoughtful and personalized gifts for friends, family, or teachers. Tailor the colors to match the recipient’s preferences or decor for an extra special touch.
- Therapeutic Hobby: Engaging in creative activities like candle making can be a wonderful stress reliever. The process of melting, mixing, and pouring can be meditative, providing a much-needed break from daily routines.
- Educational for Kids: It’s an excellent project to do with children (under adult supervision), teaching them about recycling, color mixing, and the basics of candle making in a fun, hands-on way.
Conclusion: Illuminate Your Home with Handmade Charm
Transforming broken crayons into beautiful, layered candles is a wonderfully rewarding DIY project. It’s a testament to the power of upcycling and the joy of creating something unique with your own hands. Not only will you reduce waste, but you’ll also infuse your home with personalized warmth and color. We encourage you to gather your materials, follow these steps, and embark on your own crayon candle-making adventure. The possibilities for color combinations and designs are truly endless!
Special thanks to Art IDEA via YouTube for the inspiring tutorial and captivating visuals that made this project come to life. Her channel is a treasure trove of creative DIY ideas, and we highly recommend giving her a visit and subscribing for more innovative crafts!