
Master Your Sewing Machine: A Comprehensive Guide to Essential Presser Feet
Whether you’re just threading your first needle or have years of experience under your belt, understanding your sewing machine’s presser feet is key to elevating your projects. These small, often overlooked attachments are the unsung heroes of precision stitching, transforming your basic machine into a versatile powerhouse. Each presser foot is specifically engineered to perform certain tasks with greater accuracy and ease, allowing you to achieve professional-quality results on a wide array of sewing ventures. This comprehensive guide will delve into four fundamental presser feet that every sewer should know, enhancing their skills and opening up new creative possibilities.
Many sewers, even those who sew regularly, might not be utilizing their machines to their full potential. The right presser foot can simplify complex tasks, enhance fabric handling, and open up a world of creative possibilities that extend far beyond basic straight stitching. From achieving invisible hems to creating perfectly formed buttonholes and adding intricate decorative appliqués, these feet are designed to make your sewing journey smoother, more efficient, and ultimately, more enjoyable. Let’s unlock the secrets to flawless stitching and discover how these indispensable tools can revolutionize your next sewing project. We extend our gratitude to Tale Handmade for providing inspirational insights into the diverse and practical applications of these essential sewing accessories.
Unlock Flawless Finishes: Essential Presser Feet Every Sewer Needs
1. The Blind Hem Foot: Achieve Invisible Hems with Professional Precision
The blind hem foot is an absolute game-changer for anyone seeking a professional, virtually invisible finish on garment hems. This specialized presser foot is expertly designed to create a hem that is almost undetectable from the right side of the fabric, making it an indispensable tool for tailored trousers, elegant skirts, flowing dresses, and neatly finished curtains. Its unique construction features an adjustable guide or blade that helps you maintain a consistent distance from the fabric edge, ensuring uniform stitching that merely “catches” a tiny thread or two from the main fabric, thus appearing invisible. Mastering this foot will significantly elevate the quality and appearance of your handmade garments, giving them a high-end, store-bought finish.
How to Utilize the Blind Hem Foot for Perfect Hems:
- Prepare Your Hem Allowance: Begin by precisely pressing your hem allowance into place. For most garments, this involves folding the raw edge up once by a small amount (e.g., 1/4 inch or 6mm), pressing, and then folding it up a second time by the desired hem depth to fully enclose the raw edge. Ensure your hem is even, flat, and securely pressed.
- Create the “Blind” Fold: This is the most crucial step for achieving the invisible effect. Fold the hemmed edge back towards the right side of the fabric, ensuring that about 1/4 inch (6mm) of the previously pressed hem allowance is still exposed. This creates a small, fan-like fold. The purpose of this fold is to strategically position the fabric so that the needle, when swinging for its occasional zigzag stitch, will catch only a minimal portion of the main fabric, making the stitch appear “blind.”
- Position Fabric and Select Stitch: Attach the blind hem foot to your sewing machine. Place your prepared fabric under the foot, aligning the fold you just created against the adjustable guide on the foot. Select your machine’s dedicated blind hem stitch setting. This stitch typically consists of several straight stitches running parallel to the hem fold, followed by one wider zigzag stitch that just catches the folded-back portion of the main fabric.
- Sew and Adjust: Begin sewing slowly and steadily. Monitor the needle to ensure that the zigzag stitch is consistently catching only the very edge of the main fabric fold. After sewing, carefully unfold the fabric. On the wrong side, you should see a neat row of stitches on the hem allowance, and on the right side of your garment, only tiny, almost imperceptible dots where the zigzag caught the fabric. Practice on fabric scraps to fine-tune the stitch width and length, as well as the position of the guide, to suit your specific fabric type and desired invisibility.
The blind hem foot performs exceptionally well on a wide variety of woven fabrics, from lightweight cottons to heavier wools, and can also be used effectively on some stable knit fabrics. Mastering the use of this specialized foot will undoubtedly add a truly professional and polished touch to all your sewing projects, giving them a refined finish that rivals ready-to-wear garments.
2. The Buttonhole Presser Foot: Effortless and Consistent Buttonholes
Creating perfect buttonholes can often be a daunting task for beginners, and even experienced sewers sometimes struggle with consistency. However, with the right buttonhole presser foot, this intricate process transforms into a simple, highly automated, and consistently accurate endeavor. Most modern sewing machines come equipped with an automatic buttonhole foot that cleverly takes the guesswork out of sizing and stitching, reliably producing uniform buttonholes every time. This foot is an absolutely indispensable tool for anyone making garments, bags, cushions, or any other item requiring neat and functional closures.
Step-by-Step Guide to Using Your Buttonhole Foot for Flawless Closures:
- Measure and Mark Your Buttonhole: The first step is to select the button you intend to use for your project. Place this button into the special sizing mechanism located at the back of the buttonhole foot. This ingenious feature automatically communicates the required buttonhole length to your sewing machine. Next, meticulously mark the desired placement of your buttonhole(s) on your fabric using a fabric pen, chalk, or tailor’s tacks. Ensure your marks are perfectly straight, evenly spaced, and accurately positioned according to your pattern or design.
- Attach the Buttonhole Foot: Carefully remove your machine’s standard presser foot and securely attach the buttonhole foot in its place. Ensure it clicks firmly into position. Lower the presser foot lever as you would with any other foot.
- Position Fabric and Engage Lever: Place your prepared fabric under the buttonhole foot, precisely aligning your marked buttonhole line with the center guide on the foot. This alignment is critical for a straight buttonhole. Locate the buttonhole lever on your sewing machine (it’s typically a small lever situated to the left or right of the needle area). Pull this lever down and ensure it is positioned behind the buttonhole foot. This lever activates the automatic sizing mechanism. Finally, select the buttonhole stitch setting on your sewing machine.
- Initiate Automatic Stitching: With the buttonhole lever engaged and the stitch selected, your machine will now automatically proceed to sew the entire buttonhole. This process typically occurs in several distinct stages: it will stitch the first side, then create the bottom bar tack, proceed to stitch the second side, and finally, finish with the top bar tack. The machine will automatically stop when the buttonhole is complete, thanks to the measurement taken from your button.
- Carefully Open the Buttonhole: Once the stitching is complete, carefully remove the fabric from your machine. Using a sharp seam ripper, gently and slowly cut open the center of the buttonhole. To prevent accidentally cutting too far and damaging your beautifully stitched buttonhole, a helpful tip is to place a sewing pin at each end of the bar tack before you begin ripping. This acts as a physical stop for your seam ripper.
It is always highly recommended to test your buttonhole on a scrap piece of your project fabric before working on your final garment. This crucial step allows you to check the tension, stitch quality, and overall appearance, enabling you to make any necessary adjustments to your machine’s settings or stitch preferences for a flawless result. With this intelligent foot, perfectly sized and beautifully stitched buttonholes are easily within your reach, adding a refined and professional touch to all your handmade creations.
3. The Overcast Foot: Professional Edge Finishing Without a Serger
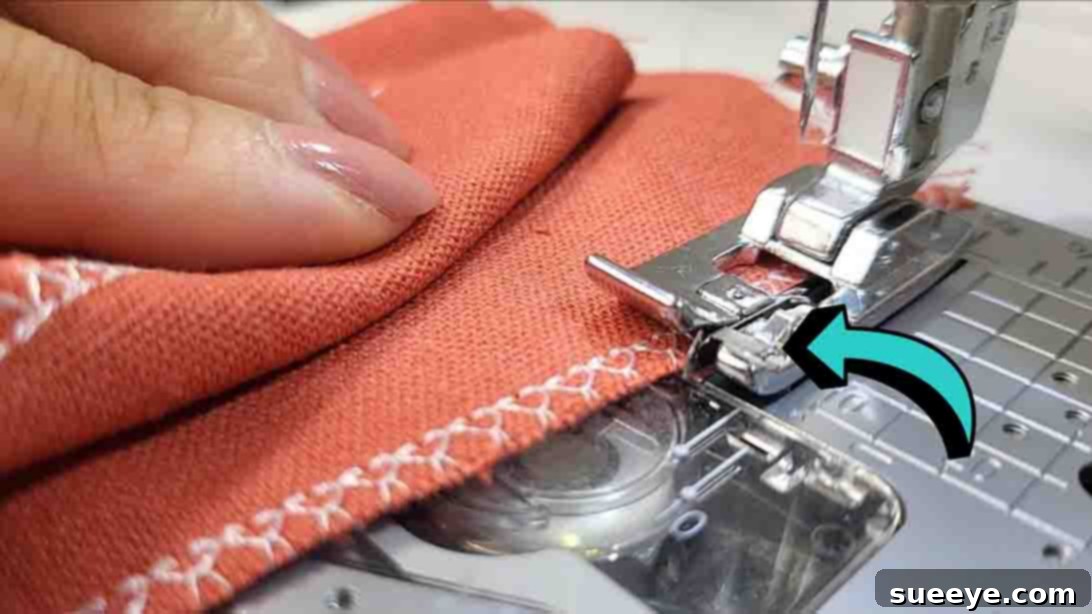
The overcast foot is a powerful, yet often underutilized, secret weapon for achieving clean, professional-looking seam finishes without the need for a separate serger or overlocker. It’s specifically engineered to prevent fabric edges from fraying by neatly encasing them with thread, effectively mimicking the appearance and function of an overlock stitch. This foot is particularly useful for managing raw edges on woven fabrics that are highly prone to unraveling, significantly enhancing both the durability and the aesthetic appearance of your sewing projects. By using the overcast foot, you can give your garments and fabric items a much longer lifespan and a more polished, ready-to-wear quality.
Utilizing the Overcast Foot for Impeccable Neat Edges:
- Attach the Overcast Foot: Begin by replacing your standard presser foot with the specialized overcast foot. Ensure it is securely attached to your machine’s presser foot holder.
- Select the Appropriate Stitch: Turn on your sewing machine and select its dedicated overcast stitch. This stitch typically involves a sophisticated combination of zigzag stitches and straight stitches that work in harmony to wrap precisely around the fabric edge. Refer to your machine’s manual if you are unsure which stitch is designated as the overcast stitch; it often has an icon that resembles a zigzag with an additional straight line along the edge.
- Position Your Fabric Correctly: Place the raw edge of your fabric directly under the overcast foot. It is crucial to ensure that the very edge of the fabric aligns perfectly with the small guide or pin that is typically located on the right side of the foot. This guide is a vital component as it prevents the fabric edge from curling inwards during stitching and helps the overcast stitch form correctly and consistently over the edge of the fabric.
- Stitch with Care and Precision: Begin sewing slowly and steadily along the raw edge of your fabric. Observe how the needle operates: it will swing off the fabric slightly on the right side, creating loops that beautifully wrap around the fabric edge, while the straight stitches securely anchor the thread to the main body of the fabric. This coordinated action creates a robust, finished edge that effectively resists fraying and unraveling, providing a clean and lasting finish.
The overcast foot is ideally suited for finishing seam allowances before you press them open or press them neatly to one side. It is also an excellent choice for tidily finishing the edges of collars, facings, pocket bags, or any other part of a garment or fabric item where a clean, enclosed, and durable edge is desired. Employing this foot significantly extends the life of your handmade items by preventing wear and tear on raw edges, imparting a professional, ready-to-wear quality that elevates your craftsmanship and ensures your creations stand the test of time.
4. The Applique Foot: Precision and Visibility for Decorative Work
Also commonly known as an embroidery foot or an open-toe foot, the applique foot is specifically designed for intricate precision work, making it an invaluable asset for attaching appliqués, performing decorative stitching, and engaging in free-motion embroidery or quilting. Its distinctive design features a clear sole (often transparent plastic) and a wider opening at the front, which together provide an unobstructed and crystal-clear view of your stitching area. This unparalleled visibility allows you to guide your fabric with exceptional accuracy and confidence, especially when working around tight curves, sharp points, and other intricate elements of your designs. It truly empowers your creative decorative endeavors by giving you full control over your stitch placement.
Mastering Appliqué and Decorative Stitching with the Applique Foot:
- Prepare Your Appliqué Element: First, meticulously cut out your appliqué piece according to your pattern. To prevent it from shifting during the stitching process, adhere it securely to your main fabric using a fusible web (iron-on adhesive), a temporary fabric adhesive spray, or a few dabs of fabric glue. This stabilization is crucial for achieving clean and precise appliqué results.
- Attach the Applique Foot: Carefully remove your machine’s standard presser foot and firmly attach the specialized appliqué foot in its place. Ensure it is properly secured.
- Select Your Stitch: Choose a suitable stitch on your sewing machine for your appliqué technique. A dense zigzag stitch, often referred to as a satin stitch, is a very popular choice as it effectively covers the raw edges of the appliqué piece and provides a smooth, decorative finish. For raw-edge appliqué or for a less bulky look, a straight stitch or a narrow zigzag stitch can also be used, sometimes followed by additional fray-prevention methods.
- Stitch with Utmost Precision: Position your fabric so that the needle will begin stitching precisely along the edge of your appliqué shape. The open toe and clear design of this foot are immensely beneficial here, allowing you to see exactly where your needle is going at all times, which is paramount for navigating intricate curves, sharp corners, and delicate details. Guide the fabric slowly and smoothly, especially when maneuvering around tight corners or complex shapes. For very sharp turns, you may need to stop with the needle down in the fabric, lift the presser foot, pivot the fabric slightly, and then continue stitching.
- Consider Using a Stabilizer: For projects involving delicate fabrics, stretch knits, or when applying very dense stitching (like a wide satin stitch), it is highly recommended to use a tear-away or wash-away stabilizer underneath your main fabric. This additional layer provides essential support, preventing puckering, distortion, and ensuring a crisp, professional-looking appliqué or decorative stitch.
The versatile appliqué foot is not solely limited to appliqué techniques; it is also an excellent choice for precise topstitching, accurately guiding various decorative stitches, and even for certain types of free-motion quilting where an unobstructed view of the needle and fabric is highly beneficial. Its clear design and wide opening make it a cherished favorite for any sewing project that demands meticulous stitching, intricate detailing, and a clear line of sight, allowing your creative designs to truly stand out and shine.
Elevate Your Sewing: Practical Tips for Maximizing Your Presser Foot Collection
Understanding and proficiently utilizing these four essential presser feet – the blind hem, buttonhole, overcast, and applique foot – is a significant step towards unlocking your sewing machine’s full capabilities. However, the journey doesn’t end there. Here are some general tips to help you get the absolute most out of your entire presser foot collection and continually enhance your sewing prowess:
- Consult Your Machine Manual Religiously: Every sewing machine, even within the same brand, has its unique quirks and specific functionalities. Your machine’s manual is an invaluable resource that contains precise instructions for attaching, using, and troubleshooting each presser foot that came with your machine, as well as recommended stitch settings for optimal results. Don’t skip this critical step!
- Always Practice on Fabric Scraps: Before committing to your main project, make it a golden rule to always test your chosen presser foot and stitch settings on a scrap piece of the exact same fabric you plan to use. This crucial practice allows you to fine-tune tension, experiment with stitch length and width, and make any necessary adjustments to achieve the best possible results, avoiding costly mistakes on your final piece.
- Invest in Quality Specialized Feet: While your sewing machine typically comes with a foundational set of presser feet, consider investing in additional specialized feet if you find yourself frequently performing certain tasks. For instance, a walking foot for quilting, a zipper foot for perfect zipper installation, or a gathering foot for creating beautiful ruffles can dramatically improve efficiency and precision in these specific areas.
- Maintain and Organize Your Collection: Presser feet are small components and can easily get misplaced or damaged. Keep your collection neatly organized in a dedicated storage box, a custom-designed presser foot organizer, or a segmented drawer. This not only keeps them safe but also ensures they are easily accessible when you need them, saving you valuable time and frustration.
- Experiment and Continuously Explore: Do not be afraid to think outside the box and try different feet for various purposes. Sometimes a presser foot designed for one specific task can be surprisingly effective or even superior for another. Engage with online sewing communities, watch tutorials (like those from Tale Handmade), and read sewing blogs to discover innovative uses and new techniques for your presser feet. The sewing world is constantly evolving, and there’s always something new to learn!
Conclusion: Stitch Smarter, Not Harder, for Beautiful Results
The diverse and fascinating world of sewing machine presser feet offers endless opportunities for creativity and precision. By mastering these four essential feet – the blind hem, buttonhole, overcast, and applique foot – you will significantly enhance your sewing skills and dramatically elevate the quality of your finished projects. Understanding their specific functions and how to utilize them effectively will instill greater confidence in your abilities, save you valuable time, and consistently help you achieve results that look professionally made. Embrace the remarkable versatility of your sewing machine and allow these small but mighty tools to transform your creative vision into beautifully crafted realities. Remember, every stitch is an opportunity to learn and grow. Happy sewing!