
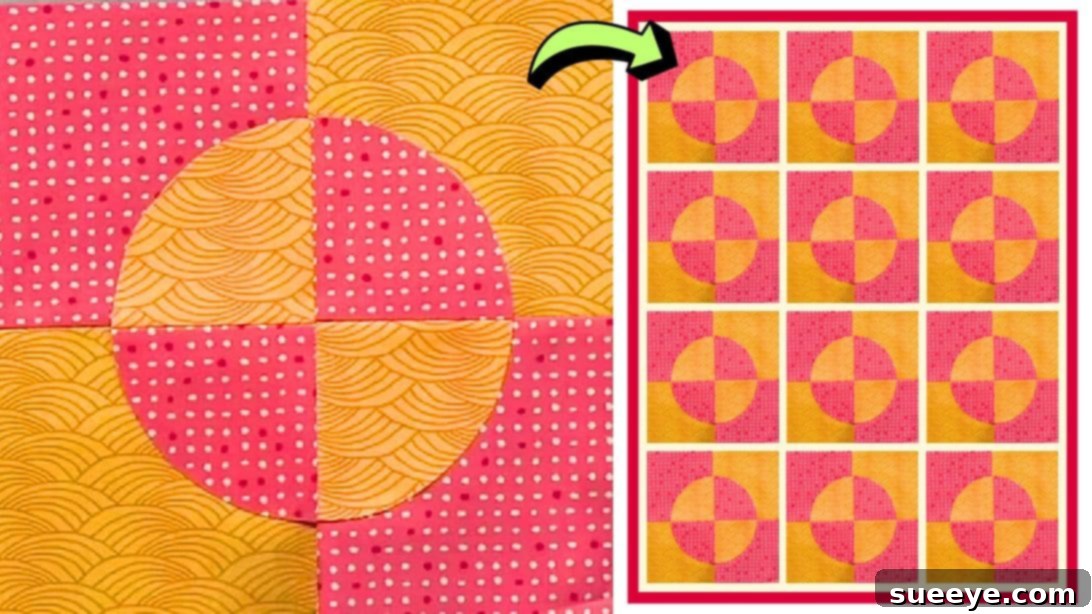
Mastering the “It Takes Two” Quilt Block: Create Stunning Visual Illusions
There’s an undeniable magic in quilt projects that captivate the eye, drawing viewers in with intricate designs or clever optical illusions. These are the projects that are not only immensely satisfying to create but also become cherished pieces of art. The “It Takes Two” quilt block technique, brilliantly showcased by National Quilters Circle on YouTube, stands out as a true gem in the world of quilting. Its simplicity belies its incredible versatility, allowing for a multitude of creative expressions once you grasp the fundamental steps. Whether you’re a seasoned quilter looking for a fresh challenge or a beginner eager to dive into the rewarding craft, this comprehensive guide will walk you through everything you need to know to bring these mesmerizing blocks to life.
The beauty of the “It Takes Two” block lies in its ability to create a dynamic visual effect using just two contrasting fabrics. This technique isn’t just about sewing pieces together; it’s about crafting an illusion, a dance of light and shadow that gives your quilt depth and movement. Join us as we explore this fantastic method, from preparing your fabrics to stitching your final design, and discover the endless possibilities that await your creative touch.
Why the “It Takes Two” Quilt Block is a Must-Try for Every Quilter
The allure of the “It Takes Two” quilt block extends beyond its immediate visual appeal. It offers a unique blend of simplicity and sophisticated design, making it accessible for quilters at any skill level while still providing ample room for creative exploration. Here’s why this particular block deserves a prominent spot in your quilting repertoire, and why you’ll love creating it:
- Stunning Visual Impact: The core of this block’s charm is its clever use of contrasting fabrics. When arranged correctly, these fabrics create an optical illusion that makes the central circle appear to float, sink, or pop off the background. This extraordinary dimension adds an element of surprise and complexity to any quilt, making it a true conversation starter.
- Beginner-Friendly with Impressive Results: Don’t let the intricate look deceive you. The fundamental technique for the “It Takes Two” block involves basic cutting and sewing skills, making it an excellent project for those new to quilting. Beginners can achieve remarkably professional and impressive results early in their quilting journey, building confidence and fostering a love for the craft.
- Unleash Endless Versatility: Once you master the basic construction of this block, the design possibilities are truly limitless. You can experiment with an array of color palettes, explore different fabric textures (solids, prints, batiks), and play with various arrangements of the finished blocks. This versatility allows you to create unique patterns and larger quilt designs that reflect your personal style.
- A Foundation for Creativity and Exploration: The original video tutorial by National Quilters Circle is fantastic because it demonstrates several exciting variations. These examples showcase how even slight changes in fabric placement, color choices, or block orientation can dramatically alter the final look and the illusion created. This encourages quilters to think beyond the pattern and truly make each piece their own.
- The Deep Satisfaction of Craft: There’s immense joy and satisfaction in watching flat pieces of fabric transform, through your own hands, into a three-dimensional illusion. Each completed “It Takes Two” block is a testament to your growing skill, careful attention to detail, and burgeoning creativity. It’s a rewarding feeling that keeps you coming back to your sewing machine.
Essential Materials for Your “It Takes Two” Quilt Block Project
Before you embark on your creative quilting journey, gathering the right tools and materials is paramount for a smooth, efficient, and enjoyable process. Having everything ready before you start will help you maintain focus and precision. Here’s a detailed look at what you’ll need to create your captivating “It Takes Two” quilt blocks:
- Two Contrasting Print or Solid Fabrics: These are the stars of the show! The success of the “It Takes Two” illusion hinges entirely on distinct contrast. Choose two fabrics that stand out boldly against each other. This could be a light fabric paired with a dark one, a vibrant pattern juxtaposed with a calm solid background, or even two contrasting patterns (e.g., a bold geometric with a soft floral). Consider how different print scales will interact – a large print versus a small print can create different visual effects.
- Needle and Thread: Fundamental for all sewing projects. Opt for a good quality polyester or cotton thread that matches or subtly complements your chosen fabrics. A strong, consistent thread ensures the durability of your stitches and contributes to a professional, polished finish.
- Marking Pen, Pencil, or Chalk: Essential for accurately drawing your circle template and any other necessary guidelines on your fabric. Select a marking tool that is clearly visible on your fabric but can be easily removed, erased, or will be completely hidden by your stitching or seams.
- Quilting Ruler: A transparent acrylic quilting ruler with precise measurements is indispensable. It will be used for accurate cutting of your fabric squares (especially for the 4-patch blocks) and for drawing straight lines. Look for rulers with clear markings and non-slip grips.
- Fusible Paper (e.g., HeatnBond Lite, Lite Steam-A-Seam 2): This specialized paper is a game-changer for appliqué. It has a heat-activated adhesive on one side. When ironed onto fabric, it creates a temporary bond that stabilizes the fabric, prevents fraying, and makes cutting and positioning your appliqué shapes much easier and more precise. It’s crucial for achieving crisp circles.
- Iron and Ironing Board: Proper pressing is a cornerstone of professional-looking quilting. Your iron will be crucial for flattening seams, setting the fusible paper adhesive, and ensuring your fabric pieces lay perfectly smooth without distortion. Always remember to press, not iron (lift and place the iron, don’t glide).
- Sewing Machine: While hand-stitching is always an option for the appliqué, a sewing machine will significantly speed up the construction of your 4-patch blocks and provide consistent, strong stitches for securing your circle appliqué, whether using a zigzag or blanket stitch.
- Rotary Cutter and Cutting Mat (Optional but Highly Recommended): For precise and efficient cutting of fabric squares and strips, especially when making multiple blocks or if you plan to continue quilting. A self-healing cutting mat protects your work surface and ensures accurate cuts.
Step-by-Step Directions to Craft Your Captivating Illusion Quilt Block
Now that your materials are ready, let’s dive into the hands-on process of creating these beautiful and intriguing “It Takes Two” quilt blocks. Follow these detailed instructions carefully to ensure accuracy and achieve stunning, professional results.
Step 1: Preparing Your Foundation – The 4-Patch Block and Circle Template
The journey to your illusion quilt block begins with a solid foundation: the 4-patch block. This is a classic quilting unit formed by sewing four smaller squares together to create a larger square. To start, cut two squares from each of your two contrasting fabrics. For example, if you aim for a finished 4-patch block of 6 inches, you’ll typically cut four squares that are 3.5 inches each (this includes a 1/4-inch seam allowance on all sides). Arrange these four smaller squares in a checkerboard pattern, carefully alternating your contrasting fabrics. Sew them together into two rows first, then join these two rows to complete your 4-patch block. Press your seams meticulously to ensure a flat, crisp block – this attention to detail is vital for the overall success of your quilt.
Next, you’ll prepare your circle template. Begin by deciding on the desired diameter for your illusionary circle. A good rule of thumb is to choose a size that fits comfortably within your 4-patch block, leaving a small border or allowing it to cover key intersections of your 4-patch. Draw this circle precisely on a piece of regular paper. Crucially, add clear horizontal and vertical lines that intersect exactly at the center of the circle. These lines will serve as vital guides for perfect alignment in subsequent steps. Once your paper template is complete, trace the circle shape onto the smooth, non-adhesive side of your fusible paper. At this stage, do not cut it out precisely; instead, roughly cut around the traced circle, leaving approximately a quarter to half an inch margin around the drawn line. Take this roughly cut fusible paper circle and position it onto the wrong side of one of your completed 4-patch blocks. Ensure it is perfectly centered and that the traced circle encompasses the exact area of the 4-patch block where you want your appliqué to be.
Step 2: Attaching the Circle and Creating the Contrasting Layer
With your fusible paper positioned on the wrong side of your first 4-patch block, it’s time to adhere it. Carefully center the fusible paper template, ensuring that the drawn circle aligns exactly where you envision your fabric circle to be. Pay close attention to matching the edges and using the previously drawn horizontal and vertical center lines on the fusible paper to align with the seams of your 4-patch block. This precision is key for a balanced final look. Gently iron the fusible paper in place, following the manufacturer’s instructions for appropriate heat and duration. The heat will activate the adhesive, creating a strong, temporary bond between the paper and the fabric. Once adhered, it is vital to allow the block to cool completely. This cooling period ensures the adhesive sets properly, preventing any shifting or distortion when you proceed to cut.
Once the fabric is cool to the touch, use a sharp pair of fabric scissors or a rotary cutter to precisely cut out the fabric circle along the drawn line on the fusible paper. Take your time with this step to ensure a perfectly smooth, even circle, as this shape will be a prominent feature in your finished design. After cutting, carefully peel off the paper backing from the fabric circle. You will now have a crisp fabric circle with an exposed, heat-activated adhesive layer on its wrong side, ready for appliqué.
Now for the truly magical part that creates the illusion! Take this fabric circle and place it onto the right side of a *second*, completely different 4-patch block. This second 4-patch block will serve as the background for your appliqué. To achieve the captivating contrast that defines the “It Takes Two” block, it is crucial to rotate your fabric circle. Position it so that its original color arrangement (from the first 4-patch it was cut from) differs significantly from the background 4-patch block where it will now be attached. For instance, if the top-left square of your background 4-patch is dark, try to position your circle so that a lighter part of the circle covers that area, creating a strong visual break. This deliberate placement of contrasting fabrics is precisely what gives the “It Takes Two” block its signature depth, movement, and mesmerizing visual interest.
Step 3: Securing Your Design and Exploring Creative Variations
With your contrasting fabric circle perfectly positioned on the right side of the second 4-patch background block, press it firmly in place with your iron. This final press will activate the adhesive on the circle’s back, securely bonding it to the background block. While the fusible paper provides an excellent temporary hold and prevents shifting, it’s essential to stitch around the edges of the circle for a permanent, durable, and professional finish. You have a couple of excellent and popular options for this crucial step:
- Blanket Stitch: This decorative stitch is often used for appliqué and adds a beautiful, hand-stitched look around the edge of your circle. It’s not only strong and secure but also adds a charming visual element. You can execute this by hand for a traditional feel or use a machine blanket stitch setting for speed and consistency.
- Zigzag Stitch: A machine zigzag stitch is a quick and highly secure way to finish the raw edge of your appliqué circle. This stitch effectively encapsulates the fabric edge, preventing any fraying. You can adjust the stitch length and width to your preference – a wider, denser zigzag (sometimes called a satin stitch) creates a smooth, embroidered edge, while a narrower zigzag can be more subtle.
Once you’ve secured the edges, your first “It Takes Two” quilt block is complete! Step back and admire the illusion you’ve created. The real fun, however, truly begins as you proceed to make more blocks. The incredible versatility of this technique, beautifully demonstrated in the National Quilters Circle video, lies in the endless creative variations you can achieve. Here are just a few ideas to inspire your next steps and help you expand your quilting horizons:
- Varying Fabric Choices: Don’t limit yourself to the initial two fabrics. Experiment with different types of contrasting fabrics and patterns. Try a vibrant solid against a subtle tone-on-tone print, or combine two contrasting prints (e.g., a bold floral with a classic stripe or polka dot). The impact of the illusion can change dramatically with different fabric scales, textures, and color combinations.
- Intriguing Block Rotation: Once you have created several “It Takes Two” blocks, experiment with rotating them. Arranging blocks in different orientations – perhaps creating a grid where some are flipped horizontally or vertically – allows the dark and light areas to interact in new ways, creating fascinating secondary patterns within your larger quilt layout. This can lead to complex-looking designs from simple units.
- Exploring Color Palettes: Dive into color theory! Explore monochromatic schemes for a subtle, elegant effect, or go bold with complementary colors for a dynamic visual pop. Consider how a series of “It Takes Two” blocks will interact when arranged in a larger quilt top – will they create a continuous flow or distinct focal points?
- Mixing Block Sizes: Challenge yourself by creating “It Takes Two” blocks of varying sizes. Incorporating larger and smaller versions into a single quilt can add another layer of visual interest, complexity, and a sense of movement to your design.
- Beyond the Quilt – Combined Projects: These versatile blocks aren’t just for full-sized quilts. They are perfect for a multitude of smaller projects. Consider using them to make decorative pillows, eye-catching tote bags, elegant table runners, unique placemats, or stunning wall hangings. They also make thoughtful and personalized gifts for friends and family.
Expert Tips for Quilt Block Success
To ensure your “It Takes Two” quilt blocks turn out beautifully every time and to make your quilting experience as enjoyable as possible, keep these expert tips in mind:
- Precision is Paramount: In quilting, accuracy in every step—from cutting fabric to stitching seams—makes an enormous difference in the final outcome. Take your time with measurements, use clear rulers, and ensure your 1/4-inch seam allowances are consistent throughout your project. Small inaccuracies can compound and distort your blocks.
- Pressing vs. Ironing: Understand the difference. When joining fabric pieces and setting seams, always “press” your seams (lifting and placing the iron firmly) rather than “ironing” (gliding the iron back and forth). Pressing prevents stretching and distortion of your fabric, helping your blocks maintain their true shape.
- Test Your Fusible Paper: Before committing to your precious main fabric, always test a small piece of fusible paper on a scrap of your chosen fabric. This ensures good adhesion, confirms the heat setting, and verifies that the fusible doesn’t leave any residue or alter the fabric color or texture.
- Use Sharp Tools: A sharp rotary cutter blade makes clean, accurate cuts, and a fresh sewing machine needle prevents skipped stitches, snags, and uneven tension. Dull tools can lead to frustration and flawed results. Change them regularly!
- Reference the Video Tutorial: The original tutorial by National Quilters Circle provides invaluable visual guidance, especially for understanding the nuances of fabric placement, the ironing process, and exploring various creative options. Watching it multiple times can help solidify your understanding of each step.
Unleash Your Quilting Creativity with “It Takes Two” Blocks
The “It Takes Two” quilt block is more than just a simple technique; it’s a gateway to endless creative possibilities and personal expression in your quilting journey. Once you’ve mastered the basic steps and feel comfortable with the construction, don’t hesitate to push the boundaries and experiment. Think deeply about how different color combinations evoke distinct moods – perhaps cool blues and greens for a serene atmosphere, or fiery reds and oranges for an energetic feel.
Consider how various arrangements of your finished blocks can create mesmerizing secondary patterns. These patterns emerge not just from individual blocks, but from how they interact when placed side-by-side, transforming a simple collection of units into a cohesive, artistic statement. Imagine a quilt entirely made of these illusion blocks, where the circles seem to dance across the surface, or perhaps using them as a dynamic, eye-catching border for a larger, more traditional quilt center. They can serve as the bold focal point of a modern art quilt or add a surprising, contemporary twist to an otherwise traditional design.
The journey of quilting is one of continuous discovery, learning, and profound personal expression. The “It Takes Two” block offers a fantastic playground for both novice and experienced quilters to explore design principles, fabric interplay, and the sheer joy of creating something beautiful and unique. So, gather your materials, set up your sewing space, and prepare to be delighted by the captivating and rewarding results of the “It Takes Two” quilt block. Happy quilting!
Thanks to National Quilters Circle via YouTube for providing the invaluable inspiration and original content for this tutorial, including all images used here. Their channel is a fantastic resource for quilters of all levels, offering a wealth of knowledge and creative ideas. If you enjoyed learning this engaging technique, we highly recommend you visit their channel and subscribe for more amazing quilting tutorials, tips, and project ideas!