
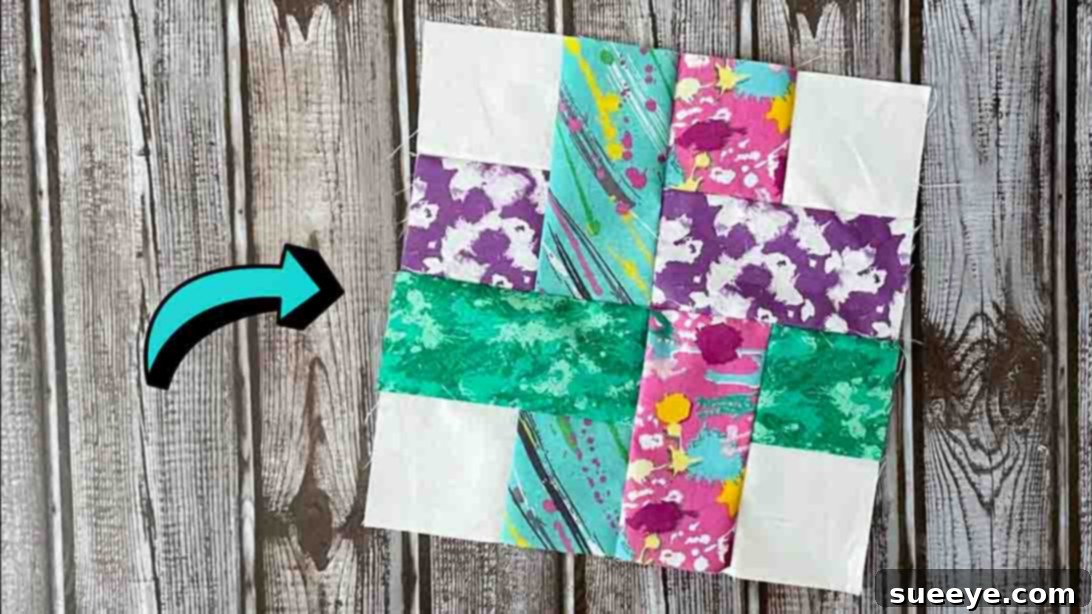
Embarking on a quilting journey can be incredibly rewarding, offering a creative outlet and the satisfaction of crafting beautiful, tangible items. For many beginners, however, the initial steps can feel daunting, with complex patterns and intricate techniques seeming out of reach. That’s where the **Dream Weaver Quilt Block** shines brightly as an ideal starting point. As an avid quilting enthusiast always seeking approachable projects to hone my skills and expand my knowledge, I’ve discovered this particular block to be a true gem. Its simplicity and charm, popularized by channels like Cut and Create on YouTube, make it an exceptional choice for anyone new to the world of quilting. I’ve personally created several projects using this pattern, and its consistent ease and stunning results never fail to impress.
The beauty of the Dream Weaver Quilt Block lies in its uncomplicated nature. Unlike more advanced patterns that demand precise, intricate cuts and expert sewing techniques, this design is remarkably straightforward. It’s perfectly suited for beginners who are still familiarizing themselves with their sewing machine and the basics of fabric manipulation. The steps are intuitive, allowing you to build confidence with each stitch and see tangible progress quickly, which is incredibly motivating for new quilters.
Why the Dream Weaver Quilt Block is Your Perfect Beginner Project
Beyond its initial ease, the Dream Weaver Quilt Block offers a wealth of benefits that make it an outstanding choice for any budding quilter. Here’s why it stands out:
Simplicity and Speed
The core design of this block is ingenious in its simplicity. It utilizes a manageable number of fabric pieces, primarily squares and rectangles, which are assembled in a logical and repetitive manner. This straightforward construction means less time spent deciphering complex instructions and more time enjoying the actual process of sewing. For beginners, the ability to complete a block quickly provides immediate gratification and fosters a sense of accomplishment, encouraging you to continue your quilting adventure.
Skill Development
While easy, the Dream Weaver Quilt Block isn’t without its learning opportunities. It’s an excellent pattern for practicing fundamental quilting skills such as accurate fabric cutting, maintaining a consistent seam allowance, and precise pressing techniques. Mastering these basics on a simple block will lay a solid foundation for tackling more elaborate projects in the future. Each block you create acts as a mini-lesson, reinforcing these essential techniques without overwhelming you.
Unmatched Versatility in Design
Perhaps one of the most appealing aspects of the Dream Weaver Quilt Block is its incredible versatility. This pattern is a blank canvas, ready to be transformed by your fabric choices. You can create a vibrant, eclectic quilt by diving into your stash of unused fabric scraps, giving new life to forgotten textiles. This “scrappy” approach is not only sustainable but also results in unique, one-of-a-kind creations that tell their own story. Alternatively, if you prefer a more cohesive and serene aesthetic, you can opt for a solid-colored quilt, using a limited palette of pastels or bold hues. I personally gravitate towards clean and simple designs, often selecting solid pastel tones for a calming, elegant finish. However, I can attest that this block truly shines in a scrappy manifestation, offering endless possibilities for color and pattern combinations. Whether you aim for a modern minimalist look or a charming, bohemian vibe, the Dream Weaver Quilt Block adapts beautifully to your vision.
Choosing Your Fabrics: Crafting Your Vision
The fabrics you select will significantly influence the final appearance of your Dream Weaver Quilt Block. Making thoughtful choices can elevate your project from good to truly exceptional. Here are some considerations:
The Allure of Solids and Pastels
For a clean, contemporary, and often soothing look, solid-colored fabrics are an excellent choice. Pastels, in particular, lend themselves well to the Dream Weaver block, creating a soft and inviting aesthetic. Think about complementary shades like mint green and baby blue, lavender and cream, or soft peach and grey. Using solids emphasizes the geometric design of the block itself, giving it a crisp, modern appeal. This approach is fantastic for showcasing precise piecing and for those who prefer a more understated elegance in their finished quilt.
Embracing the Scrappy Style
If you have a collection of fabric scraps from previous projects, the Dream Weaver Block is your perfect opportunity to put them to good use. A “scrappy” quilt is not only economical but also deeply personal and full of character. To create a cohesive scrappy look, try to establish a common thread—perhaps a consistent background fabric, or a predominant color family, while letting other prints and colors dance around it. Don’t be afraid to mix different patterns, such as florals with geometrics or stripes with dots; the key is to ensure there’s enough contrast so each fabric piece stands out without overwhelming the design. This method often results in the most visually interesting and conversation-starting quilts.
Considering Fabric Types and Prints
While 100% cotton quilting fabric is typically recommended for its ease of cutting, sewing, and durability, you can experiment with other cotton blends. When incorporating patterned fabrics, consider the scale of the prints. Small prints work well within the smaller squares of the block, while larger prints might be more impactful in the rectangular sections. Always pre-wash your fabrics to prevent shrinking and color bleeding, especially if you’re mixing different fabric types or colors.
Essential Quilting Tools for Beginners
Before you begin, gathering a few key tools will make your quilting experience much smoother and more enjoyable:
- Rotary Cutter, Mat, and Ruler: These are indispensable for accurate and efficient fabric cutting. A self-healing mat protects your surfaces, and an acrylic ruler with clear markings ensures straight, precise cuts.
- Sewing Machine: Any basic sewing machine that can produce a straight stitch will work perfectly. Ensure it’s in good working order and you have a fresh needle.
- Iron and Ironing Board: Proper pressing is as crucial as sewing for flat, professional-looking quilt blocks.
- Fabric Scissors: Sharp scissors are essential for cutting thread and any intricate fabric adjustments.
- Pins or Fabric Clips: To hold your fabric pieces securely in place before sewing.
- Matching Thread: High-quality polyester or cotton thread that complements your fabrics.
Materials for One Dream Weaver Quilt Block:
To create a single 9-inch finished Dream Weaver Quilt Block, you will need the following fabric pieces. Remember, precise cutting is paramount for accurate results!
- 4 – 2 1/2″ white squares (These often serve as background or contrast pieces.)
- 4 – 2 1/2″ squares (Choose a different color or pattern that complements your white squares.)
- 4 – 4 1/2″ x 2 1/2″ rectangles (Again, select a color or pattern that harmonizes with your chosen squares. These will be the larger, defining elements of your block.)
Directions: Crafting Your Dream Weaver Quilt Block
Now that you have your materials, let’s dive into the step-by-step process of assembling this beautiful and easy quilt block. Taking your time with each step will ensure a satisfying outcome.
Step 1: Precise Cutting and Initial Preparation
To start, dedicate your attention to cutting all your fabric requirements with utmost precision. Accuracy in this initial stage is critical to ensuring your final block is square and your seams align perfectly. Use your rotary cutter, mat, and ruler for clean, straight edges. Before cutting, iron your fabric to remove any wrinkles or creases, which can lead to inaccurate measurements. Once cut, organize your pieces. It’s helpful to lay them out temporarily to ensure the colors and patterns correspond and you have the correct number of each size. For instance, ensure the colors or patterns you’ve chosen for your 2 1/2″ squares beautifully complement the fabric you selected for your 4 1/2″ x 2 1/2″ rectangles. This visual check helps prevent mistakes down the line. Once satisfied, set your perfectly cut pieces aside, ready for assembly.
Step 2: Assembling the Block’s Core
This step involves the strategic placement and initial stitching of your fabric pieces to form the distinctive Dream Weaver pattern. Begin by laying out all your cut fabric pieces on a flat surface, such as your cutting mat or ironing board. Visualize your quilt block: The four 2 1/2″ white squares will form the outer corners of a 3×3 grid. The four 2 1/2″ colored/patterned squares will sit directly beside each white square, forming the middle sections of the top, bottom, left, and right rows. Finally, the four 4 1/2″ x 2 1/2″ rectangles will fill the central cross formation of your block. If you refer to the image below, you’ll see the exact placement of each fabric piece – this visual guide is incredibly helpful for ensuring correct alignment. Once your layout is perfect, begin sewing. Start by joining the small 2 1/2″ squares together to form horizontal rows. For example, sew a white square to a colored square, and then a colored square to another white square, creating your top and bottom rows. Similarly, create your middle row, joining two colored squares with a rectangle in the center. Remember to use a consistent 1/4-inch seam allowance throughout your sewing. After you’ve sewn these smaller units together, carefully attach each of the longer 4 1/2″ x 2 1/2″ rectangles beside them, following your initial layout. This will result in four distinct sub-units or rows. Once these units are complete, sew them together, much like you would assemble a traditional four-patch block. Press your seams open or to one side after each stitching step to ensure your block lays flat and the finished quilt has a smooth, professional appearance. Good pressing truly makes a difference!
Step 3: Repetition for a Full Quilt
Congratulations, you’ve successfully completed your first Dream Weaver Quilt Block! The next step, and arguably the most enjoyable, is to repeat these instructions to create as many blocks as needed for your desired quilt size. Whether you’re aiming for a small baby quilt, a cozy lap quilt, or a large bedspread, the process remains the same. The beauty of this block is that its repetitive nature allows you to get into a rhythm, making the process both meditative and efficient. As you create more blocks, you’ll gain speed and confidence, transforming individual fabric pieces into a harmonious collection of quilt blocks that will eventually come together to form your beautiful quilt top. You can also experiment with different color combinations for each block, or maintain a consistent palette for a unified look.
Tips for Quilting Success with Your Dream Weaver Blocks
To ensure your quilting journey is smooth and your final project is something you’ll cherish, keep these additional tips in mind:
- Accurate Seam Allowance: A precise 1/4-inch seam allowance is the golden rule in quilting. Use a seam guide on your machine if available, or mark a line on your sewing machine bed with painter’s tape to maintain consistency. A “scant” 1/4-inch (just slightly less than 1/4 inch) is often recommended to account for the thread thickness.
- Pressing Power: Don’t underestimate the power of proper pressing. Pressing seams open or to one side after each sewing step ensures your block lies flat and square. Avoid ironing back and forth, which can stretch fabric; instead, lift and press.
- Chain Piecing: To save time and thread when making multiple blocks, try chain piecing. Sew several fabric pairs or units one after another without lifting the presser foot or cutting the thread in between. This creates a “chain” of stitched pieces that can then be snipped apart.
- Square Up Your Blocks: After completing each block, use a clear acrylic ruler and your rotary cutter to “square it up” to the desired finished size (e.g., 9 inches). This ensures all your blocks are uniform, making it much easier to join them together later without puckers or misalignments.
- Patience and Practice: Quilting is a skill that develops with practice. Don’t be afraid to make mistakes; they are part of the learning process. Enjoy the journey, and celebrate each completed block!
Expanding Your Project: From Block to Quilt and Beyond
Once you’ve mastered the Dream Weaver Quilt Block, the possibilities for its application are endless. While a full-sized quilt is a natural progression, you don’t have to stop there!
Calculating Quilt Size
To plan a larger quilt, you’ll need to calculate how many blocks you need. For example, if your finished blocks are 9×9 inches:
- A baby quilt (approx. 36×45 inches) might require a 4×5 block layout (20 blocks).
- A lap quilt (approx. 54×63 inches) could use a 6×7 block layout (42 blocks).
- A twin-size quilt (approx. 63×85 inches) might need a 7×9 block layout (63 blocks).
Consider adding sashing (strips of fabric between blocks) and borders around the perimeter to increase the quilt’s size and add another design element.
Creative Project Ideas
The Dream Weaver Block is incredibly versatile and can be used for more than just traditional quilts:
- Table Runners or Placemats: A few blocks sewn together can create a stunning centerpiece for your dining table.
- Pillow Covers: One or two blocks can form the front of a decorative throw pillow, adding a handmade touch to your home decor.
- Tote Bags: Use a larger block or combine several smaller ones to create a unique and stylish tote bag.
- Wall Hangings: Frame a single beautiful block or a small arrangement of blocks for a charming piece of textile art.
Finishing Your Quilt: The Final Touches
Once your quilt top is complete, the final steps transform it into a functional and cozy masterpiece:
- Layering: Create a “quilt sandwich” by layering your quilt backing (face down), batting, and quilt top (face up). Secure all three layers with pins or basting spray.
- Quilting: This is the process of stitching through all three layers to hold them together and add texture. You can do straight-line quilting with your machine, follow the seam lines (“stitch in the ditch”), or try free-motion quilting for more elaborate designs.
- Binding: The final edge of your quilt is finished with binding strips, which encase the raw edges and provide a neat, durable border. This can be sewn by machine or hand-finished for a traditional look.
Your Quilting Adventure Begins Here
The Dream Weaver Quilt Block is more than just a pattern; it’s an invitation to explore the wonderful world of quilting with confidence and creativity. Its straightforward design ensures that even absolute beginners can achieve beautiful results, fostering a love for the craft that will last a lifetime. Whether you choose to create a vibrant scrappy quilt or a serene solid-colored masterpiece, this block provides the perfect foundation. So, what are you waiting for? Gather your materials now, watch the detailed video tutorial provided by Cut and Create, and embark on a fulfilling journey of crafting. Your beautiful, handmade quilt is just a few stitches away!