
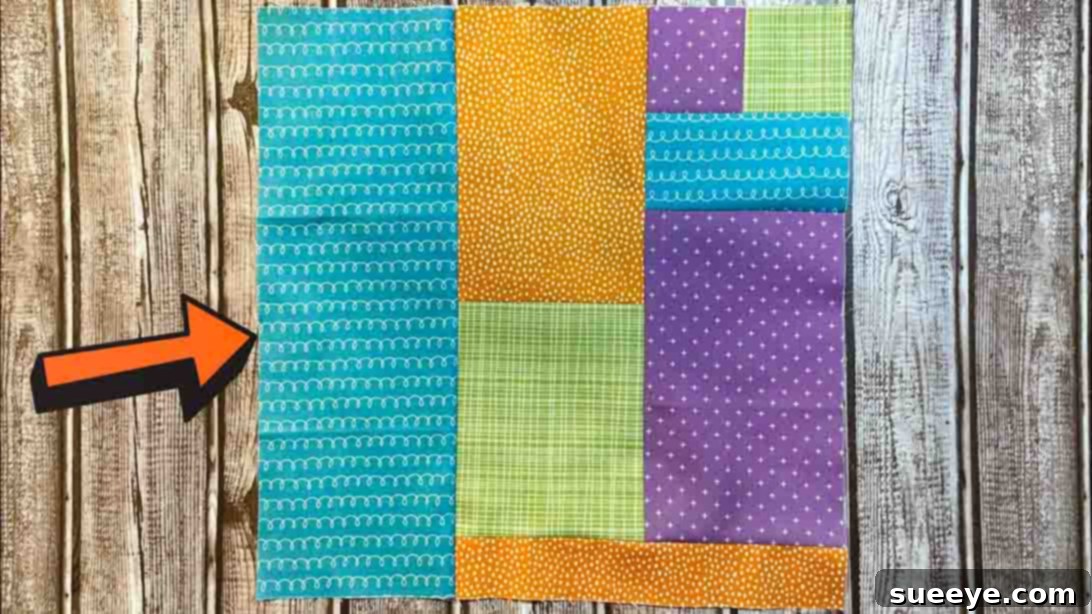
Are you searching for an exciting, yet straightforward quilting project that you can confidently complete this weekend? Look no further! We highly recommend the delightful Becky Quilt Block, a fantastic design brought to life by Cut and Create on YouTube. This particular block stands out for its incredible versatility and charm, promising an enjoyable creative experience whether you’re a novice or an experienced quilter. Imagine crafting a vibrant, scrappy quilt using all those cherished fabric remnants, or perhaps showcasing bold, captivating prints that truly make a statement. The Becky Quilt Block is one of our absolute favorite patterns because it shines with any fabric choice – from playful solids to intricate patterns, and especially with a charming layer cake bundle. Its inherent design ensures a stunning outcome, regardless of your chosen color palette or print style.
For those new to the art of quilting, this pattern is an absolute dream. Its simplicity makes it an ideal starting point for your quilting journey, providing a perfect introduction to fundamental techniques without overwhelming complexity. Many seasoned quilters recall this pattern as a foundational piece in their early days, often creating numerous blocks to practice and share with loved ones. It builds confidence and allows you to quickly achieve a sense of accomplishment, laying a solid groundwork for more intricate projects down the line.
And for our seasoned quilters, rest assured, the Becky Quilt Block offers a refreshing break and a wonderful opportunity to play with fabric combinations. It’s a quick, satisfying project that can easily be adapted for different sizes and layouts, serving as a palate cleanser between more complex endeavors. Whether you’re looking to bust your stash, create a thoughtful gift, or simply enjoy the meditative process of piecing, this block promises a good time. So, what are you waiting for? Dive into this fantastic quilt project today and rediscover the joy of creating. For comprehensive, step-by-step instructions, be sure to watch the invaluable video tutorial provided by the talented team at Cut and Create. Their clear guidance will ensure your success from start to finish!
Why the Becky Quilt Block is Your Next Favorite Project
The Becky Quilt Block isn’t just another pattern; it’s a gateway to creative expression and a rewarding quilting experience. Its inherent simplicity makes it incredibly accessible, featuring clear lines and manageable pieces that come together beautifully. This makes it a perfect confidence-builder for those embarking on their first quilting adventure. You’ll learn essential techniques like accurate cutting, precise piecing, and effective pressing, all within a forgiving framework that allows for learning and experimentation.
Beyond its beginner-friendly nature, the Becky Quilt Block truly excels in its adaptability. Do you have a collection of fabric scraps overflowing your bins? This block is an exceptional scrap buster! Its design allows you to mix and match various colors and patterns, creating a wonderfully eclectic and unique finished piece. Each block becomes a miniature canvas for your favorite fabric snippets, transforming remnants into a cohesive and beautiful whole. Alternatively, if you’re a fan of pre-cuts, especially layer cakes (10-inch squares), this pattern is a match made in heaven. Layer cakes provide a curated selection of fabrics that already coordinate, taking the guesswork out of fabric pulling and allowing you to jump straight into the fun of cutting and sewing. The results are consistently stunning, showcasing the beauty of the chosen fabric line.
The visual impact of the finished Becky Quilt Block is another major draw. Despite its straightforward construction, the arrangement of the fabric pieces creates interesting lines and a dynamic, modern aesthetic. When multiple blocks are joined, they form a striking larger pattern, making it suitable for a wide range of projects, from small decorative items like placemats and table runners to larger quilts for babies, throws, or even full beds. It’s a pattern that truly keeps on giving, offering endless possibilities for personalizing your creations.
Moreover, the act of quilting itself offers significant therapeutic benefits. The methodical rhythm of cutting, sewing, and pressing can be incredibly calming and meditative. It provides a wonderful opportunity to disconnect from daily stresses, focus on a tangible creative task, and experience the satisfaction of bringing something beautiful into existence with your own hands. The Becky Quilt Block, with its manageable steps, is perfect for fostering this sense of peace and accomplishment, making your crafting time not just productive, but also deeply enjoyable.
Essential Materials for Your Becky Quilt Block
Gathering your materials accurately is the first crucial step towards a successful quilting project. For the Becky Quilt Block, you’ll need a selection of fabrics in contrasting or complementary colors to truly make the design pop. While the original tutorial uses specific colors (purple, green, blue, orange), remember that these are merely suggestions; feel free to unleash your creativity and choose fabrics that speak to your personal style or match your intended recipient’s preferences. Beyond the fabrics, ensure you have standard quilting tools on hand to make your process smooth and precise.
Here’s a detailed breakdown of the fabric pieces required for a single Becky Quilt Block:
Fabric A (e.g., Purple or your chosen dominant color):
- 1 piece – 4 1/2″ x 7 1/2″ (This rectangular piece forms a significant part of one corner of the block, providing a solid color anchor.)
- 1 piece – 2 1/2″ square (This smaller square will be used for a precise corner unit, adding a touch of contrast or continuity.)
Fabric B (e.g., Green or a coordinating color):
- 1 piece – 4 1/2″ x 5 1/2″ (This rectangular segment contributes to another section of the block, often providing visual balance.)
- 1 piece – 2 1/2″ square (Similar to Fabric A’s small square, this piece integrates into a corner unit, enhancing the pieced look.)
Fabric C (e.g., Blue or an accent color):
- 1 piece – 2 1/2″ x 4 1/2″ (This smaller rectangle is key for creating specific pieced sections within the block, offering an opportunity for a vibrant accent.)
- 1 piece – 12 1/2″ x 4 1/2″ (This longer strip is vital for framing or creating a larger, distinct section that helps define the block’s overall shape and flow.)
Fabric D (e.g., Orange or another complementary color):
- 1 piece – 1 1/2″ x 8 1/2″ (This narrow strip is often used for sashing-like elements or delicate outlining within the block, adding a subtle yet impactful detail.)
- 1 piece – 4 1/2″ x 6 1/2″ (This final rectangular piece completes another significant area of the block, often serving to balance the other larger sections.)
Additional Essential Tools:
- Rotary Cutter, Mat, and Quilting Ruler: For precise and efficient fabric cutting. Accuracy here is paramount for perfectly matching seams.
- Sewing Machine: A well-maintained machine with a fresh needle.
- Iron and Ironing Board: Crucial for pressing seams open or to one side, ensuring flat, professional-looking blocks.
- Pins or Fabric Clips: To hold fabric pieces together securely before sewing.
- Thread: High-quality cotton thread that matches or blends with your fabrics.
- Seam Ripper: Every quilter’s best friend!
Step-by-Step Directions to Create Your Becky Quilt Block
Now that your materials are ready, let’s embark on the rewarding journey of piecing together your Becky Quilt Block. Follow these directions carefully, and remember that precision and patience are your best allies in quilting.
Step 1: Precision Cutting and Initial Layout
Begin by meticulously cutting each piece of fabric according to the dimensions listed in the materials section. Accuracy in this step cannot be overstated, as even slight variations can lead to misaligned seams later on. Use your rotary cutter, mat, and quilting ruler to ensure straight lines and exact measurements. Once cut, it’s highly recommended to label each fabric piece (A, B, C, D, and their respective sizes) with small paper labels or fabric markers. This organization will prevent confusion as you start to assemble the block.
After all your pieces are cut and labeled, find a clear, flat surface – your design wall, a clean table, or even the floor – and lay out all the fabric pieces according to the Becky Quilt Block pattern. Refer diligently to the provided image below for the precise placement of each piece. This pre-assembly layout is a crucial visual step; it allows you to see the block come together before you make any permanent stitches. Take your time to confirm that every piece is in its correct position. This visual check helps prevent errors and ensures your fabric choices create the desired aesthetic.
Step 2: Sewing and Pressing with Precision
Once you are completely satisfied with your fabric layout, it’s time to bring your block to life at the sewing machine. The key to a professional-looking quilt block lies in consistent seam allowances and careful pressing. For this project, a 1/4″ seam allowance is standard. If your machine has a quarter-inch foot, now is the time to use it! Otherwise, use masking tape or a seam guide to help maintain this critical measurement. Sew the smaller units together first, typically working in rows or segments, as dictated by the block’s design.
After sewing each small unit, take it to your ironing board. Pressing is just as important as sewing. Gently press your seams, either to one side (usually towards the darker fabric to prevent shadowing) or open. Pressing seams open can create a flatter block, while pressing to one side often makes nesting seams easier for future connections. The tutorial will guide you on the preferred pressing method. Always press from the front of the block occasionally to ensure it remains flat and distortion-free. This crucial step sets your seams and flattens the fabric, making subsequent piecing much easier and more accurate.
Continue sewing these smaller units into larger sections, and then sew those sections together to complete the entire Becky Quilt Block. After each significant seam, return to the iron to press. This iterative process of sew-and-press ensures that your block stays square and lays flat. To enhance accuracy, especially when joining longer pieces or multiple units, use pins or fabric clips to align edges perfectly before sewing. This helps prevent shifting and ensures your seams meet up precisely. Remember, you have complete freedom to use any color of fabric you like for this project; let your imagination guide your choices!
Once your block is fully assembled, give it a final press. You might also want to square up your block using your quilting ruler and rotary cutter to ensure it’s the exact desired size (e.g., 12.5 inches if that’s the intended finished size) and perfectly square. This step is optional but highly recommended for quilts that will join multiple blocks, as it ensures all blocks are uniform, making final assembly much smoother.
Tips for Mastering Your Becky Quilt Block and Beyond
Creating beautiful quilt blocks involves a blend of technique, patience, and creativity. Here are some extra tips to help you master the Becky Quilt Block and elevate your quilting skills:
- Invest in Quality Tools: Sharp rotary blades, good quality thread, and a reliable sewing machine can make a significant difference in your results and overall enjoyment.
- Chain Piecing: To save time and thread, sew multiple identical units one after another without lifting the presser foot or cutting the thread between them. This technique is especially useful when making several Becky Quilt Blocks for a larger project.
- Test Your Seam Allowance: Before starting on your main fabric, sew a couple of scrap pieces together with a 1/4-inch seam. Measure the sewn strip to ensure your seam allowance is accurate. Adjust if necessary.
- Pressing is Key, Not Just Ironing: Remember that pressing involves lifting and setting the iron down, rather than sliding it across the fabric, which can stretch or distort your pieces.
- Stay Organized: Keep your cut pieces organized, especially when working on a multi-block project. Small trays or plastic containers can be very helpful.
- Don’t Fear the Seam Ripper: Everyone makes mistakes. A seam ripper is a tool for correction, not a sign of failure. Embrace it and learn from any errors.
- Get Creative with Fabrics: While the original tutorial uses four distinct fabrics, experiment with subtle variations, tone-on-tone prints, or even a completely monochromatic scheme for a different effect.
- Listen to Your Body: Take breaks, stretch, and ensure your workspace is ergonomically comfortable to avoid fatigue.
Beyond the Block: What to Do Next with Your Becky Quilt Blocks?
Once you’ve successfully completed one or several Becky Quilt Blocks, a world of possibilities opens up! Here are some ideas for turning your individual blocks into larger, functional, and beautiful projects:
- Baby Quilt or Play Mat: Combine four to nine Becky Quilt Blocks (depending on their finished size) to create a charming and personal baby quilt. Add a simple border to frame the design.
- Throw Quilt or Lap Quilt: Assemble a larger number of blocks – perhaps 12 to 20 – to construct a cozy throw quilt perfect for snuggling on the sofa. You can experiment with sashing (strips of fabric between blocks) to give your quilt a more defined grid.
- Table Runner or Placemats: A single Becky Quilt Block can be the center of a placemat, or you can join two or three in a row for an eye-catching table runner.
- Pillow Cover: One block is often the perfect size for a decorative throw pillow cover, adding a handmade touch to any room.
- Bag or Tote Accent: Integrate a Becky Quilt Block into the design of a handmade tote bag or project pouch for a unique and stylish accessory.
- Wall Hanging: Frame a beautifully made Becky Quilt Block with coordinating borders and hang it as a piece of textile art.
After piecing your chosen number of blocks together, you’ll move on to layering your quilt top with batting and backing fabric, then quilting (stitching all three layers together), and finally, binding the edges for a professional finish. Each of these steps offers further creative opportunities to personalize your project.
Your Journey to a Beautiful Becky Quilt Block Starts Now!
The Becky Quilt Block is truly a standout pattern – accessible for beginners, yet endlessly engaging for seasoned quilters. Its ability to shine with any fabric choice, from a whimsical scrappy look to sophisticated layer cake coordinates, makes it a versatile addition to any quilter’s repertoire. We hope this expanded guide has provided you with the confidence and detailed understanding needed to embark on this delightful project. Remember, the journey of creating is just as important as the final product.
Now, it’s time to gather your fabrics, fire up your sewing machine, and bring your unique vision to life. For a full visual walkthrough and expert guidance, don’t forget to watch the comprehensive video tutorial by Cut and Create on YouTube. Their clear instructions will illuminate every step of the process, ensuring your Becky Quilt Block is a resounding success. Happy quilting!