
Mastering Machine Binding: An Easy Quilt Binding Tutorial for Beginners
Are you embarking on your quilting journey and eager to give your beautiful creations a professional, durable finish? Learning how to properly machine bind your quilt early on is a game-changer! This comprehensive tutorial, inspired by expert techniques, will guide you through an easy and efficient method for machine binding. Perfect for beginners, this technique ensures your quilt edges are not only neat and secure but also completed with surprising ease. Say goodbye to tedious hand-stitching for your binding finish and hello to a quick, strong, and stunning result!
Machine binding offers several advantages, especially for those new to quilting. It’s significantly faster than hand-binding, which can be a relief after spending hours piecing and quilting. It also provides a robust, long-lasting edge that stands up well to regular use and washing. Follow along as we break down each step, providing clear instructions and helpful tips to ensure your first machine-bound quilt looks fantastic.
Why Machine Binding Is Perfect for Your Quilting Projects
For many quilters, the binding stage can feel like a final hurdle. However, mastering machine binding transforms this step into a satisfying and efficient process. This method provides a clean, crisp edge that complements any quilt design, from simple throws to intricate heirlooms. Our tutorial focuses on techniques that minimize bulk at the corners and create seamless joins, ensuring a polished look that belies its simplicity. Ready to elevate your quilting skills? Let’s dive in!
RELATED: If you’re looking to refine your binding joins, explore advanced techniques such as How to Join Binding Ends Without Overlap or Bulk for an even smoother finish. These skills complement each other perfectly, giving you a well-rounded approach to quilt finishing.
For a visual walkthrough, consider watching a video tutorial. For those who prefer detailed written instructions, continue reading below for a complete, step-by-step guide that will help you achieve a beautifully bound quilt.
Directions for Flawless Machine Quilt Binding:
Step 1: Preparing Your Quilt for Binding
The foundation of a great binding starts with careful preparation of your quilt layers. Begin by ensuring your quilt top, batting, and backing are securely quilted together. Once your quilting is complete, it’s time to trim the edges. Carefully trim three-eighths inches (3/8″) from the outside edge of your quilt top. This precise measurement is crucial because it ensures that your batting and backing fabrics extend slightly beyond your quilt top. This slight overhang provides a buffer, making it easier to catch all layers securely within your binding strip and preventing any ‘short’ edges later on.
Next, to reduce bulk and create crisp, clean corners, you’ll need to trim the corners of your quilt. Measure and cut away a small triangle at each corner, approximately half an inch (1/2″) away from the edge. This small diagonal cut helps eliminate excess fabric where the binding will miter, allowing for a much flatter and neater corner finish once the binding is applied. Take your time with this step, ensuring all four corners are trimmed consistently. Once trimmed, set your quilt aside temporarily while you prepare your binding strips.
Step 2: Calculating and Preparing Your Binding Strips
Accurate binding strip calculation is key to avoiding running out of fabric mid-project or having excessive waste. To determine how many binding strips you’ll need, measure the perimeter of your quilt (add up all four sides). Then, add an extra 15 inches (15″) to this total. This additional length provides ample overlap for joining the ends seamlessly and offers a comfortable margin for error. Next, divide this total length by 40 inches (40″), as this is a common effective length for continuous binding strips cut from standard fabric widths after seam allowances are considered. Always round this number up to the nearest whole number to ensure you have enough strips.
Once you have your calculated number, cut your fabric strips. A standard width for quilt binding is 2.5 inches (2 1/2″), but you can adjust this slightly based on your preference for a wider or narrower binding. Cut your strips across the width of the fabric (WOF). After cutting, join these strips together on the diagonal. Joining on the diagonal creates a less bulky seam compared to a straight seam, allowing the binding to lay flatter and withstand more wear. Press these diagonal seams open to further reduce bulk and distribute the fabric evenly.
Finally, prepare your continuous binding strip by folding it in half lengthwise, with wrong sides together, and pressing firmly along the fold. This creates a double-fold binding, which is durable and provides a clean finished edge. This folded strip is now ready to be attached to your quilt.
Step 3: Attaching the Binding to the Quilt (First Pass)
Now it’s time to attach the prepared binding strip to the front of your quilt. Align the raw edges of your folded binding strip precisely with the raw edges of your quilt top. It’s often helpful to start sewing along one of the longer sides of the quilt, about 2 1/2 inches (2 1/2″) from one of the corners. This starting point allows for easy maneuvering when you join the binding ends later. Begin sewing with a consistent 1/4 inch (1/4″) seam allowance.
As you approach each corner, stop sewing approximately 1/4 inch (1/4″) from the edge of the quilt (not the binding edge, but the quilt’s raw edge). Mark this point clearly. Sew directly on this marked line, stopping exactly at the 1/4″ point. Keep your needle down in the fabric, lift your presser foot, then pivot your quilt 90 degrees. Stitch off the quilt at a 45-degree angle for about 1/2 inch, then reverse stitch to secure, and cut your thread, leaving a small tail. This creates the first part of your mitered corner.
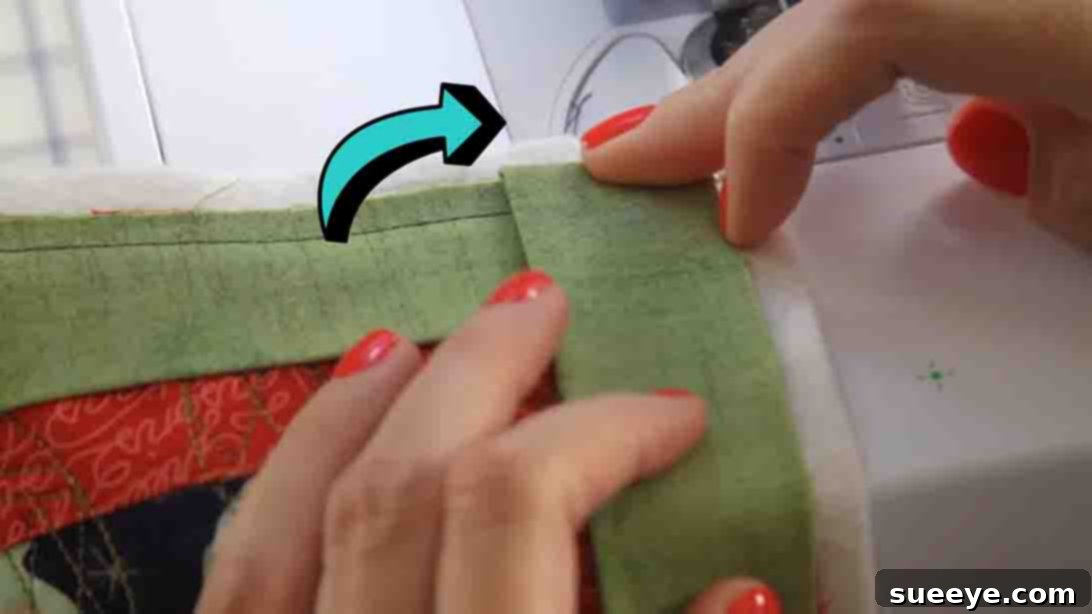
Next, take the binding strip and fold it upwards at a 45-degree angle, aligning the raw edge of the binding with the previous stitched edge of the quilt. Finger press this fold firmly. Then, bring the folded binding strip back down, aligning its raw edge with the next side of the quilt. Ensure the fold created on the corner is neat and square. Start sewing again directly on the new edge of the binding, beginning with a backstitch to secure. Continue sewing along this new side with your consistent 1/4″ seam allowance. Repeat this corner technique for all four corners of your quilt.
Continue sewing until you are approximately 5 to 6 inches (5-6″) away from your starting point. Backstitch firmly at this point to secure your stitching. This creates an opening for joining the binding ends seamlessly, which is the next crucial step.
Step 4: Joining the Binding Ends for a Seamless Finish
Joining the binding ends neatly is essential for a professional look. With your quilt still under the machine and the 5-6 inch opening remaining, take the “left tail” (the end of the binding strip that you started with). Fold it back about 1/4 inch (1/4″) and finger press it firmly. Then, fold it over again, ensuring all edges are neatly aligned, and iron press for a crisp crease. This creates a clean, hemmed edge on one end of your binding.
Now, take the “right side” of the binding (the end you just stopped sewing with). Lay it on top of the left side, allowing for an overlap. Trim this right side so that it extends approximately 1 1/2 inches (1 1/2″) past the folded edge of the left side. This overlap is crucial for creating the diagonal joining seam.
To create the diagonal join, carefully open up both ends of your binding strips, unfolding them flat. Place the right end on top of the left end, creating a right angle where they overlap. You’ll want to mark a diagonal line from corner to corner where these two strips intersect. Pin them securely. Stitch precisely along this diagonal line. Trim the excess fabric, leaving a 1/4 inch (1/4″) seam allowance, and press the seam open. This creates a perfect, continuous loop of binding.
Once the ends are joined and pressed, refold the binding strip lengthwise. Now you can sew the remaining length of the edge in the open section, stitching down the final few inches of your first binding pass. Backstitch at the beginning and end to secure it. Once this is done, give the entire first side of the binding a good press with an iron. This helps to set the seams and prepare the binding for its final placement.
Step 5: Finishing the Binding on the Back of the Quilt
Now comes the satisfying part of bringing your binding to its final finish. Flip your quilt over so the backing fabric is facing up. Take the binding strip that you just attached to the front and bring it around to the back of the quilt. You’ll want to fold the binding so that its folded edge extends approximately an eighth of an inch (1/8″) past the stitch line you created in Step 3. This slight overhang ensures that your final machine stitching will securely catch the binding on the back, covering the previous seam line completely for a neat finish.
Carefully pin the binding in place all around the perimeter of your quilt. Take your time with this step, especially around the corners. Ensure the binding is taut but not stretched, and that it lies flat and evenly covers the previous stitch line. For the corners, you’ll naturally form a neat mitered corner as you fold the binding over. Pin these mitered corners securely to maintain their shape.
Return to your sewing machine. Start sewing a few inches away from one of the corners. You will be stitching from the front of the quilt, “in the ditch” or very close to the edge of the binding strip, aiming to catch the folded binding on the back. Start sewing right to the left of the binding, as close to the folded edge as possible. This means your stitch line will be on the front of the quilt, running along the seam line of the binding, but your needle will be piercing through the binding fabric on the back. As you sew, slowly and carefully remove the pins one by one just before your needle reaches them. This prevents your needle from hitting a pin, which can damage it or your machine.
Continue sewing slowly and precisely around the entire quilt, maintaining an even stitch line. When you reach the mitered corners, take extra care to ensure they are folded neatly and caught securely by your stitches. Once you’ve stitched all the way around and met your starting point, backstitch to secure your work. Give your newly bound quilt a final press with an iron to set all the stitches and flatten the binding.
Achieve Professional Quilt Edges with Machine Binding!
Congratulations! You’ve successfully learned how to machine bind your quilt, a fundamental skill that opens up a world of possibilities for your quilting projects. This method provides a durable, beautiful, and efficient finish, ensuring your quilts stand the test of time and look fantastic doing so. Remember, practice makes perfect, so don’t be discouraged if your first attempt isn’t flawless. Each quilt you bind will improve your technique and confidence.
Tips for Success:
- Use a Walking Foot: A walking foot attachment for your sewing machine can significantly help in feeding multiple layers of fabric evenly, preventing puckering and shifting, especially when binding.
- Consistent Seam Allowance: Maintaining a consistent 1/4″ seam allowance throughout the entire binding process is crucial for neat results.
- Pressing is Your Friend: Don’t underestimate the power of a good press at each stage. It helps set seams, flatten fabric, and achieve crisp folds.
- Quality Thread: Use a high-quality thread that matches your binding fabric for the best results.
- Go Slow at Corners: Corners are often where mistakes happen. Slow down, pivot carefully, and ensure your mitered folds are neat.
- Don’t Rush the Joining: The binding join is critical. Take your time to measure, mark, and stitch accurately for an invisible seam.
Now that you’ve mastered this essential quilting technique, you can tackle any quilt with confidence, knowing you can give it a professional and lasting finish. Share your beautifully bound quilts with fellow crafters, and continue exploring new techniques to enhance your quilting journey. Happy quilting!