
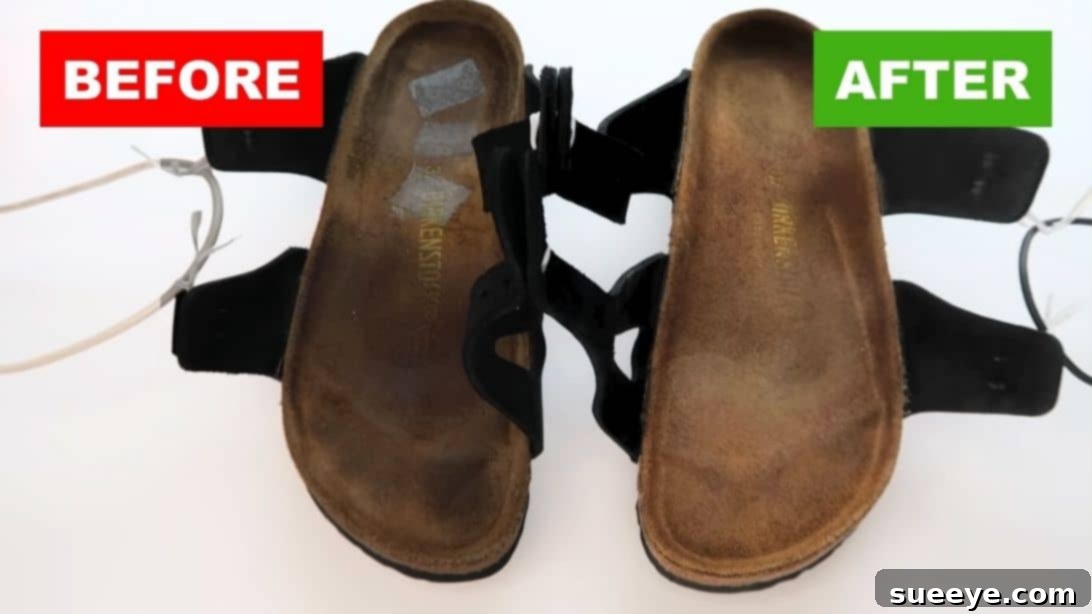
Birkenstock sandals have long been celebrated for their exceptional comfort, ergonomic design, and timeless style. They become a trusted companion for everything from casual strolls to daily errands. However, like any well-loved item, they eventually show signs of wear, particularly on the footbeds. That distinct, contoured cork and latex footbed, designed to mold to your unique foot shape, can absorb dirt, sweat, and oils over time, transforming from its original light hue to an unsightly dark, grimy appearance. Many Birkenstock owners face this dilemma: the sandals are still perfectly functional and comfortable, but their aesthetic appeal has diminished significantly.
The initial reaction might be to consider purchasing a new pair. Yet, anyone familiar with the brand knows that Birkenstocks represent a significant investment. Replacing them purely because of a dirty footbed feels wasteful, especially when the rest of the sandal is in excellent condition. Professional cleaning is another option, but for those mindful of their budget, it can add an unnecessary expense. This leads many to seek effective, affordable, and accessible DIY solutions to restore their beloved footwear.
Fortunately, bringing your Birkenstocks back to life doesn’t require specialized tools or costly chemicals. With a few common household ingredients and a bit of effort, you can effectively clean and rejuvenate your sandals, making them look presentable once more. Drawing inspiration from helpful online resources, such as the practical methods shared by Amber Resells on YouTube, countless Birkenstock enthusiasts have discovered the secret to a sparkling clean footbed. This comprehensive guide will walk you through a simple yet highly effective cleaning process, ensuring your favorite sandals are not only comfortable but also clean and fresh, ready for many more adventures.
RELATED: Discover the Easiest Way to Clean Your Crocs
Why Regular Birkenstock Cleaning is Essential
Maintaining the cleanliness of your Birkenstocks goes far beyond mere aesthetics. Regular cleaning plays a crucial role in preserving the longevity, hygiene, and comfort that these iconic sandals are known for. Over time, the unique footbed—crafted from a blend of cork and latex, often topped with a suede liner—becomes a magnet for dirt, dust, skin oils, and sweat. This accumulation can lead to several undesirable outcomes if not addressed.
- Improved Hygiene: Uncleaned footbeds can harbor bacteria and fungi, leading to unpleasant odors and potential skin irritations. Regular cleaning eliminates these microbes, ensuring your feet stay fresh and healthy.
- Enhanced Appearance: A clean footbed instantly revitalizes the look of your Birkenstocks. It restores their original appeal, making them suitable for various occasions where you want to look your best.
- Extended Lifespan: Dirt and grime can degrade the materials of the footbed over time, causing cracking or hardening of the suede and cork. By removing these corrosive elements, you help preserve the integrity of the sandal, significantly extending its usable life.
- Retained Comfort: A buildup of compacted dirt can alter the feel of the footbed, making it less comfortable and supportive. Cleaning helps maintain the footbed’s original texture and cushioning, ensuring that signature Birkenstock comfort endures.
Understanding Birkenstock Materials for Proper Care
Before diving into the cleaning process, it’s beneficial to understand the different components of your Birkenstocks, as each material might require slightly different handling. The most common Birkenstock models feature:
- The Footbed: This is the heart of the Birkenstock. It consists of a resilient cork and latex core, offering exceptional arch support and shock absorption. This core is often topped with a soft suede or leather lining that directly touches your foot. This suede lining is particularly prone to absorbing sweat and dirt, leading to discoloration.
- Uppers: Birkenstocks come with various upper materials, including natural leather (smooth, oiled, nubuck, suede), Birko-Flor (a synthetic, skin-friendly material), and fabric. Each material has its own cleaning nuances, though the primary focus of this guide is the footbed.
- Outsole: Typically made of EVA (ethylene vinyl acetate), the outsole provides cushioning and traction. These are generally easy to clean.
- Cork Sealant: The exposed cork edge around the footbed is often protected by a sealant. This sealant can wear off over time, making the cork vulnerable to moisture damage.
Our primary concern for this cleaning guide will be the heavily used suede-lined footbed, which tends to accumulate the most noticeable grime.
The Miracle DIY Cleaning Solution for Birkenstocks
You might be surprised to learn that the most effective solution for cleaning Birkenstock footbeds comes from everyday household items you likely already have. This simple, non-toxic mixture harnesses the natural cleaning powers of baking soda and dish soap, combined with water, to tackle stubborn grime without damaging the delicate materials of your sandals.
- Baking Soda (Sodium Bicarbonate): A mild abrasive and natural deodorizer, baking soda excels at lifting dirt and absorbing odors. Its fine particles provide gentle scrubbing action without scratching the suede or cork.
- Mild Dish Soap (e.g., Dawn): A powerful degreaser, dish soap helps break down oils and sweat that have accumulated in the footbed. Its surfactant properties allow water and baking soda to penetrate and emulsify the dirt effectively.
- Water: The solvent that binds everything together and helps rinse away the loosened dirt. Room temperature water is ideal as it won’t shock the materials.
This combination creates a gentle yet potent cleaning paste that is safe for your Birkenstocks and environmentally friendly.
Gathering Your Essential Cleaning Supplies
Before you begin the transformation of your Birkenstocks, ensure you have all the necessary items at hand. The beauty of this method lies in its simplicity and the accessibility of the required tools.
- Room Temperature Water: Approximately 2 parts for your cleaning solution.
- Baking Soda: Approximately 1 part for your cleaning solution.
- Mild Dish Soap: A small squirt of a gentle, degreasing dish soap (like Dawn) is perfect. Avoid harsh detergents.
- Small Container or Bowl: To mix your cleaning solution.
- Old Toothbrush: An indispensable tool for gently scrubbing the footbed’s contours. Its small bristles can reach into all the nooks and crannies.
- Two Clean, Dry Rags or Microfiber Cloths: One for initial wiping and another for damp wiping. Microfiber cloths are excellent for their absorbency and gentle touch.
- Optional (but Recommended): A small, stiff-bristled brush (like a suede brush) for pre-cleaning and post-cleaning fluffing of the suede.
Step-by-Step Guide: Restoring Your Birkenstock Footbeds
Step 1: Initial Preparation & Removing Loose Dirt
Before applying any cleaning solution, it’s crucial to remove any loose debris, dust, or superficial dirt from your Birkenstocks. Use a dry, stiff-bristled brush (a dedicated suede brush works wonderfully, or even a dry toothbrush) to gently brush away any accumulated particles from the footbed and straps. This step prevents loose dirt from turning into mud once wet and allows the cleaning solution to work more effectively on the embedded grime. Pay particular attention to the edges and seams where dirt tends to collect.
Step 2: Crafting Your Homemade Cleaning Solution
In your small container or bowl, combine your cleaning ingredients. The recommended ratio is 2 parts room temperature water to 1 part baking soda. For instance, if you use half a cup of water, add a quarter cup of baking soda. Then, add just a small squirt of mild dish soap – a drop or two is usually sufficient. Mix these ingredients thoroughly until you achieve a consistent, slightly pasty solution. The mixture should be thick enough to cling to your toothbrush but liquid enough to spread. Adjust the water or baking soda as needed to reach this consistency.
Step 3: Gentle Scrubbing for Deep Footbed Cleaning
Dip your old toothbrush into the freshly prepared cleaning solution, making sure the bristles are adequately saturated. Begin by gently scrubbing the footbed of your Birkenstocks. Focus on the areas that are most discolored and grimy, typically where your heel and toes rest. Use small, circular motions and avoid pressing too hard. The goal is to lift the dirt, not to abrade the suede or cork. You will notice the solution starting to foam slightly and the dirt beginning to loosen. Work on one sandal at a time, ensuring thorough coverage of the entire footbed surface.
Step 4: Wiping Away the Solution and Initial Residue
Once you’ve thoroughly scrubbed the footbed, take one of your clean, dry rags. Begin to wipe away the cleaning solution and the loosened dirt. You may notice a white residue forming, which is primarily the baking soda drying. This is completely normal and expected. Continue wiping until you’ve removed as much of the paste and dirt as possible with the dry cloth. This initial dry wipe is important for absorbing the bulk of the moisture and grime.
Step 5: Final Rinse and Residue Removal with a Damp Rag
Now, take your second clean rag and dampen it with plain water. It’s crucial that this rag is only damp, not soaking wet. Wring it out thoroughly to remove any excess water. Gently wipe the footbed again, this time to remove any remaining white residue and cleaning solution. Be gentle and methodical. You may need to rinse and re-wring your damp rag a few times to ensure all traces of the cleaning paste are gone. The goal is to leave the footbed as clean and residue-free as possible without saturating it with water.
Step 6: The Crucial Drying Process
This step is perhaps the most critical for preventing damage to your Birkenstocks. Once you’ve finished wiping, set your sandals aside in a well-ventilated area to air dry completely. This process can take several hours, or even a day or two, depending on humidity levels.
A vital warning: Do not place your Birkenstocks in direct sunlight, near a heater, or in any area with extreme heat. High temperatures can cause the cork footbed to dry out, crack, or become brittle, and can also damage the adhesives holding the shoe together. Patience is key here. Allow them to dry naturally and thoroughly to maintain their shape, integrity, and comfort. Once fully dry, the suede may feel a bit stiff; a gentle rub with your dry hand or a suede brush can help restore its softness.
Beyond the Footbed: Comprehensive Birkenstock Care
While the footbed is often the main area needing attention, proper Birkenstock care extends to all parts of the sandal to ensure its overall longevity and appearance.
Caring for Birkenstock Uppers
- Suede/Nubuck Uppers: For these delicate materials, use a specialized suede brush to gently brush away dirt and dust. For minor stains, a suede eraser can be effective. Avoid using water or harsh liquid cleaners on suede, as they can cause permanent marks.
- Smooth Leather Uppers: Wipe clean with a damp cloth and mild soap if necessary. After cleaning, apply a good quality leather conditioner to keep the leather supple and prevent cracking.
- Oiled Leather Uppers: These have a natural, distressed look. Wipe with a damp cloth. Minor scuffs can often be rubbed out with your fingers, or a small amount of leather conditioner can be applied.
- Birko-Flor/Synthetic Uppers: These are the easiest to clean. Simply wipe them down with a damp cloth and a little mild soap. They are very durable and resistant to water.
Protecting the Cork Sole
The exposed cork edges of your Birkenstocks are vital for their structure and support. Over time, the factory-applied sealant can wear off, leaving the cork vulnerable to moisture and drying out, which can lead to cracks.
- Cork Sealer Application: Regularly (every few months, or when you notice the cork looking dry) apply a thin layer of Birkenstock-specific cork sealant. This creates a protective barrier, keeping the cork moist and preventing damage. It’s a small step that makes a huge difference in the lifespan of your sandals.
Cleaning the Outsoles
The EVA outsoles can accumulate dirt and mud. Simply wipe them with a damp cloth or use an old toothbrush with a little dish soap and water to scrub away grime. Rinse thoroughly and air dry.
Preventative Measures: Keeping Your Birkenstocks Cleaner, Longer
Prevention is always better than cure. By adopting a few simple habits, you can significantly reduce the frequency of deep cleaning your Birkenstocks and keep them looking their best for an extended period.
- Regular Brushing: Dedicate a minute or two each week to lightly brush the footbeds with a dry suede brush. This helps dislodge loose dirt and prevents it from embedding deeply.
- Wear Socks: For casual wear, especially around the house or in situations where feet might sweat more, wearing socks with your Birkenstocks can act as a barrier, absorbing sweat and oils before they reach the footbed.
- Avoid Excessive Moisture: While the footbed cleaning involves water, try to avoid prolonged exposure to rain, puddles, or excessively wet environments. If they do get wet, follow the careful drying instructions outlined above.
- Proper Storage: When not wearing your Birkenstocks, store them in a cool, dry place away from direct sunlight or extreme temperatures. Keeping them in their original box or a shoe bag can protect them from dust.
- Rotate Your Pairs: If you own multiple pairs of Birkenstocks or other shoes, rotating them allows each pair to air out and dry completely between wears, reducing moisture buildup and odors.
- Consider Footbed Liners: Disposable or washable footbed liners are available and can be a convenient way to protect the original footbed from direct contact with feet, absorbing sweat and dirt instead.
Common Birkenstock Cleaning Mistakes to Avoid
While DIY cleaning is effective, it’s equally important to know what not to do to prevent irreversible damage to your beloved sandals.
- Machine Washing: Never put your Birkenstocks in a washing machine or dryer. The aggressive tumbling, harsh detergents, and extreme heat will destroy the cork, footbed, and adhesives, rendering them unwearable.
- Soaking in Water: Avoid submerging your Birkenstocks in water. Excessive saturation can delaminate the layers, damage the cork, and cause the materials to warp or crack.
- Direct Sunlight or Heat Drying: As emphasized, direct heat sources (sunlight, heaters, hairdryers) will dry out and crack the cork, shrink leather, and compromise the integrity of the sandal. Always air dry in a shaded, well-ventilated area.
- Using Harsh Chemicals: Bleach, strong solvents, or abrasive cleaners can strip away natural oils, discolor materials, and degrade the cork and glues. Stick to the mild cleaning solution recommended.
- Ignoring Cork Sealant: Neglecting the cork sealant can lead to dry, brittle, and cracked cork edges, which is a common cause of Birkenstock deterioration.
When to Consider Professional Cleaning or Replacement
While this DIY method is highly effective for most footbed grime, there are instances where professional intervention or even replacement might be necessary.
- Deep-Seated Damage: If your cork footbeds are severely cracked, crumbling, or the outsoles are completely worn through, a professional cobbler specializing in Birkenstocks might be able to repair them, but sometimes replacement is the only option.
- Persistent Odors or Stains: For very old, deeply embedded odors or stains that don’t respond to home cleaning, a professional shoe cleaner might have stronger, specialized tools or solutions. However, for most situations, the baking soda method addresses odors quite well.
- Structural Integrity: If the straps are ripped, buckles are broken beyond repair, or the footbed has lost its structural support, it might be time to invest in a new pair. Regular cleaning and care can delay this need significantly.
Conclusion: Enjoy Your Revitalized Birkenstocks
There’s immense satisfaction in restoring something you love, and your Birkenstocks are no exception. With just a few simple household items and a little dedicated effort, you can transform unsightly, grimy footbeds into clean, fresh surfaces. This DIY cleaning method not перonly saves you money on replacements or professional services but also helps extend the life of your favorite sandals, allowing you to continue enjoying their unparalleled comfort and style for many more seasons.
Embrace this simple routine, and say goodbye to embarrassing dirty footbeds. Your feet – and your wallet – will thank you. Now, go forth and confidently wear your wonderfully clean Birkenstocks!