
Few things are as frustrating as opening your cabinet to find a plastic food container that, despite multiple washes, still carries the lingering odor of last week’s leftovers or a greasy film that just won’t budge. We’ve all been there – those stubborn stains and persistent smells can make you want to toss the container altogether. But what if we told you there’s a surprisingly simple, incredibly effective, and remarkably inexpensive solution hidden right in your bathroom cabinet? Forget harsh chemicals and endless scrubbing; the secret to sparkling clean, odor-free plastic containers lies with an everyday hero: toothpaste.
This ingenious hack has been a game-changer for many, transforming seemingly ruined plasticware back into pristine condition. Toothpaste, with its unique blend of mild abrasives and deodorizing agents, works wonders on those tough residues and embedded smells. The process is incredibly straightforward, requiring minimal effort and common household items. You don’t need to be a cleaning expert to achieve fantastic results. For a visual guide and a deeper dive into this amazing trick, make sure to check out the insightful video tutorial by Andrea Jean Cleaning on YouTube. She also shares a fantastic bonus hack at the end that you’ll definitely want to try!
The Science Behind the Sparkle: Why Toothpaste Works Wonders
Before we dive into the steps, you might be wondering: why toothpaste? The answer lies in its carefully formulated composition, designed to clean and refresh. Most toothpastes contain a combination of key ingredients that make them surprisingly effective against grime and odors on plastic:
- Mild Abrasives: Ingredients like calcium carbonate, hydrated silica, or dicalcium phosphate act as gentle scrubbers. These fine particles are abrasive enough to dislodge sticky food residues, greasy films, and even light stains from the surface of plastic without causing significant scratches. Think of it as a very fine-grit sandpaper, but safe for your containers.
- Detergents/Surfactants: Toothpaste also contains mild detergents, similar to those found in dish soap. These surfactants help to break down oils and grease, allowing them to be rinsed away more easily. They reduce the surface tension of water, enabling it to better penetrate and lift contaminants.
- Deodorizing Agents: Many toothpastes incorporate baking soda or other compounds specifically designed to neutralize odors. The refreshing minty scent of toothpaste also helps to mask and eventually eliminate unpleasant smells, leaving your containers smelling fresh and clean.
- Binding Agents: These ingredients give toothpaste its pasty consistency, making it easy to apply and ensuring it adheres to surfaces, allowing the active cleaning agents to do their work effectively over time.
Together, these components create a powerful, yet gentle, cleaning agent that can tackle some of the toughest challenges posed by plastic food storage.
Materials for Your Toothpaste Cleaning Hack:
Gathering your supplies is quick and easy. You likely have everything you need already:
- An old toothbrush: Perfect for reaching into corners and scrubbing surfaces without damaging your containers.
- White toothpaste: Any standard white paste toothpaste will do. While gel toothpastes may work, white paste typically contains more of the effective abrasive agents. Avoid highly abrasive “whitening” toothpastes if you’re concerned about potential scratching on very soft or clear plastics, though for most food containers, standard white paste is perfectly safe.
- Paper towel or magic eraser, optional: These come in handy for the bonus hack and can also assist with tougher scrubbing if needed.
Directions: Restoring Your Plastic Containers
This simple process will leave your containers fresh and ready for their next meal. Follow these steps for best results:
- Initial Rinse: Before applying toothpaste, give your plastic container a quick rinse with warm water. This helps remove any loose food particles and prepares the surface for cleaning.
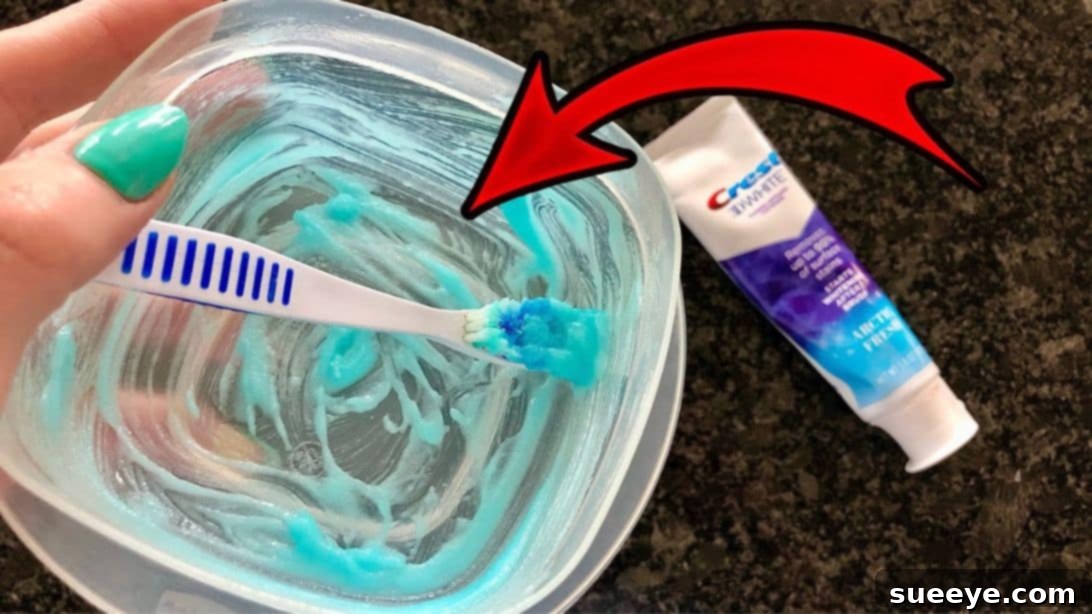
- Apply the Toothpaste: Squeeze a generous amount of white toothpaste directly onto the interior surfaces of your greasy or smelly Tupperware or plastic container. Don’t be shy – ensure there’s enough to cover the affected areas. For larger containers, you might need a substantial dollop.
- Thoroughly Brush: Using your old toothbrush, begin to scrub the toothpaste all over the inside of the container. Pay special attention to corners, grooves, and any areas with visible stains or particularly strong odors. The mild abrasives in the toothpaste will work to lift the grease and grime, while the detergents begin to break down oils. The toothbrush helps to work the product into the plastic, maximizing its effectiveness.
- Let it Sit Overnight: This is a crucial step for truly eliminating odors and tackling deep-set stains. Once you’ve thoroughly brushed the container, leave the toothpaste lather on the plastic and let it sit undisturbed overnight. This extended contact time allows the deodorizing agents to neutralize smells and the abrasives to continue their work on stubborn residues.
- Wash as Usual: In the morning, you’ll be amazed by the transformation. Rinse out the toothpaste and then proceed to wash the container as you normally would – either by hand with dish soap and water or by placing it in the dishwasher. You’ll notice immediately that the greasy film is gone, and any lingering odors have vanished, replaced by a fresh, clean scent.
- Inspect and Air Dry: After washing, give your container a quick inspection to ensure all residues and odors are gone. If any faint smell remains, you can repeat the process. Finally, allow your container to air dry completely. Air drying helps prevent new, musty odors from developing.
Beyond the Kitchen: A Bonus Toothpaste Hack for Your Home
The versatility of toothpaste extends beyond just your kitchenware. Here’s another brilliant hack that can save the day, especially for parents or anyone who has ever faced the artistic endeavors of a young child:
Cleaning Crayola Markings and Drawings
Children’s creativity often knows no bounds, and sometimes, that creativity ends up on walls, doors, or furniture. Instead of reaching for harsh chemical cleaners that might damage paint or finishes, turn to your trusty tube of toothpaste. This hack works because of the same mild abrasive action that cleans your containers, gently lifting crayon wax without stripping paint.
How to do it:
- Prepare Your Spot: Identify the crayon markings you want to remove. This works best on painted walls, wooden doors, or other non-porous, hard surfaces. Always do a small spot test in an inconspicuous area first, especially on delicate finishes, to ensure no discoloration or damage occurs.
- Apply Toothpaste: Dab an ample amount of white toothpaste onto a paper towel, a soft cloth, or directly onto the crayon mark.
- Gently Rub: Using light to moderate pressure, rub the toothpaste over the crayon markings. You’ll notice the crayon starting to lift and transfer onto the paper towel. For tougher marks, you might need to apply a bit more pressure or add a touch more toothpaste.
- Alternative Tool: For particularly stubborn marks, or if you prefer an alternative, a magic eraser can be used instead of a paper towel. Simply moisten the magic eraser, apply a small amount of toothpaste to it, and gently rub the mark. Magic erasers are micro-abrasive and can be very effective, but again, always test in an hidden spot first.
- Wipe Clean: Once the mark is gone, use a clean, damp cloth to wipe away any toothpaste residue from the surface. Then, dry the area with a clean, dry towel.
This trick is incredibly effective for removing crayon from a variety of surfaces, leaving them looking fresh and clean without the need for specialized cleaners.
Pro Tips for Optimal Cleaning Results:
- Choose Your Toothpaste Wisely: While most white toothpastes work, avoid gel formulations or those with micro-beads, as they may not have the same abrasive power. For clear plastic, avoid highly abrasive “whitening” toothpastes if you’re concerned about micro-scratches, although for most food containers, this isn’t a significant issue.
- Don’t Rush the Soak: The overnight soak is genuinely critical for deep odor elimination. It gives the toothpaste ample time to break down stubborn molecules and deeply ingrained grease.
- Immediate Action: For best results with both containers and crayon marks, address the issue as soon as possible. Fresh stains and odors are generally easier to remove than those that have set in for a long time.
- Preventative Measures for Containers: To minimize future grease and odor problems, always rinse your plastic containers thoroughly immediately after use, especially if they held oily or strong-smelling foods. Store containers without lids for a short period after washing to ensure they are completely dry, which prevents mold and musty smells.
- Safety First: Although toothpaste is generally safe, always ensure you rinse containers thoroughly after cleaning to remove all residue before using them for food again.
Embrace the Genius of Simple Solutions!
It’s truly amazing how a common household item like toothpaste can be repurposed for such effective cleaning tasks. No longer do you need to endure greasy, smelly plastic containers or worry about crayon marks defacing your home. These simple yet genius hacks provide a practical, cost-effective, and often more eco-friendly alternative to specialized cleaning products.
So, the next time you encounter a stubborn cleaning challenge, remember the power of toothpaste! We highly recommend trying these fantastic tricks for yourself. You’ll be surprised by the results and might even start looking at other everyday items with new cleaning potential. A huge thank you to Andrea Jean Cleaning via YouTube for sharing these incredible insights and providing the inspiration for these solutions. Her channel is full of valuable tips and tricks that make home cleaning a breeze. If you loved these hacks, then you’ll surely love her other videos too, so give her channel a visit and subscribe for more brilliant ideas!