
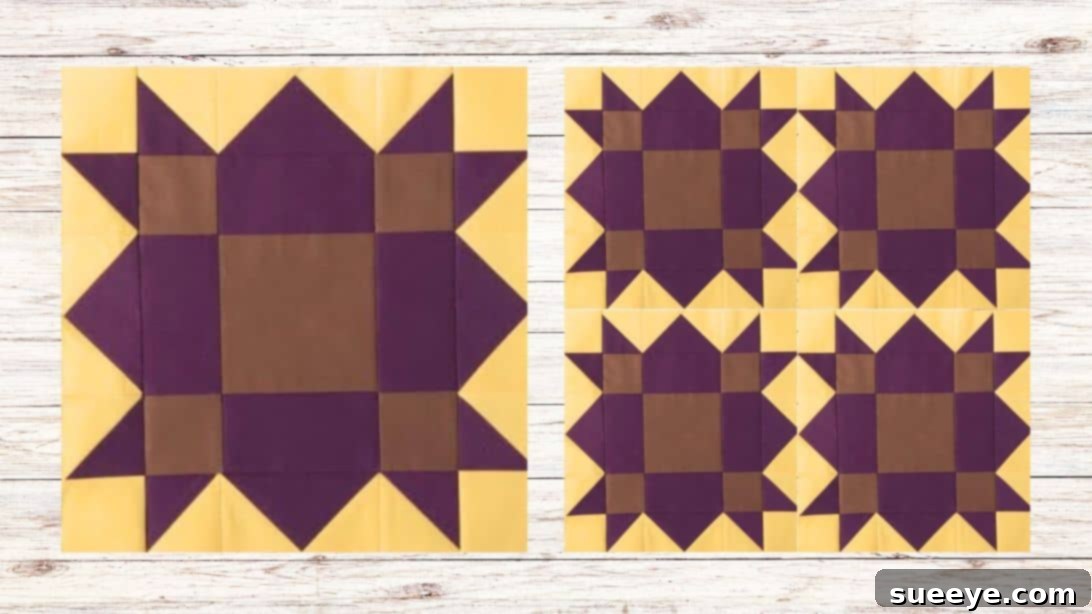
Are you ready to elevate your quilting journey and tackle a truly rewarding project? The Weathervane Quilt Block offers the perfect blend of challenge and satisfaction, pushing your skills while creating a beautifully intricate design. This classic pattern, known for its dynamic, directional appeal, is a fantastic next step for quilters looking to move beyond beginner projects.
While some variations of the Weathervane block exist for absolute beginners, the version we’re exploring here provides a fulfilling challenge, striking a balance between straightforward construction and meticulous piecing. If you’ve enjoyed mastering basic squares and strips, this block introduces you to more complex unit assembly without being overly daunting. For those seeking a deeper dive or a slightly different approach, resources like Nancy’s Notions’ tutorial offer valuable insights and alternative methods to consider.
RELATED: Enhance your quilting repertoire with our Windmill Quilt Tutorial, a great complementary pattern!
The beauty of the Weathervane Quilt Block lies in its clever combination of fundamental quilting elements: crisp half-square triangles (HSTs), versatile squares, precise rectangles, and elegant flying geese-style units. While its construction is logical and clear for seasoned quilters, the sheer number of individual pieces requires patience and attention to detail. This isn’t a race; it’s an opportunity to hone your precision piecing and develop a deep understanding of how different components come together to form a cohesive whole. Prepare to immerse yourself in the art of quilting, and watch your skills blossom with every seam.
Understanding the Weathervane Quilt Block
The Weathervane Quilt Block is a traditional nine-patch block, meaning it is typically divided into a 3×3 grid when viewed in its finished form. Its characteristic design features a central square surrounded by units that create a swirling or directional motion, reminiscent of a weathervane indicating wind direction. This visual movement is achieved through the strategic placement of light and dark fabrics within the half-square triangles and other shaped units.
Crafting this block is an excellent exercise in accuracy. Each component, from the smallest square to the carefully constructed half-square triangle, plays a vital role in the final block’s appearance. Precision in cutting and a consistent scant quarter-inch seam allowance are paramount to ensure all points meet cleanly and your block lays flat. Don’t be intimidated by the number of pieces; approach each step methodically, and you’ll soon see the captivating pattern emerge.
Preparing for Your Weathervane Quilt Block: Essential Materials & Tools
Before diving into the piecing, gathering all your materials and tools will ensure a smooth and enjoyable quilting experience. The right supplies can make a significant difference in the accuracy and ease of your project. For the Weathervane Quilt Block, careful fabric selection is key to achieving its distinctive visual impact.
Fabric Selection for Your Weathervane Block:
We recommend using 100% quilting cotton for its durability, ease of sewing, and vibrant colors. For this block, we’ll designate three distinct colors:
- First Color: Often a medium to dark fabric, used for specific rectangles and half-square triangles to create definition.
- Second Color: Typically a lighter or contrasting fabric that complements the first, used in half-square triangles and corner squares.
- Third Color: A distinct color, often used for the central square and its surrounding rectangles, providing a focal point or a strong contrast.
Consider the interplay of these colors. A strong contrast between light and dark will make the “weathervane” effect pop, while more subtle contrasts can create a softer, more blended look. Don’t be afraid to experiment with prints, but ensure the values (lightness/darkness) are clear to maintain the pattern’s visibility.
Required Fabric Cuts:
For one Weathervane Quilt Block, you will need the following pre-cut pieces. Remember to cut accurately!
For the Outer Units (Weathervane Arms):
- 2 7/8” squares: (4) in your First Color and (4) in your Second Color. These will be used to create your half-square triangles.
- 2 ½” x 4 ½” colored rectangles: (4) in your First Color.
- 2 ½” squares: (8) in your Second Color. These will be paired with the rectangles to form flying geese-style units.
For the Center Unit:
- 2 ½” squares: (4) in your Third Color. These form the inner corners of the central grid.
- 2 ½” x 4 ½” rectangles: (4) in your First Color. These frame the central square.
- 4 ½” square: (1) in your Third Color. This is the prominent centerpiece of the block.
For the Block’s Corners:
- 2 ½” squares: (4) in your Second Color. These will occupy the four outermost corners of your completed block.
Essential Quilting Tools:
Beyond your fabrics, these tools are indispensable for precise piecing:
- Rotary Cutter, Mat, and Rulers: For accurate and efficient cutting.
- Sewing Machine: Ensure it’s in good working order, with a fresh needle.
- Quilting Thread: A neutral color (like white, grey, or cream) is often best.
- Iron and Ironing Board: Crucial for pressing seams flat and ensuring accuracy.
- Fabric Markers or Pencils: For drawing diagonal lines.
- Pins or Fabric Clips: To hold pieces securely during sewing.
- Seam Ripper: Every quilter’s essential “undo” button.
How to Make the Weathervane Quilt Block: A Step-by-Step Tutorial
Now that your materials are ready, let’s embark on the rewarding process of assembling your Weathervane Quilt Block. Follow these detailed steps carefully for the best results.
Step 1: Constructing Your Half-Square Triangles (HSTs)
Half-Square Triangles are foundational units in quilting, and precision here sets the stage for a perfect block. You will need your eight 2 7/8” squares (four in your first color, four in your second color).
- Take one 2 7/8” square of your first color and one 2 7/8” square of your second color.
- Place them right sides together, aligning all edges perfectly.
- Using a fabric marker or pencil, draw a diagonal line from one corner to the opposite corner across the lighter fabric.
- Now, using your sewing machine, sew a seam a scant ¼” away from one side of the drawn line. Repeat this on the other side of the drawn line. You will have two parallel stitch lines.
- Carefully cut directly on the drawn diagonal line between your two stitch lines. You now have two triangular units.
- Press each unit open. It’s often recommended to press towards the darker fabric to prevent seam allowances from showing through lighter fabrics. You should now have two identical half-square triangle blocks, each measuring 2 ½” square (after pressing).
- Repeat this process with the remaining three pairs of 2 7/8” squares. By the end of this step, you will have a total of eight 2 ½” HST units. Ensure they are accurately squared up to 2 ½” if necessary, using a ruler and rotary cutter.
Step 2: Creating Flying Geese-Style Units
These units, though slightly different from traditional flying geese, give a similar pointed effect. You’ll need your four 2 ½” x 4 ½” colored rectangles (first color) and your eight 2 ½” squares (second color).
- Take one 2 ½” x 4 ½” rectangle (first color) and one 2 ½” square (second color).
- Place the 2 ½” square on top of the left end of the rectangle, right sides together, aligning the raw edges precisely.
- Draw a diagonal line on the back of the 2 ½” square, starting from the top-left corner and ending at the bottom-right corner.
- Sew directly on this diagonal line.
- Trim the excess fabric, leaving a ¼” seam allowance beyond your sewn line. This creates a neat corner.
- Press the sewn square open, away from the rectangle. The corner will now form a triangle pointing inwards.
- Repeat this process on the right end of the *same* rectangle, but this time, draw the diagonal line from the top-right corner to the bottom-left corner of the 2 ½” square.
- Sew on this second diagonal line, trim the excess, and press open.
- You should now have a single unit measuring 2 ½” x 4 ½” with two ‘points’ on either end, created by the lighter squares.
- Repeat this entire process with the remaining three 2 ½” x 4 ½” rectangles and six 2 ½” squares to create a total of four identical units.
Step 3: Assembling the Outer Weathervane Sub-Units
Now we’ll combine the HSTs with the units from Step 2 to form the “arms” of the weathervane. You will use two HSTs and one unit from Step 2 for each sub-unit.
- Lay out one unit created in Step 2. Place one HST (from Step 1) on either side of it, ensuring the direction of the HSTs’ diagonal seam aligns with the visual flow of the weathervane. The illustration below shows the correct orientation.
- With right sides together, sew one HST to one end of the Step 2 unit. Use a precise ¼” seam allowance.
- Press the seam open or towards the Step 2 unit.
- Then, sew the second HST to the other end of the Step 2 unit, again with a ¼” seam.
- Press this seam. You will now have a longer, rectangular sub-unit that forms one of the four “arms” of your weathervane.
- Repeat this arrangement and sewing process with the remaining HSTs and Step 2 units. You will create a total of four identical “Weathervane Arm” sub-units.
Step 4: Constructing the Central Panel of the Block
This forms the heart of your Weathervane block. You’ll need your 4 ½” square (third color), four 2 ½” x 4 ½” rectangles (first color), and four 2 ½” squares (third color).
- Lay out the 4 ½” square (third color) in the very center.
- Place one 2 ½” x 4 ½” rectangle (first color) on each of its four sides, creating a plus-sign shape around the center square.
- Then, fill each of the four remaining corner positions with a 2 ½” square (third color).
- This arrangement creates a classic nine-patch layout (3×3 grid). Sew the pieces together in three horizontal rows.
- First, sew the three pieces of the top row together (corner square, rectangle, corner square). Press seams.
- Next, sew the three pieces of the middle row together (rectangle, central 4 ½” square, rectangle). Press seams.
- Finally, sew the three pieces of the bottom row together (corner square, rectangle, corner square). Press seams.
- Now, join these three completed rows together, carefully aligning your seams. Pin generously at the seam intersections to ensure points match up.
- Sew the rows together with a ¼” seam allowance. Press the final central panel carefully. This central unit should measure approximately 8 ½” square, ready to be joined with your outer units.
Step 5: Final Block Assembly – Bringing It All Together
You now have four “Weathervane Arm” sub-units (from Step 3) and one central panel (from Step 4). It’s time to assemble the complete Weathervane Quilt Block.
- Arrange your central panel in the center.
- Position one of your “Weathervane Arm” sub-units on each of the four sides of the central panel. Refer to the photo below for the correct orientation – the pointed ends of the arms should extend outwards from the central panel, creating the iconic weathervane effect.
- This again forms a larger nine-patch layout (3×3 grid) made up of your larger sub-units.
- Sew the top row together: (Weathervane Arm) + (Central Panel – Top Edge) + (Weathervane Arm). Press seams.
- Sew the middle row together: (Weathervane Arm) + (Central Panel – Middle) + (Weathervane Arm). Press seams.
- Sew the bottom row together: (Weathervane Arm) + (Central Panel – Bottom Edge) + (Weathervane Arm). Press seams.
- Finally, join these three large rows together, pinning carefully at all seam intersections to ensure a neat finish.
- Sew with a ¼” seam allowance and press the entire block. For a flat block, you might choose to press seams open in this final stage or alternate pressing directions in adjacent rows to nest seams.
- Your completed Weathervane Quilt Block should now be square and beautiful! Carefully square up the block to its final dimension (e.g., 12 ½” or 16 ½” depending on initial fabric sizes), trimming any slight excess with your rotary cutter and ruler.
Quilting Tips for a Flawless Weathervane Block
Achieving a perfectly pieced Weathervane Quilt Block relies on a few key quilting principles. Keep these tips in mind as you work:
- Maintain a Scant ¼” Seam Allowance: This is critical for all piecing. A scant ¼” means your seam is just a thread’s width less than a true ¼”, which accounts for the fabric lost in the fold when pressing.
- Pressing is Key: Pressing is as important as sewing. Pressing after each seam helps your blocks lay flat and prevents bulk. Generally, press seams towards the darker fabric to avoid “shadows” on lighter fabrics. However, for bulky intersections, pressing seams open can be beneficial.
- Chain Piecing: To save time, especially with the HSTs or when sewing the 2 ½” squares to rectangles, use chain piecing. Sew multiple units consecutively without cutting threads in between.
- Square Up Your Units: After creating your HSTs and flying geese-style units, take the time to square them up to their correct unfinished size. This ensures all your components are the same size, leading to perfectly matching seams in the final assembly.
- Use Good Quality Thread: A strong, lint-free cotton thread will result in more durable seams.
- Sharp Needle: Change your sewing machine needle regularly, especially when working on a project with many seams. A dull needle can cause skipped stitches or fabric damage.
- Pin, Pin, Pin: Don’t underestimate the power of pins, especially when joining rows or pieces where points need to match. Pinning at intersections, corners, and along edges will help keep your pieces aligned.
- Enjoy the Process: Quilting is a journey, not a race. Take your time, savor each stitch, and don’t be afraid to use your seam ripper if a seam isn’t quite right. Practice makes perfect!
Weathervane Quilt Block: Variations and Project Ideas
Once you’ve mastered this Weathervane Quilt Block, a world of creative possibilities opens up. This versatile block can be adapted in many ways and integrated into various projects.
- Color Play: Experiment with different color palettes. A two-color scheme offers a dramatic, graphic look, while a scrappy Weathervane block using many different fabrics can create a lively, dynamic feel. Try ombre effects by graduating fabric shades within the block.
- Size Variations: Adjust the initial cutting dimensions to create smaller or larger Weathervane blocks, perfect for different project scales.
- Single Block Projects: A single, well-made Weathervane block can stand alone as a beautiful mug rug, a hot pad, or the front of a decorative throw pillow.
- Multi-Block Quilts: Combine multiple Weathervane blocks to create stunning larger quilts. Arrange them in rows and columns, or rotate alternate blocks by 90 degrees to create intriguing secondary patterns.
- Combine with Other Blocks: Pair your Weathervane blocks with simpler squares or sashing strips to give the eye a resting place and highlight the complexity of the weathervane design.
- Borders and Sashing: Consider adding borders around individual blocks or sashing between blocks to enhance the overall quilt design.
The Weathervane Quilt Block is more than just a pattern; it’s a testament to the joy of quilting and the satisfaction of creating something beautiful with your own hands. This block offers a wonderful opportunity to refine your techniques and build confidence for more complex quilting adventures. With patience and precision, you’ll craft a stunning block that will be a proud addition to any quilt.
For those who prefer a visual guide or need a little extra help seeing each step in action, we highly recommend watching the accompanying video tutorial. It provides clear demonstrations and reinforces the instructions shared here. Happy sewing, and may your weathervane block point you towards many more wonderful quilting projects!
Weathervane Quilt Block Video Tutorial
For a complete visual walkthrough and additional tips, be sure to watch the comprehensive video tutorial below. It perfectly complements these written instructions, guiding you through each stage of the Weathervane Quilt Block creation.