
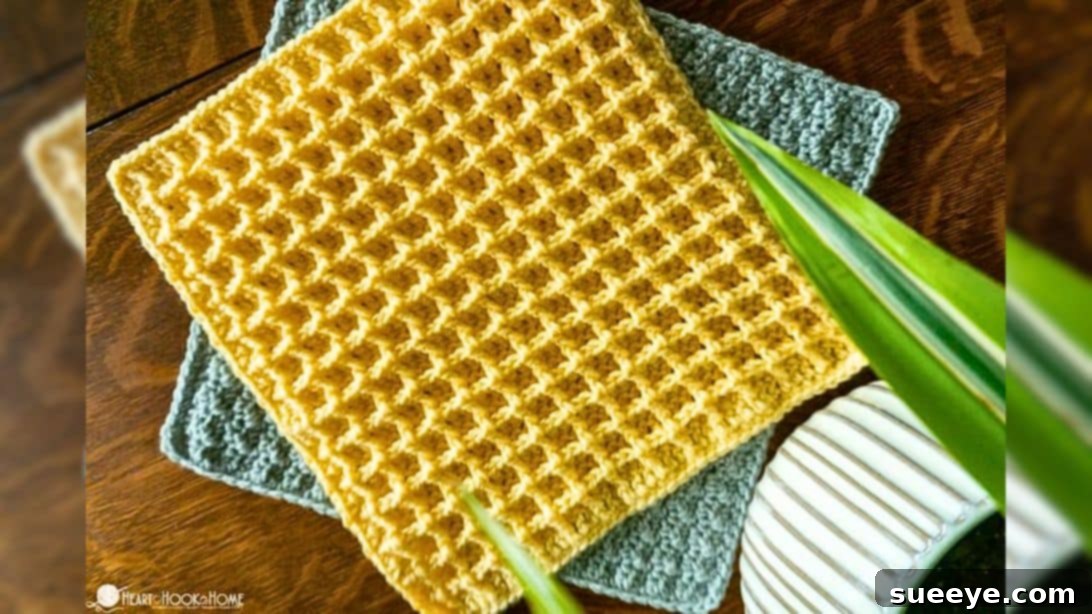
Embarking on new crochet adventures is always a joy, and among the myriad of stitches and patterns available, the Waffle Stitch stands out as a true delight. Its unique, textured surface resembles the familiar breakfast treat, making it incredibly appealing for a variety of projects. Despite its sophisticated appearance, mastering the waffle crochet technique is surprisingly straightforward, even for those new to the craft. What might initially seem intricate quickly reveals itself to be a simple, repetitive sequence that yields stunning results.
For a long time, the distinctive raised squares of the Waffle Stitch seemed like a challenge best left to advanced crocheters. However, my perception completely shifted when I stumbled upon a fantastic video tutorial by Heart Hook Home on YouTube. This resource demystified the process, proving that this beautiful stitch is accessible to everyone, regardless of their prior experience. It’s a project that promises not only a rewarding crafting experience but also a functional and aesthetically pleasing finished product.
The beauty of the Waffle Stitch lies not just in its look but also in its versatility. The dense, squishy fabric it creates is perfect for items that require a bit of body and warmth. Imagine transforming a simple ball of yarn into a charming coaster, a cozy blanket, or even a thoughtful, handmade gift. This stitch is incredibly adaptable, lending itself beautifully to both practical items for your home and heartfelt presents for loved ones. It’s an ideal way to unwind after a long day or to keep your hands busy and creative during a relaxing weekend. If you’re ready to add a delightful new stitch to your repertoire, join us as we explore the art of waffle crochet.
RELATED: Easy Fingerless Gloves Crochet Tutorial
Why The Waffle Crochet Stitch Is A Must-Try
The Waffle Stitch isn’t just another crochet pattern; it’s a texture wonderland. Its distinctive characteristic is the raised “waffle” grid, achieved by strategically alternating between standard double crochets and front post double crochets. This combination creates a fabric that is thick, soft, and incredibly squishy, offering a wonderful tactile experience. Beyond its luxurious feel, the Waffle Stitch boasts several advantages:
- Visual Appeal: The three-dimensional texture adds depth and interest to any project, making even a single-color item look sophisticated.
- Warmth and Density: The thick fabric is excellent for blankets, scarves, and cozies, providing superior insulation and comfort.
- Durability: Its dense structure makes it very sturdy and long-lasting, perfect for items that will see frequent use, like dishcloths or trivets.
- Beginner-Friendly: While it uses two types of double crochet stitches, the pattern is highly repetitive once you get the hang of it, making it an excellent skill-building project for those looking to expand beyond basic stitches.
- Versatility: From small coasters to large afghans, the Waffle Stitch adapts beautifully to various project sizes and purposes.
Exploring this stitch opens up a world of creative possibilities, allowing you to craft items that are both beautiful and highly functional. It’s a fantastic way to elevate your crochet skills and produce truly remarkable pieces.
Essential Materials for Your Waffle Crochet Project:
Before you dive into the delightful world of waffle crochet, gathering the right tools is key to a smooth and enjoyable crafting experience. Luckily, you won’t need an extensive array of supplies; just a few basic items will suffice to get you started on this charming project.
- Crochet Yarn: The type of yarn you choose will significantly impact the look and feel of your finished waffle crochet item. For beginners, a medium-weight (worsted weight) acrylic yarn is often recommended due to its affordability, wide color range, and ease of handling. Acrylic yarn is forgiving, making it perfect for practicing new stitches. If you’re planning to make coasters or dishcloths, cotton yarn is an excellent choice as it’s absorbent and heat-resistant. For warmer items like scarves or blankets, wool or a wool blend will provide extra coziness. Experiment with different colors – solid colors beautifully highlight the stitch definition, while variegated yarns can create an intriguing visual tapestry.
- Crochet Hook: The size of your crochet hook should correspond to your chosen yarn weight. Most worsted weight yarns suggest a hook size between 5.0mm (H) and 6.0mm (J). Always check the yarn label for the recommended hook size. Having a hook that is too small might make your fabric stiff and difficult to work with, while a hook that is too large could result in a loose, gappy texture. It’s always a good idea to make a small swatch to ensure your gauge (the number of stitches and rows per inch) matches your desired outcome.
- Scissors: A sharp pair of scissors is essential for cleanly cutting your yarn at the beginning, end, and during color changes of your project. Small craft scissors are perfect for this task.
- Tapestry Needle (Optional but Recommended): While not strictly necessary for the actual crocheting, a tapestry needle (also known as a yarn needle) is invaluable for weaving in loose ends once your project is complete. This step ensures a neat and professional finish, preventing your beautiful stitches from unraveling.
With these simple materials in hand, you are well-equipped to begin your waffle crochet journey. Let’s move on to the exciting part: learning how to create this captivating stitch.
Mastering the Waffle Crochet Stitch: A Step-by-Step Guide
Creating the Waffle Stitch is a rewarding process that combines two fundamental crochet techniques: the double crochet (dc) and the front post double crochet (fpdc). By understanding the rhythm of these stitches, you’ll quickly form the characteristic raised squares that give this pattern its name.
Step 1: Laying the Foundation – The Starting Chain and First Row
Every crochet project begins with a foundation chain, and the Waffle Stitch is no exception. For this pattern, your starting chain needs to be a multiple of 3, plus an additional 2 chains. For example, if you want your project to be 18 stitches wide, you would chain 18 + 2 = 20 stitches. This extra ‘plus 2’ is crucial as it accounts for your turning chain and ensures your stitch count is correct for the pattern repeat.
- Starting the Chain: Create a slip knot and chain the appropriate number of stitches. For a practice swatch, a chain of 17 (15 + 2) is a good starting point.
- First Double Crochet Row: Once your chain is complete, you’ll work your first row entirely in double crochet stitches. Skip the first 2 chains from your hook (these count as your first double crochet), then insert your hook into the 3rd chain from the hook and make a double crochet. Continue to make one double crochet in each remaining chain across the entire row. This forms a solid base for your waffle texture.
- Turning and Preparing for Row 2: At the end of the row, chain 2. This chain-2 acts as the turning chain and will count as the first double crochet of your next row. Now, turn your work, bringing the opposite side of your fabric facing you.
Step 2: Building the Waffle Texture – Alternating Stitches
This is where the magic of the Waffle Stitch truly begins! The second row, and all subsequent textured rows, will involve alternating between regular double crochets and front post double crochets. This creates the unique raised and recessed effect.
- Starting Row 2: Your chain-2 from the previous row counts as your first double crochet. Now, you will begin the alternating pattern. The pattern for Row 2 (and all odd-numbered rows thereafter, if you consider the first dc row as Row 1) is: *1 front post double crochet (fpdc) around the next stitch, 2 double crochets (dc) in the next two stitches*. You will repeat this sequence across the row.
- Understanding Front Post Double Crochet (fpdc): Unlike a regular double crochet where you insert your hook into the top of the stitch, for a fpdc, you insert your hook from the front, around the post of the stitch from the previous row, and then back out to the front. You then complete a double crochet as usual (yarn over, pull up a loop, yarn over, pull through two loops, yarn over, pull through last two loops). This action pushes the post forward, creating the raised texture.
- Alternating for the Row: So, after your initial chain-2 (which counts as a dc), you’ll likely start with a fpdc, then two dc, then a fpdc, and so on. Continue this alternation until you reach the very last stitch of the row. The last stitch should always be a regular double crochet into the top of the last stitch from the previous row (which was the turning chain-2). This ensures a straight edge for your project.
- Turning and Preparing for Row 3: Once you’ve completed the last double crochet, chain 2 and turn your work. This chain-2 again counts as your first double crochet for the next row.
Step 3: Continuing the Pattern – Rows of Repetition
The beauty of the Waffle Stitch pattern is its consistent rhythm. From Row 3 onwards, you will be alternating between two types of rows:
- Rows that start with a double crochet followed by *fpdc, dc, dc*: These are the rows where you’ll be working a front post double crochet around the “post” of the double crochets that appear to be recessed from the previous row, and regular double crochets into the tops of the front post double crochets from the previous row. This creates the ‘ridges’ of the waffle.
- Rows that start with a double crochet followed by *dc, fpdc, fpdc*: On these rows, you’ll be working a regular double crochet into the tops of the stitches that appear recessed, and a front post double crochet around the posts of the stitches that are already raised. This creates the ‘valleys’ of the waffle.
It’s important to pay attention to where you place your stitches. A simple rule of thumb is: when you see a raised post from the previous row, you will typically work a regular double crochet into the top of it. When you see a flat, recessed stitch from the previous row, you will work a front post double crochet around its post. This creates the alternating, interlocking grid.
Keep adding rows, consistently following the pattern repeat. As you continue, you will vividly see the waffle pattern emerge and take shape. The fabric will grow thicker and more textured with each passing row. The key is to be consistent with your tension and stitch placement. Don’t be discouraged if your first few rows look a bit uneven; practice makes perfect, and soon you’ll be effortlessly creating beautiful waffle fabric.
Project Ideas for Your Waffle Crochet Masterpiece
Now that you’ve mastered the Waffle Stitch, the possibilities for creating beautiful and functional items are endless. This versatile stitch lends itself to a wide array of projects, perfect for gifting, home decor, or personal use. Here are some inspiring ideas to get your creativity flowing:
- Coasters: This is an excellent starting project for beginners. A small square of waffle stitch makes a thick, absorbent coaster that protects surfaces and adds a touch of handmade charm to your home.
- Dishcloths and Washcloths: The textured surface of the Waffle Stitch is ideal for scrubbing, making it perfect for reusable dishcloths or luxurious washcloths. Use cotton yarn for best results.
- Baby Blankets and Throws: The dense and squishy nature of the Waffle Stitch creates incredibly warm and cozy blankets. A waffle stitch baby blanket is a cherished gift, and a larger throw adds comfort and style to any living space.
- Scarves and Cowls: The texture looks fantastic in a long scarf or a fashionable cowl. The stitch provides excellent warmth and a unique visual appeal that stands out.
- Potholders and Trivets: The thick fabric of the Waffle Stitch offers excellent heat resistance, making it perfect for functional potholders or trivets in the kitchen.
- Pillows: Crochet a large waffle stitch square and sew it onto a cushion cover or create an entire pillow cover for a cozy and inviting addition to your sofa or bed.
- Bags and Totes: The sturdy nature of the Waffle Stitch makes it suitable for creating durable market bags or stylish tote bags.
Don’t be afraid to experiment with different yarn colors and weights to see how they transform the Waffle Stitch. A chunky yarn will create a very pronounced texture, while a finer yarn will give a more delicate waffle pattern. The joy of crochet lies in creating something unique with your own hands, and the Waffle Stitch offers a fantastic foundation for countless creative endeavors.
Tips for Success with Your Waffle Crochet
Even though the Waffle Stitch is beginner-friendly, a few tips can help ensure your project turns out beautifully:
- Practice Swatch: Always start with a small swatch (e.g., 20 chains, 10 rows) to get comfortable with the stitch pattern and check your gauge. This helps you avoid having to unravel a larger project later.
- Count Your Stitches: It’s easy to accidentally add or lose stitches, especially when learning new techniques. Periodically count your stitches at the end of each row to maintain a consistent width.
- Understand Post Stitches: The key to the Waffle Stitch is correctly identifying and working into the posts of the stitches. Practice this motion until it feels natural. The front post double crochet works *around* the vertical post of the stitch below, not into the top loops.
- Consistent Tension: Maintaining an even tension throughout your work is crucial for a uniform fabric. If your tension is too tight, your fabric will be stiff; too loose, and it will be floppy.
- Watch Tutorials: Visual learners will benefit immensely from watching video tutorials. Seeing the hook movements in real-time can clarify any confusion from written instructions.
- Take Breaks: Crochet is meant to be enjoyable. If you feel frustrated or your hands are tired, take a break. Come back to your project with fresh eyes and renewed energy.
With a little practice and patience, you’ll soon be crocheting the Waffle Stitch with confidence and creating stunning textured pieces that will impress everyone.
*Many thanks to Heart Hook Home via YouTube for the invaluable video tutorial and inspiring images that guided this instruction. Their clear guidance makes learning new crochet techniques an absolute pleasure. If you’ve enjoyed this project idea and found their tutorial helpful, we highly recommend visiting their channel for more fantastic crochet patterns and tips. Don’t forget to subscribe to stay updated with their latest creations!