
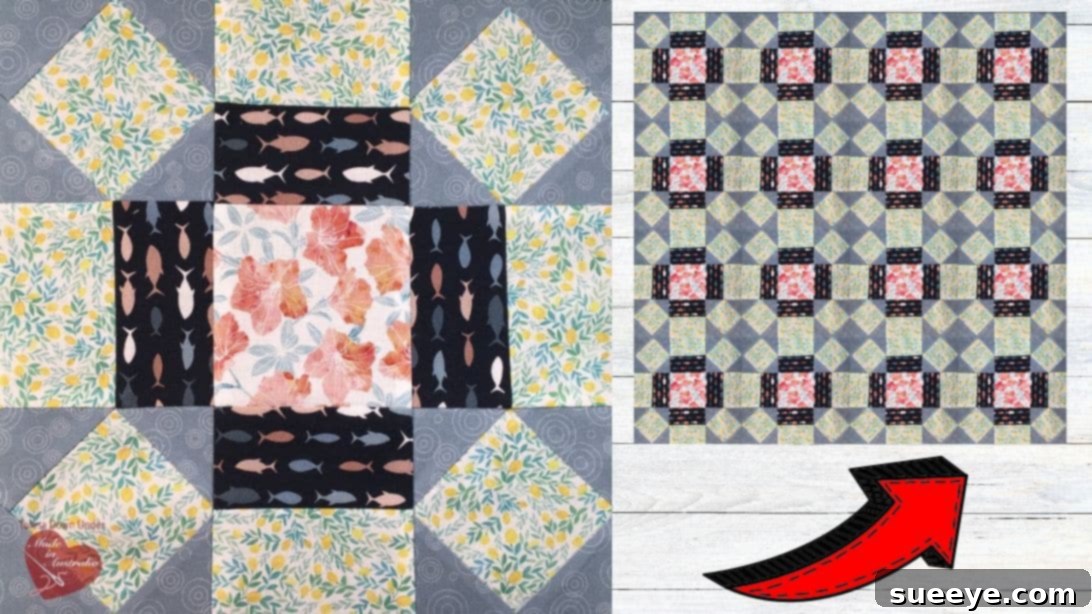
Mastering the Broken Wheel Quilt Block: An Easy Tutorial for All Skill Levels
Embark on a delightful quilting journey with the timeless and charming Broken Wheel Quilt Block! Whether you’re a seasoned quilter looking for a refreshing project or a beginner eager to dive into the world of fabric artistry, this block offers a wonderful blend of simplicity and stunning visual appeal. We’re thrilled to guide you through this process, inspired by the fantastic tutorial from Teresa DownUnder on YouTube.
The Broken Wheel Quilt Block is renowned for its elegant design, which creates a captivating sense of movement and depth in any quilting project. Its beauty lies in its deceptive simplicity, making it incredibly accessible for those just starting out while still providing a satisfying creative outlet for experts. Imagine the possibilities – from a cozy throw quilt for your living room to decorative pillow covers, intricate wall hangings, or even unique tote bags. This block is a fantastic foundation for countless creative endeavors.
Quilting is more than just sewing fabric; it’s a creative expression, a way to relax, and a skill that yields beautiful, heirloom-quality pieces. With the Broken Wheel Quilt Block, you’ll not only hone your piecing skills but also gain confidence in choosing fabrics and assembling units. Get ready to transform simple fabric pieces into a gorgeous, dynamic pattern that will undoubtedly become a cherished part of your next masterpiece.
RELATED: Easy Origami Pinwheel Quilt Block Tutorial
Why Choose the Broken Wheel Quilt Block?
The appeal of the Broken Wheel Quilt Block extends beyond its aesthetic beauty. It’s a fantastic choice for several reasons:
- Beginner-Friendly: Despite its intricate appearance, the block primarily uses basic half-square triangle techniques and straight seams, making it ideal for new quilters to build foundational skills.
- Versatile Design: The pattern can be easily adapted with different fabric choices and color palettes. Opt for high contrast for a dramatic effect, or use softer, coordinating prints for a more subtle elegance.
- Classic Appeal: This block has a timeless quality that never goes out of style. It works wonderfully in both traditional and modern quilt designs.
- Engaging Project: The process of constructing the block is enjoyable and rewarding, with each unit bringing you closer to the final beautiful design.
Using your favorite fabric prints and colors is highly encouraged for this quilt block. Whether you prefer vibrant hues, subtle pastels, or striking monochromes, the Broken Wheel design allows your fabric choices to truly “pop” beautifully. This guide will walk you through each step, ensuring a smooth and enjoyable crafting experience from start to finish. Let’s gather our supplies and begin!
Essential Materials for Your Broken Wheel Quilt Block
Before diving into the creative process, gathering all your materials is crucial for a smooth and efficient quilting experience. High-quality tools and fabrics will not only make the process easier but also ensure a more beautiful and durable finished block.
- Light Print Fabric: Designated for the center sections of your block. Choose a fabric with a relatively light background or print that will contrast nicely with your darker fabrics.
- Dark Print Fabric: This fabric will create the “wheel” effect. Select a print or solid that stands out against your light print fabric.
- Light Contrasting Fabric: Used for the accent strips, this fabric should provide a clear contrast to both your light and dark print fabrics, often a solid or a very subtle print.
- Background Fabric: This fabric will frame your design and tie the elements together. A neutral solid or tone-on-tone print often works best, allowing the main elements to shine.
- Marking Pen, Pencil, or Chalk: Essential for accurately drawing diagonal lines on your fabric squares. Make sure it’s erasable or disappears with heat/water.
- Ruler: A clear acrylic ruler with ¼-inch markings is indispensable for precise cutting and measuring.
- Scissors or Rotary Cutter and a Cutting Mat: While scissors can be used, a rotary cutter with a self-healing cutting mat will significantly increase accuracy and speed, especially for repetitive cuts.
- Needle and Thread: For any hand-sewing adjustments or if you prefer to hand-quilt. However, most of the construction will be done by machine. Choose good quality 100% cotton thread that matches your fabric or is a neutral color.
- Iron and Ironing Board: Crucial for pressing seams open or to one side. Proper pressing is as important as accurate sewing in quilting, ensuring flat and precise blocks.
- Sewing Machine: A reliable sewing machine with a ¼-inch seam foot will be your best friend for piecing these fabric units together accurately.
Having these materials ready will help you maintain focus and momentum throughout the project. Take your time selecting fabrics; the combination of colors and patterns is what will give your Broken Wheel Quilt Block its unique character.
Step-by-Step: Crafting Your Broken Wheel Quilt Block
Now that you have all your materials, let’s dive into the creation of this beautiful quilt block. Precision in cutting and sewing is key to achieving crisp points and a perfectly aligned design.
Step 1: Constructing the Corner Units (Diamond Quilt Block Units)
This first step involves creating four identical corner units that will form the “broken” parts of your wheel. This technique is often referred to as the “snowball” method.
First, take your **light print fabric** and cut one square measuring **4.5 inches by 4.5 inches**. This will be the base for our corner units. Next, take your **dark print fabric** and cut four squares, each measuring **2.5 inches by 2.5 inches**. These smaller squares will be used to create the angled corners.
On the back (wrong) side of each of the four 2.5-inch dark print squares, use your marking pen, pencil, or chalk to draw a diagonal line from one corner to the opposite corner. This line will serve as your stitching guide.
Now, take one of the 4.5-inch light print squares. Place one of the 2.5-inch dark print squares on one of the top corners of the larger light square, with their right sides facing each other. Align the edges carefully. Then, place another 2.5-inch dark print square on the opposite bottom corner of the same 4.5-inch light square, again with right sides together and edges aligned.
Stitch directly along the diagonal lines you drew on both small dark squares. Once stitched, use your scissors or rotary cutter to trim the fabric ¼ inch away from the stitching line, on the side closer to the corner. This will remove the excess fabric and create your seam allowance. Be sure to discard the trimmed triangles.
Carefully press the seams toward the darker fabric. Pressing toward the darker fabric helps to prevent the seam allowance from showing through lighter fabrics. Now, repeat the same process on the remaining two empty corners of the 4.5-inch light print square. You will place two more 2.5-inch dark squares, stitch along the diagonal, trim, and press the seams. You should now have one finished block unit with four “snowballed” corners, creating a diamond-like shape in the center.
For the Broken Wheel Quilt Block, you will need a total of **four** of these completed block units. Repeat all the steps above to make three more identical units.
Step 2: Assembling the Central Panel and Final Block
This step brings all the components together to form the complete Broken Wheel Quilt Block. It involves creating a central panel and then attaching the corner units.
Begin by cutting your **background fabric** for the center at **4.5 inches by 4.5 inches**. This square will form the very heart of your quilt block. Next, take your **light contrasting fabric** and cut two strips, each measuring **2.5 inches by 19 inches**. These longer strips will create the striking contrast lines around the central square.
Stitch these two 2.5 x 19-inch contrasting strips together along their long edge, right sides facing. Press the seam open or to one side, depending on your preference (pressing open helps reduce bulk). This creates a single strip unit.
Now, take this strip unit and subcut it into four pieces, each **4.5 inches wide**. You will end up with four smaller strip units, each consisting of two contrasting fabrics sewn together.
Lay your 4.5-inch background fabric square (the center fabric) on your work surface. Arrange the four strip units around each of its four sides. The contrasting colors should create a framed effect around the central square. Carefully stitch one strip unit to each side of the central background square. Remember to use a consistent ¼-inch seam allowance. Press your seams after each attachment to keep the block flat and accurate.
Finally, it’s time to incorporate the four corner units you made in Step 1. Place one of these diamond quilt block units onto each of the four corners of your partially assembled block. Ensure that the “points” of the diamond are facing inward, towards the center of the block, to create the broken wheel effect. Stitch each corner unit in place, one at a time, using your ¼-inch seam allowance. As always, press all the final seams. Inspect your block to ensure all points meet cleanly and seams are flat.
Congratulations! You have now completed your beautiful Broken Wheel Quilt Block. Stand back and admire your handiwork. The interplay of colors and the unique design truly make this block a showstopper.
Tips for Quilting Success and Best Practices
Achieving perfectly pieced quilt blocks often comes down to a few key practices. Keep these tips in mind to enhance your quilting journey:
- Accuracy is Paramount: “Measure twice, cut once” is a quilter’s mantra. Even a slight discrepancy in cutting or seam allowance can throw off the entire block. Use a sharp rotary cutter blade and a clear ruler for precise cuts.
- Consistent Seam Allowance: A perfect ¼-inch seam allowance is critical. Many sewing machines have a special ¼-inch foot, or you can use painter’s tape as a guide on your machine’s throat plate.
- Pressing vs. Ironing: In quilting, we “press” seams, which means lifting and placing the iron down, rather than “ironing” (gliding the iron back and forth). This prevents stretching and distortion of your fabric.
- Chain Piecing: To save time and thread when making multiple identical units (like the four corner units), consider chain piecing. Sew one unit, then feed the next unit directly into the machine without lifting the presser foot or cutting the thread in between.
- Fabric Preparation: While not always necessary for small projects, pre-washing your fabrics can prevent shrinkage and color bleeding, especially if combining different fabric types or colors.
- Sharp Tools: Always use a sharp rotary cutter blade and good quality needles in your sewing machine. Dull tools can fray fabric and lead to less precise results.
- Thread Choice: Opt for a good quality 100% cotton thread that matches your fabric’s fiber content. This ensures durability and consistent stitches.
Unleashing Creativity: Variations and Project Ideas
The beauty of the Broken Wheel Quilt Block lies in its adaptability. Once you’ve mastered the basic construction, you can explore countless variations:
- Color Play: Experiment with different color palettes. Create a monochromatic quilt for a sophisticated look, a scrappy quilt using various fabric scraps for a lively feel, or seasonal quilts with appropriate colors (e.g., reds and greens for Christmas, pastels for spring).
- Fabric Textures: While cotton is standard, consider incorporating other fabric types for unique texture, such as flannel for a cozier feel or linen blends for a different drape (ensure they are handled appropriately).
- Scale Up or Down: You can resize the block by adjusting the initial cut sizes, though remember to maintain the proportions for a balanced design.
Beyond a full quilt, the Broken Wheel Quilt Block is perfect for smaller, impactful projects:
- Pillow Covers: A single block makes a stunning focal point for a decorative pillow.
- Table Runners or Placemats: Combine a few blocks in a row for an elegant table setting.
- Tote Bags or Pouches: Integrate a block into the front panel of a handmade bag for a personalized touch.
- Wall Hangings: Frame a larger block or arrange several to create beautiful fabric art for your home.
*All these amazing images are thanks to Teresa DownUnder via YouTube. Do visit her channel to see more videos like this!
Embark on Your Quilting Adventure Today!
The Easy Broken Wheel Quilt Block Tutorial offers a fantastic opportunity to create something truly beautiful with your own hands. Whether this is your first quilt block or your hundredth, the satisfaction of seeing a collection of fabric pieces transform into a cohesive and intricate design is incredibly rewarding. This block, with its classic appeal and straightforward construction, is a testament to the joy and accessibility of quilting.
We hope this detailed guide empowers you to tackle this project with confidence and creativity. Don’t be afraid to experiment with your fabric choices and make each block uniquely yours. Remember, every stitch is a step closer to a masterpiece. We encourage you to visit Teresa DownUnder’s YouTube channel for more inspiring quilting tutorials and to see the Broken Wheel Quilt Block in action. Happy quilting!