
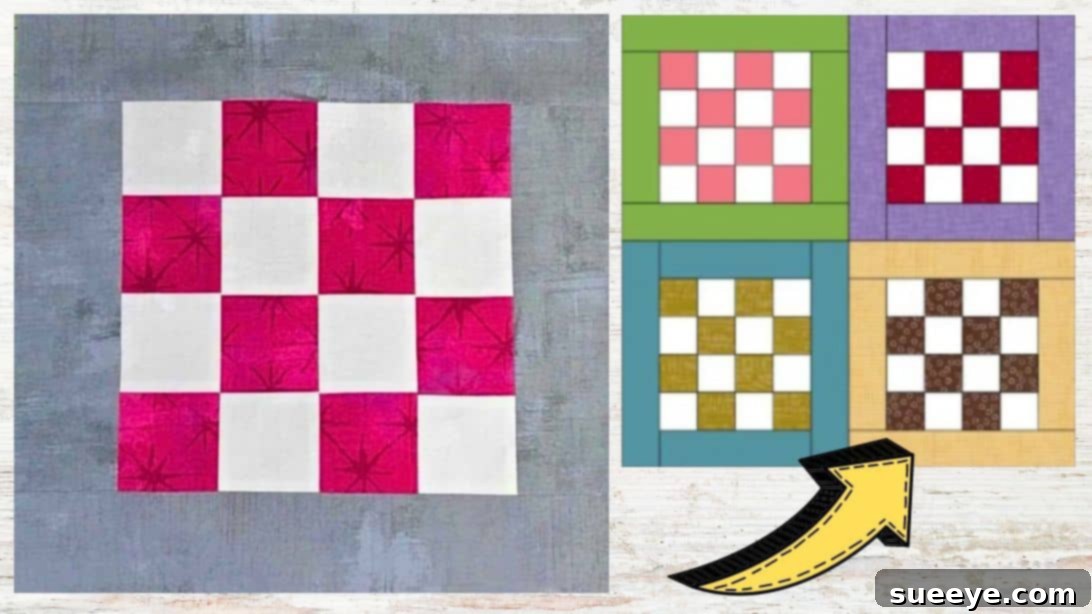
Embark on your quilting journey with confidence! The classic Checkerboard Quilt Block, as demonstrated by the talented Carol Thelen on YouTube, might initially appear intricate, but don’t let its sophisticated look deceive you. This popular block is surprisingly simple to master, making it an ideal choice for both seasoned quilters seeking a quick project and absolute beginners looking to hone their skills. With clear, step-by-step instructions, you’re guaranteed to achieve perfect results on your very first attempt, building a solid foundation in essential quilting techniques. Dive in and discover how easily you can create a beautiful and timeless checkerboard design!
Why the Checkerboard Quilt Block is Perfect for You
The checkerboard pattern is a cornerstone of quilting, renowned for its versatility and classic appeal. It offers a fantastic opportunity to experiment with color combinations and develop foundational sewing skills such as accurate cutting, precise piecing, and effective pressing. This easy quilt block project is more than just a craft; it’s a stepping stone into the rewarding world of quilting. Whether you’re creating a cozy blanket, a decorative wall hanging, or a stylish tote bag, the checkerboard design adds a touch of timeless elegance. Its straightforward nature allows beginners to build confidence without being overwhelmed, while experienced quilters can appreciate its quick assembly for larger projects. Get ready to transform simple fabric strips into a stunning work of art that reflects your creativity and passion for quilting.
Essential Materials for Your Checkerboard Quilt Block
Gathering the right tools and materials is the first step towards a successful quilting project. For this easy-to-make checkerboard quilt block, you’ll need the following:
- Jelly Roll or 2½-inch Fabric Strips: These pre-cut strips are a fantastic time-saver and provide a convenient way to select coordinating fabrics. If you prefer, you can also cut your own 2½-inch wide fabric strips from your stash, which offers more control over color and pattern selection. Aim for a good contrast between your accent, background, and frame fabrics to make the checkerboard pattern truly pop.
- Background Fabric: A solid or subtly patterned fabric that complements your chosen strip colors will make your accent pieces stand out. This fabric will be used for creating the contrasting squares in your checkerboard design.
- Marking Pen, Pencil, or Chalk: Essential for accurate measurements and marking your fabric for cutting and sewing lines. Choose a tool that is easily visible on your fabric and can be removed or disappears over time.
- Quilting Ruler: A transparent ruler, ideally 6×24 inches or similar, is crucial for precise cutting and squaring up your fabric pieces. Accuracy in measuring is key to achieving crisp, even quilt blocks.
- Scissors or Rotary Cutter and a Cutting Mat: A rotary cutter paired with a self-healing cutting mat allows for quick and accurate cutting of multiple fabric layers, making the process much more efficient. Sharp fabric scissors are also indispensable for smaller cuts or trimming threads.
- Needle and Thread: High-quality cotton thread in a neutral color (like white, grey, or ecru) that blends with your fabrics is recommended. Ensure your sewing machine needle is sharp and suitable for quilting cottons.
- Iron and Ironing Board: An iron is non-negotiable in quilting. Pressing seams correctly at each stage ensures your blocks lie flat and your points match up perfectly. Always press, don’t iron (which involves gliding the iron), to avoid stretching the fabric.
- Sewing Machine: A reliable sewing machine with a quarter-inch foot attachment will make piecing your quilt block much easier and more precise.
- Pattern: Make sure to click here to download the pattern for the exact measurements and visual guidance needed for this project.
Step-by-Step Guide: Crafting Your Easy Checkerboard Quilt Block
Follow these detailed steps to construct your beautiful checkerboard quilt block. Precision and careful pressing are your best friends in quilting!
Step 1: Preparing Your Fabric Strips for the Checkerboard Design
Begin by selecting your fabric strips. You’ll need one strip for the main accent color, one for the background, and one for the framing around the block. For the frame fabric, start by trimming off the selvage edge (the woven edge of the fabric that prevents fraying). Then, meticulously cut this strip into four segments measuring 8½ inches each, and another four segments measuring 12½ inches each. These will form the border of your completed checkerboard block.
Next, take your accent and background strips. Place them together with their right sides facing each other, ensuring all edges are perfectly aligned. Stitch these two strips together along one long edge using a consistent ¼-inch seam allowance. This precise seam is vital for the accuracy of your finished block. After stitching, carefully press the seam open. Pressing seams open helps to reduce bulk and creates flatter, more stable blocks. Once pressed, fold the newly joined strip set in half lengthwise, ensuring the raw edges meet evenly. From the folded end, carefully trim off a small, consistent amount of fabric. This simple step helps to square up your strip set and prepare it for the next phase of cutting.
Step 2: Assembling Your Checkerboard Units and Adding the Frame
Separate the strip sets you created in Step 1. Lay them out with their right sides facing up, ensuring that the colors alternate beautifully – one accent, one background, one accent, and so on. Using your ruler and rotary cutter, accurately cut these alternating strip sets into eight individual segments, each measuring 2½ inches wide. These segments are the building blocks of your checkerboard design.
Now, pair these segments into groups of two. For each pair, take one segment and rotate it 180 degrees so that the colors within the pair alternate, creating the classic checkerboard effect, as clearly demonstrated in Carol Thelen’s video tutorial. This careful rotation is crucial for achieving the desired pattern. Sew each of these rotated pairs together along their long edge, again using a precise ¼-inch seam allowance. After stitching, press the seams open to maintain flatness and prevent bulk. Once you have several of these two-segment units, stitch two units together to form a larger checkerboard block. At this point, you should have two complete checkerboard blocks. Take the time to press all seams diligently as you go; this practice will significantly impact the professional finish of your quilt.
Finally, it’s time to frame your checkerboard blocks. Take the shorter 8½-inch frame strips you prepared earlier and stitch one to each side of your checkerboard block. Then, take the longer 12½-inch frame strips and stitch one to the top and one to the bottom of the block. As always, press all seams carefully after each attachment. This iterative pressing ensures that your block remains flat and square, ready for integration into a larger quilt project or to stand alone as a beautiful finished piece. You’ve now successfully completed an easy and elegant checkerboard quilt block!
Tips for Beginner Quilters: Mastering Your First Checkerboard Block
Quilting is a journey of precision and patience. For those new to the craft, starting with an easy quilt block like the checkerboard is a brilliant choice. Here are a few extra tips to ensure your success:
- Accurate Cutting is Paramount: Measure twice, cut once! Even a slight deviation in your initial cuts can lead to misaligned seams later on. Utilize your rotary cutter and ruler with a firm, even pressure.
- Consistent Seam Allowance: A ¼-inch seam allowance is standard in quilting. Practice maintaining this exact measurement. A quarter-inch foot for your sewing machine can be incredibly helpful.
- Pressing vs. Ironing: Remember to “press” your seams, not “iron” them. Lifting and lowering the iron prevents fabric distortion. Pressing seams open (as in this tutorial) or to one side helps create flat blocks and aids in matching points.
- Chain Piecing: For efficiency, especially when making multiple blocks, try chain piecing. Sew one seam, then without cutting the thread, feed the next unit directly under the needle. This saves time and thread.
- Don’t Fear the Seam Ripper: Everyone makes mistakes! A seam ripper is a quilter’s essential tool. Don’t be afraid to unpick and re-sew for better accuracy. It’s part of the learning process.
- Enjoy the Process: Quilting should be a relaxing and enjoyable hobby. Don’t strive for absolute perfection on your first few blocks. Focus on learning the techniques and celebrating your progress.
Fabric Selection Guide for Your Checkerboard Quilt
The beauty of a checkerboard quilt block lies significantly in its fabric choices. The contrast and harmony between your chosen fabrics bring the design to life. Here’s how to approach fabric selection:
- Contrast is Key: For a striking checkerboard effect, ensure a clear contrast between your “accent” and “background” fabrics. This could be light vs. dark, warm vs. cool, or busy pattern vs. solid.
- Color Palette: Decide on a color scheme. Do you want vibrant, playful colors? Or perhaps a more subdued, elegant palette of neutrals? Jelly rolls often come with pre-selected coordinating fabrics, making this choice easier.
- Pattern Play: Don’t be afraid to mix patterns! A small floral print can work wonderfully with a geometric pattern, as long as the color values provide enough contrast. Solids are excellent for creating breathing room and emphasizing patterned fabrics.
- Consider the “Frame”: The frame fabric acts as a border, helping to define the block and separate it from other blocks if you’re making a larger quilt. It can be a unifying solid, or a subtle print that ties into your main block colors.
- Fabric Quality: High-quality 100% cotton quilting fabric is recommended. It’s easier to cut, sew, and holds its shape better than lower-quality alternatives.
Taking Your Checkerboard Quilt Project Further
Once you’ve mastered this easy checkerboard quilt block, a world of possibilities opens up! You can:
- Create a Full Quilt: Simply make more blocks! Stitch them together in rows and columns, adding sashing (strips of fabric between blocks) if desired, and a larger outer border to create a stunning full-sized quilt.
- Smaller Projects: Turn a single block into a charming mug rug, a hot pad, or the front of a throw pillow. Two or three blocks could make a beautiful table runner.
- Experiment with Layouts: Play with rotating blocks to create secondary patterns. For example, arranging blocks so the frame colors meet can create interesting visual lines.
- Color Variations: Try making the same block with entirely different color combinations. You’ll be amazed at how different the same pattern can look with new fabrics.
- Gift Giving: Handmade quilt blocks or small quilted items make thoughtful and personalized gifts for friends and family.
Conclusion: Your Journey into Quilting Begins Here
Congratulations on completing your easy checkerboard quilt block! This timeless design is a fantastic introduction to quilting, offering a blend of simplicity and satisfying results. By following Carol Thelen’s clear guidance and applying the tips shared here, you’ve not only created a beautiful piece but also built foundational skills that will serve you well in all future quilting endeavors. Remember, practice makes perfect, and every stitch is a step forward in your creative journey. We encourage you to visit Carol Thelen’s YouTube channel for more inspiring tutorials and to subscribe for her latest quilting adventures. Happy quilting!
All images are credited to Carol Thelen via YouTube.