
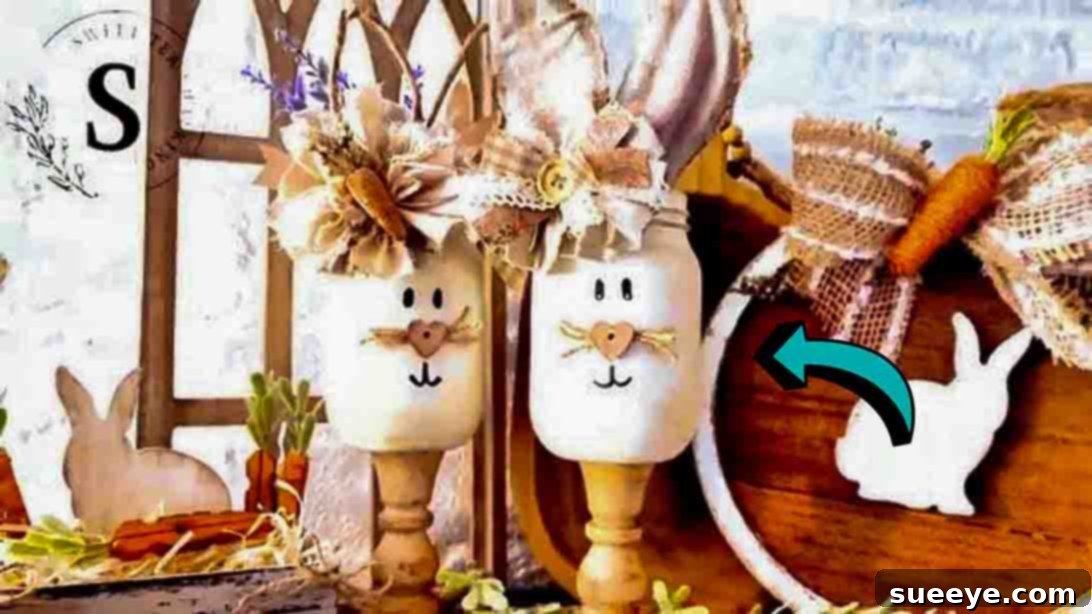
DIY Whimsical Mason Jar Easter Bunnies: Enchant Your Home with Handmade Charm
As the days grow longer and the first signs of spring emerge, our thoughts naturally turn to the joy and warmth of Easter. What better way to welcome this season of renewal than by infusing your home with a touch of handmade charm? This year, ditch the store-bought decorations and embark on a delightful crafting adventure that promises to transform ordinary items into extraordinary festive accents. Get ready to create the most adorable and whimsical Easter bunnies, crafted from humble mason jars, perfect for adorning your Easter celebration!
This fantastic project, inspired by the creative genius of Sweet Tea Chalking on YouTube, offers a delightful way to upcycle and personalize your holiday decor. Whether you’re planning a fun crafting session with friends, a memorable activity with family, or simply seeking a relaxing solo project, these DIY mason jar bunnies are an absolute delight. They bring a unique blend of rustic charm and whimsical cuteness that will undoubtedly become a conversation starter and a cherished part of your Easter Sunday traditions.
The beauty of this particular DIY lies in its accessibility and affordability. Sweet Tea Chalking brilliantly demonstrates how to bring these enchanting bunnies to life using just a few simple crafting materials, many of which can be readily found at your local Dollar Tree or existing craft supplies. This makes it an incredibly budget-friendly way to achieve stunning results without breaking the bank. From the moment you gather your supplies to the final touch of a rosy cheek, this tutorial promises an enjoyable journey filled with creativity, imagination, and plenty of bunny-inspired joy.
Regardless of your crafting experience – whether you’re a seasoned DIY enthusiast or just dipping your toes into the world of handmade decor – this step-by-step guide is designed to be straightforward and rewarding. We’ll walk you through each stage, ensuring you gain confidence and enjoyment from the process. So, let’s gather our materials, unleash our inner artist, and hop right into creating some truly magical Easter decorations that will brighten your home and warm your heart!
RELATED: How To Make A Cute DIY Felt Easter Bunny
Essential Materials for Your Whimsical Mason Jar Bunnies
Before we dive into the creative process, let’s ensure you have all the necessary components for crafting your adorable bunnies. The great news is that most of these items are incredibly easy to find, making this project accessible and enjoyable for everyone. Here’s a detailed list of what you’ll need, along with a few tips for selection:
- Mason Jars: The star of our project! Any size mason jar will work, offering variety in your bunny collection. Pint or quart-sized jars are popular choices, but feel free to experiment with smaller jelly jars for mini bunnies or larger ones for a statement piece. Ensure they are clean and dry.
- White Chalk Paint: This provides a beautiful, matte, and slightly rustic finish that adheres well to glass. You can choose a pure white or an off-white/cream shade for a softer look. Acrylic paint can also be used as an alternative, though chalk paint often offers better coverage on glass.
- Paintbrush: A medium-sized flat brush is ideal for covering the jar smoothly, while a smaller brush might be useful for touch-ups or details if you decide to add them.
- Jute Twine: This natural fiber is perfect for creating the ears and whiskers, adding to the rustic charm of your bunnies. Look for a medium thickness that can hold its shape when bent.
- Scissors: A sharp pair of scissors will be essential for cutting twine, fabric, and any other materials precisely.
- Hot Glue Gun & Glue Sticks: Your primary adhesive for quick and strong bonds. Always exercise caution when using a hot glue gun, especially with children present.
- Canvas Fabric: A small piece of canvas fabric (or a similar sturdy, natural-looking fabric like linen or burlap) will be used to wrap the twine ears. Its texture adds depth and character to the bunny ears.
- Eyeshadow (Pink or Rosy Tone): This might seem unconventional, but a touch of pink eyeshadow is perfect for adding a subtle, blushing tint to the inner ears, mimicking a real bunny’s delicate features. Choose a matte or slightly shimmery light pink or peach shade.
- Marker (Fine-Tip Permanent): A black fine-tip permanent marker is ideal for drawing the bunny’s eyes and mouth. Make sure it’s waterproof to prevent smudging.
- Small Button: This will serve as the adorable bunny nose. Look for a small, round button in a coordinating color (black, brown, or even a soft pink) that fits the scale of your jar.
- Scrap Fabrics: A collection of colorful or patterned scrap fabrics will be used to create charming bows or “collars” for your bunnies. This is a great opportunity to use up fabric remnants and add personality to each bunny.
- 4-inch Candle Holder: This surprising element will act as the base for your bunny, giving it a bit of height and a finished, decorative look. Small wooden or metal candle holders work best.
- E6000 Adhesive: A strong, permanent adhesive that will securely bond the glass jar to the candle holder base. E6000 is known for its industrial strength and durability, making it perfect for this structural connection. Remember to use it in a well-ventilated area.
Directions: Bringing Your Easter Bunny Jars to Life
Now that you have all your materials gathered, let’s dive into the fun part: crafting your charming mason jar bunnies. Take your time with each step, enjoy the process, and don’t be afraid to add your own personal flair!
Step 1: Preparing the Jar and Crafting the Whimsical Ears
The foundation of our bunny begins with the mason jar itself, followed by the delicate creation of its ears. This step requires a bit of patience to ensure a smooth finish and perfectly shaped ears.
- Paint the Mason Jar: Start by giving your mason jar a fresh, clean coat of white chalk paint. For optimal coverage and a smooth, opaque finish, it’s best to apply two to three thin coats, allowing each coat to dry completely before applying the next. Chalk paint dries relatively quickly, but air drying for at least 30 minutes between coats is recommended. Ensure you cover the entire exterior surface of the jar evenly. Once painted, set the jar aside in a well-ventilated area to thoroughly dry and cure while you work on the other components.
- Prepare the Jute Twine for Ears: While your painted jar is drying, you can begin crafting the bunny’s ears. Cut two separate pieces of jute twine, each approximately 10 inches long. The length can be adjusted slightly depending on how tall and prominent you want the ears to be.
- Shape the Twine Ears: Take one piece of the 10-inch jute twine and carefully shape it into an ear loop. This involves bending it into a rounded “U” shape or a slightly elongated oval, making sure the two ends meet at the base. Repeat this process for the second piece of twine, aiming for two symmetrical ear shapes.
- Wrap the Ears with Canvas Fabric: Cut two rectangular strips of canvas fabric, each wide enough to fully encase the jute twine ear shape and long enough to wrap around it with a slight overlap. Apply a thin line of hot glue along one side of your twine ear shape, then carefully press one edge of your canvas fabric strip onto the glue. Begin to wrap the fabric snugly around the jute twine, applying small dabs of hot glue intermittently to secure it, ensuring the twine is fully covered. Once wrapped, trim any excess fabric, leaving a small seam allowance. Repeat for the second ear, striving for uniformity.
- Refine the Ear Edges: After the fabric is securely glued, carefully cut out the excess fabric around the perimeter of each ear, following the twine’s shape. To create a charming, slightly distressed or “fluffy” effect, gently sand the edges of the fabric-wrapped ears with a fine-grit sandpaper. This will encourage some of the canvas threads to loosen and fray, giving your bunny ears a wonderfully rustic and authentic texture.
- Add a Pop of Pink: To give the ears a realistic and adorable touch, grab your pink eyeshadow. Using a soft brush (like a makeup brush or a small paintbrush), lightly dust the inner part of each ear with the eyeshadow. Blend it gently to create a natural, blushing pink effect, mimicking the delicate skin inside a bunny’s ear. This small detail adds a significant amount of charm.
- Attach the Ears to the Jar: Once your painted mason jar is completely dry and the ears are finished, it’s time to bring them together. Decide on the desired placement for the ears on the top, back rim of the jar. Apply a generous amount of hot glue to the base of each ear. Carefully press the glued ear onto the top of the mason jar, holding it firmly in place for a few seconds until the glue sets. Repeat for the second ear, ensuring they are positioned symmetrically and to your liking. Allow the glue to cool and fully dry.
Step 2: Crafting the Bunny’s Face, Embellishments, and Base
With the ears firmly in place, it’s time to give your bunny its unique personality by adding its facial features, a charming bow, and a sturdy base.
- Create the Whiskers: Grab a tiny piece of jute twine – approximately 3-4 inches long, or shorter depending on the size of your jar. Cut several small segments from this piece, about 1 to 1.5 inches each. Arrange three or four of these segments horizontally on the front of your jar, just below where the nose will go, fanning them out slightly to create the appearance of whiskers. Apply a tiny dot of hot glue to the center of the arranged whiskers to hold them together and then press them onto the jar.
- Attach the Nose: Select a small button that complements your bunny’s style. Apply a small dot of hot glue to the back of the button and carefully place it directly in the center of the jute twine whiskers, slightly above where they meet. This creates the bunny’s adorable nose, instantly adding character to its face.
- Draw the Eyes and Mouth: Using your fine-tip permanent marker, carefully draw the bunny’s eyes and mouth. For eyes, simple dots or small, closed “V” shapes can create a whimsical, sleeping, or contented look. For the mouth, a small “X” or a subtle “V” shape just below the nose works wonderfully. Feel free to practice on a scrap piece of paper first to get the desired expression. The key is to keep it simple and charming.
- Fashion a Fabric Bow or Collar: Gather several strips of your scrap fabrics. You can choose a variety of patterns and colors for a vibrant look, or stick to a single color palette for a more cohesive aesthetic. Stack these fabric strips neatly on top of each other. Once stacked, tie them together in the middle with a small piece of jute twine or another thin strip of fabric to create a charming multi-layered ribbon or bow. Alternatively, you can simply tie a pretty bow with a single piece of fabric. Apply hot glue to the back of your assembled bow and securely attach it to the front of the mason jar, just below the bunny’s face, resembling a festive collar.
- Prepare the Candle Holder Base: Take your 4-inch candle holder. To add a touch of vintage or rustic appeal, you can optionally brush some antiquing wax onto its surface. Apply the wax sparingly with a brush, then wipe off any excess with a clean cloth, allowing it to settle into crevices and enhance the texture. Let the wax dry completely.
- Secure the Base: This step provides stability and elevates your bunny. Apply a generous bead of E6000 adhesive to the top rim of the candle holder. Carefully center the bottom of your mason jar onto the glued surface of the candle holder. Press firmly and hold it in place for a minute or two. E6000 takes time to cure fully, so it’s crucial to let your bunny stand undisturbed for at least 24-72 hours to allow for a strong, permanent bond. Ensure it’s placed on a flat surface during this curing period.
- Final Touches: Once the E6000 has fully cured, your whimsical mason jar bunny is complete! Take a moment to admire your creation. You can gently fluff the fabric ears or adjust the bow if needed.
Your Finished DIY Mason Jar Bunnies: A Delightful Addition to Your Decor
Congratulations! You’ve successfully transformed simple mason jars into charming and whimsical Easter bunnies, adding a touch of handmade magic to your seasonal decor. These adorable creations are perfect for a multitude of uses: place them as centerpieces on your Easter dining table, arrange them on a mantelpiece, use them to hold small Easter treats or flowers, or even give them as thoughtful, personalized gifts to friends and family.
The beauty of this DIY project lies not only in the delightful outcome but also in the creative journey. Each bunny you create will possess its own unique character, a testament to your personal touch and craftsmanship. Feel free to experiment with different sizes of jars, various colors of chalk paint, unique button styles for noses, and a wider array of scrap fabrics for their bows. You might even consider adding tiny pom-pom tails for an extra dash of cuteness!
By engaging in projects like these, we not only create beautiful objects but also foster a sense of accomplishment and bring a personal, heartfelt element into our celebrations. These upcycled mason jar bunnies are a wonderful reminder of the joy of spring, the warmth of the holiday, and the endless possibilities that a bit of creativity and a few simple materials can unlock.
We hope this detailed tutorial, inspired by the wonderful work of Sweet Tea Chalking, has empowered you to embrace your inner crafter and create something truly special. Share your finished Easter bunny creations with us and inspire others to embark on their own DIY adventures. Happy crafting and a very happy Easter!