
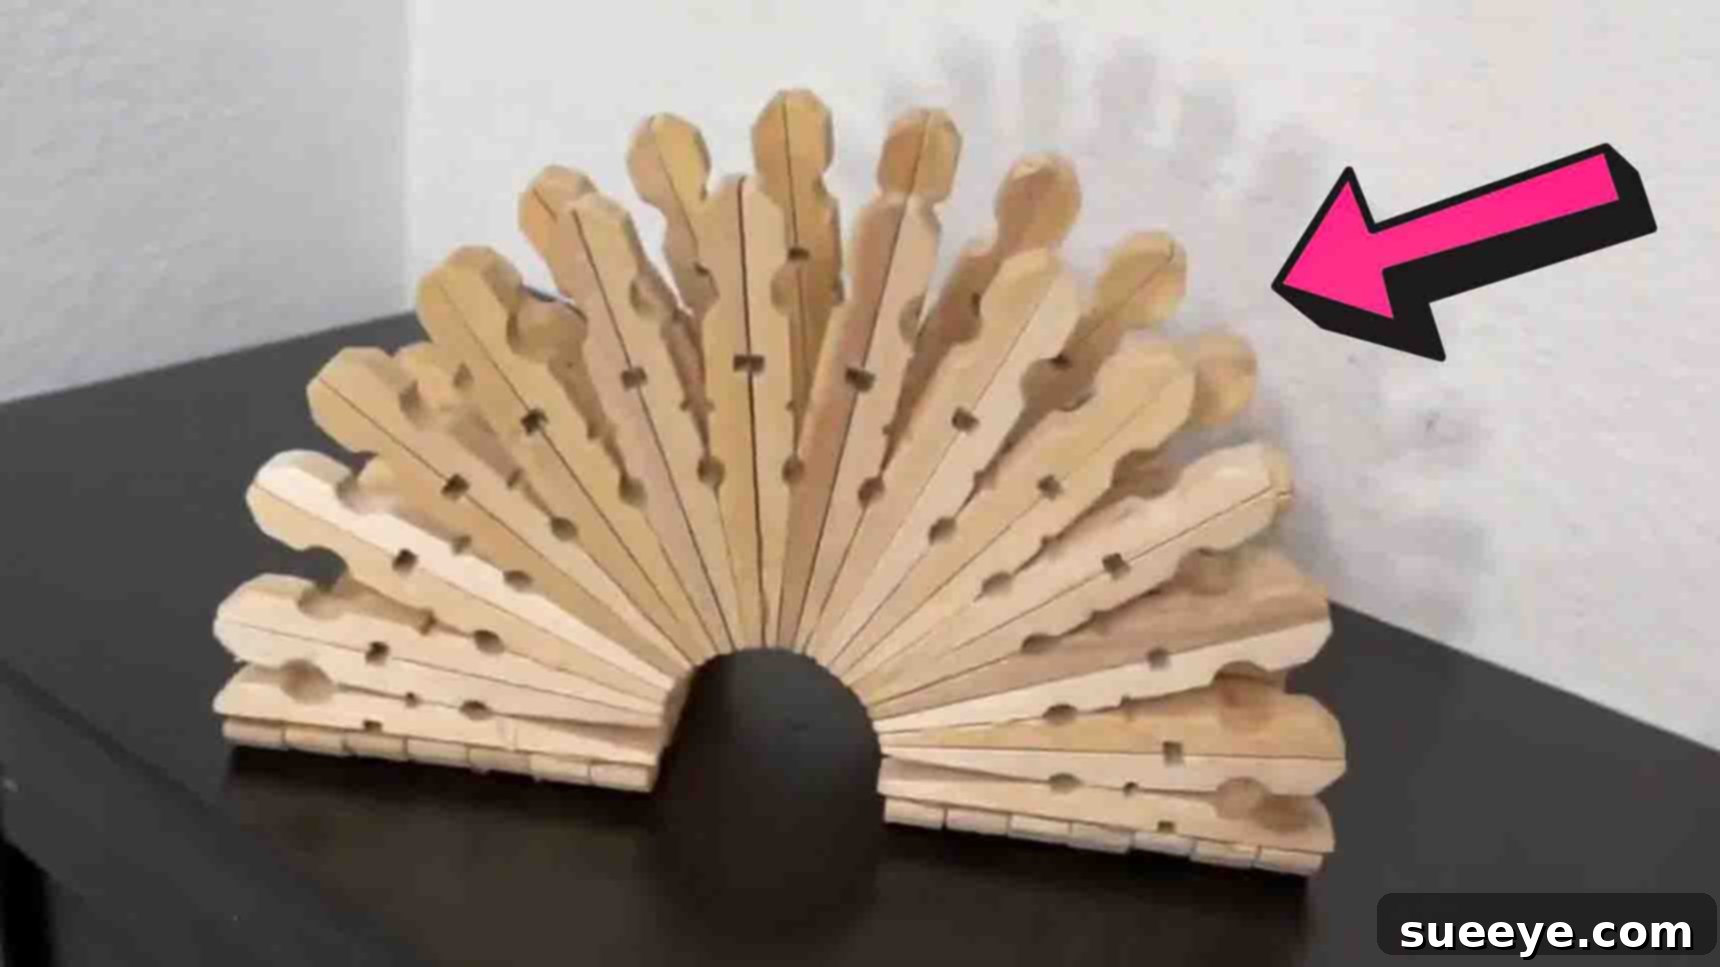
DIY Clothespin Napkin Holder: An Easy & Stylish Craft Project for Your Home
Are you searching for a fun, budget-friendly weekend activity that also adds a touch of rustic charm to your home? Look no further! This ingenious DIY napkin holder, inspired by the creative minds at Happy Crafty on YouTube, is the perfect project. Requiring only a handful of clothespins and a hot glue gun, it’s incredibly simple to construct, making it an ideal craft for beginners, families looking for a bonding activity, or anyone eager to create unique home decor on a dime. Beyond its primary function, this versatile holder can also serve as a thoughtful, handmade gift for friends, family, or loved ones. Get ready to transform ordinary clothespins into a functional piece of art as we guide you through the step-by-step instructions below.
In a world of mass-produced items, there’s something truly special about a handmade creation. Not only does this clothespin napkin holder project offer immense satisfaction, but it also allows for complete customization to match your personal style and existing home aesthetics. Imagine a beautifully crafted holder gracing your dining table, a testament to your creativity and resourcefulness. This project is a fantastic way to repurpose common household items into something both practical and visually appealing. Let’s gather our minimal materials and dive into the world of DIY crafting!
Why Craft a DIY Clothespin Napkin Holder?
Before we embark on our crafting journey, let’s explore the compelling reasons why this particular DIY project stands out:
- Cost-Effective Decor: Clothespins are incredibly inexpensive, often found in bulk at dollar stores or supermarkets. This project offers high-impact decor without breaking the bank.
- Personalized Touch: Unlike store-bought napkin holders, your DIY version can be painted, stained, or embellished to perfectly complement your kitchen or dining room decor. Match it to your color scheme, or create a unique, eye-catching centerpiece.
- Beginner-Friendly: With simple steps and common tools, this is an excellent project for crafting novices. It builds confidence and introduces basic crafting techniques.
- Family Bonding Activity: Involve children (with adult supervision for the hot glue gun) in this project. It’s a wonderful way to spend quality time together, foster creativity, and teach practical skills.
- Thoughtful Gift Idea: Handmade gifts carry immense sentimental value. A custom-made napkin holder is a practical and heartfelt present for housewarmings, birthdays, or holidays.
- Versatility Beyond Napkins: As you’ll discover, this holder isn’t just for napkins. It can be repurposed for mail, recipes, notes, or even small books, making it a truly functional addition to any space.
- Eco-Conscious Crafting: Repurposing everyday items like clothespins helps reduce waste and promotes sustainable living.
Materials & Essential Tools
One of the beauties of this DIY clothespin napkin holder is its minimal material requirement. Here’s what you’ll need:
- Clothespins: You will need a significant quantity of standard wooden clothespins. While the exact number depends on the desired size of your napkin holder, a good estimate is around 30-40 clothespins for a standard-sized holder. Look for sturdy wooden ones, as they provide a better aesthetic and hold hot glue more effectively than plastic alternatives. Dollar stores are an excellent source for bulk, inexpensive clothespins.
- Hot Glue Gun: A reliable hot glue gun is your primary tool. Ensure it’s in good working condition and you have plenty of glue sticks on hand. High-temperature glue guns generally provide a stronger bond, which is ideal for this project.
- Hot Glue Sticks: Stock up on all-purpose hot glue sticks. They dry quickly, which speeds up the crafting process.
Optional Materials for Customization:
- Acrylic Paint or Spray Paint: For coloring your napkin holder.
- Wood Stain: To enhance the natural grain of wooden clothespins for a rustic look.
- Sealant/Varnish: To protect the paint or stain and provide durability.
- Small Embellishments: Ribbons, twine, buttons, stencils, or small decorative items to personalize your holder.
- Craft Knife or Small Pliers: Helpful for removing the metal springs from the clothespins cleanly.
- Protective Mat or Old Newspaper: To protect your work surface from hot glue.
Step-by-Step Directions to Craft Your Napkin Holder
Follow these detailed instructions to create your beautiful and functional DIY clothespin napkin holder.
Step 1: Preparing Clothespin Segments and Constructing the Side Walls
Begin by carefully disassembling your clothespins. Each standard clothespin consists of two wooden halves and a small metal spring. Gently remove the metal rings, separating the two wooden pieces. Take your time with this step to avoid splintering the wood. Once separated, you will have numerous individual wooden clothespin halves. For this entire project, you will exclusively use these wooden halves.
Next, you will create the building blocks for your napkin holder’s side walls. Take two individual wooden clothespin halves and apply a line of hot glue along one flat edge of one piece. Immediately press the flat edge of the second piece onto the glued edge, aligning them perfectly. You are essentially gluing the two halves together lengthwise, forming a single, thicker wooden segment. Repeat this process until you have created a sufficient number of these paired clothespin segments for your side walls. You’ll need enough to construct two identical wall pieces, and for a standard size, aiming for 12-15 paired segments per wall is a good starting point (so, 24-30 segments in total). Set aside four individual clothespin halves (the ones without rings) for the stand/feet of your holder – do not pair these four. Allow a moment for the glue on each paired segment to set firmly.
Now, let’s form the distinctive “fan” shape that will comprise the side walls. Take one of your paired clothespin segments. Apply a line of hot glue along the lower half of one side. Then, take another paired segment and attach it to the first, creating a slight angle. Continue this process, adding subsequent paired segments and gluing them to the lower half of the previous one, fanning them out slightly as you go. This will create a gentle curve or “fan” effect, forming one of the side walls of your napkin holder. Ensure the angle is consistent for all segments to maintain an even and stable structure. Aim for a length that comfortably holds your napkins. Repeat this entire process to create a second, identical fan-shaped side wall.
With both side walls constructed, it’s time to add the supporting feet. Retrieve the four individual clothespin halves you saved earlier. These will serve as the stabilizing feet for your napkin holder. On one of your fan-shaped side walls, apply a generous dab of hot glue to the bottom, outermost end. Firmly press one of the individual clothespin halves vertically against this end, ensuring it is flush with the bottom edge of the wall. Hold it in place until the glue sets. Repeat this for the other end of the same wall, and then attach the remaining two individual clothespin halves to the ends of your second fan-shaped wall. These four individual pieces, when positioned vertically, will provide stability and elevate your napkin holder slightly, acting as its stand.
Step 2: Crafting the Base and Final Assembly
Now, let’s construct the base for your napkin holder. For this, you will again use individual clothespin halves (without rings). Take seven individual clothespin halves and apply hot glue along one long edge of the first piece. Press the long edge of the second piece firmly against it, aligning them side by side to create a flat strip. Continue this process, gluing all seven individual halves side by side, creating a single, flat row of clothespins. Repeat this to create a second identical row of seven individual clothespin halves. Once you have two such rows, apply hot glue along the entire long edge of one row and carefully press the second row onto it, aligning them perfectly to form a sturdy, flat rectangular base made of 14 individual clothespin halves. This base will provide a solid foundation for your napkin holder and contain the napkins securely.
With your base and two side walls (complete with their feet) ready, it’s time for the final assembly. Lay your rectangular base flat on your work surface. Take one of your fan-shaped side walls (the one with the two individual clothespin halves attached vertically as feet). Apply a continuous bead of hot glue along the entire bottom edge of this side wall (the edge that will connect to the base). Carefully position this glued edge onto one of the long edges of your base, ensuring it is perfectly straight and parallel to the base’s edge. Press down firmly and hold in place until the glue cures and creates a strong bond. The vertical feet should be resting on your work surface, providing initial stability.
Next, repeat this process for the second fan-shaped side wall. Apply hot glue along its entire bottom edge and carefully attach it to the opposite long edge of your base, ensuring it is parallel to the first wall. Take your time to align both walls properly, creating an even gap between them for your napkins. Once both walls are securely attached to the base, double-check all glued joints for strength. Apply additional glue if any areas feel loose. Allow your DIY napkin holder to fully dry and cure for at least an hour, or as per your hot glue gun manufacturer’s recommendations, to ensure maximum stability. Your custom-made DIY clothespin napkin holder is now finished and ready to be used or decorated!
Tips for Success & Creative Customization
To ensure your DIY napkin holder project goes smoothly and to add your personal touch, consider these tips:
- Safety First: Hot glue guns can cause burns. Always exercise caution, keep your fingers clear of the nozzle, and work in a well-ventilated area. If crafting with children, adult supervision is essential.
- Work on a Protected Surface: Hot glue can be messy. Lay down an old newspaper, silicone mat, or craft paper to protect your table.
- Practice Alignment: Before applying glue, dry-fit pieces to visualize how they will connect. This helps in achieving precise alignment.
- Less is More (with Glue): While you want a strong bond, too much glue can ooze out and create a messy finish. Apply a consistent, thin bead for neat results.
- Drying Time is Key: Even though hot glue dries quickly, allow adequate time for it to fully cool and set before handling your holder extensively, especially during the final assembly.
Unleash Your Creativity: Customization Ideas
This project offers a blank canvas for personalization:
- Paint It: Spray paint offers a quick, even coat for a modern look. Acrylic paints allow for intricate designs, distressing, or a vibrant pop of color. Consider painting before final assembly for easier coverage.
- Stain It: For a natural, rustic, or vintage feel, apply wood stain to the clothespins. A dark stain can give it an antique appearance, while a lighter stain enhances the wood grain.
- Decoupage: Apply decorative paper, fabric scraps, or even pictures using decoupage medium for a truly unique finish.
- Embellishments: Attach small decorative elements like miniature artificial flowers, tiny buttons, twine wrapped around the edges, or small charms. Use stencils to add monograms or patterns.
- Seal for Durability: Once decorated, apply a clear sealant or varnish to protect your design from wear and tear, especially if it will be used frequently.
Beyond Napkins: Other Uses for Your Clothespin Holder
While designed for napkins, the sturdy and stylish construction of this DIY holder makes it incredibly versatile:
- Mail Organizer: Keep incoming and outgoing mail neatly sorted on your desk or entryway table.
- Recipe Card Holder: Perfect for holding recipe cards upright while you cook, preventing them from getting soiled.
- Bill & Note Keeper: Tame paper clutter by using it to hold important bills, receipts, or notes.
- Small Book or Tablet Stand: Its fan-shaped sides can cradle smaller books or even a tablet for hands-free viewing.
- Desk Organizer: Use it to store pens, pencils, scissors, or other small office supplies.
- Photo Display: Place favorite small photographs or postcards within the holder for a charming display.
Maintaining Your DIY Clothespin Napkin Holder
Maintaining your handmade napkin holder is simple. For regular cleaning, a light dusting with a soft cloth or a quick wipe with a slightly damp cloth is usually sufficient. Avoid submerging it in water or using harsh chemical cleaners, especially if it has been painted or stained. If you’ve applied a sealant, it will offer additional protection against spills and moisture, ensuring your beautiful creation lasts for years to come.
Conclusion: Crafting Joy and Functional Beauty
Congratulations! You’ve successfully transformed simple clothespins into a practical and charming DIY napkin holder. This project embodies the spirit of creative resourcefulness, proving that you don’t need expensive materials to craft beautiful and functional items for your home. Whether it’s gracing your dinner table, organizing your desk, or given as a heartfelt gift, your handmade creation will undoubtedly spark conversations and bring a sense of personal accomplishment.
We encourage you to experiment with different finishes and embellishments to truly make this project your own. Share your creations, explore other DIY projects, and continue to discover the joy and satisfaction that comes from making something with your own hands. Happy crafting!