
Sew Your Own Laptop Case: An Easy & Stylish DIY Project
There’s nothing quite like the thrill of unboxing a brand new piece of technology, especially when it’s an upgrade you’ve eagerly awaited. This past year, I was incredibly fortunate to receive a 13″ MacBook Air as a Christmas gift. It wasn’t just a shiny new gadget; it was a much-needed tool to elevate my blogging journey. For years, I had relied on a trusty but aging 6-year-old Netbook, originally purchased for college classes. While it served its purpose admirably, tasks like photo editing often tested the limits of my patience and the Netbook’s processing power. The difference a powerful new machine makes is truly transformative.
Naturally, I was absolutely delighted with my new MacBook Air. A sleek, powerful laptop deserves a stylish and protective home, which, for a seasoned crafter like myself, meant one thing: it was time for a new sewing creation. Adding a laptop case to my ever-growing collection of handmade bags and accessories seemed like the perfect project. Having developed a passion for sewing, I’ve embraced a philosophy of crafting items I know I can make myself, often for a fraction of the cost of buying them pre-made. This approach not only saves money but also ensures a unique, personalized touch.
Inspired by the need for practical protection and a desire to avoid generic, expensive store-bought options, I decided to whip up a super easy laptop case pattern. I genuinely believe this is a pattern worth sharing with fellow sewing enthusiasts, beginners and experienced alike. The best part? This entire project took me approximately 20 minutes from start to finish. In stark contrast, I’d seen similar custom laptop sleeves on platforms like Etsy retailing for around $30. My handmade version? It cost me a mere $6 in materials. The satisfaction of creating something so useful, so quickly, and so affordably is immense, and I absolutely adore how it turned out.
This particular case or sleeve is crafted from beautiful quilted cotton, a fantastic choice for laptop protection due to its inherent padding and delightful texture. Whether you’re looking for your next thoughtful handmade gift for a tech-savvy friend or family member, or simply want to add a practical and pretty item to your own collection of sewing projects, this laptop sleeve is an excellent option. Join me in exploring the simple steps to create this gorgeous case and give your valuable laptop the stylish protection it deserves.
Why Sew Your Own Laptop Case? The Unbeatable Benefits of DIY
In a world overflowing with mass-produced accessories, there’s a unique charm and practical advantage to creating your own laptop case. Beyond the joy of crafting, DIY laptop sleeves offer a multitude of benefits that make them a superior choice for protecting your valuable electronics.
Significant Cost Savings
As highlighted by my personal experience, the financial benefits of sewing your own laptop case are undeniable. Store-bought sleeves, especially those with any degree of style or quality, can quickly add up. A simple, functional case might cost $20-$40, while a designer or specialized option could easily reach $50 or more. By utilizing fabric scraps, remnant pieces, or inexpensive cuts of fabric, you can create a high-quality, protective case for a fraction of that price. My $6 case stands as a testament to just how much you can save, proving that premium protection doesn’t have to come with a premium price tag.
Unmatched Personalization and Style
One of the most compelling reasons to sew your own laptop case is the complete freedom of personalization. Tired of bland, black, or grey neoprene sleeves? With DIY, your imagination is the only limit. Choose from an infinite array of fabric colors, patterns, and textures – from vibrant florals and geometric prints to subtle solids and rich textures. You can match your case to your personal style, your favorite outfit, or even your home decor. Add unique embellishments like embroidery, patches, monograms, or contrasting accents to make a statement that’s uniquely you. This level of customization simply isn’t available off the shelf.
Superior Protection Tailored to Your Device
While aesthetics are important, the primary function of a laptop case is protection. When you sew your own, you have full control over the level of padding and reinforcement. You can specifically tailor the dimensions to fit your laptop snugly, preventing unnecessary movement that can lead to scratches or dings. Moreover, you can choose materials like quilted cotton, fusible fleece, or foam interfacing to provide substantial cushioning against everyday bumps and drops. This bespoke approach ensures that your expensive laptop receives the precise protection it needs, far exceeding the often-generic padding found in mass-produced options.
A Rewarding and Beginner-Friendly Sewing Project
For those new to sewing, a laptop case is an ideal project. Its relatively simple rectangular shape and straightforward construction make it incredibly accessible. You’ll practice fundamental sewing skills such as cutting straight lines, sewing seams, and perhaps adding a simple closure. The quick turnaround time means you get to enjoy the fruits of your labor almost immediately, providing a fantastic confidence boost for tackling more complex projects in the future. It’s a gratifying experience to create something so functional and beautiful with your own hands.
The Perfect Handmade Gift
Looking for a thoughtful and practical gift? A custom-sewn laptop case is an excellent choice. Tailor the fabric and design to the recipient’s tastes, and you’ll present them with a truly unique item they’ll use every day. It’s a gift that speaks volumes about your care and effort, far more so than a store-bought alternative. This project is also versatile enough to adapt for tablets, e-readers, or even as a chic clutch, making it a go-to pattern for various gifting occasions.
Gathering Your Materials: What You’ll Need for Your DIY Laptop Sleeve
Before you begin sewing, it’s essential to gather all the necessary materials and tools. The right supplies will ensure your project is not only successful but also results in a durable and attractive laptop case. For this easy design, we’ll focus on materials that offer both aesthetic appeal and practical protection.
Fabric Choices: The Foundation of Your Case
- Quilted Cotton: As used in my project, quilted cotton is an excellent choice. It comes pre-quilted, meaning it already has a layer of batting sewn between two layers of fabric, providing instant cushioning and a lovely texture. It’s durable, easy to work with, and comes in countless patterns and colors.
- Outer Fabric (e.g., Canvas, Duck Cloth, Home Decor Fabric): If you prefer to add your own padding, a sturdy outer fabric is key. Canvas, duck cloth, or heavier home decor fabrics are durable and offer good structure.
- Lining Fabric (e.g., Cotton, Flannel): A smooth lining fabric protects your laptop from scratches. Standard quilting cotton or a soft flannel would be ideal. Choose a contrasting color or pattern for an extra pop of style.
Padding and Interfacing: Crucial for Protection
- Fusible Fleece or Batting: If your outer fabric isn’t pre-quilted, you’ll need to add a layer of padding. Fusible fleece is fantastic as it irons onto your fabric, preventing shifting during sewing. Alternatively, a layer of cotton or polyester batting can be used, though it will need to be sewn into place or quilted.
- Foam Interfacing: For maximum protection, especially if your laptop is particularly delicate or you anticipate rough handling, a thin layer of foam interfacing can be incorporated. It provides superior shock absorption.
Closure Options: Securing Your Laptop
- Velcro: Simple, secure, and easy to sew. A strip of Velcro sewn onto the flap and main body provides quick access.
- Magnetic Snaps: These offer a clean, professional finish and are relatively easy to install.
- Buttons and Elastic Loop: A classic, charming option. Sew a button onto the case body and create an elastic loop on the flap to hook over it.
- Zipper: For ultimate security, a zipper closure is a great choice, though it adds a bit more complexity to the sewing process.
Essential Sewing Tools
- Sewing Machine: Any standard sewing machine will work perfectly for this project.
- Fabric Scissors or Rotary Cutter and Mat: Sharp scissors are a must for precise cutting. A rotary cutter with a self-healing mat makes quick work of straight lines.
- Ruler or Measuring Tape: For accurate measurements of your laptop and fabric pieces.
- Fabric Marking Tool: Chalk, a disappearing ink pen, or a regular pencil to mark cutting lines or sewing points.
- Pins or Fabric Clips: To hold fabric layers together securely while sewing.
- Matching Thread: High-quality polyester all-purpose thread that matches or complements your chosen fabric.
- Iron and Ironing Board: Essential for pressing seams and applying fusible interfacing, creating a crisp and professional finish.
Preparing for Your Project: Accurate Measurements and Design Considerations
The key to a perfectly fitting laptop case lies in precise measurements and thoughtful design planning. Before you even think about cutting fabric, take the time to accurately measure your device and decide on the details of your case.
Measuring Your Laptop for a Perfect Fit
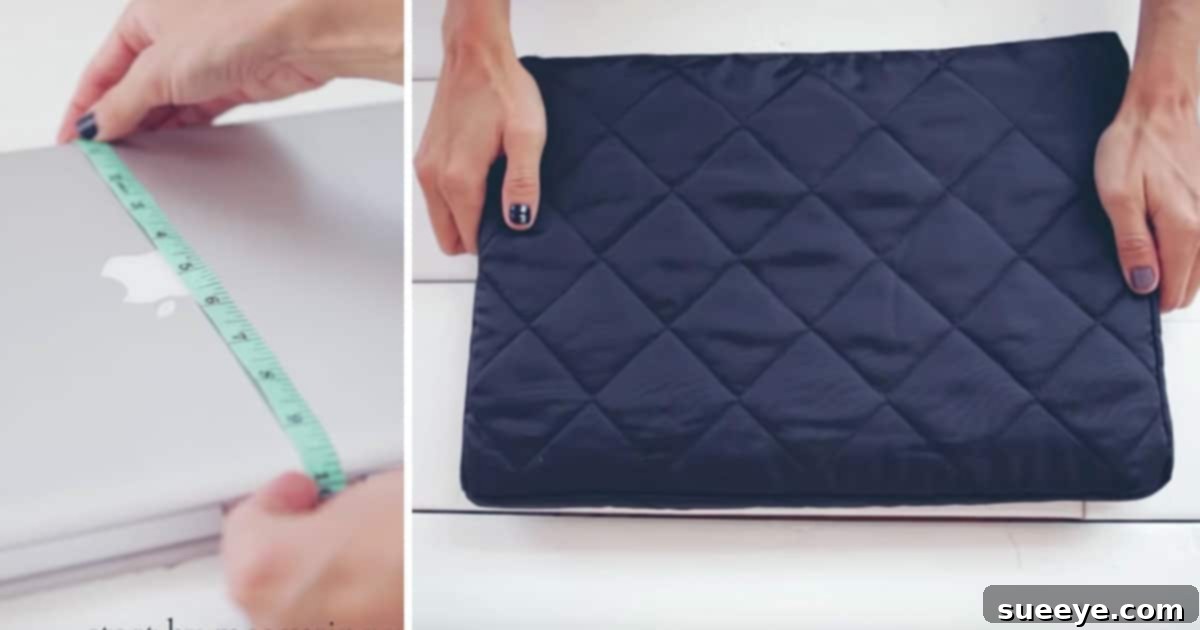
To ensure a snug yet easy-to-insert fit, you’ll need to measure your laptop carefully. Use a flexible measuring tape or a ruler.
- Width: Measure the widest part of your laptop, from left to right.
- Height: Measure the height of your laptop, from top to bottom.
- Thickness: Measure the thickness of your laptop when closed. This is crucial for adding sufficient depth to your case.
Once you have these measurements, you’ll add seam allowances and extra room for ease of use. A good rule of thumb is to add about 1 to 1.5 inches to both the width and height measurements to account for seam allowances (typically 0.5 inches per side) and the laptop’s thickness. For example, if your laptop is 12″ wide, 8″ high, and 0.5″ thick, you might aim for a case that is roughly 13.5″ wide and 9.5″ high before sewing the sides. The thickness of your chosen padding will also influence these allowances – thicker padding requires a little more room.
Design Considerations: Making It Yours
Beyond the basic sleeve, consider these design elements to personalize your case:
- Flap or No Flap: A simple envelope-style flap offers extra security and a classic look. A zipper closure provides maximum security without a flap.
- Added Pockets: Do you need a pocket for your charger, mouse, or a pen? Plan for an exterior or interior pocket early in the design phase.
- Handles or Straps: Will you carry your laptop case as a stand-alone item? Consider adding a simple handle or a detachable strap for versatility.
- Embellishments: Think about decorative stitching, appliqués, contrasting fabric panels, or even simple embroidery to enhance the aesthetic appeal.
A Glimpse at the Sewing Process: Creating Your Laptop Case
While a detailed step-by-step tutorial (like the one originally referenced from Boat People Vintage, which inspired the ease of this particular design) would provide precise instructions, understanding the general flow of the sewing process will help you visualize the project. The beauty of this easy laptop case lies in its straightforward construction, making it accessible even for those with limited sewing experience.
- Cut Your Fabric Pieces: Based on your laptop measurements and desired allowances, you’ll cut rectangular pieces for the outer case, the lining, and any padding. Remember to account for seam allowances on all sides. If you’re adding a flap, cut separate pieces for that as well.
- Prepare Your Outer Fabric and Padding: If using fusible fleece, iron it onto the wrong side of your outer fabric pieces according to the manufacturer’s instructions. If using batting or pre-quilted fabric, simply layer it appropriately.
- Assemble the Outer Case: Place your outer fabric pieces right sides together (with padding if applicable) and sew along the sides and bottom, leaving the top open. Clip corners and turn right side out.
- Assemble the Lining: Repeat the process for your lining fabric. Sew the sides and bottom, leaving the top open. It’s often helpful to leave a small opening in the bottom seam of the lining for turning later.
- Create and Attach the Flap (if applicable): Sew your flap pieces right sides together, turn, and press. Attach the finished flap to the back edge of the outer case’s opening.
- Install Closure: If using a magnetic snap or Velcro, this is usually the best time to attach the components to the flap and corresponding spot on the main outer case before final assembly.
- Join Outer Case and Lining: Insert the outer case (right side out) into the lining (wrong side out), so their right sides are facing each other. Align the top raw edges and sew around the entire top opening, securing the flap in place.
- Turn and Finish: Carefully pull the outer case through the opening you left in the lining’s bottom seam. Once turned right side out, push out all corners and press the top seam neatly. Hand-stitch or machine-stitch the opening in the lining closed.
- Final Touches: Give your new laptop case a final press, and perhaps top-stitch around the opening for a polished look.
This general outline covers the core steps. With good measurements and careful sewing, you’ll quickly create a protective and personalized sleeve for your laptop.
Customization and Embellishment Ideas for Your Unique Laptop Case
Once you’ve mastered the basic laptop case, the real fun begins with customization! This is where you can truly let your creativity shine and make your laptop sleeve an extension of your personal style.
- Pockets Galore: Add an exterior slip pocket for quick access to a pen or notebook, or a zippered pocket for your charger and mouse. Interior pockets can keep small essentials organized.
- Unique Closures: Experiment with different types of closures. Beyond the common Velcro or snap, consider a stylish toggle, a large decorative button with a fabric loop, or even a sleek elastic band that wraps around the entire case.
- Handles and Straps: Transform your sleeve into a mini-briefcase or messenger bag by adding sturdy fabric handles or D-rings for an adjustable shoulder strap.
- Fabric Mixing and Matching: Don’t be afraid to use complementary fabrics for different parts of your case. A patterned outer fabric with a solid contrasting flap, or even a patchwork front, can create a striking effect.
- Embroidery and Appliqués: Personalize your case with hand-stitched embroidery, your initials, or fun fabric appliqués of shapes, animals, or abstract designs.
- Decorative Stitching: Use a contrasting thread color and experiment with decorative stitches available on your sewing machine to add texture and visual interest to your seams or flap edge.
Caring for Your Handmade Laptop Case
To ensure your beautiful, handmade laptop case lasts as long as your laptop (and beyond!), proper care is essential. The cleaning instructions will largely depend on the type of fabric you used.
- Spot Cleaning: For minor spills or marks, spot clean immediately with a damp cloth and a mild soap. Gently blot the area, then dab with a clean, damp cloth to rinse.
- Machine Washing (for most cottons): If your case is made from washable cottons (like quilting cotton, canvas), you can usually machine wash it on a gentle cycle with cold water. It’s best to air dry flat to maintain its shape and prevent shrinking or distortion of the padding. Avoid harsh detergents or bleach.
- Delicate Fabrics: If you’ve used delicate fabrics, wool, or faux leather, hand washing or even dry cleaning might be necessary. Always check the care instructions for your specific fabric if unsure.
- Avoid Over-Washing: Frequent washing can wear down fabrics and padding. Only wash when necessary to prolong the life of your case.
Conclusion: Crafting Protection, Style, and Savings
Creating your own laptop case is a profoundly rewarding project. It’s an opportunity to blend practicality with personal style, all while enjoying the immense satisfaction that comes from making something beautiful and functional with your own two hands. From saving significant money on store-bought alternatives to ensuring bespoke protection perfectly tailored for your device, the benefits are clear.
This easy sewing project, inspired by the simplicity and charm of designs seen from crafters like Boat People Vintage, proves that you don’t need to be an expert seamstress to achieve professional-looking results. In just about 20 minutes and for a mere $6, you can craft a durable, stylish, and utterly unique laptop sleeve that perfectly complements your new tech. So, gather your chosen fabrics, fire up your sewing machine, and get ready to protect that expensive laptop in a way that truly reflects your creativity. Happy sewing!