
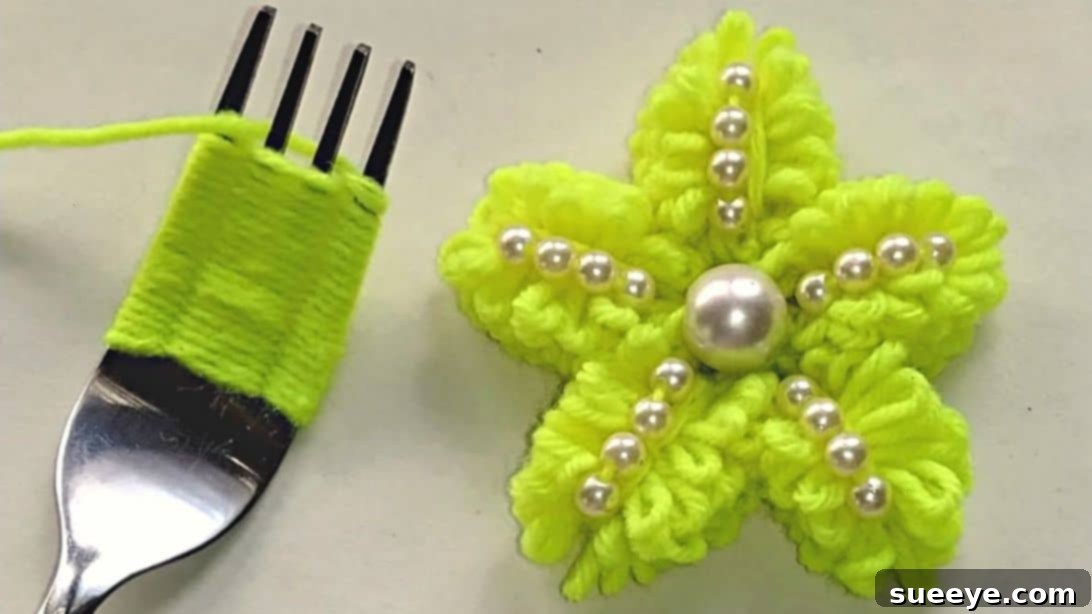
Delightful woolen projects offer a fantastic way to unleash your creativity, and they are surprisingly simple to master. Among the numerous crafting techniques available, the “fork method” stands out as a particularly enjoyable and accessible option. What makes it so appealing? Primarily, its sheer ease and convenience. There’s no need to hunt for specialized tools; a common kitchen fork is all you need, making this a truly household-friendly craft. This enchanting little project allows you to transform simple yarn into beautiful, intricate flowers, perfect for embellishing your home, gifts, or even your apparel. This wonderful guide is inspired by the creative brilliance of Aachees World on YouTube, who demonstrates just how magical a simple fork and some yarn can be.
Whether you’re a seasoned crafter looking for a quick and satisfying project or a beginner eager to dive into the world of yarn crafts, creating woolen flowers with a fork is an excellent choice. It’s a meditative process that yields impressive results, adding a touch of handmade charm to anything it adorns. Let’s gather our materials and embark on this creative journey to craft charming yarn flowers that will bring warmth and beauty into your world.
Essential Materials for Your Woolen Flower Project
Before we begin transforming simple strands of yarn into beautiful floral creations, let’s ensure we have all the necessary tools and supplies at hand. The beauty of this project lies in its minimal material requirements, making it an incredibly affordable and accessible craft for everyone.
- Woolen Yarn: The star of our project! Choose a yarn that is soft, easy to work with, and in a color that inspires you. Different yarn weights and textures can produce varied effects, so feel free to experiment. A medium-weight yarn (like DK or worsted weight) is generally recommended for beginners, as it’s neither too thin nor too bulky, making it easier to handle and see your stitches.
- Standard Kitchen Fork: Your primary crafting tool! Any standard four-tine dinner fork will do. The spacing of the tines is crucial for creating the perfect petal size, so a typical fork works best.
- 4 Small Beads: These will form the delicate center embellishments of your flower. Opt for beads that complement your yarn color and are small enough to be easily threaded onto the yarn with an embroidery needle. Seed beads or small glass beads work wonderfully.
- 1 Large Bead: This will be the prominent central feature of your completed flower, providing a focal point and adding a touch of elegance. Select a bead that is larger than your small beads, perhaps a different color or material, to create a striking contrast.
- Embroidery Needle: Essential for threading yarn through the intricate parts of your project and adding the beads. Choose a needle with an eye large enough to accommodate your chosen yarn comfortably. A tapestry needle or a large-eyed blunt needle also works well.
Having these materials ready will ensure a smooth and enjoyable crafting experience. Now, let’s move on to the step-by-step instructions and discover how effortlessly you can create these charming woolen flowers.
Step-by-Step Guide to Crafting Your Woolen Flowers
Creating these lovely yarn flowers is a rewarding process. Follow these detailed steps carefully, and you’ll soon have a collection of beautiful handmade blooms.
Step 1: Mastering the Fork Weaving Technique
The first and most crucial step involves setting up your yarn on the fork to form the base of your flower’s petals. This weaving pattern might seem a bit intricate at first, but with a little practice, it becomes quite intuitive. Let’s orient ourselves with the fork’s structure for clarity.
Imagine your fork’s tines (the prongs) are numbered from left to right: the leftmost tine is the “1st point,” followed by the “2nd,” “3rd,” and “4th” points. The spaces between these tines are your “slots”: the gap between the 1st and 2nd tines is the “left slot,” between the 2nd and 3rd is the “center slot,” and between the 3rd and 4th is the “right slot.”
- Initial Setup: Begin by taking the end of your woolen yarn. Hold this end firmly against the back of the fork’s neck (the part connecting the tines to the handle). This will secure your starting point.
- First Loop: Pull the yarn upwards, over the top of the fork, and guide it into the “left slot” (between the 1st and 2nd tines).
- Through the Back: From the back of the fork, bring the yarn forward again, passing it through the “left slot” once more. This creates a loop around the 1st tine.
- Across the Middle: Now, pull the yarn across the top of the fork, over both the 2nd and 3rd tines. Guide it down into the “right slot” (between the 3rd and 4th tines).
- Back Around: From the back of the fork, bring the yarn forward through the “right slot.” This completes a loop around the 4th tine.
- The Repeating Pattern: You’ve now established the basic pattern. To continue, pull the yarn across the top, over the 4th tine, then over to the “left slot,” and finally over the 1st tine. You’re essentially creating a figure-eight or infinity symbol pattern around the outer tines (1st and 4th) while crossing over the inner tines (2nd and 3rd).
- Repeat and Build: Continue repeating this exact pattern—pulling the yarn from the back of the “left slot” over the 2nd and 3rd tines into the “right slot,” then from the back of the “right slot” over the 4th tine and back to the “left slot” over the 1st tine. Work your way up the tines, pushing the loops down gently as you go, until your woven yarn reaches the very end tip of the fork tines. The goal is to create a dense, layered structure that will eventually form the petals. Ensure you maintain a consistent, medium tension throughout this process – too tight and it will be hard to remove, too loose and your flower will lack definition.
Remember, patience is key. If your first few attempts don’t look perfect, simply unravel and try again. You’ll quickly get a feel for the rhythm of the weaving.
Step 2: Securing the Petal Base and Adding Embellishments
Once you’ve densely packed the fork with your woven yarn, creating the robust foundation for your petals, it’s time to secure this structure and begin adding the decorative elements. This step transforms the woven yarn into a recognizable petal unit.
- Thread the Needle: Take the working end of your yarn (the one you’ve been weaving with) and thread it onto your embroidery needle. Make sure you have a tail long enough to work with comfortably.
- Initial Stitch (Underneath): Carefully insert the needle from the back of the fork, underneath all the woven yarn loops at the very bottom of the “center slot” (between the 2nd and 3rd tines). Pull the yarn through, ensuring it captures all the loops at this point.
- Bringing Yarn Upwards: Now, bring the yarn up and over the top part of the “center slot.” This means your yarn is now looping over the woven structure, essentially cinching it in the middle.
- Second Stitch (Underneath Again): Pull the yarn downwards and insert the needle under the bottom of the “center slot” again, just as you did before. This reinforces the central cinching and creates a sturdy base for your embellishments. Pull the yarn to the front of the fork.
- Adding Small Beads: While the yarn is at the front, carefully thread your four small beads onto the yarn. Slide them down until they rest against the woven yarn on the fork. These beads will form a charming clustered center.
- Final Secure Stitch: After adding the beads, pull the yarn upwards and then insert the needle under the “center slot” for the very last time. This stitch locks the beads in place and further secures the petal structure. Pull the yarn gently.
- Creating the Loop for Knotting: Now, pull the yarn and insert it under the loop you just created where the beads are situated. This creates a small loop.
- Finishing the Back Loop: Insert the needle under the bottom of the center slot again, pull it through to the back of the fork. Then, carefully insert the needle through the loop at the back of the woven structure. This helps to further gather and secure the central part of your petal.
- Tie and Trim: Finally, tie a secure double knot at the ends of the yarn, bringing the working yarn end together with the initial short tail you held at the back of the fork’s neck. Trim any excess yarn close to the knot. This completes one individual petal unit.
Take your time with the bead placement and knot tying to ensure everything is secure and aesthetically pleasing. A well-tied knot is essential for the longevity of your flower.
Step 3: Assembling Your Woolen Flower and Final Touches
With individual petal units now complete, the exciting part begins: assembling them into a beautiful, multi-petaled flower. This step brings all your hard work together into a cohesive design.
- Gently Remove from Fork: Carefully slide the woven yarn structure off the fork. Be gentle to avoid unraveling or distorting its shape. You should now have a distinct petal-like shape with a cinched center and beads.
- Create Multiple Petals: To form a full flower, you’ll need multiple individual petal units. Repeat Steps 1 and 2 until you have a total of 5 pieces. You can choose to make all petals the same color for a classic look, or experiment with different yarn colors for a vibrant, multi-hued flower.
- Joining the Petals: To assemble the flower, take a fresh piece of woolen yarn (about 12-18 inches long, depending on your comfort). Thread this yarn through the bottom, gathered section of each individual petal. Arrange the 5 petals in a circular fashion, making sure the cinched, beaded sides are facing outwards to form the flower’s ‘face’.
- Cinch and Secure: Once all 5 petals are threaded onto the new piece of yarn, pull the yarn tightly. This action will draw the bases of the petals together, forming the circular shape of your flower. As you pull, ensure the petals sit neatly next to each other and aren’t twisted. If they do twist, gently adjust them by hand so they are properly aligned and form a symmetrical flower shape. Tie a secure double knot at the ends of this joining yarn to lock the petals firmly in place. Trim any excess yarn.
- Adding the Central Embellishment: Now for the finishing touch! Take your large bead and thread it onto another piece of yarn, or use one of the existing yarn tails from tying the petals together. Position the large bead in the very center of the assembled flower. Using your embroidery needle, carefully sew the large bead securely to the center, passing the needle through the gaps between the petals and ensuring it’s firmly attached. Make several stitches for durability and tie off the yarn at the back of the flower.
Congratulations! You’ve just created a beautiful woolen flower. Each flower you make will have its own unique charm, a testament to your personal touch and creativity.
*All these images are credited to Aachees World via YouTube. Give his channel a visit and subscribe for more inspiring DIY projects!
Why Choose the Fork Method for Yarn Flowers?
In the vast world of yarn crafts, many techniques exist for creating decorative elements like flowers. However, the fork method stands out for several compelling reasons, making it an ideal choice for both beginners and experienced crafters alike.
- Unmatched Accessibility: The primary advantage is its universal accessibility. Unlike specialized crafting tools, a common kitchen fork is readily available in almost every household. This eliminates the need to purchase expensive or hard-to-find equipment, allowing anyone to start crafting immediately.
- Simplicity for Beginners: The weaving technique, while requiring a bit of initial coordination, is fundamentally simple and repetitive. It’s much less daunting than learning complex crochet stitches or knitting patterns, making it perfect for those new to yarn crafts. The clear, defined tines of the fork provide an excellent guide, helping maintain consistent tension and shape.
- Speed and Efficiency: Once you get the hang of the weaving pattern, you’ll find that individual petal units can be created remarkably quickly. This efficiency is great for making multiple flowers for larger projects like garlands or decorative wraps, allowing you to build a collection of blooms in a short amount of time.
- Consistent Results: The structure of the fork naturally guides your yarn, helping to create consistently sized and shaped petals. This leads to more uniform and professional-looking finished flowers, even for novices.
- Low Cost, High Impact: Beyond the fork, the only other significant material is yarn. You can use scraps from other projects, making this an excellent way to use up leftover yarn and reduce waste. The resulting flowers look far more intricate and expensive than the minimal resources required to create them.
- Versatile and Customizable: While the core method remains the same, the outcome can be varied significantly by changing yarn colors, textures, and the types of beads used. This versatility allows for endless creative possibilities, ensuring that each flower you make can be truly unique.
In essence, the fork method democratizes yarn flower crafting, making it an enjoyable, low-barrier entry point into the world of handmade decorations.
Tips for Success and Creative Customization
To ensure your woolen flower crafting experience is as enjoyable and successful as possible, here are some additional tips and ideas for personalizing your creations:
- Yarn Choice Matters: While most woolen yarns will work, consider their properties. Acrylic yarns are affordable and come in a vast array of colors, while wool yarns offer a natural, cozy texture. Variegated yarns (those with multiple colors in one strand) can create stunning, multi-toned flowers without needing to change yarn colors manually. Experiment with different yarn weights too – thinner yarns will yield more delicate flowers, while bulkier yarns create more substantial blooms.
- Maintain Consistent Tension: This is crucial for uniform petals. Try to keep the yarn neither too tight (which can distort the fork tines and make removal difficult) nor too loose (which results in a floppy, ill-defined petal). A gentle, even tension is ideal.
- Practice Makes Perfect: Don’t get discouraged if your first petal isn’t perfect. The weaving technique becomes second nature after a few attempts. Consider making a few practice petals to get a feel for the process before committing to your final flower.
- Color Combinations: Be adventurous with your color palettes! Monochromatic flowers (different shades of the same color) offer elegance, while complementary or contrasting colors can create vibrant, eye-catching designs. Consider the end use of your flower when choosing colors.
- Bead Variations: Instead of standard round beads, try using crystal beads for a touch of sparkle, pearl beads for classic elegance, or even small buttons for a whimsical feel. The large central bead can also be a unique focal point – perhaps a faceted bead or a decorative button.
- Add Greenery: To make your flowers even more realistic, consider adding small felt leaves or creating simple yarn leaves (perhaps using a similar fork weaving technique or finger knitting) and attaching them to the back of your finished flower.
- Flower Size Experimentation: While a standard dinner fork is recommended, you might try forks with different tine spacings (e.g., salad forks, larger serving forks) to see how it alters the size of your petals. This can help you create a variety of flower sizes.
- Troubleshooting Tangled Yarn: If your yarn starts to tangle while weaving, stop, unravel a bit, and smooth it out. Working with smaller lengths of yarn (say, 2-3 feet at a time) can prevent excessive tangling.
By keeping these tips in mind, you’ll not only master the technique but also discover endless ways to personalize and elevate your woolen flower creations.
Creative Uses for Your Handmade Woolen Flowers
Once you’ve perfected the art of making these adorable woolen flowers, you’ll find that their uses are limited only by your imagination. Here are some fantastic ideas to inspire you:
- Home Decor Accents:
- Vases and Arrangements: Group a few flowers together and place them in a small vase for a charming, everlasting floral display.
- Garlands: String multiple flowers together to create a beautiful garland that can adorn mantels, doorways, or children’s rooms.
- Cushions and Pillows: Sew a flower onto a plain cushion cover to add texture and a pop of color.
- Curtain Tie-Backs: Attach a flower to a ribbon or a strip of fabric to create decorative tie-backs for curtains.
- Wall Art: Mount a collection of different-sized and colored flowers onto a canvas or frame for a unique piece of textile art.
- Fashion and Accessories:
- Hair Accessories: Glue or sew a flower onto a bobby pin, hair clip, or headband for a lovely, custom hair accessory.
- Brooches and Pins: Attach a pin back to the reverse of a flower to create a charming brooch for jackets, sweaters, or bags.
- Hats and Scarves: Embellish plain hats or scarves with a few strategically placed woolen flowers for a personalized touch.
- Jewelry: Smaller flowers can be incorporated into necklaces or statement earrings.
- Gift Embellishments:
- Gift Wrapping: Instead of a traditional bow, use a handmade woolen flower to adorn a gift package. It adds a personal and thoughtful touch.
- Gift Tags: Attach a small flower to a gift tag for an extra special detail.
- Handmade Cards: Glue a flat-backed flower onto the front of a greeting card for a unique, dimensional design.
- Practical Applications:
- Keychains: Securely attach a flower to a keychain ring for a soft, colorful identifier.
- Bookmarks: Attach a flower to a ribbon to create a lovely, personalized bookmark.
- Fridge Magnets: Glue a small magnet to the back of a flower for a charming fridge decoration.
These woolen flowers are not just crafts; they are expressions of creativity that can brighten up any space or item. They make thoughtful, personalized gifts and are a wonderful way to add a touch of handmade warmth to your everyday life.
Caring for Your Handmade Yarn Flowers
To ensure your beautiful woolen flowers remain vibrant and intact for years to come, a little care goes a long way. Since they are primarily decorative, they generally don’t require rigorous cleaning, but it’s good to know how to maintain them.
- Dusting: Over time, dust can accumulate on your yarn flowers, especially if they are displayed openly. Gently dust them using a soft brush, a can of compressed air (held at a distance), or a lint roller on a very light setting.
- Spot Cleaning: If a flower gets a small smudge or stain, avoid submerging it in water. Instead, use a damp cloth with a tiny drop of mild soap (like baby shampoo) to gently dab the affected area. Blot dry immediately with a clean, dry cloth. Ensure it’s thoroughly dry to prevent mildew.
- Avoid Harsh Chemicals: Do not use bleach, strong detergents, or chemical cleaners, as these can damage the yarn fibers and alter the color.
- Reshaping: If your flower becomes slightly misshapen, you can gently reshape it with your fingers. For more stubborn cases, you can lightly mist it with water (if the yarn type allows for it without bleeding colors) and then reshape it while it dries.
- Storage: If storing your flowers, keep them in a clean, dry place away from direct sunlight, which can cause colors to fade. A breathable fabric bag or a box will protect them from dust and getting crushed.
- Pet and Children Safety: If using the flowers in areas accessible to pets or small children, ensure all beads are very securely sewn on, as loose beads can be a choking hazard.
By following these simple care instructions, your handmade woolen flowers will continue to bring joy and beauty to your surroundings for a very long time.
Embrace the Joy of Fork Weaving
Crafting woolen flowers using a simple fork is a truly delightful and accessible journey into the world of handmade creations. From the satisfying rhythm of weaving yarn around the tines to the magical moment when individual petals unite to form a beautiful bloom, every step is infused with creative joy. This project not only yields charming decorative pieces but also offers a wonderful opportunity to unwind, practice mindfulness, and discover the hidden crafter within you.
We’ve explored everything from selecting the perfect yarn and mastering the unique fork weaving technique to assembling your multi-petaled masterpieces and finding creative ways to display them. Remember, the beauty of handmade items lies in their imperfections and individuality. Don’t be afraid to experiment with different yarn colors, textures, and bead types. Each flower you create will be a unique testament to your creativity and a charming addition to your home or a thoughtful gift for a loved one.
So, grab a fork, pick your favorite yarn, and let your imagination blossom. The world of woolen flowers awaits!