
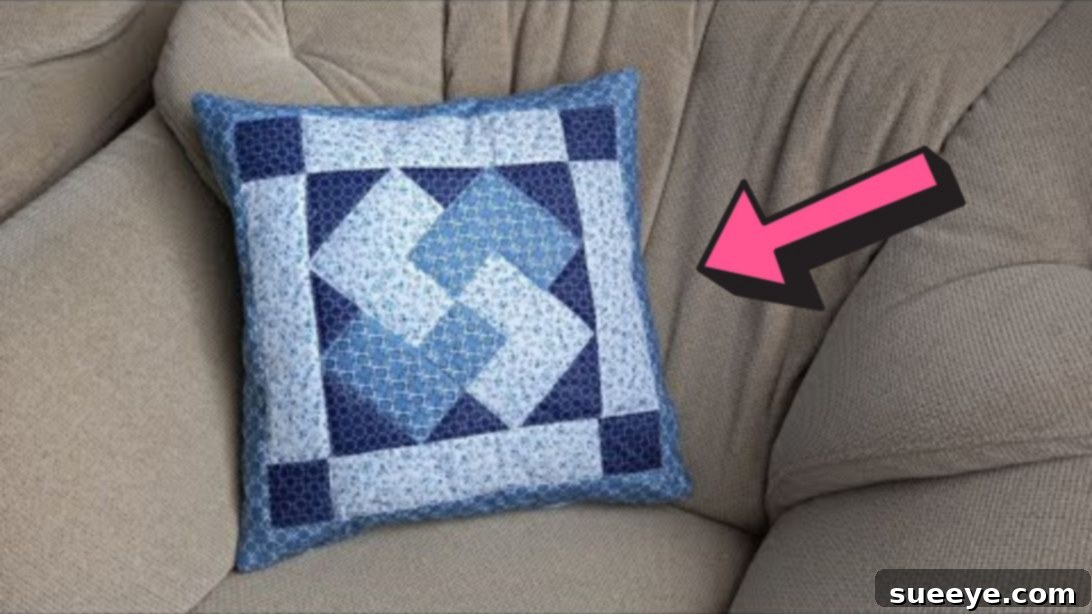
Mastering the Card Trick Patchwork Pillowcase: A Comprehensive Sewing Guide
Transform your living space with a touch of handmade elegance! The Card Trick Patchwork Pillowcase is not just a sewing project; it’s an opportunity to create a stunning focal point that reflects your unique style and craftsmanship. This captivating design, popularized by talented creators like Shveyniy ugolok s Ludmiloy Zardinovoy on YouTube, appears intricate yet is surprisingly accessible, even for those with moderate sewing experience. Imagine the vibrant colors and geometric precision of this block adorning your sofa or bed – it’s a true conversation starter. Beyond pillowcases, the versatile Card Trick block can be adapted for an array of textile projects, including charming table runners, cozy bedsheets, stylish wall hangings, or unique napkins. This comprehensive tutorial will guide you through each step, ensuring you achieve a professional and beautiful finish.
Patchwork sewing is an age-old craft that combines small pieces of fabric into a larger design, creating a unique visual narrative. The Card Trick pattern, in particular, is renowned for its optical illusion, giving the impression of overlapping cards or a clever three-dimensional effect. This tutorial breaks down the complexity into manageable steps, making the journey from fabric scraps to a finished masterpiece both enjoyable and rewarding. You’ll not only learn how to construct this specific pillowcase but also gain valuable quilting and sewing techniques that can be applied to countless future projects. Prepare your sewing machine, gather your fabrics, and let’s embark on this creative adventure together!
Materials for Your Card Trick Pillowcase
Precision is key in patchwork, so ensure your fabric pieces are cut accurately to the specified dimensions. Choosing high-quality, pre-shrunk cotton fabrics will yield the best results and ensure your pillowcase stands the test of time. Select colors that complement your existing decor or dare to experiment with bold, contrasting hues to make your Card Trick truly pop.
- White Squares (A): 2 pieces, 2.95″ x 2.95″
- Blue Squares (B): 2 pieces, 2.95″ x 2.95″
- White Strips (C): 2 pieces, 2.95″ x 5.12″
- Blue Strips (D): 2 pieces, 2.95″ x 5.12″
- Dark Blue Square (E): 1 piece, 6.10″ x 6.10″
- Dark Blue Square (F): 1 piece, 4.9″ x 4.9″
- White Strips (G): 4 pieces, 10.4″ x 2.95″
- Dark Blue Squares (H): 4 pieces, 2.95″ x 2.95″
- Blue Strips (I): 2 pieces, 14.96″ x 2.76″
- Blue Strips (J): 2 pieces, 19.49″ x 2.76″
- Batting: Sufficient size for your pillowcase front (approximately 20″ x 20″ or larger)
- Backing Fabric: Sufficient size for your pillowcase front (approximately 20″ x 20″ or larger)
- Pillow Insert: To complete your pillowcase, ensure you have an appropriately sized pillow insert (e.g., 18″ x 18″ or 20″ x 20″ depending on your desired final pillow size).
- Zipper (optional): For a professional closure, choose a zipper approximately 16-18 inches long.
Essential Sewing Tools
Having the right tools makes all the difference in achieving precise and clean patchwork. Before you begin, gather these essentials:
- Sewing Machine: A reliable machine with a quarter-inch foot attachment is highly recommended for accurate seam allowances.
- Rotary Cutter, Mat, and Ruler: Indispensable for precise and efficient fabric cutting.
- Iron and Ironing Board: Crucial for pressing seams open or to one side, which helps blocks lie flat and match up perfectly.
- Fabric Scissors: For trimming threads and other cutting tasks.
- Matching Thread: High-quality polyester or cotton thread that blends with your fabric colors.
- Seam Ripper: For those inevitable moments when a stitch needs to be undone.
- Fabric Clips or Pins: To hold fabric pieces securely in place before sewing.
Fabric Preparation: The Foundation of Success
Proper fabric preparation is fundamental to a successful patchwork project. It prevents distortion and ensures your finished pillowcase maintains its shape and beauty over time.
- Pre-wash and Dry Fabrics: Always pre-wash and dry all your fabrics before cutting. This prevents potential shrinkage and color bleeding after your project is complete, ensuring your pillowcase remains vibrant and perfectly sized.
- Press Fabrics: Once dry, thoroughly press all your fabrics to remove any wrinkles or creases. Flat, smooth fabric is much easier to cut accurately.
- Accurate Cutting: Using a rotary cutter, mat, and ruler, meticulously cut each fabric piece to the exact dimensions specified in the materials list. Precision at this stage will save you headaches later when assembling the block. Double-check all measurements before making your cuts.
- Organize Your Pieces: Label or organize your cut pieces (A, B, C, etc.) to avoid confusion during the assembly process. This will streamline your workflow and prevent errors.
Step-by-Step Instructions: Crafting Your Card Trick Pillowcase
Step 1: Constructing the Core Four-Patch Unit
Begin by creating the central four-patch unit that forms the heart of your Card Trick block. Take one square from set A (white) and one from set B (blue). Place them side-by-side. Then, take the remaining two squares (one A and one B) and place them below the first pair, but with their positions exchanged (e.g., if the top row is A-B, the bottom row would be B-A). This creates a checkerboard effect. Carefully align these four squares with right sides together for each pair, then sew them together with a precise 1/4-inch seam allowance along the edges. After sewing, press the seams open or to one side to reduce bulk. Trim the resulting block to a perfect 5.12″ by 5.12″ square, ensuring all corners are crisp and square. This initial accuracy is vital for the overall block construction.
Step 2: Preparing the Corner Triangles from E and F Fabrics
For this step, you will be transforming your square fabrics E and F into the triangles that will create the dynamic “card” effect. Take your 6.10″ dark blue square (E) and place it on your cutting mat. Using your ruler and rotary cutter, cut it diagonally from corner to corner in one direction, then repeat the cut diagonally in the opposite direction. This will yield four equilateral triangles from fabric E. Repeat the same process for your 4.9″ dark blue square (F), also cutting it diagonally twice to produce four triangles. These triangles will be strategically placed to give the illusion of cards tucked into the corners and sides of the central block.
Step 3: Assembling the First Layer of the Card Trick Block
Now, let’s bring the core block to life. Take the 5.12″ x 5.12″ square you created in Step 1. This is your central unit. From fabric C (white strips), place one strip on the left side of the central block and another on the right side. From fabric D (blue strips), place one strip along the top edge and another along the bottom edge of the central block. These strips will frame your center. Next, take the four smaller triangles you cut from fabric F in Step 2; these will form the corners of this initial square. Carefully place one F triangle onto each corner of the current assembly, aligning the raw edges. For the remaining four triangles (from fabric E), position one on the top, one on the bottom, one on the left side, and one on the right side of the block, filling the gaps. Pin all pieces securely. Now, carefully sew these strips and triangles to the central block and to each other, working one side at a time. Press seams as you go, ensuring a flat and tidy finish.
Step 4: Adding the Border Strips and Corner Squares
With the core Card Trick block now assembled, it’s time to expand it with an additional border. Take the four pieces of white strips (G) and position one along each of the four sides of your current block. Next, take the four dark blue squares (H) and place one at each corner, where the G strips meet. These squares will add visual weight and further define the block. Carefully align these pieces with right sides together, pinning them securely along all edges. Stitch them into place with a 1/4-inch seam allowance. Once sewn, press all seams meticulously to ensure the block lays flat and square. Trim off any excess fabric or threads to neaten the edges, preparing for the final borders.
Step 5: Attaching the Final Borders (I and J Strips)
To give your pillowcase front its final dimensions and a polished frame, you’ll attach the last set of border strips. First, take the two blue strips from set I (14.96″ x 2.76″) and sew one to each of the opposing sides of your patchwork block (e.g., left and right). After sewing, press the seams. Then, rotate your piece so that the newly added blue strips are now at the top and bottom. Next, take the two longer blue strips from set J (19.49″ x 2.76″) and sew one to each of the remaining unadorned sides. This method ensures that your borders are evenly distributed and that the overall block remains square. Press these final seams neatly. Your complete Card Trick patchwork top is now finished and ready for quilting!
Step 6: Quilting, Finishing, and Assembling the Pillowcase
With your patchwork top complete, it’s time to add batting and backing to create a sturdy and comfortable pillowcase. Lay your backing fabric right side down, then place your batting on top. Finally, carefully center your patchwork top, right side up, on top of the batting. Pin or baste all three layers together to prevent shifting during quilting. Begin quilting by stitching along the edges of each patchwork piece, or create a free-motion design if you prefer. This quilting step adds texture, durability, and ensures the layers stay together. Once quilted, trim off any excess batting and backing fabric, squaring up your pillow front. For the back of the pillowcase, you can create an envelope style closure or, for a more professional finish, install a zipper. Once the back is prepared, place the pillow front and back right sides together, pin carefully, and sew along the edges, leaving an opening if using an envelope closure, or sewing all around if the zipper is already integrated. Clip the corners, turn right side out, and admire your beautifully crafted Card Trick Patchwork Pillowcase!
Tips for a Flawless Finish
- Consistent Seam Allowance: A precise 1/4-inch seam allowance is crucial for patchwork. Invest in a 1/4-inch presser foot for your sewing machine if you don’t already have one.
- Pressing is Key: Pressing seams after each step, rather than ironing, helps to flatten the fabric without stretching and ensures your blocks remain square. Decide whether to press seams open or to one side and maintain consistency.
- Sharp Tools: Use a sharp rotary cutter blade and good quality pins/clips. Dull blades can pull fabric and lead to inaccurate cuts.
- Chain Piecing: For steps involving many small pieces, consider chain piecing to save time and thread. Sew pieces continuously without lifting the presser foot between sections, then cut them apart.
- Test Stitches: Before sewing your actual pieces, do a test stitch on a scrap of fabric to check your tension and stitch length.
- Don’t Rush: Patchwork is a meditative process. Take your time, enjoy each step, and accuracy will naturally follow.
Unleash Your Creativity: Project Variations
The Card Trick block is incredibly versatile! Once you’ve mastered the pillowcase, consider these exciting variations:
- Quilt Blocks: Make multiple Card Trick blocks and join them together to create a stunning throw quilt or even a full-sized bed quilt.
- Table Runner: A row of two or three Card Trick blocks, bordered with coordinating fabric, makes an exquisite table runner.
- Tote Bag Panel: Use a single Card Trick block as the central panel for a unique and stylish tote bag.
- Wall Hanging: Frame a Card Trick block with decorative borders and add a hanging sleeve for a striking piece of textile art.
- Cushion Set: Create a collection of Card Trick pillowcases in varying color schemes to add dynamic interest to your sofa.
Caring for Your Handmade Pillowcase
To ensure your beautiful Card Trick Patchwork Pillowcase lasts for years to come, follow these simple care guidelines:
- Machine Wash Cold: Use a gentle cycle with cold water to prevent shrinking and preserve fabric colors.
- Mild Detergent: Opt for a mild, color-safe detergent.
- Tumble Dry Low or Air Dry: Tumble dry on a low setting or, for best results, air dry flat to prevent wrinkles and maintain shape.
- Iron as Needed: If wrinkles persist, iron on a low-to-medium heat setting, using a pressing cloth if necessary.
- Avoid Bleach: Do not use bleach, as it can damage fabric fibers and fade colors.
Your Handmade Card Trick Patchwork Masterpiece Awaits
Congratulations on embarking on and completing your Card Trick Patchwork Pillowcase! This project is more than just sewing; it’s a journey into the art of quilting, a testament to your patience, precision, and creativity. The resulting pillowcase is a beautiful, handcrafted item that adds warmth and personality to any room, and a source of immense satisfaction knowing you made it yourself. Remember, practice makes perfect, and every stitch contributes to your growing skill set. Don’t hesitate to experiment with different color palettes and fabric textures to make each Card Trick creation truly your own. Share your finished project with fellow crafters, inspire others, and continue to explore the endless possibilities of textile artistry. Happy sewing!