
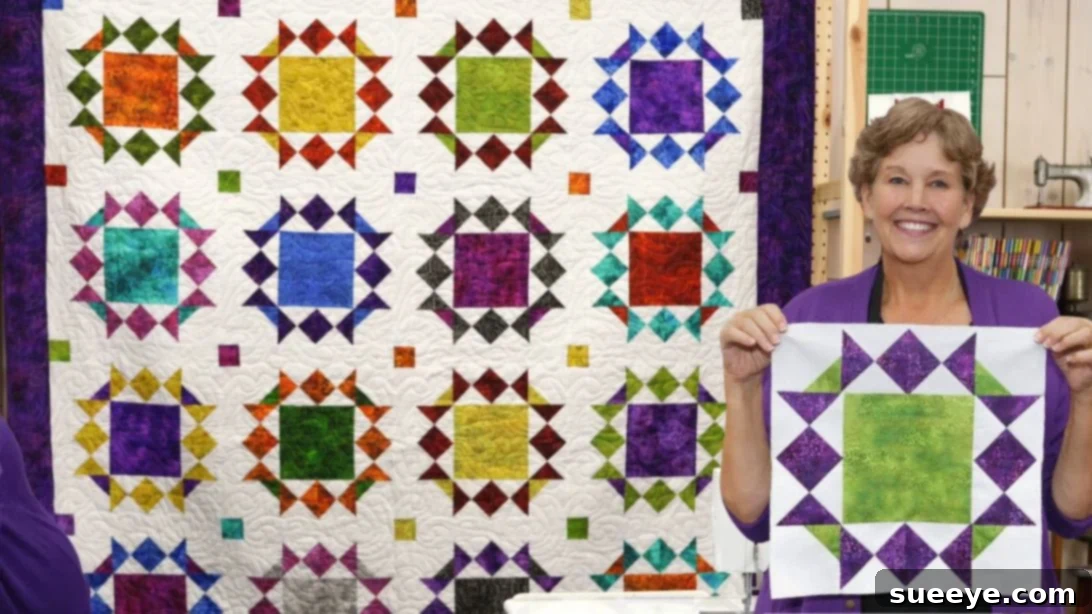
Embark on a delightful quilting journey with the mesmerizing Hourglass Wreath Quilt, a stunning design brought to life by the imaginative mind of Jenny Doan from Missouri Star Quilt Company. If you’ve ever admired a quilt that looks like a blooming flower from afar, this is the pattern for you. It’s a project that combines playful design with satisfying construction, making it an excellent choice for quilters looking for their next creative endeavor. This tutorial will guide you through creating a visually captivating quilt that not only enhances your space but also allows you to master fundamental quilting techniques with ease.
The Hourglass Wreath Quilt is renowned for its charming aesthetic and surprisingly straightforward assembly. At its core, this design leverages the efficient “Magic 8 method” to create a multitude of half-square triangles (HSTs) quickly and accurately. These HSTs are then cleverly transformed into hourglass blocks, which are the building blocks for the elegant wreath motif. Whether you’re a seasoned quilter or just starting out, Jenny Doan’s expert guidance ensures a smooth and enjoyable experience, leading to a beautiful finished piece that you’ll be proud to display or gift.
Why You’ll Love Crafting the Hourglass Wreath Quilt
There’s something uniquely satisfying about watching a quilt block come to life, and the Hourglass Wreath pattern offers an extra layer of visual intrigue. Its unique layout creates an optical illusion, where individual hourglass blocks merge to form a continuous, flowing wreath or a beautiful floral design, depending on your fabric choices. This quilt is not just a collection of fabric squares; it’s a piece of art that invites admiration and adds warmth to any home. Its versatility also shines through; by simply changing your fabric prints and colors, you can adapt this pattern to any season, holiday, or personal aesthetic, making it an endlessly customizable project.
Beyond its aesthetic appeal, this project is also a fantastic way to hone your quilting skills. The repetition of creating HSTs and hourglass blocks builds precision and confidence, while the assembly process teaches valuable layout and piecing techniques. Plus, the “Magic 8 method” is a game-changer for efficiency, allowing you to generate eight HSTs from just two squares, saving you considerable time and effort. This makes the project feel less daunting and more achievable, even for those with limited time.
Mastering the Hourglass Block: A Foundation for Stunning Quilts
The hourglass block, also known as the “quarter-square triangle” (QST), is a fundamental and versatile quilting unit. It consists of two contrasting triangles that meet at their points in the center, creating an ‘X’ or hourglass shape. When many of these blocks are arranged together, they can form dynamic secondary patterns, such as the beautiful wreath we are creating today. This tutorial will focus on a smart method to produce these blocks efficiently.
Central to this pattern is the “Magic 8 method” for Half-Square Triangles. This technique is a quilter’s best friend, allowing you to create eight perfectly sized HSTs from just two larger squares. It’s incredibly efficient, reduces cutting time, and minimizes fabric waste, making the initial stages of your quilt assembly much faster and more enjoyable. Once you’ve mastered the Magic 8 method for HSTs, converting them into hourglass blocks becomes a simple, yet satisfying, next step.
Gather Your Quilting Essentials: Hourglass Wreath Quilt Materials
To embark on this exciting quilting adventure, gather the following high-quality materials. Using pre-cut fabrics, such as 10-inch squares (often called Layer Cakes), can significantly streamline your preparation process, allowing you to jump straight into the fun of piecing.
- 1 pack of 10″ print squares: These will form the colorful, intricate designs of your hourglass blocks. Choose a variety of prints that complement each other for a cohesive yet dynamic look.
- 1 pack of 10″ background squares: Opt for a solid or subtle print that contrasts well with your print squares. White, cream, or a light gray often work beautifully to make the colored blocks pop.
- 1 1/2 yards of background fabric: This fabric will be used for additional background elements and potentially for sashing or borders, providing balance and cohesion to your design.
- 1 1/2 yards of border fabric: Select a fabric that frames your quilt top beautifully, enhancing the overall design. Consider a print that ties in with your block fabrics or a solid that creates a strong visual boundary.
- 3/4 yards of binding fabric: This essential finishing touch will encase the raw edges of your quilt. A contrasting color can create a vibrant edge, while a matching one offers a seamless look.
- 5 3/4 yards of backing fabric: The foundation of your quilt, providing stability and a cozy feel. Choose a fabric that coordinates with your quilt top, knowing it will be seen when the quilt is draped or turned over.
- Rotary cutter, mat, and ruler: Essential tools for precise cutting.
- Sewing machine: With a quarter-inch presser foot for accurate seams.
- Iron and ironing mat: For pressing seams flat and crisp.
- Fabric markers or pencils: For drawing lines on fabric.
- Thread: High-quality cotton thread that matches your fabrics.
Step-by-Step Guide: Crafting Your Hourglass Wreath Quilt
Preparation: Setting the Stage for Success
Before diving into cutting and sewing, take a moment to prepare your fabrics. Pre-washing your fabrics is often recommended to prevent shrinkage and color bleeding, especially if you’re mixing different types of fabrics. Once dry, press all your fabrics thoroughly to remove any wrinkles or creases; this ensures accurate cutting and piecing. Organize your workspace, ensuring you have ample room for cutting and sewing, and gather all your tools. A tidy workspace leads to a tidy quilt!
Step 1: Creating the Quilt Block’s Heart
Every Hourglass Wreath block begins with a central square and surrounding elements. To start, take one of your 10-inch background squares. From one side, measure and cut off a 2 1/2-inch strip. Repeat this on the adjacent side, cutting off another 2 1/2-inch strip from what was originally the bottom of your 10-inch square. The remaining larger square in the middle is your block’s center. From the two 2 1/2-inch strips you just cut, you will need to create four 2 1/2-inch squares. These small squares will be crucial for your corner blocks, which we’ll address in Step 3. Set aside any remaining 2 1/2-inch strips or squares for future cornerstones in other blocks or other projects.
Precision in this initial cutting step is paramount. Use a sharp rotary cutter and a reliable ruler to ensure your cuts are perfectly straight. This attention to detail now will save you headaches later when piecing your blocks together, as accurately cut pieces fit together much more smoothly.
Step 2: The Magic of Half-Square Triangles & Hourglass Units
This step is where the “Magic 8 method” truly shines, allowing you to create multiple units simultaneously.
First, lay one 10-inch print square right sides together with one 10-inch background square. On the back of the lighter fabric (usually the background square), draw two diagonal lines from corner to corner, forming an ‘X’. Then, draw a horizontal line and a vertical line directly through the center, connecting the midpoints of each side. This creates a grid of eight triangles.
Next, sew a seam 1/4 inch away from *both* sides of the two diagonal lines. Do not sew on the horizontal or vertical lines yet. Once sewn, carefully cut directly on all the drawn lines (the two diagonal lines, and the horizontal and vertical lines). When you separate these pieces, you will have eight perfect half-square triangles, each with one print and one background fabric. Press these HSTs open, typically pressing the seam allowance towards the darker fabric to avoid “shadowing” through the lighter fabric.
Now, to transform these HSTs into hourglass blocks: take two of your newly created HSTs. Place them right sides together, ensuring the seams nest perfectly and the contrasting fabrics are oriented in opposite directions (e.g., if one HST has the print fabric on the top left, the other should have it on the bottom left when stacked). On the back of the top HST, draw a diagonal line that bisects the block, running perpendicular to the existing seam line. Sew 1/4 inch away from both sides of this new diagonal line. Cut directly on the drawn diagonal line, and then press the two new hourglass blocks open. You now have two hourglass units. Square up each hourglass block to a precise 4 inches; this step is crucial for ensuring your blocks fit together perfectly in the final assembly. Repeat this process until you have enough hourglass blocks for your quilt.
Finally, assemble your hourglass blocks into pairs, sewing them color to color. This means you will pair two hourglass blocks together, ensuring that the similar color sections align to create a larger, cohesive unit. You will need four such pairs for each main wreath block.
Step 3: Crafting the Snowball Corner Blocks
To create the distinctive points of the wreath, we’ll use a technique often called “snowballing.” Take four 4-inch background squares (these can be cut from your 1 1/2 yards of background fabric or from additional 10-inch squares if you have them). From Step 1, retrieve the four 2 1/2-inch squares you set aside. Take one 4-inch background square and place one 2 1/2-inch square in one corner, right sides together, aligning the edges. Draw a diagonal line on the back of the smaller square from one corner to the opposite corner. Sew directly on this line. Trim the excess fabric, leaving a 1/4-inch seam allowance, and press the smaller triangle open, revealing the “snowballed” corner. Repeat this for all four 4-inch background squares, ensuring the small square is always placed in the same corner position across all four, to maintain consistency in your wreath design.
These snowballed corners will form the outer tips of your wreath “petals,” adding a lovely clean finish and helping to define the circular shape when the block is assembled.
Step 4: Assembling Your Wreath Quilt Block
Now comes the exciting part: arranging all your meticulously crafted units to form the complete Hourglass Wreath block! Lay out your pieces on a flat surface, such as a design wall or a large table, in a 3×3 grid.
In the very center, place the larger square you cut in Step 1.
Position the four hourglass pairs (created in Step 2) around the center square, ensuring their points are oriented correctly to create the swirling wreath effect. Pay close attention to the direction of your hourglass blocks; they should ‘point’ towards the center or outward in a consistent manner to form the wreath.
Finally, place your four snowballed corner blocks (from Step 3) in the four outer corner positions of the grid. These will complete the wreath’s shape and provide balance to the block.
Once you are satisfied with your layout, begin sewing the pieces together in rows. Sew the three units in the top row together, then the three units in the middle row, and finally the three units in the bottom row. Press seams as you go, usually pressing them in opposite directions for adjacent rows to allow for perfect nesting when joining the rows. Finally, sew the three completed rows together to form your finished Hourglass Wreath quilt block. Carefully align your seams to ensure a crisp, professional finish. Repeat these steps to create as many blocks as needed for your desired quilt size.
Completing Your Hourglass Wreath Quilt: Borders, Batting, and Binding
Once you have pieced all your individual Hourglass Wreath blocks, assemble them into rows and then join the rows to create your full quilt top. This is where your quilt truly takes shape! After the quilt top is complete, it’s time to add the borders. The 1 1/2 yards of border fabric will frame your beautiful design and often helps the quilt lay flatter. Measure your quilt top carefully to ensure your borders are cut to the correct length and width.
The next crucial step is layering your quilt. You’ll need the 5 3/4 yards of backing fabric, a layer of batting (the fluffy middle layer that gives the quilt its warmth and dimension), and your completed quilt top. Create a “quilt sandwich” by laying the backing fabric face down, then the batting, and finally your quilt top face up. Baste these three layers together using pins, spray adhesive, or hand-stitching to prevent shifting during the quilting process.
With your quilt basted, you can now quilt it! This involves stitching through all three layers to secure them together and add texture. You can choose simple straight lines, a meandering design, or more elaborate custom quilting, either on your home machine or by sending it to a long-arm quilter. Finally, use your 3/4 yards of binding fabric to create strips that will encase the raw edges of your quilt, providing a neat, durable, and decorative finish. This final step brings all your hard work to a beautiful conclusion.
Tips for a Flawless Quilt
- Precision is Your Best Friend: Accurate cutting and a consistent 1/4-inch seam allowance are the cornerstones of successful quilting. Invest in a good rotary cutter, mat, and ruler, and always double-check your measurements. Using a 1/4-inch presser foot on your sewing machine can significantly improve seam accuracy.
- Pressing Matters: Don’t underestimate the power of good pressing. Pressing seams correctly (either open or to one side, usually the darker fabric) helps blocks lie flat and fit together perfectly. Pressing as you go, after each seam, makes a huge difference in the overall appearance of your finished quilt.
- Fabric Choice: Experiment with different fabric combinations. While a high-contrast pairing between print and background will make the wreath pattern pop, a more subtle, tonal approach can create a sophisticated, textured look. Don’t be afraid to try different color palettes to personalize your quilt.
- Chain Piecing: For repetitive tasks like making HSTs or joining hourglass pairs, use chain piecing. This involves feeding units through your sewing machine one after another without cutting the thread in between. It saves time and thread.
- Square Up Your Blocks: After creating your HSTs and hourglass blocks, always square them up to the exact dimensions specified (e.g., 4 inches). This ensures all your units are uniform, which is essential for a flat and accurate quilt top.
Explore More Hourglass Quilt Patterns
Once you’ve fallen in love with the versatility of the hourglass block, you’ll find there are countless ways to incorporate it into your quilting projects. Its simple yet effective design lends itself to a wide array of stunning patterns. If you’re eager to expand your hourglass quilt repertoire, consider exploring some of these fantastic variations:
- Disappearing Hourglass 2 Quilt: This clever pattern creates an entirely new design from a basic hourglass block, offering a surprising visual effect.
- 9 Patch and Hourglass Quilt: Combine the classic nine-patch block with hourglass units for a quilt that offers both traditional charm and dynamic movement.
- Easy Strip Hourglass Quilt Tutorial: Learn how to use fabric strips to efficiently create hourglass blocks, perfect for using up scraps or working with pre-cuts.
Each of these patterns offers a unique twist on the hourglass block, allowing you to continually grow your quilting skills and create diverse and beautiful quilts.
Final Thoughts: Your Beautiful Hourglass Wreath Quilt Awaits
The Hourglass Wreath Quilt by Jenny Doan and Missouri Star is more than just a quilting project; it’s an opportunity to create a stunning piece of textile art that brings joy and beauty into your home. With its charming floral appearance and the efficient “Magic 8 method,” this pattern is accessible and rewarding for quilters of all levels. From selecting your fabrics to piecing the final blocks and adding the finishing touches, every step of this journey is designed to be enjoyable and fulfilling. We hope this detailed guide empowers you to confidently embark on making your very own Hourglass Wreath Quilt, a testament to your creativity and skill. Happy quilting!