
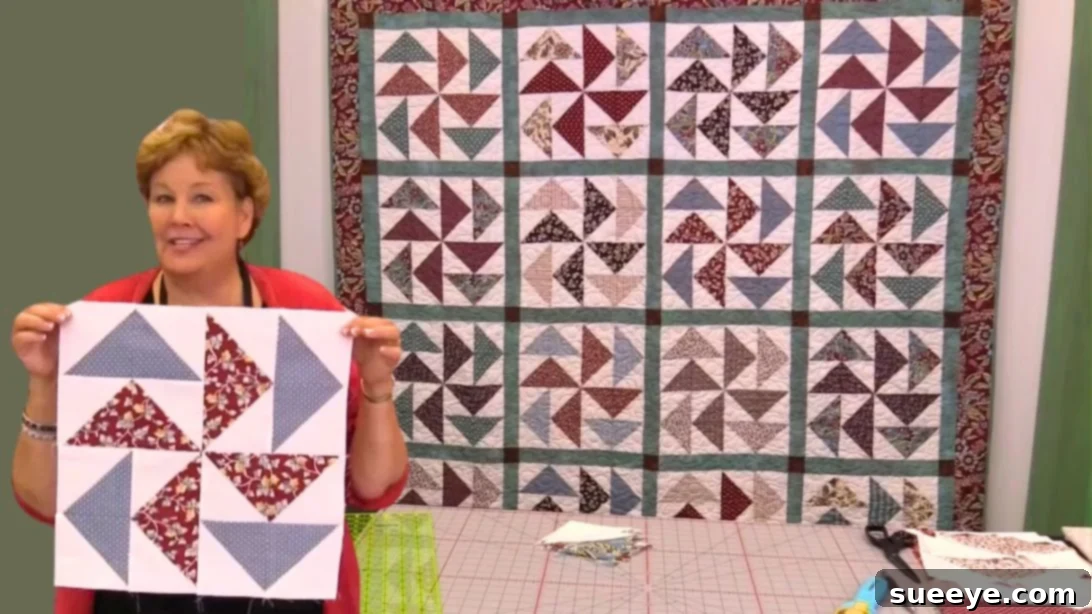
Embark on a delightful quilting journey with the classic Dutchman’s Puzzle quilt block. Sometimes, the most intricate-looking designs emerge from the simplest components, and this traditional pattern is a perfect example. Renowned quilting expert Jenny Doan from Missouri Star masterfully demonstrates how to construct this stunning block, making it accessible and enjoyable for quilters of all experience levels, especially beginners looking to expand their skills. If you’ve previously tackled a few quilting projects, you’ll quickly recognize the familiar elements that come together to form this charming design: primarily an array of precisely crafted flying geese units surrounding a dynamic pinwheel block at its heart.
The Dutchman’s Puzzle quilt pattern holds a special place in quilting history, known for its timeless appeal and the mesmerizing movement it creates across a quilt top. Its name evokes a sense of playful challenge, yet the construction itself is surprisingly straightforward, relying on foundational quilting techniques that are easy to master. This comprehensive guide will walk you through each step, ensuring you achieve a beautiful, professional-looking quilt that you’ll be proud to display or gift. Get ready to transform simple fabric squares into a masterpiece of geometric artistry!
RELATED: Explore more Flying Geese Projects: Half Square and Flying Geese Patchwork Centerpiece Mat
Unlocking the Magic: Half-Square Triangles and Flying Geese
The foundation of the Dutchman’s Puzzle quilt, and indeed many beloved quilt patterns, lies in two incredibly versatile units: the half-square triangle (HST) and the flying geese unit. These are among the most fundamental building blocks in a quilter’s toolkit, offering endless possibilities for design and creativity. While there are various methods to create these units, Jenny Doan introduces a particularly efficient and ingenious technique for HSTs that simplifies the entire process: the “Magic 8” method. This technique allows you to create eight perfectly sized half-square triangles from just two fabric squares at once, drastically cutting down on repetitive steps and speeding up your project.
The flying geese units, which give the block its characteristic arrow-like appearance, are then simply constructed by sewing together two of these precisely made HSTs. This streamlined approach means you won’t need to laboriously create each HST individually. Instead, you’ll produce them in batches, ready to be assembled into the elegant flying geese units that dominate the Dutchman’s Puzzle. This method not only saves time but also promotes accuracy, ensuring your finished quilt blocks are crisp and well-defined. Mastering these techniques will empower you to tackle a wide array of other quilting patterns with confidence and ease.
Essential Materials for Your Dutchman’s Puzzle Quilt
Gathering your materials is the first exciting step in any quilting adventure. For this Dutchman’s Puzzle quilt, the fabric choices play a significant role in the visual impact of your finished piece. We’ll be working with pre-cut 10-inch squares, often known as “layer cakes,” which are incredibly convenient and save a lot of time on cutting. The combination of patterned and solid fabrics will create the striking contrast necessary for the design to pop.
- 1 pack of 10″ squares print fabric: These will form the patterned side of your half-square triangles, adding visual interest and depth to your quilt. Choose a pack with a coordinated color scheme for a cohesive look, or mix and match for a more eclectic feel.
- 1 pack of 10″ squares solid fabric: These solid squares will serve as your background fabric for the HSTs, providing a clean contrast to the prints and allowing the dynamic pattern to stand out. A neutral solid like white, cream, or a soft gray is often a popular choice.
- 2 yards of sashing fabric: Sashing strips are used to frame and separate your quilt blocks, adding structure and often a visual break between the more intricate patterns. Choosing a complementary or contrasting solid for your sashing can dramatically alter the overall aesthetic of your quilt top.
- 1/4 yard of cornerstone fabric: Cornerstones are small squares placed at the intersections of sashing strips. While a subtle detail, they add a touch of polish and can be used to introduce another accent color or simply blend with your sashing.
- 1 1/4 yards of border fabric: The border is the final frame for your quilt top, providing a neat finish and often an opportunity to incorporate a wider strip of fabric that ties all the colors and patterns together. Consider a fabric that complements your main prints and solids, adding a professional touch to your finished quilt.
Crafting Your Dutchman’s Puzzle Quilt: Step-by-Step Instructions
Now that you have all your materials ready, let’s dive into the practical steps of bringing your Dutchman’s Puzzle quilt to life. Precision in cutting and sewing is key to achieving crisp, beautiful blocks, so take your time with each step and enjoy the process of watching your quilt come together.
Step 1: Master the Magic 8 Half-Square Triangle (HST) Method
This ingenious technique is a game-changer for producing HSTs quickly and accurately. Begin by selecting one of your printed 10-inch squares and one solid 10-inch square. Place these two squares right sides together, ensuring their edges are perfectly aligned. The solid square should be on top for easier marking if you prefer to mark on the lighter fabric. Using a ruler and a fabric-marking pen or pencil, draw two diagonal lines from corner to corner, creating an “X” across the top square. These lines will serve as your cutting guides.
Next, you’ll sew seams precisely 1/4 inch away from *both sides* of each drawn diagonal line. This means you will have a total of four seam lines, running parallel to the marked diagonals. Once all four lines are stitched, it’s time to cut. First, cut the joined squares in half horizontally and then vertically, resulting in four smaller squares. Finally, cut along both of your original drawn diagonal lines. When you’re done, you will magically have eight individual half-square triangles! Carefully press each HST open, always pressing the seam allowance towards the darker fabric. This helps reduce bulk and ensures a flatter, more professional finish for your quilt block.
Step 2: Assemble Your Flying Geese Units
With your collection of perfectly pressed half-square triangles, it’s time to create the dynamic flying geese units. Each flying geese unit is constructed from two HSTs. Take two of your HSTs and align them so that the colors create a distinct arrow or ‘flying geese’ shape. Typically, this means one point of your printed fabric triangle will meet the side of another printed fabric triangle, forming the “body” of the goose, while the solid fabric forms the “sky.” Sew these two HSTs together along the seam where their colors meet, maintaining a consistent 1/4-inch seam allowance. Repeat this process with your remaining HSTs until you have enough flying geese units for your blocks. Press these newly formed units open, again directing the seam allowances towards the darker fabric to minimize bulk and ensure a neat finish.
Step 3: Join Contrasting Flying Geese Units
To create the larger components of the Dutchman’s Puzzle block, you will now join pairs of these flying geese units. Select two contrasting flying geese units. “Contrasting” here can refer to the direction the ‘geese’ are flying, or the dominant color of the fabrics within the units. Arrange them so that the triangles in both units are facing the same direction when viewed side-by-side. Sew these two units together along their long edge, taking care to match the seams where the HSTs meet for a smooth transition. Press the newly created unit open. Continue this step until you have paired up all your flying geese units, forming the four larger segments that will make up your central block.
Step 4: Assemble the Dutchman’s Puzzle Quilt Block
Now for the exciting part: assembling the full Dutchman’s Puzzle block! Gather four of the larger units you created in Step 3. Arrange these four pieces into a 2×2 grid, much like a giant four-patch block. Pay close attention to the orientation of the flying geese within each unit. When arranged correctly, the points of the triangles will converge in the center, forming a captivating pinwheel design. This is where the “puzzle” aspect of the block truly comes alive.
Once you are satisfied with the arrangement, sew the units together in rows. First, sew the top two units together, then sew the bottom two units together. Press the seams in opposite directions (e.g., top row seams to the left, bottom row seams to the right) to help them nest perfectly when you join the rows. Finally, sew the two rows together to complete your first Dutchman’s Puzzle quilt block. Take care to align the center points accurately to achieve a sharp, defined pinwheel. Press the final block thoroughly to ensure it lies flat and square.
Step 5: Incorporating Sashing and Cornerstones for a Polished Look
Sashing and cornerstones are essential elements that frame your quilt blocks, adding structure, defining the pattern, and providing a visual resting place between the more intricate blocks. For this project, your sashing units will be strips measuring 16 inches long by 2 1/2 inches wide. These strips will be placed horizontally and vertically between your completed Dutchman’s Puzzle blocks to create a grid. The cornerstones, which are small 2 1/2-inch squares, will be nestled at the intersections of these sashing strips, creating a cohesive and elegant design element.
When assembling your quilt top, lay out your completed blocks in the desired configuration. Begin by sewing sashing strips to two sides of each block (e.g., the right side and the bottom side). Then, create sashing rows by alternating sashing strips with cornerstone squares. For instance, a sashing row might look like: Cornerstone – Sashing Strip – Cornerstone – Sashing Strip – Cornerstone. Once you have rows of blocks with sashing attached and separate sashing rows with cornerstones, you will join these components. Carefully sew the sashing rows between your block rows, making sure to align all seams precisely. This careful attention to detail will ensure a beautifully pieced and square quilt top.
Step 6: Adding Borders to Frame Your Quilt Top
Once your quilt blocks are assembled with sashing and cornerstones, adding borders is the next crucial step to complete your quilt top. Borders serve multiple purposes: they frame the design, protect the edges, and can even help to square up a slightly irregular quilt top. For this Dutchman’s Puzzle quilt, you will need 1 1/4 yards of border fabric. Typically, borders are cut into long strips. You’ll measure the length and width of your quilt top through the center to ensure your borders are cut to the correct size. It’s often recommended to cut border strips slightly longer than needed and then trim them flush after sewing to the quilt top.
Start by attaching the side borders. Pin the border strips right sides together along the raw edges of your quilt top, distributing any fullness evenly. Sew with a consistent 1/4-inch seam allowance. Press seams towards the border. Repeat for the top and bottom borders. This process creates a beautiful frame, giving your Dutchman’s Puzzle quilt a finished and polished appearance. Choose a border fabric that complements your block fabrics, perhaps a solid that picks up a subtle color from your prints, or a contrasting print that adds another layer of visual interest.
Step 7: The Journey from Quilt Top to Finished Quilt: Quilting and Binding
After all the meticulous piecing, your beautiful Dutchman’s Puzzle quilt top is complete! But the journey isn’t over yet. The next essential steps transform your pieced top into a warm, durable, and truly finished quilt. This involves layering, quilting, and binding.
Preparing for Quilting: Layering
You’ll need three layers: your quilt top, a layer of batting (the soft inner filling that provides warmth and dimension), and a backing fabric (usually a single large piece of fabric or pieced fabric that’s slightly larger than your quilt top). Create a quilt sandwich by laying the backing fabric face down, smoothing it out completely. Place the batting evenly on top of the backing, then carefully center your quilt top, face up, on the batting. Once aligned, secure these layers together with basting stitches, safety pins, or spray adhesive. This prevents shifting during the quilting process.
The Art of Quilting
Quilting is the process of stitching through all three layers to hold them together, adding texture and durability to your quilt. You can choose to quilt by hand for a traditional, soft look, or by machine for speed and a crisp finish. Quilting designs can range from simple straight lines or a grid pattern to more intricate free-motion designs that follow the curves and shapes of your block. For a beginner-friendly approach, “stitch-in-the-ditch” (quilting along the seam lines) or a basic stipple can be very effective and enhance the geometric nature of the Dutchman’s Puzzle.
The Final Touch: Binding
Binding is the decorative and protective edge that finishes your quilt. It encases the raw edges of your quilt sandwich, providing a neat, durable border. You’ll need to cut long strips of fabric (usually 2.5 inches wide, sewn together to create one continuous strip long enough to go around the entire perimeter of your quilt). Fold this strip in half lengthwise and press. Attach the raw edges of the binding to the raw edges of your quilt, sewing with a 1/4-inch seam. Once attached, you can either machine-stitch the binding to the back of the quilt or hand-stitch it for a traditional, invisible finish. This final step adds a professional touch and completes your Dutchman’s Puzzle masterpiece.
Embrace the Joy of Quilting with Jenny Doan and the Dutchman’s Puzzle!
The Dutchman’s Puzzle quilt block is a testament to the beauty that can be created with fundamental quilting units and a bit of patience. With Jenny Doan’s clear guidance, even novice quilters can achieve stunning results. By mastering techniques like the Magic 8 method for Half-Square Triangles and understanding the construction of Flying Geese, you’re not just making a quilt; you’re building a foundation for countless future projects. We encourage you to dive in, enjoy the tactile experience of working with fabric, and take pride in each stitch. Happy quilting!