
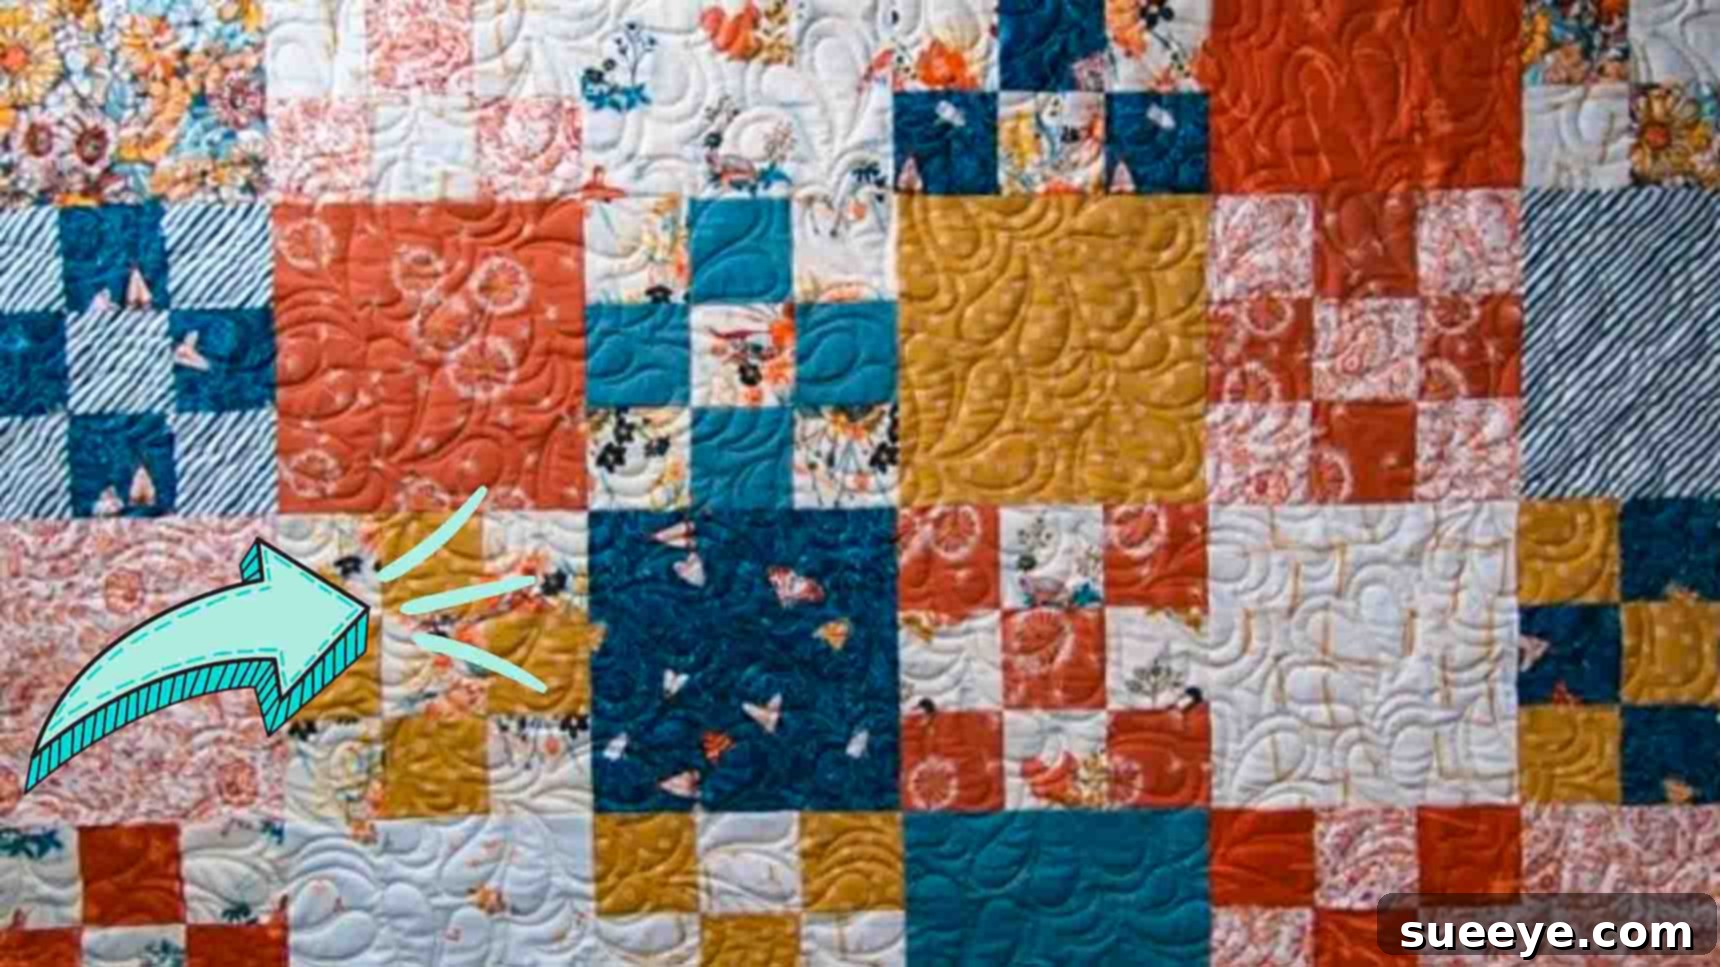
Easy & Quick Layer Cake Garden Games Quilt Pattern for Beginners
Embark on a delightful quilting journey with a project that promises beauty without the complexity. If you’re searching for a quilt pattern that’s both quick to construct and incredibly satisfying, this Layer Cake Garden Games Quilt tutorial, inspired by Moonkin Stitchery on YouTube, is an absolute gem. Ideal for quilters of all skill levels, especially beginners, this project simplifies the quilting process by utilizing pre-cut 10-inch squares, commonly known as layer cakes. Forget the daunting task of extensive fabric cutting; layer cakes are your ticket to a swift and enjoyable experience.
Whether you’re new to the world of quilting or a seasoned pro looking for a charming and relaxing make, this pattern is designed to impress. It’s perfect for transforming that cherished stash of layer cakes you’ve been saving into a stunning quilt. Imagine creating a beautiful throw-sized quilt with relative ease, following clear, step-by-step instructions. This guide will walk you through everything from material selection to the final stitches, ensuring a smooth and rewarding crafting adventure. Get ready to turn beautiful fabrics into a cozy masterpiece!
Why Choose the Layer Cake Garden Games Quilt?
This particular quilt pattern stands out for several compelling reasons, making it a favorite among the quilting community:
Perfect for Beginners
The “Garden Games” quilt is specifically designed with ease in mind. Its construction relies on simple cuts and repetitive block assembly, which are excellent for newcomers to master fundamental quilting techniques without feeling overwhelmed. You’ll gain confidence in rotary cutting, accurate piecing, and pressing seams, building a solid foundation for future projects.
Utilizes Pre-Cut Layer Cakes
One of the biggest time-savers in modern quilting is the use of pre-cut fabrics. Layer cakes, with their neat stacks of 10-inch squares, significantly reduce the initial cutting phase of a quilt. This means less prep work and more time spent on the enjoyable act of sewing, bringing your vision to life much faster than traditional methods.
A Fantastic Stash Buster
Do you have a growing collection of beautiful layer cakes that are too pretty to cut into, yet too numerous to ignore? This pattern offers the perfect opportunity to finally use those beloved fabrics. It’s an excellent way to organize your fabric stash and transform it into a functional and decorative item for your home or as a thoughtful gift.
Versatile and Customizable
While the tutorial focuses on a throw size, the accompanying free pattern provides options for various quilt sizes. This versatility allows you to adapt the design to fit your specific needs, whether you desire a crib quilt, a wall hanging, or a larger bed quilt. Plus, the choice of fabric prints from your layer cakes means every quilt will have a unique personality.
Quick and Rewarding
The straightforward nature of this pattern means you can see tangible progress quickly, which is incredibly motivating. Finishing a quilt, especially one that comes together so smoothly, provides immense satisfaction and a beautiful, handmade item to cherish.
Essential Materials for Your Garden Games Quilt
Before diving into the fun of cutting and sewing, it’s crucial to gather all your materials. This ensures a seamless creative process and prevents interruptions. The list below outlines what you’ll need for a throw-sized quilt, along with essential quilting tools.
For a Throw Size Quilt:
- 42 – 10″ Print Squares (Layer Cake): These are the heart of your quilt. Choose a layer cake with coordinating prints that speak to your style. Remember to account for potential shrinkage if you pre-wash your fabrics.
- 1/2 Yard Binding Fabric: This fabric will frame your quilt, giving it a neat and professional finish. Select a color that complements your main prints beautifully.
- 3 & 1/2 Yards Backing Fabric: The backing fabric provides stability and a finished look to the reverse side of your quilt. Consider a wide-back fabric to avoid piecing, or choose a print that harmonizes with your quilt top.
- 58″ x 66″ Batting: Batting adds warmth, loft, and structure to your quilt. Make sure your batting is slightly larger than your quilt top to allow for trimming after quilting. Cotton, polyester, or a blend are common choices.
- For the free pattern for different sizes, click here.
Essential Quilting Tools:
- Sewing Machine: A reliable machine is key. Ensure it’s in good working order and you have a fresh needle.
- Rotary Cutter: For precise and efficient fabric cutting. A sharp blade is essential for clean edges.
- Self-Healing Cutting Mat: Protects your work surface and extends the life of your rotary blade.
- Quilting Ruler (Acrylic): A clear ruler with various measurements (e.g., 6″ x 24″) is indispensable for accurate cuts.
- Fabric Scissors: Sharp scissors for trimming threads and other small cuts.
- Iron and Ironing Board: Critical for pressing seams, which ensures your blocks lie flat and your quilt top is perfectly square.
- Quilting Pins or Wonder Clips: To hold fabric layers together before sewing.
- Thread: High-quality 100% cotton thread in a neutral color (like white or grey) often blends well with various fabrics.
- Seam Ripper: Every quilter needs one! It’s there for those inevitable little mistakes.
Getting Started: Preparation is Key
A successful quilting project begins with careful preparation. Taking the time to set up your workspace and prepare your materials will make the entire process smoother and more enjoyable.
- Organize Your Workspace: Clear a spacious, well-lit area where you can comfortably cut, sew, and press. Having all your tools within reach saves time and reduces frustration.
- Inspect Your Layer Cakes: While layer cakes are pre-cut, it’s a good practice to fan through them. Familiarize yourself with the prints and consider any specific arrangements you might want for your quilt.
- Consider Pre-Washing (Optional): Some quilters prefer to pre-wash their fabrics to prevent shrinkage and color bleeding after the quilt is finished. If you choose to pre-wash, remember to do so for all fabrics (layer cakes, binding, and backing) to ensure they shrink consistently. This also applies to the batting if it’s a type that can be pre-washed.
Detailed Directions: Crafting Your Layer Cake Garden Games Quilt
Now, let’s dive into the core of the project – assembling your beautiful quilt! Follow these steps carefully for the best results.
Step 1: Crafting Your Nine-Patch Blocks
The nine-patch block is a classic and foundational element in quilting, and for this project, it forms a delightful contrast to the single-print squares. Precision in this step is crucial for an attractive finished quilt.
- Prepare Your Squares for Cutting: Take a few of your 10-inch layer cake squares. To ensure accuracy and save time, you can stack 2-4 squares neatly, aligning all edges. Make sure your rotary cutter has a fresh, sharp blade.
- Cut 3 & 1/4″ Strips: Using your cutting mat and long quilting ruler, carefully cut 3 & 1/4-inch wide strips from your stacked 10-inch squares. Each strip will measure 3 & 1/4 inches by 10 inches. For each 10-inch square you use, you’ll be able to cut approximately three of these strips. Aim for three strips from each square that will form part of a nine-patch.
- Sub-Cut into 3 & 1/4″ Squares: Now, rotate your mat or the strips. From each of the 3 & 1/4″ x 10″ strips, cut three individual 3 & 1/4″ x 3 & 1/4″ squares. You will need a total of nine of these smaller squares to form one complete nine-patch block. Repeat this process for all the layer cakes designated for nine-patch construction.
- Assemble Your Nine-Patch Blocks:
- Select Prints: Choose two different, coordinating prints for each nine-patch block. For example, you might use five squares of one print and four squares of another, alternating them in a checkerboard pattern.
- Arrange Rows: Lay out your nine small squares into three rows of three. Ensure the alternating prints create a pleasing design.
- Sew Rows Together: Using a consistent 1/4-inch seam allowance, sew the three squares in each row together. Press your seams carefully. For the first row, press seams in one direction (e.g., to the right). For the second row, press seams in the opposite direction (e.g., to the left), and for the third row, press seams to the right again. This technique, called “nesting seams,” helps the points align perfectly when you join the rows.
- Join the Rows: Now, sew your three rows together to complete the nine-patch block. Carefully align the seams where the rows meet, using pins to hold them in place. Once sewn, press the entire block flat. Your finished nine-patch block should measure approximately 8 & 3/4 inches square (unfinished size, including seam allowances).
- Repeat: Continue making as many nine-patch blocks as required for your desired quilt size, following the pattern’s specifications. Consistency in cutting and seam allowance is key here.
Step 2: Assembling the Quilt Top
With your nine-patch blocks ready, it’s time to incorporate the remaining layer cake squares to create the striking quilt top. This step is where the “Garden Games” pattern truly comes to life.
- Prepare Remaining Layer Cake Squares: Take your remaining 10-inch layer cake squares (those not used for the nine-patch blocks). Trim these down to 8 & 3/4″ squares. This size ensures they will perfectly match the unfinished size of your nine-patch blocks, allowing for consistent seam allowances when you join them.
- Lay Out Your Quilt Top: Find a large, flat surface – your design wall, floor, or a large table works well. Begin to arrange your nine-patch blocks and your trimmed 8 & 3/4″ print squares according to the pattern layout.
- Alternating Pattern: For your odd-numbered rows (Row 1, Row 3, etc.), start with one of the single print squares, followed by a nine-patch block, then another print square, and so on.
- Even-Numbered Rows: For your even-numbered rows (Row 2, Row 4, etc.), begin with a nine-patch block, followed by a single print square, then another nine-patch block. This alternation creates a beautiful checkerboard effect across your quilt.
- Experiment: Play around with the placement of your different prints until you achieve a visually appealing arrangement. Take a photo of your layout with your phone to remember your design.
- Sew Blocks into Rows: Once you are satisfied with your layout, carefully pick up the blocks for the first row, keeping them in order. Using a consistent 1/4-inch seam allowance, sew these blocks together end-to-end. Press your seams in one direction along the entire row. Repeat this process for all your rows.
- Sew Rows Together to Complete the Quilt Top: With all your rows sewn, it’s time to join them. Place your first two rows right sides together, carefully aligning all seam intersections. Pin generously at these points to ensure the seams nest perfectly. Sew the rows together using a 1/4-inch seam allowance. Press the seam either open or to one side, whichever helps the quilt top lie flatter. Continue adding the remaining rows in the same manner until your entire quilt top is complete.
Finishing Your Quilt: The Last Steps to a Masterpiece
You’ve pieced together your beautiful quilt top! Now, it’s time for the final stages that transform your creation into a durable, cozy, and finished quilt. This involves basting, quilting, and binding.
Basting Your Quilt Layers
Basting is the process of temporarily holding your three quilt layers (quilt top, batting, and backing) together so they don’t shift during quilting. This is a critical step for a smooth finish.
- Prepare Your Backing: Lay your backing fabric wrong side up on a clean, flat surface (floor or large table), smoothing out any wrinkles. Use masking tape to secure the edges to the surface, ensuring it is taut but not stretched.
- Add the Batting: Center your batting on top of the backing fabric. Again, smooth it out carefully, making sure there are no wrinkles or creases.
- Place the Quilt Top: Finally, center your quilt top right side up on top of the batting. Smooth it out meticulously, working from the center outwards to eliminate all wrinkles.
- Secure the Layers: Choose your preferred basting method:
- Safety Pins: Use curved safety pins, placing them every 4-6 inches across the entire quilt, starting from the center.
- Basting Spray: Follow the manufacturer’s instructions for a temporary adhesive spray, working in sections.
- Long Stitches: Hand-baste with long, running stitches if you prefer.
Quilting Your Layers Together
Quilting is the process of sewing through all three layers to secure them permanently. This adds texture, durability, and often the final artistic flourish to your quilt.
- Choose Your Design: For a beginner-friendly project like the Garden Games Quilt, simple quilting designs work wonderfully. Consider “stitch-in-the-ditch” (quilting along the seam lines) or straight-line quilting using your walking foot. You could also opt for a simple grid pattern or gentle wavy lines.
- Machine Quilting:
- Attach a walking foot to your sewing machine, which helps feed all three layers evenly.
- Start quilting from the center of your quilt and work outwards. This prevents fabric distortion.
- Take your time and maintain a consistent stitch length.
- Follow the lines of your chosen design.
- Trim Excess: Once quilting is complete, remove all basting pins/spray. Lay your quilt flat and use your rotary cutter and ruler to square up the edges, trimming away any excess batting and backing fabric, leaving a clean, straight edge.
Attaching the Binding
Binding provides a neat, durable finish to the raw edges of your quilt and frames your beautiful work.
- Prepare Binding Strips: From your 1/2 yard of binding fabric, cut 2 & 1/2-inch wide strips. You will need to join these strips end-to-end using diagonal seams to create one continuous long strip long enough to go around the entire perimeter of your quilt, plus about 10-12 inches extra.
- Attach to Quilt: Fold your long binding strip in half lengthwise and press. Starting on one side of the quilt (not a corner), align the raw edges of the folded binding with the raw edges of your quilt top. Leave a tail of about 8-10 inches of binding free. Sew the binding to the quilt using a 1/4-inch seam allowance.
- Mitered Corners: When you reach a corner, stop 1/4 inch from the edge, backstitch, and cut your thread. Fold the binding strip up, creating a 45-degree angle, then fold it back down along the next edge, aligning the raw edges. Start sewing from the top of this new fold. Repeat for all corners.
- Join Binding Ends: When you’re about 10-12 inches from your starting point, stop sewing. Trim the two binding tails to overlap by exactly the width of your binding strip. Join them with a diagonal seam to create a continuous loop, then finish sewing the binding down.
- Finish Binding by Hand or Machine: Fold the binding over to the back of the quilt. You can hand-stitch the binding to the back for an invisible finish or machine-stitch it for a quicker, visible method.
Tips for Success and Enjoying Your Quilting Journey
Making a quilt should be a joyful experience. Here are some extra tips to help you along the way:
- Accuracy is Key: While this is a beginner project, consistent 1/4-inch seam allowances and precise cuts will dramatically improve the final look of your quilt. Take your time, measure twice, and cut once.
- Press, Don’t Iron: When joining blocks and rows, “press” your seams, don’t “iron” them. Pressing means lifting and placing the iron down, which avoids stretching the fabric. Ironing involves sliding the iron, which can distort your fabric.
- Listen to Your Machine: If your sewing machine sounds off or stitches are uneven, stop and troubleshoot. A fresh needle can make a huge difference.
- Take Breaks: Quilting can be intense. Step away for a bit if you feel frustrated or tired. Fresh eyes often solve problems faster.
- Embrace Imperfections: Especially as a beginner, remember that handmade items have character. Don’t strive for absolute perfection; enjoy the process and the unique charm of your creation.
- Label Your Quilt: Consider adding a small label to the back of your quilt with your name, the date, and the quilt’s name. This adds a personal touch and commemorates your achievement.
Your Beautiful Layer Cake Garden Games Quilt Awaits!
Congratulations! You’ve just learned how to create a stunning Layer Cake Garden Games Quilt, a project that is as enjoyable to make as it is beautiful to behold. This tutorial, inspired by Moonkin Stitchery, proves that quilting can be accessible, rewarding, and fun, even for those new to the craft. By utilizing pre-cut layer cakes, you’ve not only saved time but also created a charming quilt perfect for snuggling, decorating, or gifting.
We encourage you to share your finished quilt with the world! The quilting community loves to see new creations and inspire one another. So, gather your fabrics, fire up your sewing machine, and prepare to be amazed by what you can accomplish. Happy quilting!