
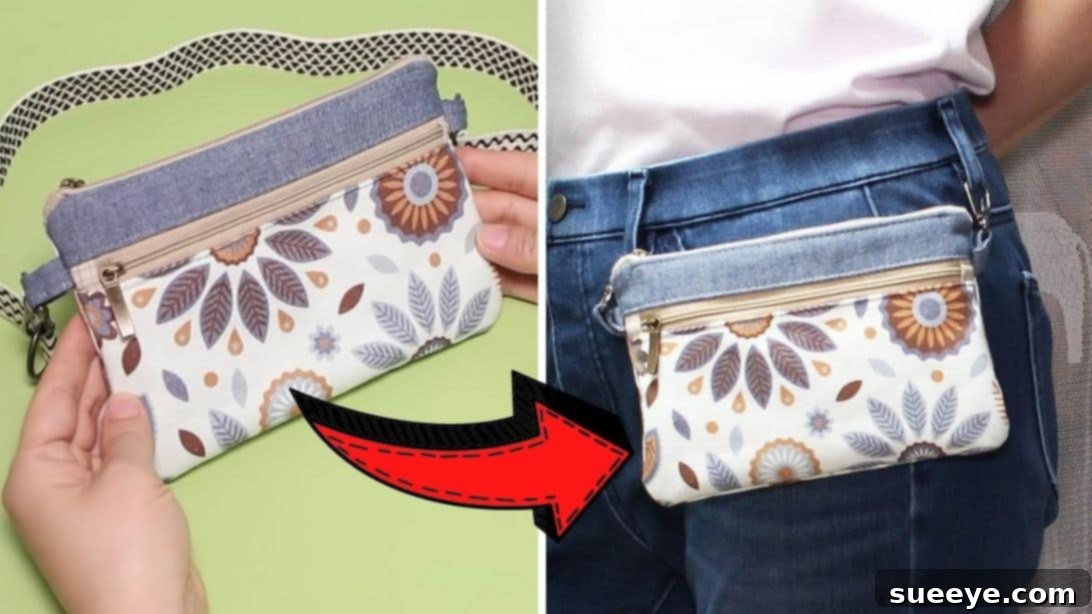
Master the Art of Sewing: Create Your Own Versatile DIY Belt Bag & Shoulder Pouch
Unlock your creative potential and craft a stylish, highly functional multipurpose bag pouch designed to simplify your everyday carry. Whether you prefer to wear it securely on your belt or draped comfortably over your shoulder, this DIY sewing project offers remarkable versatility. It’s the perfect solution for keeping your essentials — such as your smartphone, keys, cash, coins, or other small yet important belongings — safely organized and easily accessible whenever you step out. This enjoyable and practical bag design is a brilliant concept brought to life by the talented creators at sewingtimes on YouTube, known for their clear and inspiring sewing tutorials. Follow this comprehensive guide to construct your own custom accessory, adding a personal touch to your daily ensemble while honing your sewing skills.
Creating your own belt bag, also known as a fanny pack or a stylish crossbody pouch, is a rewarding project that combines practicality with personal expression. Imagine the satisfaction of carrying a unique accessory that you made yourself, perfectly tailored to your needs. This detailed tutorial breaks down each step, making it accessible for sewers of all levels, from adventurous beginners looking for their next challenge to those with more experience seeking a quick and satisfying make. Not only will you end up with a fantastic new accessory that perfectly fits your personal style, but you’ll also gain invaluable confidence in handling zippers, attaching hardware, and working with various fabric types. This project is a fantastic way to develop your sewing repertoire and produce something truly useful. Let’s gather our materials and embark on this exciting sewing journey!
Essential Materials for Your Multipurpose Pouch
Before diving into the sewing process, ensure you have all your materials meticulously prepared. Choosing the right fabrics and notions is crucial for both the durability and the aesthetic appeal of your finished bag. Taking the time to select quality components will result in a more professional and long-lasting accessory. Here’s a detailed list of what you’ll need, along with some considerations for each item:
Outer Fabric – The Face of Your Bag:
Select a durable, medium-weight woven fabric that reflects your personal style. Excellent choices include sturdy cotton canvas, denim, cotton twill, upholstery fabric, or even elegant faux leather. This fabric will form the bag’s exterior, so choose one that can withstand daily wear and tear while providing the desired look and feel.
- 1 piece 21 x 4.5cm (8¼″ × 1¾″) – This piece will form the distinctive top accent strip of your bag.
- 1 piece 21 x 11cm (8¼″ × 4⅜″) – This is for the main front panel, a key visible section of the pouch.
- 1 piece 21 x 14.5cm (8¼″ × 5¾″) – This piece will be used for the main back panel, providing structure and support.
- 2 pieces 6 x 5cm (2½″ × 2″) – These smaller pieces are designated for creating the sturdy D-ring and snap hook tabs, which are vital for attaching your strap or belt.
Lining Fabric – For a Clean Interior:
Choose a lightweight woven fabric, such as a quilting cotton or thin polyester, that complements your outer fabric. The lining provides a clean, finished interior, prevents the bag’s contents from interacting directly with interfacing, and adds an extra layer of structure and durability to the inside of your bag.
- 1 piece 21 x 4.5cm (8¼″ × 1¾″) – This piece will line the top accent strip, ensuring a neat finish.
- 1 piece 21 x 11cm (8¼″ × 4⅜″) – This piece will serve as the lining for the main front panel.
- 3 pieces 21 x 14.5cm (8¼″ × 5¾″) – These larger pieces are for the main lining panels and an additional pocket lining, providing ample interior space.
Zippers – Securing Your Valuables:
Opt for good quality nylon coil or polyester zippers that glide smoothly and are suitable for bag making. The small fabric squares will be used to create neat and professional-looking zipper tabs at the ends of your zippers, preventing fraying and adding a finished touch.
- 2 pieces 17.5 cm (7″) zipper – These are essential for creating secure, easily accessible compartments within your multipurpose pouch.
- 4 pieces 3 x 3 cm (1¼” x 1¼”) similar colored fabric – These small squares are used to create neat, matching zipper tabs, giving a polished appearance.
Hardware & Interfacing – Structure and Functionality:
These components are crucial for the bag’s structure, wearability, and overall durability. The swivel snap hooks and D-rings allow for versatile attachment to a belt or strap, while fusible interfacing provides essential body and shape.
- 2 pieces 1.5 cm (5/8″) wide Swivel snap hook – These hooks are vital for attaching the bag to a belt loop, a larger bag, or your custom webbing strap, providing flexibility in how you wear your pouch.
- 47-75 cm (18½” – 30″) long 2.5cm (1″) wide Webbing strap – This strap is perfect for creating a comfortable shoulder or crossbody option. You can adjust the length to your preference, allowing for a custom fit. Choose a durable material like cotton or polypropylene webbing.
- 2 pieces 1.5 cm (5/8″) wide D ring – These rings are where your swivel snap hooks will attach, ensuring a sturdy and reliable connection point for your strap.
- Mid-weight woven fusible interfacing – This is a game-changer for bag making. It adds crucial stability, body, and crispness to your fabric pieces, preventing stretching and giving your bag a professional, structured feel. Do not skip this!
Other essential sewing tools: A reliable sewing machine, high-quality polyester thread (matching your fabric for a seamless look), sharp fabric scissors or a rotary cutter with a cutting mat for precise cuts, a measuring ruler, fabric clips or pins to hold pieces securely, a warm iron and ironing board for crisp seams, a seam ripper (every sewer’s best friend, just in case!), and a hand-sewing needle for closing the turning gap.
Step-by-Step Guide to Sewing Your Multipurpose Belt Bag Pouch
Follow these detailed instructions carefully to construct your stylish and practical belt bag. Precision, attention to detail, and patience are key to achieving a professional-looking finish that you’ll be proud to carry.
Step 1: Preparing Fabrics and Zipper Tabs
The initial phase involves preparing all your fabric pieces and constructing the essential zipper tabs that give your bag a neat, professional edge.
- Applying Fusible Interfacing: Begin by carefully applying the fusible interfacing to the designated fabric pieces. Take the 21 x 4.5cm (8¼″ × 1¾″) interfacing piece and fuse it to the wrong side of the corresponding lining fabric. For the outer fabric, apply interfacing to the wrong sides of both the 21 x 11cm (8¼″ × 4⅜″) piece and the 21 x 14.5cm (8¼″ × 5¾″) piece. Place the rough, adhesive side of the interfacing against the wrong side of your fabric and press firmly with a warm iron, following the interfacing manufacturer’s specific instructions. This critical step adds body, prevents stretching, and significantly enhances the overall durability and shape retention of your bag.
- Shaping the Outer Fabric Panels: Locate the medium-sized outer fabric piece (21 x 11cm or 8¼″ × 4⅜″). Fold it precisely in half lengthwise, ensuring the raw edges are perfectly aligned. Using a ruler and a fabric marker or a curved template, gently mark and cut a smooth curve on one of the bottom corners. This curvature will give your bag its distinctive soft, rounded shape. Next, take the larger outer fabric piece (21 x 14.5cm or 8¼″ × 5¾″). Place it directly on top of the already curved and folded medium outer fabric, aligning the raw edges precisely. Use the curved edge of the smaller piece as a guide to accurately replicate the same curve on the larger piece. Once cut, open both pieces. Repeat this entire shaping process for the corresponding lining fabric pieces of the same sizes, ensuring all main outer and lining panels have perfectly matching curved bottom corners for a seamless assembly.
- Crafting Zipper Tabs: Take the four small 3 x 3 cm (1¼” x 1¼”) fabric squares. These will be used to create neat, finished ends for your zippers. For each of your two 17.5 cm (7″) zippers, place one fabric square at each end of the zipper tape, with right sides together, aligning the raw edges of the fabric square with the end of the zipper tape. Pin or clip them securely in place. Stitch them with a ¼” (approximately 6mm) seam allowance. After sewing, gently fold the fabric flap back and press neatly with an iron. This process creates clean, finished zipper ends, making your bag look professionally made.
- Attaching the First Zipper to the Front Panel: Take one of your now-prepared 17.5 cm zippers. Position it along the upper raw edge of the interfaced medium-sized outer fabric piece (21 x 11cm), ensuring the right side of the fabric and the right side of the zipper tape are facing each other. Align their top edges perfectly. Now, take the corresponding lining fabric piece (21 x 11cm) and place it on top of the zipper and outer fabric, with its right side facing down towards the outer fabric’s right side. This effectively creates a zipper ‘sandwich’ with the zipper tape in the middle. Pin or clip all three layers together securely. Using a zipper foot on your sewing machine, carefully stitch along the top edge with a 3/8″ (approximately 1cm) seam allowance, ensuring you sew close to the zipper teeth without hitting them.
Step 2: Completing the First Zippered Section and Adding Hardware Loops
This stage focuses on securely finishing the first zippered compartment and integrating the crucial D-ring and snap hook attachment points that allow for versatile wear.
- Securing the First Zipper and Attaching Lining: After sewing the first side of the zipper, flip the fabric layers right side out so the outer fabric and lining are on opposite sides of the zipper. Press the seam flat with your fingers, creasing it properly to create a crisp, defined edge. This helps the fabric lie flat. Expose the other side of the zipper tape. Take the remaining lining strip with fusible interfacing (21 x 4.5cm) and place it on top of the exposed zipper tape, with its right side facing down, aligning it precisely with the outer fabric’s right side on the other side of the zipper. The other strip (the plain lining piece) should be on the back, with its right side facing up, creating another zipper sandwich. Sew the top edge with a 3/8″ seam allowance. Flip the fabric layers open and crease it properly along the seam line.
- Topstitching for a Professional Finish: To give your zipper a truly professional and durable finish, carefully topstitch along each side of the zipper. Position your sewing machine needle to stitch as close as possible to the seam line you just created. This not only looks polished but also helps the zipper lie perfectly flat and prevents the fabric from getting inadvertently caught in the zipper teeth during use.
- Attaching the Main Lining Panel: Take one of the large lining fabric pieces (21 x 14.5cm or 8¼″ × 5¾″). Place it underneath the newly assembled zippered section, aligning its raw top edge with the raw bottom edge of the zippered unit. Pin or clip these edges together. Sew with a consistent 3/8″ seam allowance. This step forms the interior back panel of your first zippered compartment, beginning to give the bag its internal structure.
- Preparing D-Ring/Snap Hook Loops: Take the two smaller outer fabric pieces (6 x 5cm or 2½″ × 2″). For each piece, fold both long raw sides toward the center, press firmly with an iron to create neat, clean folds. Then, fold the entire piece in half lengthwise, effectively encasing all the raw edges within the fold. Press again and sew very close to the open edge to securely hold these folds in place. Repeat this precise process for the second piece. These meticulously prepared loops will serve as your sturdy attachment points for the D-rings and snap hooks.
- Adding Hardware Loops to the Bag: Insert a 1.5 cm (5/8″) wide Swivel snap hook into each of these fabric loops you just created. Fold the fabric loop over the hook, then place these prepared loops on each side of the bag’s main body, aligning their raw edges perfectly with the side seams. Pin or clip them securely in place, ensuring they are positioned evenly and are facing inwards towards the bag’s center so they don’t get accidentally caught when sewing the main seams. Stitch them firmly in place within the seam allowance to secure the hooks, perhaps with a few backstitches for extra reinforcement.
Step 3: Assembling the Second Zippered Compartment and Final Bag Construction
This final and most comprehensive stage brings all the components together, meticulously assembling them to create the complete, functional multipurpose bag.
- Preparing the Second Zipper Unit: Retrieve the other 17.5 cm zipper and the remaining two 3 x 3 cm fabric squares. Repeat the zipper tab attachment process exactly as described in Step 1, part 3. Carefully sew the fabric squares to each end of the zipper with a ¼” seam allowance, then fold back the flaps and press them neatly. This ensures both zippers are uniformly prepared.
- Attaching the Second Zipper to the Main Body: With the second zipper unit now prepared, fold the flap back on both sides to expose the zipper tape. Take one of the large lining fabric strips (21 x 14.5cm). Place the prepared zipper unit on top of this lining strip, ensuring their right sides are facing each other and all raw edges are perfectly aligned. Now, place another large lining fabric piece (21 x 14.5cm) on top of this assembly, with its right side facing down. Essentially, you are creating a second zipper sandwich, this time with two lining pieces. Pin or clip thoroughly along the top edge and sew along this edge with a 3/8″ seam allowance.
- Finishing the Second Zippered Section: Once sewn, flip the fabrics right side out, away from the zipper, and press the seams flat to create a crisp edge and ensure the zipper lays perfectly. Crease properly. Take the final large lining fabric piece (21 x 14.5cm). Place it at the back of the zipper unit, aligning its raw edges precisely with the top of the zipper’s edge. Now, take the other side of the bag (the front panel you assembled in Step 2) and place it on top, with its right side facing down, creating another layered sandwich. Sew these layers together at the top with a 3/8″ seam allowance. Once sewn, spread the fabrics open and then topstitch at the front, near the edge of each side of the zippers. This additional topstitching enhances durability, prevents fabric from getting caught, and gives a very professional, finished look.
- Final Bag Assembly – Joining Outer and Lining Fabrics: Now is the moment to bring the outer bag and its lining together to form the complete pouch. Carefully fold and match all the raw edges of the outer fabric pieces with each other (right sides together), and similarly, match the raw edges of the lining fabric pieces with each other (right sides together). Ensure that the D-ring/snap hook loops you attached in Step 2 are tucked securely inside the outer fabric layers and are not caught in any seams that you are about to sew. Pin or clip all around the entire perimeter of the bag, making sure all layers are perfectly aligned, especially around the previously cut curved bottom corners.
- Sewing the Bag Together (Leaving a Turning Gap): Stitch all around the clipped edges with a consistent 3/8″ seam allowance. This seam will form the main structural integrity of your bag. **Crucially, remember to leave a gap of about 3-4 inches (8-10 cm) along the bottom edge of the lining fabric pair.** This unstitched opening is absolutely essential for turning the entire bag right side out later. Ensure you reinforce the stitches at the beginning and end of this gap with backstitching for added strength.
- Turning and Finishing: Carefully and gently turn the entire bag right side out through the opening you left in the lining. Take your time with this step, especially around the curved corners. Use a turning tool or a blunt object (like a chopstick or point turner) to gently push out all corners and curves from the inside, ensuring they achieve a neat and crisp shape. Once the bag is fully turned and shaped, meticulously hand-sew the turning gap in the lining closed using an invisible stitch (often called a ladder stitch) for a clean, seamless finish that blends into the fabric. Alternatively, you can machine stitch it very close to the edge if you prefer. Finally, gently push the entire lining fabric piece inside the outer bag, smoothing it out so it sits perfectly without any wrinkles or bulges.
- Attaching the Webbing Strap: Take your 2.5cm (1″) wide webbing strap. If it’s not already pre-assembled, thread one end of the webbing strap through one of the 1.5 cm (5/8″) D-rings (which are already securely attached to your bag via the fabric loops). Fold the strap over the D-ring and sew it securely in place, creating a strong loop that permanently holds the D-ring. Repeat for the other D-ring and the other end of your strap. Then, attach the swivel snap hooks to these D-rings. If your strap design includes adjusters, now is the time to thread them according to your desired length for either comfortable belt wear or a stylish shoulder/crossbody carry.
Congratulations! You have successfully sewn your very own multipurpose belt bag and shoulder pouch. This versatile accessory is now ready to accompany you on all your adventures, keeping your essentials close, secure, and easily accessible. Take a moment to admire your handmade creation and the skills you’ve developed throughout this project. This bag is not just a practical item; it’s a testament to your creativity and dedication. Enjoy carrying your unique, custom-made pouch!
*All images used in this comprehensive tutorial are credited to sewingtimes via YouTube. We extend our gratitude for their fantastic original design and inspiring content. We highly recommend visiting their channel and subscribing for more brilliant sewing ideas, detailed tutorials, and endless creative inspiration!