
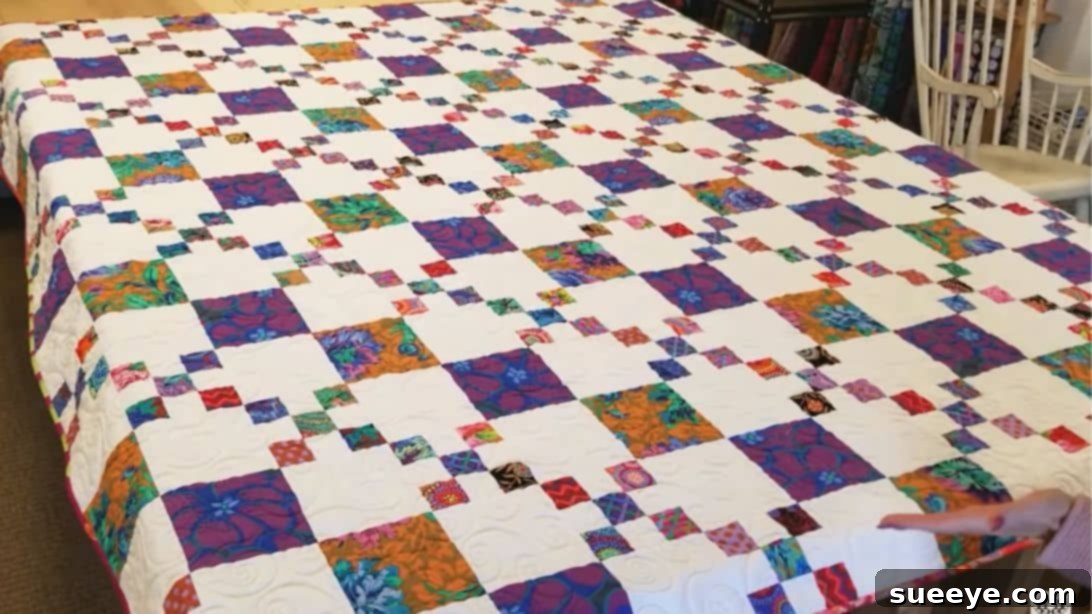
Mastering the Kaffe Iris Chain Links Quilt Pattern: A Step-by-Step Guide
The Kaffe Iris Chain Links Quilt pattern is a beloved classic, reimagined to bring a vibrant and contemporary flair to any home. This design stands out for its captivating interplay of colors and shapes, creating an illusion of intertwined chains that is both intricate and harmonious. What makes this pattern truly special is its adaptability and ease of construction, making it a fantastic project for quilters of all skill levels, including those just starting their journey.
We are particularly inspired by the innovative twists introduced by Jordan Fabrics on YouTube. Their approach breathes new life into this traditional design, making it more dynamic and enjoyable to sew. Even if you’re a beginner, you’ll find their methods, integrated into this guide, incredibly straightforward, allowing you to successfully complete this stunning quilt. Get ready to dive into the world of quilting with confidence and creativity. Let’s start crafting your beautiful Chain Links Quilt!
Essential Materials for Your Chain Links Quilt
Gathering the right materials is the first crucial step towards creating a successful quilt. For this Kaffe Iris Chain Links Quilt, we’ll focus on a blend of pre-cut strips and yardage to simplify the process while ensuring a visually rich outcome. Quality fabric is key for a durable and beautiful quilt, so choose your materials wisely.
- 20 pieces of 2 1/2″ jelly roll strips: These pre-cut strips are perfect for adding a variety of prints and colors to your chain links, saving you time on cutting.
- 5 yards background fabric: A solid or subtly patterned fabric for the background will allow your chain links to pop and create contrast.
- 1 yard of accent fabric A: Choose a fabric that complements your jelly roll strips and background, adding another layer of depth to your design.
- 1 yard of accent fabric B: Select a second accent fabric, distinct from Accent A, to enhance the visual complexity and movement of the chain links.
- 7/8 yards of binding fabric: This fabric will be used to finish the edges of your quilt, giving it a neat and professional look. Alternatively, you can use 10 pieces of jelly roll strips for a coordinated binding.
- 8 yards of backing fabric: The backing fabric provides stability and comfort to your quilt. Consider a soft, durable fabric that complements your quilt top.
Precision Cutting Instructions
Accuracy in cutting is paramount in quilting, as it directly impacts how well your pieces fit together and the overall crispness of your final design. Take your time with this step, using a sharp rotary cutter, a self-healing mat, and a reliable quilting ruler for the best results. All measurements assume a standard width of fabric (WOF) unless otherwise specified.
For Accent Fabric A:
Begin by cutting 5 strips, each measuring 6 1/2″ in width, across the width of the fabric (WOF). From these 5 strips, sub-cut them into a total of 30 individual 6 1/2″ squares. These squares will form a key component of your quilt blocks.
For Accent Fabric B:
Similar to Accent Fabric A, cut 5 strips, each 6 1/2″ in width, across the width of the fabric (WOF). Then, from these strips, cut them into 30 pieces of 6 1/2″ squares. These will complement Accent A in creating the vibrant chain effect.
For Background Fabric:
The background fabric forms the negative space that allows your chain links to shine.
- First, cut 16 strips, each measuring 2 1/2″ in width, across the width of the fabric (WOF). These narrow strips will be used for various unit constructions.
- Next, cut 20 strips, each measuring 6 1/2″ in width, across the width of the fabric (WOF). From these wider strips, meticulously cut them into 120 individual 6 1/2″ squares. These squares will be integral to the block assembly, providing the crucial negative space around your chain links.
Step-by-Step Quilting Instructions for the Chain Links Pattern
Now that your fabrics are precisely cut, it’s time to bring them together to form the stunning Kaffe Iris Chain Links Quilt. Remember to maintain a consistent 1/4-inch seam allowance throughout the piecing process, and press your seams carefully for flat, accurate blocks.
Step 1: Constructing the Primary Strip Units
This step creates the foundational units that will form the “links” of your chain.
- Select two of your vibrant 2 1/2″ printed jelly roll strips. These will be the colorful elements of your chain.
- Take one 2 1/2″ background strip.
- Carefully place the background strip in between the two printed strips. Align all raw edges perfectly.
- Sew these three strips together along their long edges using a consistent 1/4-inch seam allowance.
- Once sewn, press the seam allowances towards the darker printed fabrics. This technique helps to “bury” the seams and reduce bulk, resulting in flatter blocks.
- Repeat this process to create a total of 8 identical strip units.
- From each of these 8 strip units, sub-cut them into 16 smaller units, each measuring 2 1/2″ in width. This will yield a grand total of 128 individual 2 1/2″ units. Set these aside carefully.
Step 2: Constructing the Secondary Strip Units
These units will provide the contrasting elements necessary for the chain link effect.
- Pick two pieces of the 2 1/2″ background strips.
- Now, select one 2 1/2″ printed jelly roll strip.
- Place the printed strip in the middle of the two background strips, aligning all raw edges.
- Sew these three strips together with a precise 1/4-inch seam allowance.
- Press the seam allowances towards the darker printed strip, just as you did in Step 1.
- You will make 4 of these strip units, each measuring approximately 6 1/2″ tall (after sewing).
- From each of these 4 strip units, sub-cut them into 16 smaller units, each measuring 2 1/2″ in width. This will give you a total of 64 individual 2 1/2″ units.
Step 3: Assembling the Quilt Blocks
Now we combine the units from Step 1 and Step 2 to form the individual blocks that create the mesmerizing chain link pattern.
- Take two pieces from the units you created in Step 1 (the units with background in the middle).
- Take one piece from the units you created in Step 2 (the units with print in the middle).
- Arrange these three units so that the unit from Step 2 is in the center, flanked by the two units from Step 1. Visually, you are creating a small square block.
- Carefully sew these three units together. Pay close attention to nesting your seams where possible to ensure your points match up perfectly. Press your seams open or to one side, depending on your preference and what creates the flattest block.
- This combination will form one finished quilt block, measuring 6 1/2″ square.
- Repeat this precise process to create a total of 60 identical blocks. Consistency is key here for a harmonious overall design.
Step 4: Quilt Top Assembly, Quilting, and Binding
With all your blocks complete, it’s time to bring your vision to life by assembling the quilt top and finishing your masterpiece.
- Layout: Begin by laying out all your finished blocks, background squares (6 1/2″ from cutting instructions), and accent blocks (6 1/2″ squares from accent fabrics A and B) on a design wall or a large floor space. Arrange them according to the Chain Links pattern, aiming for a 15 x 16 block grid. This stage is crucial for visualizing your final quilt and ensuring the chain links flow correctly. Take a photo to remember your layout!
- Sewing Rows: Once you are satisfied with your layout, begin sewing the blocks together into rows. When joining rows, consider alternating the direction of pressing your seams in each row (e.g., press seams to the left in row 1, to the right in row 2, etc.). This “nesting” technique helps reduce bulk at seam intersections, resulting in flatter and more accurate row joins.
- Joining Rows: After all rows are complete, sew them together, carefully matching seams and pressing to ensure a smooth, even quilt top.
- Quilting: Once your quilt top is assembled, it’s time to layer it with batting and backing. Baste the three layers together securely. Now, quilt it in a pattern of your choice. You might opt for simple straight lines to emphasize the chain links, or try free-motion quilting for added texture and artistry.
- Binding: The final step is to sew on the binding. This not only finishes the raw edges of your quilt but also frames your beautiful work. Attach your 7/8 yards of binding fabric (or 10 jelly roll strips sewn together end-to-end) around the perimeter of the quilt, using your preferred binding method.
Tips for Quilting Success
To ensure your Chain Links Quilt project is as enjoyable and successful as possible, keep these valuable tips in mind:
- Precision is Key: Invest in a good quality rotary cutter, ruler, and cutting mat. Accurate cutting at the start prevents headaches later on. Double-check all measurements before making the cut.
- Consistent Seam Allowance: A perfect 1/4-inch seam allowance is crucial. Practice on scrap fabric to get your consistent seam down. A “scant” 1/4-inch might be necessary for certain techniques, but for this pattern, a true 1/4-inch is ideal.
- Pressing Matters: Don’t underestimate the power of proper pressing. Pressing seams in the correct direction (often towards the darker fabric or open) helps blocks lie flat and reduces bulk. Use a dry iron and a flat surface.
- Pre-wash or Not? Decide whether to pre-wash your fabrics before cutting. Pre-washing can prevent shrinkage and color bleeding, especially with vibrant fabrics like those often found in Kaffe Fassett collections. However, it can also remove some of the factory stiffness, making cutting more challenging. Be consistent with your choice for all fabrics in the quilt.
- Test Block: If you’re new to the pattern or new to quilting, consider making one or two test blocks from scrap fabric before cutting into your main materials. This helps you get a feel for the process and ensures your finished blocks are the correct size.
- Take Breaks: Quilting can be a marathon, not a sprint. Take regular breaks to avoid fatigue, which can lead to mistakes. Fresh eyes can often spot errors that tired ones miss.
- Embrace Imperfection: No quilt is perfect, and that’s part of its charm! Don’t get discouraged by minor imperfections. Your handmade quilt will be unique and filled with love.
Unleashing Creativity: Variations and Personalization
While this tutorial guides you through the Kaffe Iris Chain Links Quilt pattern, remember that quilting is an art form that encourages personal expression. Don’t hesitate to experiment and make this quilt truly your own:
- Color Palette Exploration: The Kaffe Fassett collection is renowned for its vibrant, rich colors. However, you could try a monochromatic scheme for a sophisticated look, or a collection of pastels for a softer aesthetic. Consider how different color values will make your chain links stand out.
- Fabric Choices: Beyond jelly rolls, think about incorporating different fabric textures or styles. Solids can provide calm breathing room, while carefully chosen large-scale prints can add unexpected visual interest.
- Quilting Designs: The quilting itself offers another layer of personalization. Simple stitch-in-the-ditch quilting will make the piecing pop, while an all-over free-motion design can add fluid movement. Straight-line quilting in a grid or diagonal pattern can create a modern, minimalist feel.
- Block Size Adjustments: If you’re comfortable with pattern modification, you could scale down the block size for a baby quilt or a table runner, or scale up for a grander statement piece. Remember to adjust all cutting measurements proportionally.
- Border Treatments: Add a decorative border to your quilt to enhance its overall size and design. A pieced border, a wide solid border, or even multiple narrow borders can dramatically change the quilt’s finished appearance.
Your Beautiful Kaffe Iris Chain Links Quilt Awaits!
Congratulations on embarking on or completing your Kaffe Iris Chain Links Quilt! This pattern, with its updated classic appeal and beginner-friendly approach, offers a rewarding experience for every quilter. From the precise cutting to the joyful piecing and the final decorative stitches, each step contributes to creating a unique and cherished textile artwork.
The beauty of this design lies not only in its visual impact but also in the satisfaction of bringing together colors and patterns to form something truly magnificent. Whether this is your first quilt or one of many, the Kaffe Iris Chain Links will undoubtedly become a treasured item in your home or a thoughtful handmade gift. Happy quilting, and don’t forget to share your finished creation!