
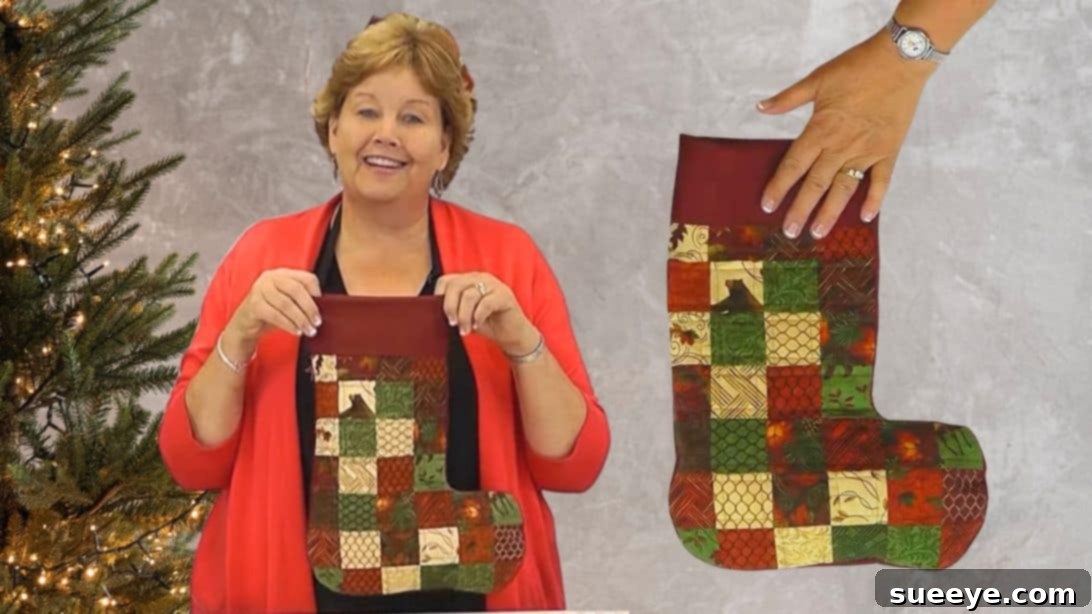
Craft Your Own Quilted Christmas Stocking: A Step-by-Step DIY Guide
There’s nothing quite like the warmth and personal touch of handmade holiday decorations, and a beautifully quilted Christmas stocking is a cherished heirloom in the making. Imagine a mantelpiece adorned with unique stockings, each lovingly crafted for a special family member, reflecting their personality or a festive theme. This project is not only incredibly rewarding but also surprisingly straightforward, making it perfect for quilters of all skill levels. With our detailed tutorial, you’ll create stunning quilted stockings that will be treasured for years to come.
The beauty of a handmade stocking lies in its endless customization possibilities. You can personalize each one by adding initials, embroidered names, or unique appliqués. For an extra touch of festive charm, consider embellishing them with delicate flowers, sparkling beads, or whimsical patches. These stockings aren’t just for the fireplace; they can bring holiday cheer to your stairway, bedposts, dresser, door, window, or even a cozy coat rack. Ready to add a bespoke touch to your holiday season? Let’s dive into making these adorable quilted Christmas stockings!
The Enduring Charm of Quilted Christmas Stockings
Quilted items hold a special place in many hearts, and for good reason. A quilted Christmas stocking stands apart from mass-produced alternatives due to its inherent qualities:
- Durability and Longevity: Quilting, a traditional craft, creates robust and long-lasting fabric items. Your handmade stockings can withstand years of joyous use, becoming a cherished part of your family’s holiday traditions.
- Unique Texture and Warmth: The layered fabrics and stitching of quilting create a unique tactile experience. The slight puffiness of the batting gives the stocking a comforting, warm feel, perfectly embodying the spirit of Christmas.
- Heirloom Quality: Hand-sewn items often carry sentimental value. A quilted stocking crafted by you can become a treasured family heirloom, passed down through generations, each stitch holding memories of holidays past.
- Personal Expression: From choosing the fabric prints to designing the quilting pattern, every step of this project allows for personal expression. The result is a truly unique item that reflects your creativity and love.
- Eco-Friendly Crafting: This project is fantastic for using up fabric scraps from previous quilting adventures, making it a sustainable and creative way to reduce waste.
Materials You’ll Need for Your Quilted Christmas Stocking Project
Gathering your materials is the first exciting step in any sewing project. For this charming quilted Christmas stocking, you’ll need a few key items. Precision in cutting your fabric squares will ensure your finished stocking comes together beautifully.
- 42 pieces of 2 1/2″ squares: These will form the main body of your stocking. Consider a mix of festive prints, coordinating solids, or a blend of your favorite holiday-themed fabrics. This is a wonderful opportunity to use up smaller fabric scraps!
- 2 pieces of 17″ x 12″ backing fabric: This fabric will serve as the foundation for your quilted stocking panels. Choose a sturdy cotton in a complementary color or a neutral tone.
- 1 piece of 8″ x 16″ contrast fabric: This will be used for the stocking cuff, adding a lovely finishing touch. A solid color, a subtle print, or even a metallic fabric can create a striking contrast.
- 1 piece of 17″ x 12″ scrap batting: The batting provides the delightful loft and warmth characteristic of a quilted item. Cotton, polyester, or a blend will work perfectly.
- Basic Sewing Supplies: You’ll also need a sewing machine, coordinating thread, a rotary cutter and mat, a quilter’s ruler, sharp scissors, an iron and ironing board, and sewing pins or clips.
Tip for Fabric Selection: When choosing your 2 1/2″ squares, think about a cohesive color palette or theme. You might opt for traditional reds and greens, icy blues and silvers for a winter wonderland feel, or even whimsical prints for a child’s stocking. Don’t be afraid to mix and match patterns for a truly unique patchwork effect!
Step-by-Step: How to Sew Your Own Quilted Christmas Stocking
Creating your own quilted Christmas stocking is a delightful journey. Follow these steps carefully, and you’ll soon have a beautiful, personalized decoration ready for the holidays. This tutorial is inspired by the wonderful methods shared by Missouri Star.
Step 1: Preparing Your Fabric Squares and Assembling the Main Panel
Begin by laying out your 2 1/2″ squares. For the main body of the stocking, you will arrange 8 rows, with 4 squares in each row. Take your time to play with the arrangement, ensuring you like the visual flow of the colors and patterns. Once satisfied with your design, start sewing them together. Sew the squares in pairs first, pressing the seams open or to one side after each stitch to keep your work flat and tidy. Then, sew these pairs together to form complete rows. Finally, sew all 8 rows together, carefully aligning your seams, to create a rectangular quilted panel. Press the entire panel flat to set your stitches and ensure a crisp finish.
Step 2: Shaping the Stocking Toe and Heel
Now it’s time to give your panel the classic stocking shape. For the toe, you’ll need to create a smaller section. Arrange 2 rows, with 3 squares in each row. Sew these squares together as you did in Step 1, forming a small rectangle. Carefully align this small rectangle onto the bottom right side of your larger quilted panel, ensuring it flows naturally to form the toe of the stocking. Stitch it securely in place. At this stage, you have the basic outline of your stocking’s front piece.
Step 3: Quilting the Stocking Front and Preparing for Assembly
With your stocking front panel assembled, it’s time to add the batting and backing. Lay your 17″ x 12″ backing fabric right side down. Place your 17″ x 12″ scrap batting on top of the backing fabric. Finally, center your pieced stocking front panel (from Step 2) on top of the batting, right side up. Pin all three layers securely in place, starting from the center and working outwards to prevent shifting.
Now, it’s time to quilt! Using your sewing machine, quilt these layers together. A simple yet effective method is “stitch-in-the-ditch,” where you sew directly along the seam lines of your pieced squares. Alternatively, you can sew a row down the center of each square, creating a grid pattern. Sew both vertically and horizontally across your panel. This quilting secures all layers and adds texture. Once quilted, carefully trim around the excess batting and backing fabric, following the shape of your stocking front. Use a pair of sharp scissors to gently round the toe and heel sections, creating a smooth, professional curve.
Step 4: Creating the Stocking Back and Lining Pieces
At this point, you have one beautifully quilted front panel. You’ll need a corresponding back panel and two lining pieces to complete your stocking. You can either repeat Steps 1-3 to create a second quilted panel for the back, or for a simpler approach, use a single piece of your second 17″ x 12″ backing fabric for the back panel. Lay your finished quilted front panel onto your chosen fabric for the back (or a second piece of backing fabric if you’re not quilting the back). Pin it in place and cut around it, creating an identical shape for the back of your stocking. Now, repeat this process with two separate pieces of lining fabric (which can be a simple cotton or flannel). You should now have a quilted front, a back piece, and two lining pieces, all cut to the exact shape of your stocking.
Step 5: Assembling the Outer Stocking and Lining
Place your quilted front panel and your chosen back panel right sides together. Pin securely around the raw edges, leaving the top edge of the stocking open. Sew all the way around the pinned edges with a 1/4-inch seam allowance. Clip the curves and turn the outer stocking right side out. Set aside.
Next, take your two lining pieces. Place them right sides together and pin around the raw edges, again leaving the top edge open. When sewing the lining, remember to leave a 3-4 inch opening along the straight edge of one side (e.g., the leg of the stocking)—this gap will be used later for turning your entire stocking right side out. Sew the lining, backstitching at the beginning and end of the opening. Clip the curves on the lining and set aside (do not turn it right side out yet).
Step 6: Constructing and Attaching the Cuff
Take your 8″ x 16″ contrast fabric for the cuff. Fold it in half crosswise (so it measures 8″ x 8″) and press firmly with an iron. Open it up, then fold it lengthwise, right sides together, aligning the 8″ edges. Sew along the 8″ raw edges to form a loop. Press the seam open. Now, fold the loop in half wrong sides together, so the raw edges meet. You’ve created your stocking cuff.
Insert the cuff into your outer stocking, aligning the raw edges of the cuff with the raw top edge of the stocking. Ensure the raw seam of the cuff lines up with the back seam of your stocking for a neat finish. Pin the cuff in place around the top edge.
Now, with your outer stocking still right side out, insert the lining (which is still wrong side out) into the outer stocking. The outer stocking and the lining should be right sides together, with the cuff sandwiched between them. Align the raw top edges of all three layers (outer stocking, cuff, lining) and pin securely all the way around. Make sure the back seams of the outer stocking and the lining are aligned. Sew all around the top edge of the stocking, using a 1/4-inch seam allowance.
Step 7: Final Assembly and Finishing Touches
Once you’ve sewn the top edge, reach through the opening you left in the lining in Step 5. Carefully pull the entire stocking (outer and cuff) through this opening until it is right side out. Gently push out the toe and heel of the stocking so they are well-formed. Stitch the opening in the lining closed by hand with an invisible ladder stitch or by machine with a small seam allowance. Tuck the lining into the outer stocking. Finally, flip the cuff towards the top, over the edge of the stocking, and press it gently to create a crisp, finished look. If desired, you can add a small loop of ribbon or fabric to the inside of the cuff for hanging. And there you have it – your beautiful quilted Christmas stocking is complete!
Personalize Your Quilted Christmas Stocking: Endless Customization Ideas
The true magic of a handmade item comes from the ability to infuse it with personal touches. Your quilted Christmas stocking is a blank canvas for creativity!
- Monograms and Names: Add the recipient’s initial or full name using embroidery, fabric paint, or fabric appliqué. This transforms a lovely stocking into a truly personal gift.
- Embellishments Galore: Elevate your stocking with a variety of embellishments. Consider delicate lace trim along the cuff, a scattering of small beads or sequins for sparkle, charming buttons, miniature fabric flowers, or even small jingle bells for a festive jingle.
- Fabric Play: Don’t limit yourself to just squares. Experiment with different shapes, stripes, or even fussy-cut motifs from your favorite fabrics to create a unique patchwork design. You could even use a different fabric for the toe and heel sections for an added design element.
- Hanging Loops: While the cuff provides a natural hanging point, consider adding a sturdy fabric loop, a loop of decorative ribbon, or even a leather tab for hanging. This can be sewn into the top seam when attaching the cuff.
- Themed Stockings: Design stockings around a specific theme for each family member – a nature theme, a favorite color scheme, or even a hobby.
- Different Sizes: Adjust the dimensions of your initial fabric pieces to create stockings of various sizes, perfect for different family members or even as decorative accents around the house.
Caring for Your Handmade Christmas Stocking
To ensure your beautiful quilted Christmas stocking remains a cherished part of your holiday traditions for years to come, proper care and storage are essential.
- Washing: If your stocking gets dirty, it’s best to hand wash it gently in cold water with a mild detergent. Avoid harsh chemicals or bleach, which can damage the fabric and quilting. If machine washing is necessary, use a delicate cycle with cold water and place the stocking in a mesh laundry bag to protect it.
- Drying: Lay the stocking flat on a clean towel or a drying rack to air dry. Avoid hanging it while wet, as the weight of the water can distort its shape. Tumble drying on low heat can also be an option, but air drying is always gentler.
- Ironing: If needed, gently press your stocking with a warm iron. Use a pressing cloth to protect any embellishments or delicate fabrics.
- Storage: After the holidays, ensure your stocking is clean and completely dry before storing it. Fold it neatly and place it in a breathable cotton bag or an acid-free tissue paper-lined box. Store it in a cool, dry place away from direct sunlight to prevent fading and moisture damage.
Troubleshooting Common Quilting Stocking Challenges
Even experienced sewers encounter little snags now and then. Here are a few common issues you might face and how to overcome them:
- Seams Not Lining Up: When sewing your squares or rows, slight discrepancies can occur. Always pin carefully, especially at seam intersections, and consider using a walking foot on your machine for better fabric feeding. If a seam is off, unpick it and re-sew slowly.
- Bulky Corners: After sewing seams and before turning your stocking right side out, clip the seam allowance at curves and corners. This reduces bulk and helps the fabric lay flat. Be careful not to cut through your stitches!
- Fabric Distortion: When quilting, fabric can sometimes stretch or warp. Basting your layers thoroughly with pins or a temporary adhesive spray will help keep them stable. Quilt at a consistent speed and avoid pulling or pushing the fabric through the machine.
- Uneven Quilting Stitches: Practice makes perfect! Ensure your machine’s tension is set correctly for your fabric and thread. Experiment with different stitch lengths to find what works best for your batting and fabric choices.
More Festive Sewing Inspiration for the Holidays
If you’ve enjoyed making your quilted Christmas stocking, you might be looking for more ways to infuse your home with handmade holiday spirit. Here are a couple of related projects to keep your creativity flowing, along with some additional ideas:
Related Project: DIY Corner Bookmark
While not strictly Christmas-themed, a DIY Corner Bookmark can be a quick and charming gift to tuck into a stocking or pair with a book. Consider making them with festive fabrics for a holiday touch!
Related Project: Fabric Scraps Christmas Cards
This is another fantastic project for utilizing leftover fabric scraps. Create unique and textured Christmas cards that stand out from store-bought options, adding a personalized touch to your holiday greetings.
Additional Holiday Sewing Project Ideas:
- Quilted Tree Skirt: A larger project, but a quilted tree skirt adds immense warmth and elegance to your Christmas tree.
- Fabric Ornaments: Small fabric scraps can be turned into delightful ornaments, perfect for hanging on the tree or as small gifts.
- Cozy Coasters: Quilted coasters with festive patterns make great stocking stuffers or hostess gifts.
- Pillow Covers: Update your living room for the holidays with removable quilted pillow covers.
Jenny Doan Quilted Christmas Stocking
This tutorial draws inspiration from the simple yet brilliant techniques often shared by quilting experts like Jenny Doan from Missouri Star. Her approach emphasizes making quilting accessible and enjoyable for everyone, ensuring that even complex-looking projects like this quilted Christmas stocking can be tackled with confidence and lead to stunning results. Happy quilting, and may your holidays be filled with handmade joy!